
What is quarantine in Avast Internet Security?
Quarantine is an essential feature in Avast Internet Security that helps protect your computer from potential threats. When Avast detects a file or program that is suspected of being malicious or potentially harmful, it automatically moves it to quarantine. By doing so, it isolates the file from the rest of your system, preventing it from causing any further damage.
Quarantine serves as a secure holding place for these suspicious files, ensuring they cannot execute or harm your computer. It acts as a safety net, safeguarding your system and giving you the option to review and take appropriate action on the quarantined items.
Avast’s quarantine feature is designed to help you mitigate risks, allowing you to thoroughly investigate suspected threats before permanently deleting or restoring them. This allows you to maintain control over what happens to these files, giving you peace of mind that your system is protected from potential threats.
One of the advantages of the quarantine feature in Avast Internet Security is that it provides you with an extra layer of security. Even if a suspicious file manages to evade the real-time scanning feature and make its way onto your computer, Avast will detect and isolate it in quarantine, preventing any potential harm.
Overall, the quarantine feature in Avast Internet Security plays a critical role in protecting your computer from malware, viruses, and other malicious files. It helps ensure the safety and integrity of your system by providing a secure space for suspicious files, allowing you to review and manage them effectively.
Why access quarantine?
Accessing quarantine in Avast Internet Security is crucial for several reasons. Understanding why it is important will empower you to effectively manage and mitigate potential security risks on your computer.
1. Review and verify threats: By accessing quarantine, you can review and verify the potential threats that Avast has detected. This allows you to confirm if the files or programs quarantined are genuinely malicious or if they were mistakenly flagged. Reviewing these items gives you the opportunity to take appropriate action based on your assessment.
2. Restore important files: Occasionally, Avast may inadvertently flag a legitimate file as suspicious and move it to quarantine. This can happen if the file exhibits behavior that is similar to malware or if it contains code that triggers Avast’s detection algorithms. Accessing quarantine allows you to restore any wrongly quarantined files and prevent any disruption to your workflow.
3. Prevent false positives: False positives occur when Avast incorrectly identifies a safe file as malicious. Accessing quarantine enables you to identify and address any false positives promptly. Taking the necessary steps to exclude false positives from future scans can help optimize Avast’s performance and reduce unnecessary file quarantining.
4. Protect valuable data: Quarantine serves as an additional layer of protection for your valuable data. If a file is genuinely infected, moving it to quarantine prevents it from causing further damage to your system or compromising your sensitive information. Accessing quarantine ensures that potentially harmful files remain isolated and unable to harm your computer or your personal data.
5. Customize quarantine settings: Avast allows you to customize the quarantine settings according to your preferences. By accessing quarantine, you can configure the settings to define how Avast handles suspicious files. You can choose to automatically scan quarantined items, specify how long files should be kept in quarantine, or modify other settings to align with your security needs.
How to Access Quarantine in Avast Internet Security
Accessing the quarantine in Avast Internet Security is a straightforward process that allows you to manage and take control of suspicious files. Follow the steps below to access the quarantine feature:
Step 1: Open Avast Internet Security
Launch the Avast Internet Security program on your computer. Locate the Avast icon in the system tray or desktop and double-click to open it. Alternatively, you can access it by searching for Avast in the Start menu.
Step 2: Go to the Protection tab
Once the Avast main interface is open, you will see several tabs at the top. Click on the “Protection” tab to access the security features of Avast Internet Security.
Step 3: Click on Virus Chest
In the Protection tab, you will see a list of various security features provided by Avast. Locate and click on the “Virus Chest” option, which is where Avast stores the quarantined files.
Step 4: View and Manage Quarantined Files
Upon accessing the Virus Chest, you will see a list of all the files that have been quarantined by Avast. Here, you can view the details of each file, including the date and time of quarantine and the type of threat it is associated with.
Step 5: Restore or Delete Quarantined Files
To take action on a quarantined file, right-click on it and select the appropriate option. If you believe the file is safe and was mistakenly quarantined, choose the “Restore” option to return it to its original location. Alternatively, you can permanently delete a file by selecting the “Delete” option.
Step 6: Configure Quarantine Settings
To customize the quarantine settings in Avast Internet Security, click on the “Settings” button located at the top-right corner of the Virus Chest window. Here, you can modify various parameters such as the maximum file size allowed in the Virus Chest, how long files should be kept in quarantine, and other relevant settings.
By following these steps, you can easily access and manage the quarantine feature in Avast Internet Security. Regularly reviewing and taking action on quarantined files will help keep your computer protected from potential threats and ensure the smooth functioning of your system.
Step 1: Open Avast Internet Security
Accessing the quarantine feature in Avast Internet Security begins with opening the Avast application on your computer. This step is essential to gain access to all the security features provided by Avast, including the quarantine.
To open Avast Internet Security, follow the steps below:
Step 1: Locate the Avast icon
Look for the Avast icon on your system tray, which is typically located in the lower-right corner of your screen. The icon is represented by a blue “A” shield logo. Alternatively, you can find the Avast icon on your desktop if it has been pinned there.
Step 2: Double-click the Avast icon
Once you have located the Avast icon, double-click on it to launch the Avast Internet Security program. This action will open the main interface, where you can access all the security features and settings.
Step 3: Navigate to the Protection tab
Upon opening the Avast program, you will see a series of tabs at the top of the interface. Look for the “Protection” tab and click on it. This tab is where you can access and manage the various security features provided by Avast.
Step 4: Access the Quarantine feature
After clicking on the “Protection” tab, you will find a list of different security features. Scan the list until you locate the option for “Quarantine” or “Virus Chest”. Click on this option to access the quarantine feature in Avast Internet Security.
Once you have successfully completed these steps, you will have opened Avast Internet Security and gained access to the quarantine feature. This will allow you to review, manage, and take appropriate action on any quarantined files or programs detected by Avast.
Remember to regularly open Avast Internet Security to ensure that your computer remains protected against potential threats. It is important to stay vigilant and responsive to any suspicious files flagged by Avast, as the quarantine feature plays a vital role in maintaining the security and integrity of your system.
Step 2: Go to the Protection tab
After opening Avast Internet Security, the next step to access the quarantine feature is to navigate to the Protection tab. This tab contains various security features and settings that can help safeguard your computer from potential threats.
To go to the Protection tab in Avast Internet Security, follow the steps below:
Step 1: Locate the Avast main interface
Once you have opened Avast Internet Security by following the previous steps, you will see the main interface. It consists of different sections that provide access to Avast’s features and settings.
Step 2: Identify the Protection tab
Look for the tabs or menu options at the top of the Avast interface. One of the tabs will be labeled “Protection.” This tab is where you can access various security-related features offered by Avast Internet Security, including the quarantine feature.
Step 3: Click on the Protection tab
Once you have located the Protection tab, click on it to access the security features. Avast may display a drop-down menu or open a new window with additional options, depending on the software version you have installed. Explore the available options to become familiar with the different features Avast provides.
Step 4: Explore the security features
Within the Protection tab, you will find a range of security features that Avast offers to keep your computer protected. These features may include real-time scanning, firewall settings, web protection, and more.
It is important to note that the exact location and organization of features within the Protection tab may vary depending on the specific version of Avast Internet Security you have installed. However, Avast typically provides a user-friendly interface that is easy to navigate.
By following these steps, you will be able to access the Protection tab in Avast Internet Security. This will allow you to explore and utilize the various security features provided by Avast, including the quarantine feature. Being familiar with these features is essential for effectively managing and maintaining the security of your computer.
Step 3: Click on Virus Chest
Once you have reached the Protection tab in Avast Internet Security, the next step to access the quarantine feature is to click on the “Virus Chest” option. The Virus Chest serves as a secure storage area where Avast Internet Security stores all the quarantined files, isolating them from the rest of your system.
To proceed with accessing the Virus Chest in Avast Internet Security, follow the steps below:
Step 1: Locate the Virus Chest option
Within the Protection tab, you will find a list of different security features and settings offered by Avast Internet Security. Look for an option named “Virus Chest” or “Quarantine.” It may be located in a sidebar or submenu, depending on the version of Avast you have installed.
Step 2: Click on Virus Chest
Once you have located the Virus Chest option, click or select it. This action will open the Virus Chest interface, where you can view and manage all the quarantined files detected by Avast Internet Security.
Step 3: Explore quarantined files
Upon accessing the Virus Chest, you will be presented with a list of quarantined files. Each file entry will include details such as the file name, location, date and time of quarantine, and the specific threat associated with the file.
Step 4: Review and manage quarantined files
Take the time to carefully review each quarantined file in the Virus Chest. You can select a file to view more information about it, including additional details and the threat level indicated by Avast. This information will help you make informed decisions regarding further action on the file.
Step 5: Restore or delete quarantined files
Once you have assessed a quarantined file, you can take appropriate action based on your evaluation. Avast offers options to restore a file, which allows it to be returned to its original location on your computer, or to delete a file permanently.
Step 6: Manage quarantine settings
Avast also provides options to configure the quarantine settings according to your preferences. You can adjust parameters such as the maximum file size allowed in the Virus Chest, the duration files should remain in quarantine, and more. This allows you to customize the quarantine feature to suit your specific needs.
By following these steps, you will be able to click on the Virus Chest option and access the quarantine feature in Avast Internet Security. Taking the time to review and manage the quarantined files is an essential step in ensuring the security and integrity of your computer.
Step 4: View and Manage Quarantined Files
Upon accessing the Virus Chest in Avast Internet Security, you will be able to view and manage all the quarantined files. This step allows you to review the details of each file and make informed decisions on how to handle them.
To view and manage quarantined files in Avast Internet Security, follow the steps below:
Step 1: Explore the Quarantine Interface
Once you access the Virus Chest, you will see a list of all the files that have been quarantined by Avast. The interface may show details such as the file name, file path, date of quarantine, and the type of threat associated with each file.
Step 2: Review Quarantined Files
Take the time to carefully review each quarantined file in the list. Avast provides information about the detected threats, which can help you assess the severity and risk level associated with each file.
Step 3: Sort and Filter the File List
If you have a large number of quarantined files, you can utilize sorting and filtering options to narrow down the list. You may be able to sort files by name, date, or by the type of threat. This can help you focus on specific files or prioritize your actions.
Step 4: View File Details
To obtain more information about a specific quarantined file, select it from the list. Avast provides detailed information, such as the file size, file type, and the specific reason it was flagged as a threat. This information can assist you in making informed decisions about what action to take.
Step 5: Take Action on Quarantined Files
After reviewing and evaluating the quarantined files, you can take appropriate action based on your assessment. Avast offers several options to handle each file, such as restoring the file to its original location, permanently deleting the file, or excluding it from future scans if it is a false positive.
Step 6: Configure Quarantine Settings
If desired, you can customize the quarantine settings in Avast Internet Security to align with your preferences. This may include specifying the duration files should remain in quarantine, adjusting the maximum file size allowed in the Virus Chest, or setting up automatic scans on quarantined items.
By following these steps, you will be able to view and manage the quarantined files in Avast Internet Security’s Virus Chest. This allows you to have full control over potential threats, ensuring the security and integrity of your computer.
Step 5: Restore or Delete Quarantined Files
Once you have reviewed the quarantined files in Avast Internet Security’s Virus Chest, the next step is to take appropriate action on each file. Avast provides options to either restore the file or delete it permanently, depending on your assessment of its safety and importance.
To restore or delete quarantined files in Avast Internet Security, follow the guidelines below:
Step 1: Select the Quarantined File
From the Virus Chest interface, identify the file you wish to take action on. Click or select the file to highlight it and proceed with the restoration or deletion process.
Step 2: Restore the File
If you determine that the quarantined file is safe and should be restored to its original location, select the “Restore” option. Avast will then return the file to its previous location on your computer, allowing you to access and use it as before.
Step 3: Permanently Delete the File
If you have confirmed that the quarantined file is indeed malicious or unwanted, you can choose the “Delete” option. Avast will permanently remove the file from your system, preventing any potential harm or further infection.
Step 4: Consider File Backups
Before permanently deleting a quarantined file, it is essential to ensure that you have a reliable backup of the file if it contains any important data or information. If you are unsure about the file’s significance, it is recommended to create a backup or consult with an IT professional.
Step 5: Repeat the Process for Other Files
Continue to select and take action on each quarantined file based on your assessment. Review all remaining files in the Virus Chest, restoring the ones you trust and permanently deleting those that pose a threat.
Step 6: Perform Regular Scans
After restoring or deleting the necessary quarantined files, it is vital to perform regular scans with Avast Internet Security to ensure your computer’s ongoing protection. This will help detect any new threats that may have entered your system and enable timely action.
By following these steps, you will be able to restore or delete the quarantined files found in Avast Internet Security’s Virus Chest. This process allows you to effectively manage potential threats and maintain the security and integrity of your computer.
Step 6: Configure Quarantine Settings
Avast Internet Security provides the flexibility to configure the quarantine settings according to your preferences. This step allows you to customize how Avast handles quarantined files and fine-tune the quarantine feature to meet your specific needs.
To configure the quarantine settings in Avast Internet Security, follow the steps below:
Step 1: Access the Quarantine Settings
Locate the settings menu within Avast Internet Security. In most versions, you can find it by clicking on the gear or menu icon, usually located in the top-right corner of the Avast interface. Look for an option related to quarantine settings or virus chest.
Step 2: Review the Available Options
Once in the quarantine settings, explore the various options provided by Avast. These options may include the maximum file size allowed in the Virus Chest, the duration files should remain quarantined, and the behavior when a potential threat is detected.
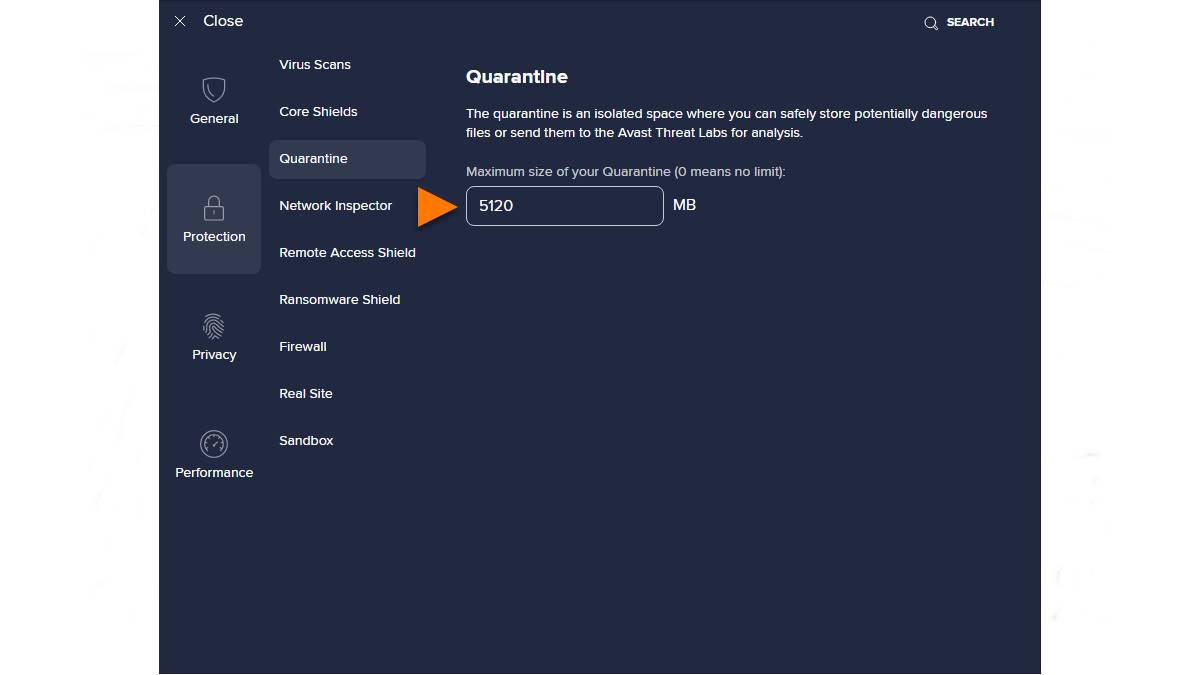
Step 3: Customize the Maximum File Size
Adjust the maximum file size allowed in the Virus Chest to your desired limit. This can be useful in cases where you want to prevent large files from filling up your storage space or impacting your computer’s performance. Choose a size that strikes a balance between security and available resources.
Step 4: Set the Quarantine Duration
Determine how long files should remain in quarantine before being automatically deleted. Depending on your needs, you can choose a shorter duration to free up storage space quickly, or a longer duration to allow for further analysis and review of quarantined files.
Step 5: Enable Automatic Scans on Quarantined Files
Avast offers the option to set up automatic scans on quarantined files. Enabling this feature allows Avast to thoroughly check the files in quarantine, ensuring they do not pose a threat even after they have been isolated. It is recommended to enable this feature for added security.
Step 6: Save and Apply the Changes
Once you have made the desired adjustments to the quarantine settings, remember to save and apply the changes. This ensures that your customized settings are in effect and that Avast will operate according to your preferences.
By following these steps, you will be able to configure the quarantine settings in Avast Internet Security. This enables you to tailor the behavior of the quarantine feature to suit your specific requirements, providing you with a more personalized and effective security experience.