
Minimum Room Requirements for HTC Vive
If you’re considering getting an HTC Vive, it’s important to understand the minimum room requirements to ensure optimal performance and a satisfying virtual reality experience. The HTC Vive is known for its immersive room-scale VR capabilities, which allow you to physically move around in virtual environments. To fully enjoy this feature, you’ll need to meet certain space requirements.
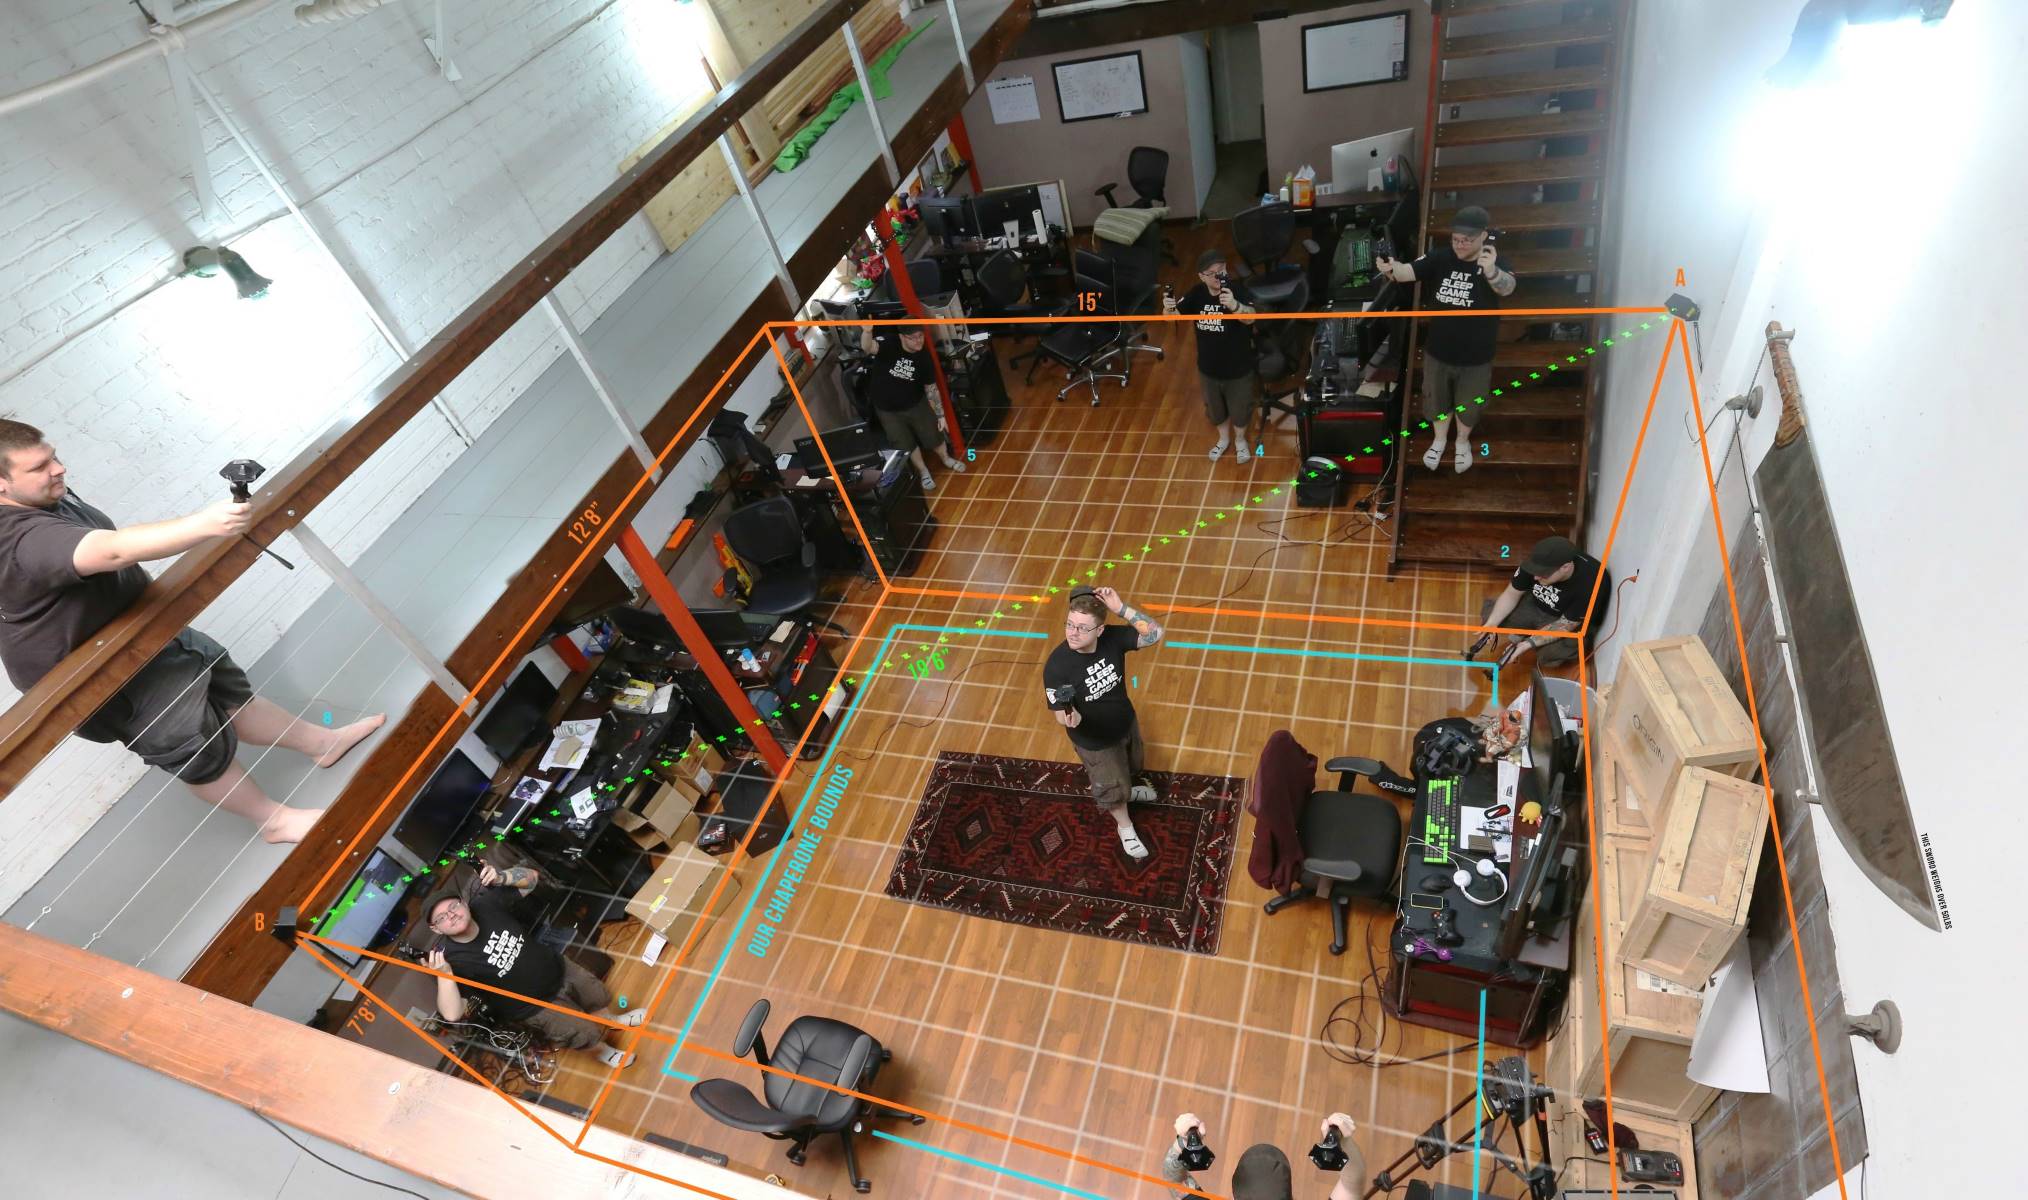
The HTC Vive requires a minimum play area of 6.5 feet by 5 feet (2 meters by 1.5 meters). This ensures that you have enough space to move around without obstructions. The play area should also be free from sharp objects and breakable items. It is recommended to have an unobstructed play area of at least 9.8 feet by 7.8 feet (3 meters by 2.5 meters) for a more immersive experience. This allows you to walk around, crouch, and even lie down in virtual worlds.
In addition to the physical space, the room should have a power outlet nearby to connect the HTC Vive. A stable and reliable internet connection is also necessary for downloading VR content and accessing online features.
Keep in mind that these minimum requirements are just a starting point. Depending on the specific VR experiences you want to enjoy, you may require more space. Some games or applications may have their own recommended space requirements, so it’s important to check the system requirements for each VR experience you plan to use.
The HTC Vive offers a chaperone system that helps prevent you from bumping into walls or other objects while wearing the headset. This system creates a virtual boundary in the VR world when you get close to a real-world barrier. It’s important to set up this chaperone system correctly and ensure that there is enough room between the play area and any potential obstacles. This will help prevent accidents and make your VR experience safer and more enjoyable.
Setting Up HTC Vive in a Small Space
If you have limited space but still want to enjoy the immersive VR experience of the HTC Vive, don’t fret! It’s still possible to set up and enjoy the HTC Vive in a small room or area. Here are some tips to make the most of your limited space:
1. Opt for a standing or seated experience: While the HTC Vive is known for its room-scale VR, it also offers options for standing or seated experiences. If you have limited space, you can still enjoy a wide range of games and applications that can be played without extensive movement.
2. Clear the area: Before setting up the HTC Vive, make sure to clear the space of any potential obstacles. Move furniture, electronics, and other items out of the way to create an open area for your VR activities. This will help prevent accidents and provide a safer environment for your VR experience.
3. Mount the base stations securely: The base stations of the HTC Vive are an essential part of the tracking system. Mount them securely on walls or use adjustable tripods to ensure optimal tracking performance. By mounting them higher up, you can maximize the space for movement and reduce the chance of them being blocked by furniture or other objects.
4. Take advantage of the chaperone system: The chaperone system in the HTC Vive creates a virtual boundary in the VR world to prevent you from bumping into real-world obstacles. Adjust the chaperone system settings to fit the available space and ensure you have a clear understanding of the play area boundaries.
5. Use VR accessories: Consider using accessories like VR mats or designated play area rugs to help define the boundaries of your VR space. This can provide a physical reference point, making it easier to stay within the confined area while immersed in virtual reality.
6. Optimize the virtual environment: Some VR experiences allow you to adjust the virtual environment to match your physical space. Take advantage of this feature to create a customized VR space that fits within the limitations of your room. This can enhance the immersion and make it feel like you have more space than you actually do.
7. Experiment with different game genres: If you have limited space, consider exploring VR games that are more focused on puzzles, strategy, or seated experiences. These genres can still provide an engaging and immersive experience without requiring extensive movement or large play areas.
Remember, even in a small space, the HTC Vive can still offer an incredible VR experience. With proper setup, optimized virtual environments, and careful consideration of space limitations, you can still enjoy a wide range of VR content and make the most of your HTC Vive.
Clearing the Area for HTC Vive Setup
Before setting up your HTC Vive, it’s important to clear the area in which you plan to use it. A cluttered space not only poses safety risks but can also limit your enjoyment and movement within the virtual reality environment. Here are some steps to help you clear the area for a smooth HTC Vive setup:
1. Remove furniture and obstructions: Start by clearing the room or designated area of any furniture, objects, or obstacles that may impede your movement or block the virtual reality sensors. This includes chairs, tables, decorative items, and anything else that could potentially be in the way. Creating an open space will allow you to navigate freely and without hindrance.
2. Secure loose cables and cords: Take the time to secure any loose cables or cords in the area. This will prevent tripping hazards and ensure a safe and unobstructed experience while using the HTC Vive. Use cable ties or floor cord covers to keep the cables out of the way and organized.
3. Ensure proper lighting conditions: Adequate lighting is important for the HTC Vive to accurately track your movements. Make sure there is sufficient lighting in the room, avoiding overly bright or dim conditions. Natural light from windows should be controlled to prevent glare on the VR headset and interfere with the tracking system.
4. Cover reflective surfaces: Remove or cover any reflective surfaces in the area, such as mirrors or glass. These can interfere with the VR tracking system by reflecting infrared light emitted by the HTC Vive’s base stations. Covering these surfaces with curtains or towels can help mitigate any potential tracking issues.
5. Clear the floor space: Ensure that the floor area is clear of any loose objects, cords, or rugs. These can create tripping hazards and disrupt your movement while using the HTC Vive. It’s important to have a smooth and obstacle-free surface to move around comfortably.
6. Consider dedicated VR playmats or rugs: To further define the play area and provide a tactile reference point, consider using dedicated VR playmats or rugs. These mats can help you stay within the boundaries of your virtual environment and add to the overall immersive experience.
By taking the time to clear the area and set up a clean and safe environment, you’ll be able to fully enjoy the HTC Vive without any unnecessary distractions or risks. This will enhance your overall VR experience and allow you to fully immerse yourself in the virtual worlds that the HTC Vive has to offer.
Assessing the Space for HTC Vive
Before setting up your HTC Vive, it’s important to assess the available space to ensure a seamless and enjoyable virtual reality experience. By understanding the dimensions and layout of your play area, you can optimize the setup and make the most of your HTC Vive. Here are some factors to consider when assessing the space for your HTC Vive:
1. Measure the dimensions: Start by measuring the dimensions of the room or area where you plan to set up your HTC Vive. Knowing the exact dimensions will help you understand the limitations and determine if you meet the minimum room requirements for the HTC Vive. Measure the width, length, and height of the play area to get an accurate understanding of the available space.
2. Identify obstructions: Take note of any potential obstructions within the play area, such as furniture, doors, windows, or other objects. It’s important to ensure that there is enough space to move around without bumping into anything. Consider rearranging or removing any obstructions that may hinder your movement or block the virtual reality sensors.
3. Evaluate the flooring: Assess the type and condition of the flooring in the play area. Make sure the surface is level, flat, and free of any bumps or tripping hazards. Hardwood floors or low-pile carpets are ideal, as they provide a smooth surface for movement. Avoid high-pile rugs or carpets that may impede mobility or cause instability.
4. Consider the proximity of power outlets: Check the availability and proximity of power outlets near the play area. The HTC Vive requires a power source for both the headset and the base stations. Ensuring that there is a power outlet nearby will make the setup process more convenient and eliminate the need for long extension cords.
5. Evaluate the internet connection: A stable and reliable internet connection is necessary for downloading VR content and accessing online features of the HTC Vive. Check the strength of your Wi-Fi signal or the availability of an Ethernet connection in the play area. If the signal is weak or unreliable, consider investing in a Wi-Fi extender or a wired connection to ensure a smooth VR experience.
6. Account for chaperone system boundaries: The chaperone system in the HTC Vive creates virtual boundaries to prevent you from bumping into walls or other objects in the real world. Take into account the recommended play space boundaries provided by the HTC Vive and ensure that there is enough room between the play area and any potential obstacles.
By thoroughly assessing the available space for your HTC Vive, you can make informed decisions about the setup and optimize the virtual reality experience. Understanding the dimensions, identifying obstructions, evaluating the flooring, checking power outlet proximity, considering internet connectivity, and accounting for chaperone system boundaries will contribute to a safe and immersive VR experience.
Creating a Dedicated VR Room for HTC Vive
If you’re a passionate virtual reality enthusiast and want to take your HTC Vive experience to the next level, creating a dedicated VR room can greatly enhance your immersive gaming and exploration. Having a dedicated space specifically designed for VR not only optimizes the setup process but also provides a safer and more enjoyable environment. Here are some key steps to help you create a dedicated VR room for your HTC Vive:
1. Choose the right room: Select a room in your home that offers enough space to accommodate the HTC Vive’s room-scale VR capabilities. Consider the size, layout, and accessibility of the room. Ideally, it should have enough space for you to move around freely, without any obstructions or potential hazards.
2. Clear the room: Before setting up your HTC Vive, clear the room of any furniture, objects, or obstacles. Create an open and uncluttered space to ensure unrestricted movement and prevent any accidents or collisions while immersed in virtual reality.
3. Optimize lighting conditions: Assess the lighting in the room and make any necessary adjustments to ensure optimal conditions for VR. Natural light can interfere with the tracking system, so it’s best to have control over the lighting. Install adjustable blinds or curtains to block out excess sunlight and reduce glare on the VR headset.
4. Mount the base stations: Properly mount the base stations on the walls or use adjustable tripods to ensure stability and optimal tracking performance. By placing them higher up, you can extend the tracking range and maximize the play area.
5. Set up cable management: VR experiences typically involve cables that connect the headset to the computer. Use cable management solutions such as hooks, clips, or cable sleeves to neatly organize and secure the cables. This will reduce tangling and tripping hazards, allowing for a smoother and safer VR experience.
6. Consider soundproofing options: To further enhance immersion and minimize disturbances from the outside world, consider soundproofing the VR room. Use acoustic panels, foam, or curtains to minimize sound reflections and absorb external noises. This will create a more immersive and focused environment for your HTC Vive sessions.
7. Personalize the space: Add personal touches to your dedicated VR room to make it truly your own. Consider adding posters, artwork, or decorations related to virtual reality, gaming, or your favorite VR experiences. This will create a welcoming and inspiring atmosphere that adds to the overall enjoyment of the VR room.
By creating a dedicated VR room for your HTC Vive, you can fully immerse yourself in the virtual worlds and gaming experiences it has to offer. By choosing the right room, clearing the space, optimizing lighting conditions, mounting the base stations, setting up cable management, considering soundproofing options, and personalizing the space, you’ll create an environment that enhances your VR experience and allows you to fully unleash the potential of the HTC Vive.
Best Furniture Arrangements for HTC Vive
When setting up your HTC Vive, the arrangement of furniture in the room plays a crucial role in maximizing the available space and optimizing your virtual reality experience. By strategically arranging your furniture, you can create a safe and immersive environment for your HTC Vive sessions. Here are some tips for the best furniture arrangements:
1. Clear the center of the room: Start by clearing the center of the room from any large furniture pieces. This will provide an open and unobstructed space for movement during your VR sessions. Move sofas, coffee tables, or any other large furniture items to the sides or against the walls to create a spacious play area.
2. Create a designated VR corner: Dedicate a corner of the room specifically for your HTC Vive setup. This corner should have enough space to accommodate the play area and the base stations. By designating this area, you can minimize the chances of bumping into furniture or walls while immersed in virtual reality.
3. Utilize storage units: Make use of shelves or storage units near the VR corner to store VR accessories, such as controllers, headsets, and charging cables. This keeps everything organized and easily accessible, while also reducing the risk of tripping over loose cables.
4. Optimize seating positions: If you have seating in the room, position them in a way that allows for easy transition between VR sessions and rest breaks. Place chairs or sofas against the walls or towards the corners of the room, providing a clear path to the VR play area. This way, you can quickly switch between sitting and standing during your VR sessions.
5. Consider movable furniture: If you have furniture that can be easily moved or rearranged, take advantage of this flexibility. Movable chairs or lightweight tables can be temporarily relocated to create more space in the VR area. This gives you the freedom to customize the room layout based on your specific VR needs.
6. Secure loose furniture: Ensure that any furniture remaining in the room is secure and will not unpredictably move during VR activities. Anchor bookshelves, TV stands, or cabinets to the walls to prevent accidents and instability while you move around within the virtual environment.
7. Use floor cushions or bean bags: For a more immersive experience and to provide additional seating options, consider adding floor cushions or bean bags to the VR area. These flexible seating options can be easily moved or adjusted to maximize comfort and ensure an immersive VR session.
By considering the best furniture arrangements for your HTC Vive setup, you can create an optimized and safe space for your virtual reality experience. Clearing the center of the room, creating a designated VR corner, utilizing storage units, optimizing seating positions, considering movable furniture, securing loose furniture, and incorporating floor cushions or bean bags will contribute to a comfortable and immersive environment for your HTC Vive sessions.
Clearing Obstacles for a Smooth HTC Vive Experience
When setting up your HTC Vive, it’s important to clear the play area of any potential obstacles to ensure a smooth and uninterrupted virtual reality experience. Obstacles in the play area can not only hinder your movement but also pose safety risks. Here are some key tips for clearing obstacles to optimize your HTC Vive experience:
1. Remove furniture and large objects: Start by removing any furniture or large objects within the play area. Chairs, tables, cabinets, and other bulky items can impede your movement and limit the space available for VR activities. Clearing the area of such obstacles will provide you with more freedom to navigate and interact within the virtual environment.
2. Secure loose cables and cords: Ensure that any loose cables or cords are properly secured and do not pose a tripping hazard. The HTC Vive requires several cables to connect the headset and the base stations, and it’s important to keep them organized and out of the way. Use cable management solutions such as clips, ties, or cord covers to ensure a tidy and hazard-free play area.
3. Safeguard fragile items: If the play area shares space with fragile or valuable items, take precautions to protect them. Move delicate objects, vases, or breakable decorations to a safer location away from the play area. This will prevent any accidental collisions or damage while you’re immersed in the virtual reality experience.
4. Cover reflective surfaces: Cover any reflective surfaces within the play area, such as mirrors or glass, as they can interfere with the HTC Vive’s tracking system. Reflective surfaces can cause issues with the infrared signals emitted by the base stations, leading to tracking errors. Use curtains, towels, or adhesive films to reduce reflections and maintain optimal tracking performance.
5. Secure loose flooring: If there is any loose or uneven flooring in the play area, secure it to prevent tripping hazards and ensure stability. Fix loose floorboards, tighten carpet edges, or use anti-slip rugs or mats to provide a safe and level surface for movement during VR sessions.
6. Check for low-hanging objects: Be mindful of any low-hanging objects, such as ceiling fans or pendant lights, that could potentially collide with the VR headset or cause obstruction. Adjust the height of these objects or mark them clearly to ensure they are visible and avoid accidental collisions.
7. Create clear boundaries: Establish clear boundaries within the play area to help you stay within the designated space. This can be achieved through the HTC Vive’s chaperone system, which displays a virtual grid or boundary when you approach the real-world limits of your play area. Adjust the chaperone system settings to match your play area, ensuring you have a clear visual indication of when you are approaching the boundaries.
By clearing obstacles in the play area, securing loose cables and flooring, safeguarding fragile items, covering reflective surfaces, checking for low-hanging objects, and creating clear boundaries, you can ensure a smooth and uninterrupted HTC Vive experience. Taking these steps will not only optimize the virtual reality environment but also prioritize your safety and enjoyment while engaging in immersive VR experiences.
Safety Precautions for HTC Vive Setup
When setting up and using your HTC Vive, it’s important to prioritize safety to ensure an enjoyable and risk-free virtual reality experience. By following these safety precautions, you can minimize potential hazards and maximize the safety of yourself and those around you:
1. Clear the play area: Before starting your HTC Vive session, ensure that the play area is clear of any obstacles, furniture, or objects that may pose a tripping hazard. By providing a clear and unobstructed space, you can move around freely and reduce the risk of accidents.
2. Secure loose cables: Make sure to secure any loose cables or cords to prevent tripping hazards and accidents during your VR sessions. Utilize cable management solutions such as clips, ties, or cord covers to keep the cables organized and out of the way.
3. Set up the chaperone system: The chaperone system in the HTC Vive acts as a virtual boundary to prevent you from entering real-world obstacles. Accurately set up the chaperone system to define the play area and ensure that you are aware of its boundaries while immersed in virtual reality.
4. Take breaks and stay hydrated: Virtual reality can be an immersive experience that may cause you to lose track of time. It’s important to take regular breaks to rest your eyes, stretch your body, and rehydrate. Prolonged VR sessions without breaks can lead to eye strain or fatigue.
5. Use wrist straps for controllers: The HTC Vive controllers can be quite immersive and may encourage energetic movements. To prevent accidentally dropping or throwing the controllers, always use the wrist straps provided. This will ensure that the controllers remain securely attached to your wrists during intense gaming sessions.
6. Be mindful of your surroundings: Pay attention to your surroundings while wearing the VR headset. It’s easy to become fully engrossed in the virtual world, but it’s important to remain aware of potential hazards in the real world. Avoid standing near edges, fragile objects, or obstacles that could be inadvertently bumped into.
7. Adjust headset straps properly: Properly adjust the straps of the VR headset to ensure a secure and comfortable fit. A loose or poorly fitted headset can slide or shift during your VR session, which may cause discomfort or distraction. Make sure the headset is snugly positioned on your head to minimize any distractions while in virtual reality.
8. Take care of your physical health: If you have any pre-existing medical conditions or are prone to motion sickness, consult with a healthcare professional before using the HTC Vive. Additionally, if you experience dizziness, nausea, or discomfort during VR sessions, take a break and consult a healthcare professional if necessary.
By following these safety precautions, you can ensure a safe and enjoyable HTC Vive experience. Clearing the play area, securing loose cables, setting up the chaperone system, taking regular breaks, using wrist straps for controllers, being mindful of your surroundings, adjusting the headset properly, and taking care of your physical health will contribute to a safer and more immersive virtual reality experience.
Using VR Mats and Chaperone System for HTC Vive
When setting up your HTC Vive, utilizing VR mats and the chaperone system are important tools to enhance your virtual reality experience and ensure safety. VR mats provide a physical reference point, while the chaperone system defines virtual boundaries. Here’s how to use VR mats and the chaperone system for your HTC Vive:
1. VR Mats: VR mats or designated play area rugs can help define the boundaries of your VR space. These mats provide a tactile reference point, making it easier to stay within the confines of the designated play area. Place the VR mat in the center of the play area, ensuring it’s large enough to accommodate your movements and provides a clear boundary for you to stay within during your VR sessions.
2. Chaperone System: The chaperone system is a vital safety feature of the HTC Vive. It creates a visual grid or boundary in the VR world when you get close to real-world objects or the play area boundaries. This helps prevent accidental collisions with walls, furniture, or other obstacles. To set up the chaperone system, go through the calibration process during the initial HTC Vive setup. Adjust the chaperone system settings to match your play area and ensure the grid is visible and clearly defined in your VR environment.
3. Calibrating the Chaperone System: The chaperone system can be calibrated according to your specific play area requirements. Follow the on-screen instructions during the initial setup process to trace the boundaries of your play area. Ensure that the chaperone system is correctly calibrated to reflect any obstacles or walls in your physical space. This ensures a safe and immersive VR experience by providing a clear warning when you approach the boundaries of your play area.
4. Understanding Chaperone System Warnings: Pay attention to the chaperone system warnings while using the HTC Vive. When you approach the virtual boundaries or any physical obstacles, the chaperone system will visually notify you within the VR environment. The warning grid or boundary will appear, indicating that you need to adjust your movement to avoid real-world objects. Responding to these warnings prevents accidents and keeps you within the confines of your designated play area.
5. Customizing the Chaperone System: The chaperone system allows for customization to suit your preferences. You can adjust the appearance and transparency of the grid or boundary, tailoring it to your comfort level and visibility. Experiment with different settings to find what works best for you and ensures a smooth and immersive VR experience.
By using VR mats and the chaperone system, you can enhance your HTC Vive experience and ensure a safer play environment. VR mats provide a tactile reference point to stay within the play area boundaries, while the chaperone system visually warns you when nearing obstacles or the physical boundaries. Properly calibrating the chaperone system, understanding its warnings, and customizing it to your needs will contribute to an immersive and risk-free virtual reality experience.