
Step 1: Open Avast Internet Security
Avast Internet Security is a powerful antivirus program that provides comprehensive protection for your computer. To schedule a scan with Avast Internet Security, you need to start by opening the program. Here’s how to do it:
1. Look for the Avast Internet Security icon on your desktop. It usually looks like a blue “A” inside a yellow shield. Double-click on the icon to launch the program. If you don’t see the icon on your desktop, you can also find it in the Start Menu or by searching for it in the Windows search bar.
2. Once you open Avast Internet Security, it will load the main dashboard. The dashboard is where you can access all the features and settings of the program. It provides an overview of your system’s security status and any potential threats that may have been detected.
3. Take a moment to ensure that your Avast Internet Security program is up to date. Updates are crucial to keep your antivirus software equipped to combat the latest threats. Look for the “Update” tab in the program’s dashboard and click on it to check for any available updates. If updates are available, follow the on-screen instructions to install them.
4. Once you’ve confirmed that your Avast Internet Security program is up to date, you’re ready to proceed to the next step and access the scan section. Locate the “Protection” or “Scan” tab in the program’s dashboard.
By following these simple steps, you can open Avast Internet Security and ensure that your antivirus program is ready for the next steps to schedule a scan. Taking a proactive approach to your computer’s security will help protect your valuable data and keep your system running smoothly.
Step 2: Access the Scan section
Now that you have Avast Internet Security open, the next step is to access the scan section. This is where you can choose the type of scan you want to schedule. To access the scan section, follow these steps:
1. In the program’s dashboard, look for the “Protection” or “Scan” tab. This is typically located on the left-hand side of the dashboard menu. Click on it to access the scan options.
2. Once you’re in the scan section, you’ll see various scan options available. Avast Internet Security offers different types of scans to cater to your specific needs. These options may include a quick scan, a full system scan, a custom scan, or a boot-time scan. Each scan type serves a different purpose and examines different areas of your computer.
3. Take a moment to familiarize yourself with the different scanning options and their descriptions. This will help you choose the most appropriate scan for your needs. For example, if you suspect a specific file or folder of being infected, a custom scan would be ideal. If you want a comprehensive scan of your entire system, a full system scan would be the best choice.
4. Click on the scan option that suits your requirements. Avast Internet Security will provide a brief description of the selected scan type and its coverage. This will help you confirm whether it aligns with your scanning goals.
By accessing the scan section in Avast Internet Security, you have taken an important step towards scheduling a scan that fits your needs. The various scan options provide flexibility and ensure thorough protection for your computer. Now that you’re ready with the scan type in mind, it’s time to move on to the next step and customize the scan settings.
Step 3: Choose the type of scan
After accessing the scan section in Avast Internet Security, the next step is to choose the type of scan you want to schedule. Avast offers a variety of scan options to cater to your specific needs and ensure the thorough protection of your computer. Here’s how to choose the type of scan:
1. Take a closer look at the different scan options available. Avast Internet Security typically offers a quick scan, a full system scan, a custom scan, and a boot-time scan. Each scan type serves a different purpose and scans different areas of your computer.
2. A quick scan is a fast and efficient way to scan the most commonly infected areas of your computer. It focuses on critical system areas and commonly used files and folders. This type of scan is ideal if you want a quick overview of your system’s security status.
3. A full system scan, on the other hand, thoroughly scans your entire system, including all files, folders, and drives. This is the most comprehensive type of scan offered by Avast Internet Security and is recommended for periodic deep scans to identify any hidden or dormant threats.
4. If you have a specific file or folder that you suspect may be infected, a custom scan is the most suitable option. It allows you to specify the exact location you want to scan, providing focused and targeted scanning.
5. Avast Internet Security also offers a boot-time scan, which scans your computer during the startup process before any malware can take control. This type of scan detects and eliminates even the most advanced threats that may attempt to hide in the booting process.
6. Consider your specific needs and requirements when deciding which type of scan to choose. If you’re unsure, a full system scan is a good choice to ensure a comprehensive scan of your entire computer.
By choosing the type of scan that aligns with your needs, you’re taking an important step toward a thorough and effective scan. The various scan options offered by Avast Internet Security ensure that your computer is protected from all possible threats. Once you’ve selected the scan type, you can proceed to the next step and customize the scan settings to further enhance your scanning experience.
Step 4: Customize scan settings
Once you’ve chosen the type of scan in Avast Internet Security, the next step is to customize the scan settings. This allows you to fine-tune the scanning process according to your preferences and specific requirements. Here’s how to customize the scan settings:
1. Look for the settings or options related to the chosen scan type. Avast Internet Security provides a range of customization options to ensure that the scan functions exactly as you desire.
2. Typical scan settings may include the option to enable or disable scanning of certain file types or extensions. This allows you to exclude specific file formats from the scan if you know they are safe.
3. You may also have the option to select the depth of the scan. This determines how thoroughly Avast Internet Security examines your files and folders. A deeper scan may take longer but provides a more comprehensive analysis.
4. Another important customization setting is the ability to choose whether to scan archives. Archives are compressed files, such as ZIP or RAR files, which can sometimes contain hidden malware. Deciding whether to include archives in the scan is essential for a thorough scan.
5. Avast Internet Security may also offer additional advanced options, such as the ability to scan for potentially unwanted programs (PUPs) or enable heuristic scanning, which detects new and unknown threats based on their behavior.
6. Take the time to go through each setting and customize them according to your preferences. Ensure that the selected settings align with your scanning goals and provide the level of security you desire.
By customizing the scan settings, you’re tailoring the scanning process to meet your specific needs. This level of customization ensures that Avast Internet Security scans your computer exactly as you want, maximizing the effectiveness of the scan. Once you’re satisfied with the customized settings, it’s time to move on to the next step and schedule the scan.
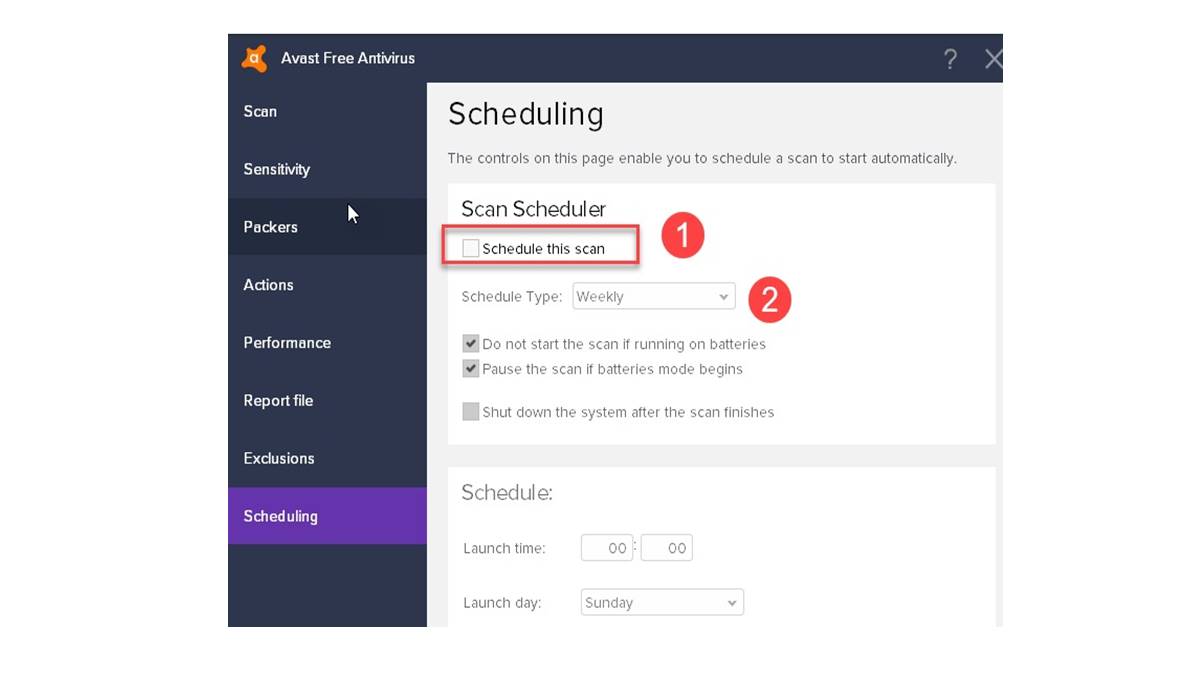
Step 5: Schedule the scan
After customizing the scan settings in Avast Internet Security, the next step is to schedule the scan. Scheduling regular scans is essential for maintaining the security of your computer without manual intervention. Follow these steps to schedule a scan:
1. Look for the option to schedule a scan in the scan settings or preferences section. Avast Internet Security provides a user-friendly interface to set up scan schedules.
2. Click on the “Schedule” or “Create Schedule” button to initiate the scheduling process. This will open a new window where you can configure the details of your scan schedule.
3. Specify the frequency of the scan. You can choose to perform the scan daily, weekly, or monthly, depending on your needs. Select the desired frequency and move on to the next step.
4. Set the starting time of the scan. Decide when you want the scan to start and ensure that it does not interfere with your regular computer usage. It is recommended to schedule scans during a time when your computer is idle, such as overnight.
5. Consider enabling the option to scan when the system is idle. This allows Avast Internet Security to perform the scan only when your computer is not in use, minimizing the impact on system performance when you’re actively working.
6. Double-check the scan schedule details to make sure they align with your preferences. Ensure that the frequency, start time, and any additional options are accurately configured.
7. Once you’re satisfied with the scan schedule, click on the “Save” or “Apply” button to finalize the settings. Avast Internet Security will now automatically run the scheduled scans according to your chosen frequency and timing.
By scheduling the scan, you’re ensuring that your computer remains protected on a regular basis without the need for manual intervention. This proactive approach to security helps safeguard your system against potential threats and keeps your data safe. Now that you’ve successfully scheduled the scan, it’s time to move on to the next step and review and confirm the scan schedule.
Step 6: Review and confirm the scan schedule
After scheduling a scan in Avast Internet Security, it’s important to review and confirm the scan schedule to ensure it aligns with your preferences. By taking a moment to verify the details, you can have peace of mind knowing that your computer will be regularly scanned for potential threats. Follow these steps to review and confirm the scan schedule:
1. Navigate to the scan settings or preferences section in Avast Internet Security where you initially set up the scan schedule.
2. Look for the option to view or manage scheduled scans. Avast Internet Security typically provides a list or calendar view of the scheduled scans.
3. Take a close look at the scheduled scan details, including the frequency, start time, and any additional options you enabled. Ensure that these details match your intended scan schedule.
4. If you need to make any changes to the scan schedule, such as adjusting the frequency or start time, look for an “Edit” or “Modify” option. This will allow you to make the necessary adjustments to the scan schedule.
5. Double-check the settings after making any changes to ensure that the modifications are accurately reflected in the scan schedule.
6. Once you’ve reviewed and confirmed the scan schedule, it’s time to give it a final check. Make sure there are no conflicting scan schedules that could cause interruptions or overlap.
7. Take a moment to confirm that all the settings are as desired, and then click on the “Save” or “Apply” button to finalize the scan schedule.
By reviewing and confirming the scan schedule, you can ensure that Avast Internet Security will automatically run the scans at the specified time and frequency. This step enhances the efficiency and effectiveness of your computer’s security, allowing you to have peace of mind knowing that regular scans are in place.
Now that you have reviewed and confirmed the scan schedule, it’s time to move on to the final step and learn how to manage scheduled scans in Avast Internet Security.
Step 7: Manage scheduled scans
Managing scheduled scans in Avast Internet Security allows you to have control over your computer’s security and make any necessary adjustments to the scan schedule. By learning how to manage scheduled scans, you can ensure optimal protection for your system. Follow these steps to manage scheduled scans:
1. Open Avast Internet Security and navigate to the scan settings or preferences section.
2. Locate the option to manage scheduled scans. Avast Internet Security typically provides a list or calendar view of the scheduled scans.
3. In the scheduled scans section, you will find an overview of your current scan schedule, including the frequency and start time of each scan.
4. To make changes to the scan schedule, look for options such as “Edit,” “Modify,” or “Delete.” Click on the appropriate option for the specific scan you want to manage.
5. If you want to make adjustments to the frequency or start time, use the available editing options to modify the scan schedule accordingly.
6. If you need to remove a scheduled scan entirely, select the option to delete or remove the scan from the list.
7. Take a moment to review any additional settings or options that may be available for each scheduled scan. Avast Internet Security may provide further customization choices such as exclusions, scan depths, or specific scan targets.
8. Once you have made the desired changes or managed the scheduled scans as needed, save the modifications by clicking on the “Save” or “Apply” button.
By effectively managing scheduled scans, you can adapt the scan schedule to match your evolving needs and optimize the security of your computer. Regularly reviewing and adjusting the scan schedule ensures that your system remains protected without any unnecessary interruptions or overlaps.
Now that you have learned how to manage scheduled scans, you are equipped with the necessary knowledge to maintain a vigilant and proactive approach to your computer’s security. Keep your scan schedule up to date to ensure continuous protection against potential threats.