
What is a Deans Connector?
A Deans connector, also known as a T plug, is a popular type of electrical connector commonly used in radio-controlled vehicles, drones, and various electronic devices. It is favored for its low resistance, which allows for efficient power transfer and minimizes the risk of overheating. The design of the Deans connector also ensures a secure and reliable connection, making it a preferred choice for hobbyists and professionals alike.
The Deans connector consists of a male and female connector, both featuring a distinctive T-shaped design that provides a snug fit when connected. This configuration helps prevent accidental disconnection during operation, ensuring uninterrupted power flow. The connector is typically constructed from high-quality materials, such as heat-resistant plastic and metal contacts, to withstand the rigors of demanding applications.
Due to its efficient power transfer capabilities and robust construction, the Deans connector has become a staple in the hobbyist and electronic enthusiast communities. Its versatility and reliability make it an ideal choice for a wide range of applications, from powering remote-controlled vehicles to connecting battery packs in electronic projects.
Understanding the fundamentals of a Deans connector is essential for anyone looking to work with electronic devices and hobbyist projects. With its ability to deliver consistent power and maintain a secure connection, the Deans connector has earned its reputation as a trusted component in the world of electronics and radio-controlled hobbies.
Tools and Materials Needed
Before soldering a Deans connector, it’s essential to gather the necessary tools and materials to ensure a smooth and successful process. Here’s what you’ll need:
- Soldering iron: A quality soldering iron with adjustable temperature settings is crucial for achieving clean and precise solder joints.
- Solder: High-quality rosin-core solder is recommended for secure and reliable connections.
- Deans connector: Both the male and female components of the Deans connector are required for the soldering process.
- Wire stripper: A wire stripper tool is essential for removing the insulation from the wires without damaging the conductive strands.
- Wire cutter: A sharp wire cutter is necessary for trimming and preparing the wires for soldering.
- Helping hands tool: This tool assists in holding the components in place during the soldering process, ensuring stability and precision.
- Heat shrink tubing: Heat shrink tubing provides insulation and protection for the soldered connections, enhancing durability and safety.
- Flux (optional): Flux can be used to promote solder flow and improve the overall quality of the solder joints.
- Safety goggles: It’s crucial to prioritize safety when working with soldering equipment, so protective eyewear is a must.
By having these tools and materials on hand, you’ll be well-prepared to tackle the soldering process and achieve professional-quality results. Ensuring that your workspace is organized and equipped with the necessary items will contribute to a successful and efficient soldering experience.
Step 1: Strip the Wires
Before soldering the wires to a Deans connector, it’s crucial to properly prepare the wires by stripping the insulation. Follow these steps to strip the wires effectively:
- Measure and Cut: Begin by measuring and cutting the wires to the desired length, ensuring that the stripped portion will securely fit into the Deans connector without excess exposed wire.
- Use the Wire Stripper: Select the appropriate notch on the wire stripper tool based on the wire gauge, then carefully insert the wire into the notch. Gently squeeze the handles of the wire stripper to cut through the insulation without damaging the conductive strands.
- Remove the Insulation: After making the initial cut, gently pull the insulation away from the wire to reveal the conductive strands. Take care to remove the insulation completely, exposing the necessary length of wire for soldering.
- Inspect the Stripped Wires: Once the insulation is removed, visually inspect the exposed conductive strands to ensure that they are clean and undamaged. Trim any frayed strands or uneven edges to achieve a smooth and uniform surface for soldering.
Properly stripped wires are essential for creating secure and reliable solder joints. Taking the time to carefully strip the wires will contribute to the overall quality and durability of the soldered connections, ensuring optimal performance in electronic devices and applications.
Step 2: Tin the Wires
Before soldering the wires to a Deans connector, it’s important to tin the exposed conductive strands to enhance the soldering process and ensure strong, reliable connections. Tinning the wires involves coating the strands with solder to protect them from oxidation and make the soldering process more efficient. Follow these steps to tin the wires effectively:
- Prepare the Soldering Iron: Turn on the soldering iron and allow it to reach the appropriate operating temperature. A temperature of around 350-400°C (660-750°F) is suitable for tinning wires.
- Apply Flux (Optional): Applying flux to the exposed wires can help improve solder flow and promote better adhesion. If using flux, apply a small amount to the exposed strands using a flux pen or brush.
- Heat the Wires: Hold the soldering iron against the exposed wires, allowing them to heat up. The heat from the soldering iron will help prepare the wires for tinning by removing any residual oxidation and contaminants.
- Apply Solder: Once the wires are sufficiently heated, touch the solder to the wires, allowing it to melt and flow over the exposed strands. Ensure that the solder evenly coats the wires, forming a thin layer of solder over the conductive strands.
- Inspect and Cool: After applying the solder, visually inspect the tinned wires to ensure that the solder has adhered uniformly to the strands. Once tinned, allow the wires to cool naturally, creating a solid and protective layer of solder over the conductive surfaces.
Tinning the wires provides several benefits, including improved solder flow, enhanced conductivity, and protection against oxidation. By following these steps to tin the wires before soldering, you’ll ensure strong and reliable connections when attaching them to the Deans connector, ultimately contributing to the overall performance and durability of the electrical connections.
Step 3: Prepare the Deans Connector
Preparing the Deans connector is a crucial step in the soldering process, ensuring that the connector is ready to receive the tinned wires and form a secure electrical connection. Follow these steps to prepare the Deans connector effectively:
- Inspect the Connector: Before proceeding, carefully inspect the male and female components of the Deans connector to ensure that they are clean, free of debris, and in good condition. Any foreign particles or damage could affect the quality of the soldered connection.
- Align the Connector: Position the male and female components of the Deans connector in a stable and accessible manner, ready for the soldering process. Ensuring that the connectors are aligned and securely held in place will contribute to a smooth and precise soldering experience.
- Secure the Connector (Optional): If necessary, use a helping hands tool or a stable holder to secure the Deans connector during the soldering process. This additional support can help maintain stability and alignment, facilitating accurate soldering of the wires to the connector.
- Clean the Connector (Optional): If the Deans connector shows signs of oxidation or contamination, gently clean the metal contact surfaces using a small amount of isopropyl alcohol and a clean cloth. This step can help ensure optimal solder adhesion and electrical conductivity.
- Inspect the Alignment: Double-check the alignment and orientation of the Deans connector components, confirming that the male and female parts are correctly positioned and ready to receive the tinned wires. Proper alignment is essential for creating a secure and reliable electrical connection.
By carefully preparing the Deans connector before soldering, you’ll set the stage for a successful and professional-quality soldering process. Ensuring that the connector components are clean, aligned, and ready to receive the tinned wires will contribute to the overall integrity and performance of the electrical connection.
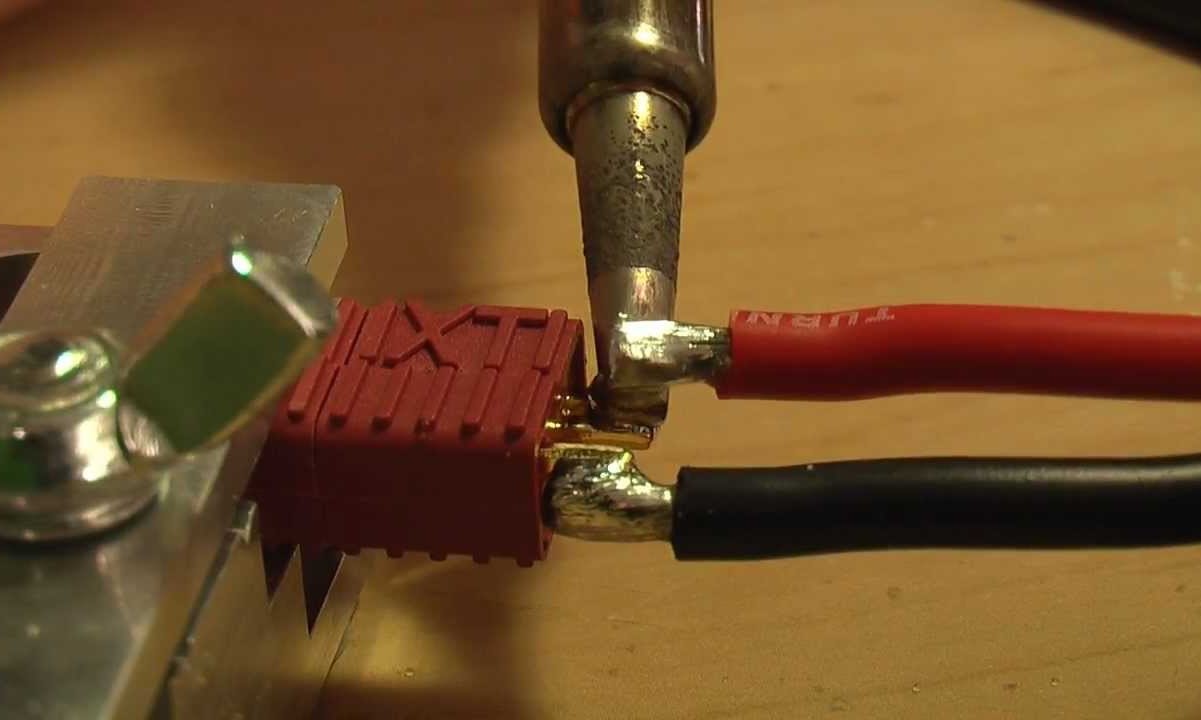
Step 4: Solder the Wires to the Deans Connector
Once the wires and Deans connector are prepared, it’s time to solder the tinned wires to the connector, creating a secure and reliable electrical connection. Follow these steps to solder the wires to the Deans connector effectively:
- Position the Tinned Wires: Carefully position the tinned wires against the metal contacts of the Deans connector, ensuring that each wire aligns with the appropriate terminal. The secure placement of the wires is essential for creating strong and reliable solder joints.
- Heat the Connector: Using the soldering iron, carefully apply heat to the metal contacts of the Deans connector while holding the tinned wires in place. The heat will help facilitate the soldering process and ensure proper adhesion between the wires and the connector.
- Apply Solder: Once the metal contacts are sufficiently heated, touch the solder to the junction of the wire and the connector terminal. Allow the solder to melt and flow over the connection, creating a solid and secure solder joint. Ensure that the solder adheres evenly and forms a durable bond.
- Inspect the Solder Joints: After soldering, visually inspect the solder joints to ensure that they are smooth, shiny, and free of any cold solder joints or irregularities. Properly soldered joints will exhibit a uniform and professional appearance, indicating a strong and reliable electrical connection.
- Cool and Secure: Once the solder joints are complete, allow them to cool naturally. Ensure that the wires are securely attached to the Deans connector and that the solder joints are stable and free from movement. Proper cooling and secure attachment are essential for the longevity and reliability of the soldered connections.
By following these steps, you’ll be able to solder the tinned wires to the Deans connector with precision and confidence, creating robust and dependable electrical connections for your electronic devices and projects.
Step 5: Insulate the Connection
After soldering the wires to the Deans connector, it’s essential to insulate the connections to protect them from potential damage and ensure electrical safety. Proper insulation enhances the durability and reliability of the soldered connections. Follow these steps to insulate the connection effectively:
- Cut Heat Shrink Tubing: Select an appropriate size of heat shrink tubing and cut it into suitable lengths to cover the soldered connections securely. Ensure that the tubing is long enough to cover the solder joints and provide a protective barrier.
- Slide the Tubing: Carefully slide the cut heat shrink tubing over each soldered connection, ensuring that it completely covers the solder joints and extends beyond the exposed conductive areas. Position the tubing to provide comprehensive insulation for the soldered connections.
- Heat the Tubing: Use a heat source, such as a heat gun or a soldering iron with a heat shrink attachment, to apply heat to the tubing. As the tubing heats up, it will shrink and conform to the soldered connections, creating a tight and protective seal.
- Inspect the Insulation: After heating, visually inspect the heat shrink tubing to ensure that it has formed a secure and uniform insulation layer around the soldered connections. Verify that the tubing covers the solder joints completely, providing effective protection against electrical shorts and environmental factors.
- Cool and Secure: Allow the heat shrink tubing to cool and solidify around the soldered connections, creating a durable and protective insulation barrier. Ensure that the tubing is securely in place and that the soldered connections are effectively shielded from potential damage.
By following these steps to insulate the soldered connections with heat shrink tubing, you’ll enhance the safety, longevity, and reliability of the electrical connections. Proper insulation is essential for safeguarding the soldered joints and ensuring optimal performance in electronic devices and applications.