
Choosing the Right Connector and Wire
When it comes to soldering wire to a connector, selecting the appropriate components is crucial for ensuring a secure and reliable connection. Here are the key steps to consider when choosing the right connector and wire for your soldering project:
- Connector Type: Begin by identifying the type of connector that best suits your application. Whether you need a barrel connector, pin connector, or terminal block, it’s essential to match the connector type to the specific requirements of your project. Consider factors such as the current rating, voltage rating, and environmental conditions to select a connector that will deliver optimal performance.
- Wire Gauge: The wire gauge, or thickness, plays a significant role in determining the appropriate wire for your soldering project. Thicker wires have lower gauges and can handle higher currents, making them suitable for applications requiring high power transmission. Conversely, thinner wires with higher gauges are ideal for low-power applications where flexibility is essential. Ensure that the wire gauge aligns with the current-carrying capacity required for your specific application.
- Insulation Material: Consider the insulation material of the wire, which should be compatible with the environmental conditions and potential exposure to heat, moisture, or chemicals. Common insulation materials include PVC, Teflon, and silicone, each offering unique properties such as heat resistance, flexibility, and durability. Select an insulation material that aligns with the environmental demands of your project to ensure longevity and reliability.
- Connector Compatibility: Verify that the chosen wire is compatible with the connector in terms of size, termination method, and insulation type. It’s essential to ensure a proper fit between the wire and connector to facilitate a secure and stable connection. Additionally, consider the solderability of the wire and connector materials to guarantee a successful solder joint.
By meticulously evaluating these factors, you can confidently select the right connector and wire for your soldering project, setting the stage for a successful and durable connection.
Preparing the Wire and Connector
Before diving into the soldering process, it’s essential to properly prepare both the wire and connector to ensure a successful and durable connection. Follow these steps to effectively prepare the wire and connector for soldering:
- Wire Stripping: Begin by carefully stripping the insulation from the end of the wire using a wire stripper, ensuring that the conductive metal core remains intact. The length of the stripped section should align with the connector’s requirements, allowing for a secure fit within the connector without excess exposed wire.
- Connector Inspection: Thoroughly examine the connector to confirm that it is free from any debris, oxidation, or other contaminants that could hinder the soldering process. Use a clean cloth or a small brush to remove any foreign particles and ensure that the connector’s surface is clean and smooth, promoting optimal solder adhesion.
- Wire Tinning: To enhance solderability and prevent fraying, consider tinning the exposed wire by applying a thin layer of solder to the stripped section. This process involves melting solder onto the wire using a soldering iron, creating a protective coating that facilitates easier soldering and promotes a robust connection.
- Connector Flux Application: Apply a small amount of flux to the connector’s soldering area to promote solder flow and improve the wetting of the solder joint. Flux aids in removing oxidation and contaminants from the metal surfaces, ensuring a clean and reliable solder connection.
- Connector Preheating: In some cases, preheating the connector with a soldering iron can help achieve better solder flow and adhesion. Gently heat the connector’s soldering area to the appropriate temperature, taking care not to overheat the connector or cause damage to any surrounding components or insulation.
By meticulously preparing the wire and connector, you can lay the groundwork for a successful soldering process, promoting strong adhesion and reliable electrical conductivity. These preparatory steps are essential for creating a durable and secure connection that meets the highest standards of quality and performance.
Tinning the Wire and Connector
One of the critical preparatory steps in soldering wire to a connector is tinning, which involves applying a thin layer of solder to both the wire and the connector to promote successful soldering and ensure a robust connection. Here’s a step-by-step guide to effectively tin the wire and connector:
- Wire Tinning: Begin by heating the exposed wire with a soldering iron to ensure it reaches the appropriate temperature for solder adhesion. Once the wire is adequately heated, gently touch the solder to the wire, allowing it to melt and flow evenly over the exposed metal. This process creates a protective layer of solder on the wire, preventing oxidation and promoting better solder flow during the final connection to the connector.
- Connector Tinning: Similarly, heat the soldering area of the connector with the soldering iron, ensuring that it reaches the necessary temperature for solder application. Once the connector area is adequately heated, carefully apply solder to the connector, allowing it to form a smooth and uniform coating over the soldering surface. Tinning the connector prepares it for the final soldering stage, promoting improved wetting and adhesion between the wire and connector.
- Flux Application: After tinning both the wire and connector, consider applying a small amount of flux to the tinned surfaces to facilitate the soldering process. Flux aids in removing any remaining oxidation, promoting solder flow, and enhancing the wetting of the solder joint, ultimately contributing to a strong and reliable connection.
- Inspecting the Tinned Surfaces: Once tinning and flux application are complete, carefully inspect the tinned wire and connector surfaces to ensure that they are uniform, free from excess solder, and exhibit a clean and shiny appearance. Properly tinned surfaces are essential for achieving a successful solder joint and ensuring the durability and reliability of the connection.
By effectively tinning the wire and connector, you set the stage for a successful soldering process, promoting strong adhesion and reliable electrical conductivity. Tinning not only facilitates the soldering process but also contributes to the longevity and performance of the soldered connection, making it an indispensable step in achieving high-quality solder joints.
Soldering the Wire to the Connector
Once the wire and connector are adequately prepared and tinned, the next crucial step is the actual soldering process, where the wire is joined to the connector to create a durable and reliable electrical connection. Follow these steps to effectively solder the wire to the connector:
- Positioning: Carefully position the tinned wire and the tinned connector to ensure proper alignment and contact between the two components. Secure the connector and wire in a stable position, either through the use of a helping hand tool or a vise, to maintain alignment during the soldering process.
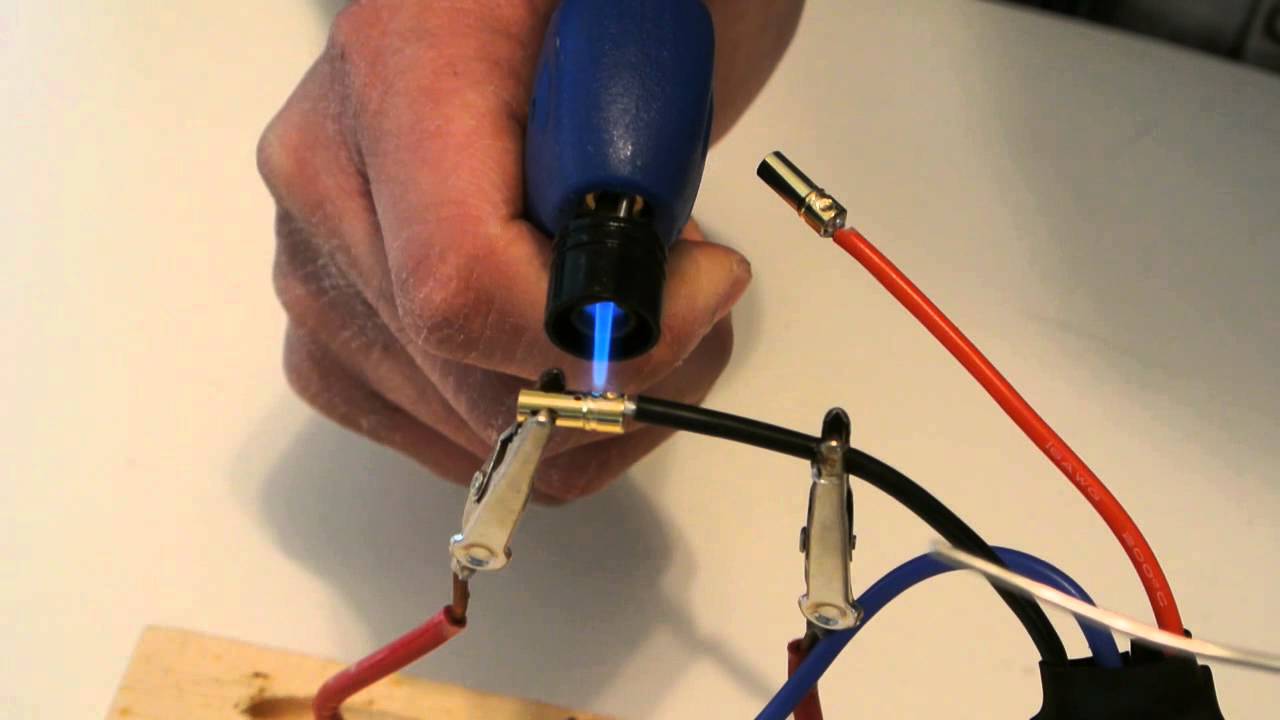
- Heat Application: Using a soldering iron with an appropriate wattage and tip size, apply heat to the junction of the wire and connector. The soldering iron should be in contact with both the tinned wire and the tinned connector to facilitate the transfer of heat and promote solder flow.
- Solder Application: Once the wire and connector reach the necessary temperature, gently touch the solder to the junction, allowing it to melt and flow evenly over the tinned surfaces. Ensure that the solder flows smoothly and uniformly, creating a solid and reliable bond between the wire and the connector.
- Observation: Observe the solder as it flows and wets the junction, ensuring that it forms a smooth and shiny fillet around the connection. This visual inspection helps confirm the completeness of the solder joint and the quality of the connection, ensuring that the solder has effectively bonded the wire to the connector.
- Cooling and Solidification: Once the solder joint is formed, allow it to cool and solidify naturally without disturbing the wire or connector. Avoid any movement or disturbance during this critical phase to ensure the integrity and strength of the soldered connection.
By following these steps, you can successfully solder the wire to the connector, creating a robust and enduring electrical connection. Proper soldering techniques are essential for achieving reliable and durable connections, ensuring optimal performance and safety in various electrical and electronic applications.
Inspecting the Solder Joint
After completing the soldering process, it’s crucial to conduct a thorough inspection of the solder joint to ensure its quality, reliability, and long-term performance. Follow these essential steps to effectively inspect the solder joint between the wire and the connector:
- Visual Examination: Begin by visually examining the solder joint to assess its overall appearance. A well-executed solder joint should appear smooth, shiny, and free from any irregularities such as cracks, voids, or excess solder. The solder fillet should form a uniform and continuous bond between the wire and the connector, indicating a successful soldering process.
- Physical Integrity: Gently tug the soldered wire to ensure that it forms a secure and stable connection with the connector. The solder joint should withstand reasonable mechanical stress without breaking or exhibiting signs of weakness, confirming its physical integrity and reliability in practical applications.
- Electrical Continuity: Verify the electrical continuity of the soldered connection by using a multimeter or continuity tester. Carefully measure the resistance across the solder joint to confirm that it provides a continuous electrical path, indicating a reliable and low-resistance connection essential for electrical conductivity.
- Insulation Check: Ensure that the insulation of the wire and connector remains intact and undamaged during the soldering process. Any heat shrink tubing or insulation materials should be in place and free from solder spatter or damage, maintaining the electrical insulation and mechanical protection of the soldered connection.
- Flux Residue Removal: If flux was used during the soldering process, it’s essential to remove any residual flux to prevent potential corrosion or electrical issues over time. Clean the soldered joint with a suitable flux remover or isopropyl alcohol, ensuring that the area is free from flux residue and any contaminants that could compromise the connection’s performance.
By meticulously inspecting the solder joint, you can verify its quality, reliability, and adherence to industry standards, ensuring a durable and high-performance electrical connection. Thorough inspection is essential for identifying and addressing any potential issues, ultimately contributing to the safety, functionality, and longevity of the soldered connection.