
What are Shared Windows Folders?
A shared Windows folder is a directory or folder on a Windows computer that has been made accessible to other computers on the same network. When a folder is shared, it enables other network users to view, modify, and transfer files and folders to and from that particular location. This feature is especially beneficial for individuals or organizations that need to collaborate and share files with others.
Shared folders allow multiple users to access the same files and resources, regardless of their physical location. This means that files stored in a shared folder can be accessed by users on different computers connected to the same network. It eliminates the need to manually transfer files using external storage devices or sending them through email.
Shared folders can be set up on both Windows 10 and Windows 7 operating systems. Once a folder is shared, other users can connect to it and access its contents. They can perform various tasks such as opening files, creating new files, editing existing files, and deleting files depending on their access permissions.
Access to shared folders can be restricted by assigning permissions to specific users or user groups. These permissions determine what actions users can perform on the shared folder, such as read-only access or full control.
Shared folders also offer the convenience of file synchronization. When changes are made to a file within a shared folder, those changes are automatically updated on all computers connected to the network. This ensures that all users have the most recent version of a file, promoting efficient collaboration and reducing the risk of data inconsistencies.
Whether you are working in a small office environment or in a remote team, shared Windows folders provide a seamless way to share and collaborate on files. It simplifies the process of file sharing and enables teams to work together more efficiently. Now that we understand what shared Windows folders are, let us explore how to access and share these folders in Windows 10 and Windows 7.
How to Access Shared Folders on Windows 10
Windows 10 provides a user-friendly interface for accessing shared folders on a network. Follow these steps to access shared folders:
- Ensure that your Windows 10 computer is connected to the network where the shared folder is located.
- Open File Explorer by clicking on the folder icon in the taskbar or by pressing the Windows key + E.
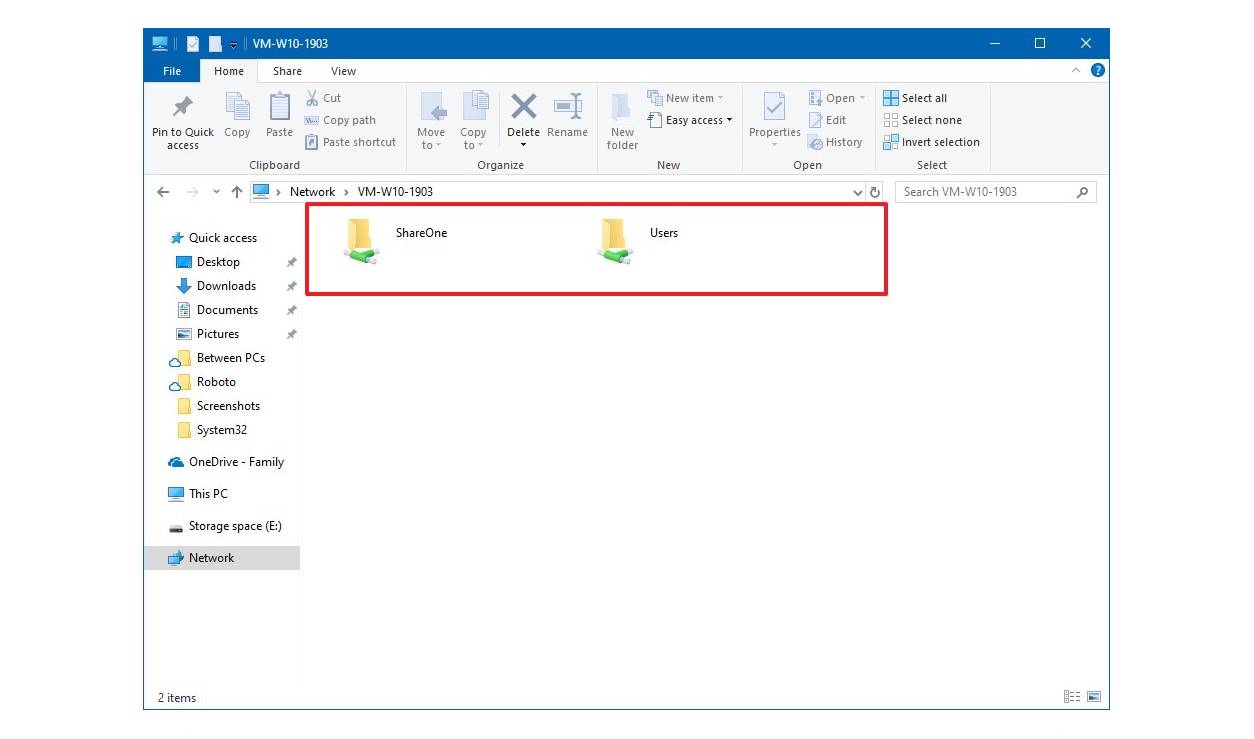
- In the File Explorer window, locate and click on the “Network” tab on the left-hand side of the screen. This will display all the devices and shared folders on the network.
- Scroll through the list of devices or use the search bar to find the computer that has the shared folder you want to access. Once you locate the computer, double-click on it to view its shared folders.
- Find the specific shared folder you wish to access and double-click on it. If prompted, enter the username and password of the computer where the shared folder is hosted.
- The shared folder will now open, and you can view, modify, and transfer files as needed.
Windows 10 also allows you to map a shared folder as a network drive. This can make it even easier to access the shared folder in the future. To do this:
- While in the shared folder, click on the “Map network drive” button located in the toolbar at the top of the File Explorer window.
- In the “Map Network Drive” dialog box, select a drive letter from the dropdown menu to assign to the shared folder.
- Check the box next to “Reconnect at sign-in” if you want the mapped drive to be available every time you start your computer.
- Click on the “Finish” button to complete the mapping process.
Once the shared folder is mapped as a network drive, you can access it directly from the This PC section in File Explorer.
In this section, we learned how to access shared folders on Windows 10. In the next section, we will explore how to share a folder on Windows 10.
How to Share a Folder on Windows 10
Sharing a folder on Windows 10 allows other users on the same network to access its contents. Follow these steps to share a folder:
- Locate the folder that you want to share. Right-click on the folder and select “Properties” from the dropdown menu.
- In the Properties window, navigate to the “Sharing” tab and click on the “Share” button.
- In the “Share” dialog box, select the users or groups you want to share the folder with. You can choose from the suggested options or click on the “Add” button to search for specific users or groups.
- Set the desired level of permissions for the shared folder using the “Permission Level” dropdown menu. The available options include read, read/write, or full control.
- Click on the “Share” button to share the folder with the selected users or groups.
- Windows will generate a network link for the shared folder. You can copy and share this link with others to provide direct access to the shared folder.
- Click on the “Done” button to close the sharing dialog box.
Once the folder is shared, other users on the network will be able to access it by following the steps mentioned in the previous section. They can open the shared folder, view its contents, and perform actions depending on the permissions you have set.
If you want to change the sharing permissions or stop sharing the folder, you can do so by following these steps:
- Right-click on the shared folder and select “Properties” from the dropdown menu.
- In the Properties window, navigate to the “Sharing” tab. You will see the list of users or groups with access to the folder.
- Click on the “Advanced Sharing” button to modify the sharing settings or click on the “Stop Sharing” button to remove sharing permissions for the folder.
- Click on the “OK” button to save the changes.
In this section, we explored how to share a folder on Windows 10. In the next section, we will discuss how to access shared folders on Windows 7.
How to Access Shared Folders on Windows 7
Accessing shared folders on Windows 7 is similar to accessing them on Windows 10. Follow these steps to access shared folders:
- Ensure that your Windows 7 computer is connected to the network where the shared folder is located.
- Click on the Start button and select “Computer” from the Start menu.
- In the Computer window, click on the “Network” tab located on the left-hand side. This will display all the available network locations.
- Scroll through the network locations list or use the search bar to find the computer that has the shared folder you want to access. Double-click on the computer to view its shared folders.
- Locate and double-click on the specific shared folder you wish to access. If prompted, enter the username and password of the computer where the shared folder is hosted.
- The shared folder will now open, and you can view, modify, and transfer files as needed.
Similar to Windows 10, you can also map a shared folder as a network drive on Windows 7. To do this:
- While in the shared folder, click on the “Map network drive” button located in the toolbar at the top of the Computer window.
- In the “Map Network Drive” dialog box, select a drive letter from the dropdown menu to assign to the shared folder.
- Check the box next to “Reconnect at logon” if you want the mapped drive to be available every time you start your computer.
- Click on the “Finish” button to complete the mapping process.
Once the shared folder is mapped as a network drive, you can access it directly from the Computer window.
In this section, we learned how to access shared folders on Windows 7. In the next section, we will discuss how to share a folder on Windows 7.
How to Share a Folder on Windows 7
Sharing a folder on Windows 7 allows other users on the same network to access its contents. Follow these steps to share a folder:
- Locate the folder that you want to share. Right-click on the folder and select “Properties” from the dropdown menu.
- In the Properties window, navigate to the “Sharing” tab and click on the “Advanced Sharing” button.
- Check the box that says “Share this folder” to enable sharing for the selected folder.
- Click on the “Permissions” button to set the sharing permissions for the folder.
- In the Permissions window, you can add or remove users or groups and set their permission levels. The available permission levels include read, change, or full control.
- Click on the “OK” button to save the sharing permissions.
- Back in the Advanced Sharing window, click on the “Apply” button and then the “OK” button to finalize the sharing settings.
Once the folder is shared, other users on the network will be able to access it by following the steps mentioned in the previous section. They can open the shared folder, view its contents, and perform actions based on the permissions you have set.
If you want to change or stop sharing the folder, you can do so by following these steps:
- Right-click on the shared folder and select “Properties” from the dropdown menu.
- In the Properties window, navigate to the “Sharing” tab.
- Click on the “Advanced Sharing” button to modify the sharing settings or click on the “Stop Sharing” button to remove sharing permissions for the folder.
- Click on the “OK” button to save the changes.
In this section, we explored how to share a folder on Windows 7. In the next section, we will discuss troubleshooting common issues with shared Windows folders.
Troubleshooting Common Issues with Shared Windows Folders
While sharing Windows folders on a network can be convenient, you may encounter certain issues that can hinder the smooth access and collaboration of shared files. Here are some common issues and troubleshooting steps:
1. Connection Issues: If you are unable to connect to a shared folder, ensure that you are connected to the correct network and that the computer hosting the shared folder is powered on and connected to the network. Restarting your computer and the hosting computer can help resolve connection issues.
2. Permission Problems: If users are unable to access a shared folder despite having the correct network connection, check the permissions on the shared folder. Ensure that the users or groups you want to grant access to have the appropriate permissions set. You may need to adjust the permissions to allow the desired level of access.
3. Firewall Blocking Access: If your computer has a firewall enabled, it may be blocking the connection to the shared folder. Check your firewall settings and ensure that the necessary ports for file sharing are allowed. You can modify your firewall settings to enable access to shared folders.
4. Network Discovery and File Sharing: Make sure that network discovery and file sharing options are enabled on both the hosting computer and the accessing computer. These options can be found in the Network and Sharing Center under the Control Panel. Enabling these settings can help resolve issues related to accessing shared folders.
5. Incorrect Credentials: If you are prompted for a username and password when accessing a shared folder, ensure that you are entering the correct credentials. Double-check the username and password of the hosting computer, and make sure that the account has the necessary permissions to access the shared folder.
6. File Locking: When multiple users access the same file simultaneously, conflicts can occur if one user has the file open in read/write mode while another user wants to edit it. This can result in file locking issues. Ensure that users are aware of these possibilities and encourage proper communication to prevent conflicts.
7. Network Connectivity: If the network connection is unstable or slow, it may affect the performance of accessing shared folders. Check your network hardware, such as routers and switches, for any issues. Additionally, ensure that all network devices are running the latest firmware updates.
By troubleshooting these common issues, you can overcome obstacles and ensure smooth access to shared Windows folders. If you continue to experience problems, consult the Windows documentation or seek assistance from your IT support personnel for further troubleshooting steps.