What are Live Photos?
Live Photos are a unique feature introduced by Apple on the iPhone. They are essentially a combination of a photo and a short video clip, allowing you to capture the moments just before and after you press the shutter. When you take a Live Photo, the camera records 1.5 seconds of video alongside the photo, resulting in a dynamic visual experience.
Live Photos come to life with a simple touch or hold on the image. When you view a Live Photo, you not only see the still photo itself but also hear the sounds and see the movement that occurred when the picture was taken. It adds an extra layer of depth and emotion to your pictures, making them more lifelike and memorable.
The Live Photos feature brings your still images to life, capturing the essence and atmosphere of the moment. Whether it’s a joyful laughter, a gust of wind blowing through someone’s hair, or the subtle change of expression, Live Photos provide a more immersive and engaging viewing experience.
It’s important to note that Live Photos are not just restricted to the camera app. You can also receive Live Photos from friends and family and even use them as wallpaper for your lock screen. With Live Photos, you can relive your favorite memories in a more vibrant and interactive way.
How to Capture Live Photos
Capturing Live Photos on your iPhone is a simple and straightforward process. Just follow these steps:
- Launch the native Camera app on your iPhone.
- Make sure the Photo mode is selected at the bottom of the screen. Live Photos are only available in this mode.
- Compose your shot and tap the shutter button to take the photo. Keep in mind that the camera will capture 1.5 seconds of video before and after the moment you press the shutter.
- While taking a Live Photo, try to hold your iPhone steady to avoid any unwanted camera movement.
- You can also enable the Live Photos feature while using the front-facing camera for selfies.
After capturing a Live Photo, you can view and edit it in the Photos app. The Live Photo will play automatically when you open it, but keep in mind that it needs to be viewed on a compatible device or platform to experience the full effect.
It’s worth noting that Live Photos can take up more space on your iPhone compared to regular photos. If you’re concerned about storage, you can enable the “Optimize iPhone Storage” option in Settings > Photos to automatically manage the size of your Live Photos.
Now that you know how to capture Live Photos, you can start adding life and movement to your memorable moments with just a tap of the shutter button.
How to View Live Photos
Viewing Live Photos on your iPhone allows you to relive the captured moments in a more dynamic and immersive way. Here’s how you can easily view your Live Photos:
- Open the Photos app on your iPhone.
- Navigate to the album or folder where your Live Photo is stored.
- Tap on the Live Photo you want to view.
- Once the Live Photo is open, simply press and hold anywhere on the image to see the movement and hear the accompanying sound. Release your finger to pause the Live Photo.
Alternatively, you can also view Live Photos from the Lock Screen or within the Photos widget by simply tapping on the image. In both cases, the Live Photo will play automatically so you can instantly enjoy the motion and sound captured alongside the still image.
If you prefer a more hands-free experience, you can use the “Live Photos” watch face on your Apple Watch to display your favorite Live Photos. Simply customize the watch face and select the Live Photos option to enjoy a slideshow of your most cherished moments on your wrist.
Keep in mind that Live Photos can only be fully experienced on compatible devices and platforms. While viewing a Live Photo on a non-Apple device or platform, it will be displayed as a static image without any motion or sound.
Now that you know how to view Live Photos, you can immerse yourself in the captured memories and enjoy the added dimension they bring to your photo collection.
How to Edit Live Photos
Editing Live Photos on your iPhone allows you to fine-tune the captured moments and make them even more captivating. Follow these steps to start editing your Live Photos:
- Open the Photos app on your iPhone and find the Live Photo you want to edit.
- Tap on the Live Photo to open it.
- Swipe up on the photo to reveal the editing options.
- Within the editing interface, you’ll see various options to enhance your Live Photo. These options include:
- Trim: Adjust the start and end points of the Live Photo to remove any unwanted footage. Simply drag the start and end handles to trim the video portion.
- Effects: Apply different visual effects to your Live Photo, such as Loop, Bounce, and Long Exposure. Experiment with these effects to add a unique touch to your Live Photos.
- Filters: Apply filters to enhance the overall look and feel of your Live Photo. Choose from a variety of preset filters or manually adjust the settings to achieve the desired effect.
- Resize: Adjust the size of your Live Photo. You can choose between the original resolution or smaller file sizes for easy sharing.
- Crop: Crop your Live Photo to, focus on a specific subject or remove unwanted elements from the frame.
- Undo: If you’re not satisfied with the changes you made, tap “Revert” to go back to the original Live Photo.
Once you’re done editing your Live Photo, simply tap “Done” to save the changes. The edited version will replace the original Live Photo in your photo library.
It’s important to note that editing Live Photos is a non-destructive process, meaning that you can always revert back to the original version if needed. This gives you the freedom to experiment and get creative without worrying about losing the original footage.
Now that you know how to edit Live Photos, unleash your creativity and make your memories shine with personalized enhancements.
How to Share Live Photos
Sharing Live Photos with your friends and family allows them to experience the dynamic moments captured in your photos. Follow these steps to easily share your Live Photos:
- Open the Photos app on your iPhone.
- Navigate to the Live Photo you want to share.
- Tap on the Share icon, which looks like a square with an upward arrow.
- Choose the medium through which you want to share the Live Photo. You have various options, including Messages, Mail, AirDrop, and social media platforms like Facebook and Instagram.
- Enter the recipient’s information or select the desired social media platform.
- Tap on the Send button to share the Live Photo.
When sharing a Live Photo via Messages or Mail, the recipient will receive both the still image and the accompanying video. They can then view the Live Photo by tapping and holding on the image. The Live Photo will come to life, allowing them to experience and enjoy the captured moment.
If you choose to share the Live Photo on social media platforms, it’s essential to check if the platform supports Live Photos. Some platforms may only display the still image, while others like Facebook and Instagram allow you to upload and share the Live Photo in its full dynamic form. Keep in mind that the playback of Live Photos on these platforms may vary.
When sharing Live Photos with other iPhone users via AirDrop, the Live Photo is transferred in its original format, retaining both the photo and video components. The recipient can then view the Live Photo on their iPhone with the same immersive experience.
It’s important to note that when sharing Live Photos with non-Apple devices or platforms, they will be treated as regular photos without any motion or sound. The Live Photo will be converted into a still image, ensuring compatibility with various devices.
Now that you know how to share Live Photos, you can spread the magic and excitement of the captured moments with your loved ones no matter where they are.
How to Set Live Photos as Wallpaper
Setting Live Photos as wallpaper on your iPhone allows you to have dynamic and animated backgrounds that come to life with each unlocking of your device. Follow these steps to set Live Photos as your wallpaper:
- Open the Photos app on your iPhone and find the Live Photo you want to use as your wallpaper.
- Tap on the Live Photo to open it.
- Tap on the Share icon, which looks like a square with an upward arrow.
- Scroll down on the Share sheet and tap on the “Use as Wallpaper” option.
- Now, you’ll be directed to the wallpaper editor. You can adjust the position and size of the Live Photo by dragging and pinching it with your fingers.
- Below the Live Photo, you’ll find three options:
- Live Photo: Choose whether you want the Live Photo to animate upon a long-press or remain still.
- Still: If you prefer to use only the still image from the Live Photo as your wallpaper, select this option.
- Perspective: Enable or disable the Parallax effect, which creates a sense of depth by slightly moving the wallpaper as you tilt your iPhone.
After customizing your wallpaper preferences, tap on “Set” to apply the Live Photo as your wallpaper. You can choose to set it as the lock screen, home screen, or both.
Now, unlock your iPhone or navigate to the home screen to see your Live Photo in action as your new wallpaper. Each time you unlock your device or return to the home screen, the Live Photo will animate, creating a dynamic and engaging visual experience.
Keep in mind that Live Photos used as wallpaper may consume more battery power compared to static images. To optimize battery life, you can set a shorter duration for the Live Photo animation or use a still image instead.
Now that you know how to set Live Photos as wallpaper, personalize your iPhone with animated and captivating backgrounds that breathe life into your device.
Live Photos on Lock Screen
With Live Photos on your iPhone, you can create a dynamic and engaging lock screen experience by setting them as your wallpaper. Here’s how you can enjoy Live Photos on your lock screen:
To begin, open the Photos app on your iPhone and navigate to the Live Photo you want to set as your lock screen wallpaper. Follow the steps below:
- Tap on the Live Photo to open it.
- Tap on the Share icon, which resembles a square with an upward arrow.
- Scroll down the Share sheet and select the “Use as Wallpaper” option.
- In the wallpaper editor, you can adjust the Live Photo’s position and size by dragging and pinching the image accordingly.
- Notice the three options available at the bottom of the editor:
- Live Photo: Choose whether you want the Live Photo to animate when you unlock your iPhone.
- Still: If you prefer the Live Photo to be displayed as a still image, select this option.
- Perspective: Enable or disable the Parallax effect, which adds depth to the wallpaper as you move your device.
Once you have customized the wallpaper settings, tap “Set” to apply the Live Photo as your lock screen wallpaper. Now, when you lock your iPhone or wake it up, the Live Photo will animate, providing a dynamic and captivating experience each time.
It’s worth noting that Live Photos on the lock screen may consume more battery power compared to static wallpapers. To conserve battery life, you can set a shorter duration for the Live Photo animation or simply use a still image instead.
Now that you know how to enjoy Live Photos on your lock screen, you can personalize your iPhone with captivating and dynamic wallpapers that come to life every time you unlock your device.
How to Convert Live Photos to Still Photos
While Live Photos provide a unique and interactive experience, there may be instances when you prefer a traditional still photo. Fortunately, converting Live Photos to still photos on your iPhone is a quick and simple process. Here’s how you can do it:
- Open the Photos app on your iPhone and locate the Live Photo you want to convert.
- Tap on the Live Photo to open it.
- Swipe up on the photo to reveal additional options.
- In the options menu, you’ll see a thumbnail of the Live Photo with the label “Live” on top.
- Tap on the “Live” label to convert the Live Photo to a still version.
Once you have converted the Live Photo to a still image, the “Live” label will disappear, indicating that the photo is now a standard still photo. The converted photo will no longer include the motion and sound elements captured in the original Live Photo.
It’s important to note that converting a Live Photo to a still photo is non-reversible, meaning you cannot bring back the motion and sound once it has been removed. Therefore, it’s advisable to create a separate copy or backup of the original Live Photo before converting it, in case you want to revert back to the dynamic version in the future.
By converting Live Photos to still photos, you can have more versatility and flexibility in choosing the perfect shot from your collection. Whether you want a more traditional and static image for printing or sharing, or simply prefer the simplicity of a still photo, the option to convert Live Photos provides you with the freedom to curate your photo collection according to your preferences.
How to Extract Frames from Live Photos
Live Photos capture a series of frames before and after the moment the photo was taken, allowing you to extract individual frames and save them as separate images. This feature is particularly useful when you want to preserve a specific moment or create a series of still photos from a Live Photo. Here’s how you can extract frames from Live Photos on your iPhone:
- Open the Photos app on your iPhone and locate the Live Photo from which you want to extract frames.
- Tap on the Live Photo to open it.
- Swipe up on the photo to reveal additional options.
- In the options menu, you’ll see a section called “Live Photos” with a thumbnail strip of all the frames captured in the Live Photo.
- Scroll through the frames to find the specific moment you want to extract as a still photo.
- Once you have identified the frame, tap on the “Share” icon, usually represented as a square with an upward arrow.
- Choose the “Save Image” option to save the selected frame as a separate still photo.
The extracted frame will now be saved as a new image in your Photos library. It will have all the properties of a regular still photo and will no longer have any motion or sound associated with it.
By extracting frames from Live Photos, you have the opportunity to capture various moments within a single photo. You can create a collection of still images that highlight different expressions, actions, or details from the original Live Photo, allowing you to preserve and share specific frames that hold significance or evoke a particular emotion.
It’s important to note that the resolution of the extracted frame may be slightly lower than the original Live Photo, as it captures a single frame from the video sequence. However, the resulting image should still maintain a high-quality appearance suitable for most purposes.
Now that you know how to extract frames from Live Photos, you can unlock the hidden potential of your dynamic photos and create a series of memorable still images from those special captured moments.
How to Change the Key Photo of a Live Photo
When you take a Live Photo, the camera captures several frames before and after the moment you press the shutter button. By default, one of these frames is selected as the key photo, which is the thumbnail displayed in your Photos library and other apps. However, if you prefer a different frame to be the key photo, you can easily change it on your iPhone. Here’s how:
- Open the Photos app on your iPhone and locate the Live Photo for which you want to change the key photo.
- Tap on the Live Photo to open it.
- Swipe up on the photo to reveal more options.
- In the options menu, you’ll see a section called “Live Photos” with a thumbnail strip of all the frames in the Live Photo.
- Scroll through the frames to find the frame you want to set as the new key photo.
- Once you have found the desired frame, firmly press on it. (If you’re using an iPhone with 3D Touch, apply moderate pressure. For devices without 3D Touch, long-press on the frame.)
- A pop-up menu will appear with the option to “Make Key Photo.” Tap on it to set the selected frame as the new key photo.
After changing the key photo, the thumbnail displayed in your Photos library and other apps will update to reflect the newly selected frame. The motion and sound elements of the Live Photo will remain intact, but the frame you chose will now be the first image seen when viewing the Live Photo.
It’s important to note that changing the key photo does not affect the duration of the Live Photo or the underlying video. It simply adjusts the thumbnail preview and the initial frame displayed.
By changing the key photo of a Live Photo, you have more control over how the photo is represented in your library and when it is shared with others. You can select a frame that best captures the essence of the moment or showcases the most compelling image within the Live Photo sequence.
Now that you know how to change the key photo of a Live Photo, you can personalize your photo library and highlight the moments that matter most to you.
How to Preserve Live Photos when Changing Devices
When upgrading to a new iPhone or switching to a different iOS device, you may wonder how to preserve your precious Live Photos and ensure they are seamlessly transferred to the new device. Fortunately, Apple provides several methods to preserve your Live Photos when changing devices. Here’s what you can do:
- Enable iCloud Photos: Ensure that iCloud Photos is enabled on both your current and new devices. This will automatically sync your Live Photos across all your Apple devices, making it easy to access them from any device you log into with your Apple ID.
- Back up with iCloud or iTunes: Before changing devices, make sure to back up your current iPhone using iCloud or iTunes. This will create a comprehensive backup file that includes your Live Photos. Once you set up your new device, restore the backup, and your Live Photos will be transferred along with all your other data.
- Use AirDrop: If you only want to transfer a small number of Live Photos, you can use AirDrop to send them wirelessly to your new device. Open the Photos app, select the Live Photos you want to transfer, tap the Share icon, and choose your new device from the AirDrop options.
- Transfer via a direct connection: If you have a Lightning to USB Cable, you can connect your old and new devices directly to transfer Live Photos. Connect the devices, open the Photos app on the old device, select the Live Photos you want to transfer, tap the Share icon, and choose the new device from the available options.
- Move Live Photos to a computer: If you prefer to transfer your Live Photos to a computer, connect your iPhone to the computer using a Lightning cable. Open the Photos app on your computer, select the Live Photos you want to transfer, and import them to your computer. You can then transfer them back to your new device using your preferred method, such as syncing via iTunes or iCloud.
By following these methods, you can ensure that your Live Photos are safely transferred to your new device, allowing you to continue enjoying and reliving the moments captured in those dynamic pictures.
Remember to take a few moments to verify that your Live Photos have transferred successfully before removing them from your old device. This way, you can have peace of mind knowing that your valuable memories are preserved and ready to be enjoyed on your new device.
Now that you know how to preserve Live Photos when changing devices, you can seamlessly transfer your cherished memories and continue to enjoy them on your new iPhone or iOS device.
How to Disable Live Photos
While Live Photos can be a fun and interactive feature on your iPhone, there may be times when you prefer to disable it. Whether you want to save storage space, capture typical still photos, or simply avoid moments being inadvertently captured as videos, disabling Live Photos is a straightforward process. Here’s how you can do it:
- Open the Camera app on your iPhone.
- Make sure the Photo mode is selected at the bottom of the screen. Live Photos are only available in this mode.
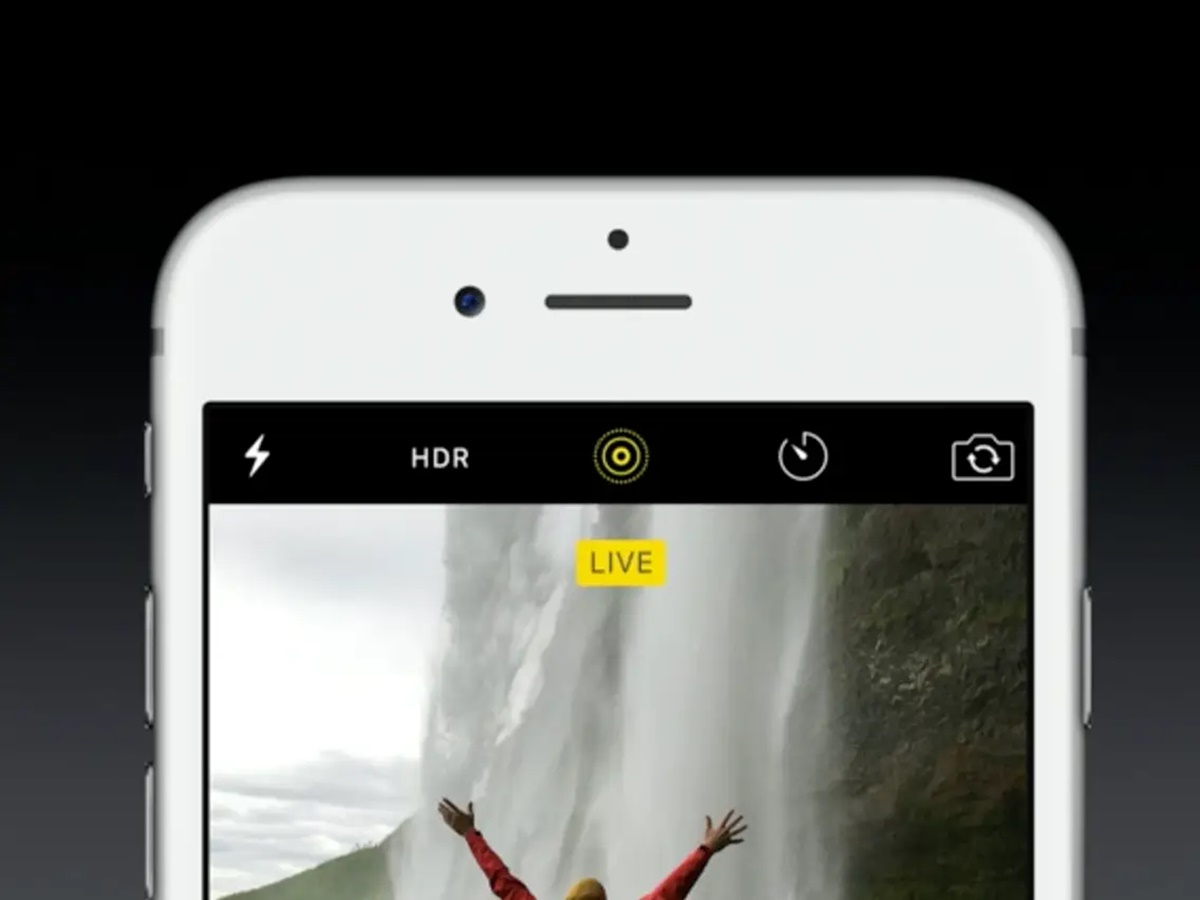
- Look for the yellow circular icon with concentric rings at the top of the screen. This indicates that Live Photos are currently enabled.
- To disable Live Photos, tap on the yellow circular icon once. It will turn white with a line through it, indicating that Live Photos are now disabled.
By following these steps, Live Photos will be disabled, and your iPhone will capture standard still photos without any accompanying video. The “LIVE” label will disappear from the corner of the screen, indicating that Live Photos are no longer being recorded.
It’s important to note that disabling Live Photos is temporary and only affects the current session of the Camera app. If you launch the Camera app again, Live Photos will be re-enabled by default and you’ll need to manually disable it again if desired.
Additionally, you can also adjust the Live Photos settings in the Camera app’s settings menu. To do this:
- Open the Settings app on your iPhone.
- Scroll down and tap on “Camera”.
- Tap on “Preserve Settings”.
- Ensure that the “Live Photo” option is turned off if you want Live Photos to be disabled by default every time you open the Camera app.
By disabling Live Photos either temporarily or by default, you have more control over the type of photos your iPhone captures and can better manage storage space and resources.
Now that you know how to disable Live Photos, you can easily switch between capturing dynamic moments and traditional still photos based on your preference and needs.
Live Photos Supported Devices
Live Photos is a feature that was introduced by Apple and is available on specific iPhone models. While it has become a popular and widely-used feature, it’s important to note that not all iOS devices support Live Photos. Here are the devices that support Live Photos:
As of now, Live Photos is supported on:
- iPhone 6s and 6s Plus
- iPhone SE (1st generation)
- iPhone 7 and 7 Plus
- iPhone 8 and 8 Plus
- iPhone X, XR, XS, and XS Max
- iPhone 11, 11 Pro, and 11 Pro Max
- iPhone SE (2nd generation)
- iPhone 12, 12 mini, 12 Pro, and 12 Pro Max
If you have any of these iPhone models, you can take advantage of the Live Photos feature to capture moments that come to life with a touch.
While Live Photos can be viewed on other Apple devices, such as iPads and iPod touch, the ability to capture Live Photos is limited to the iPhone models listed above.
It’s worth mentioning that Live Photos can also be shared and viewed on non-Apple devices and platforms, but the dynamic elements, such as motion and sound, may be lost, and the Live Photo will be displayed as a static image.
Apple continues to expand the availability of Live Photos across newer iPhone models, enhancing the user experience with each iteration. If you have an older iPhone model or a device that doesn’t support Live Photos, you can still enjoy the captured Live Photos sent by others on compatible devices.
Now that you’re aware of the supported devices for Live Photos, you can make the most out of this feature if you own any of the compatible iPhone models.
Tips and Tricks for Using Live Photos
Live Photos offer a unique way to capture and relive moments, adding a touch of life and movement to your still photos. To make the most out of this feature, here are some tips and tricks for using Live Photos on your iPhone:
- Experiment with framing: Since Live Photos capture a few seconds before and after the shutter is pressed, consider the composition and framing of your shot. Allow for some extra space around the subject to account for the movement that will be captured.
- Opt for natural movements: Encourage your subjects to maintain a natural and relaxed pose when capturing Live Photos. Avoid asking them to pose or trying to freeze a specific frame, as the spontaneity and authenticity of the movement will bring the photo to life.
- Use Live Photos for candid moments: Live Photos are particularly great for capturing candid moments, such as laughter, reactions, or interactions. These dynamic moments can be even more impactful when shared or viewed later on.
- Try different effects: Experiment with the various effects available for Live Photos, such as Loop, Bounce, and Long Exposure. Each effect adds a unique touch to your Live Photos and can enhance the visual impact.
- Use Live Photos on selfies: Don’t limit Live Photos to just capturing the world around you. Use your front-facing camera for selfies and capture animated expressions and reactions, making your selfies even more engaging and lively.
- Combine Live Photos with Burst mode: When capturing fast-paced action or group shots, consider using Burst mode in combination with Live Photos. This allows you to select the perfect frame from a sequence of images, preserving the dynamic aspect while ensuring a sharp and focused shot.
- Make Live Photos your wallpaper: Take advantage of the dynamic nature of Live Photos by setting them as your lock screen or home screen wallpaper. It adds a personalized touch and brings your device to life with each interaction.
- Share your Live Photos: Share your Live Photos with friends and family using various methods, such as Messages, social media platforms, or even AirDrop. It allows others to experience the captured moment in a more engaging and immersive way.
- Protect storage space: Live Photos can take up more storage space compared to regular photos. If you’re concerned about storage, consider enabling the “Optimize iPhone Storage” option in Settings > Photos. This will automatically manage the size of your Live Photos, keeping them accessible while optimizing storage usage.
By following these tips and tricks, you can elevate your Live Photos experience, capturing and preserving moments in a more dynamic and engaging way.
Now that you’re equipped with these helpful tips, go out and explore the possibilities of Live Photos on your iPhone, creating a collection of vibrant and memorable moments.