
Enabling or Disabling the New Mail Sound in Windows Mail
Windows Mail is a popular email client that comes pre-installed with Windows 10. It allows you to manage your email accounts all in one place with a user-friendly interface. One of the features that can enhance your email experience is the new mail sound notification. When enabled, this feature plays a sound whenever a new email arrives in your inbox, alerting you to check your mail. However, if you find the sound notifications distracting or you prefer a more silent approach, you can easily disable the new mail sound. In this article, we will guide you through the steps to enable or disable the new mail sound in Windows Mail.
The first step is to open the Windows Mail app on your computer. To do this, click on the Start menu and search for “Mail”. Once the app appears in the search results, click on it to open it.
Next, ensure that you have the latest version of the Mail app installed on your computer. To check for updates, click on the Settings icon (it looks like a gear) located in the bottom left corner of the Mail app window. In the Settings menu, click on “About” in the left sidebar. The About screen will display the current version of the Mail app. If you are not on the latest version, Windows will prompt you to update the app.
After confirming that you have the latest version of the Mail app, it’s time to access the settings. To do this, click on the Settings icon again and choose “Options” from the dropdown menu. The Options screen will now appear, providing you with various customization options for the Mail app.
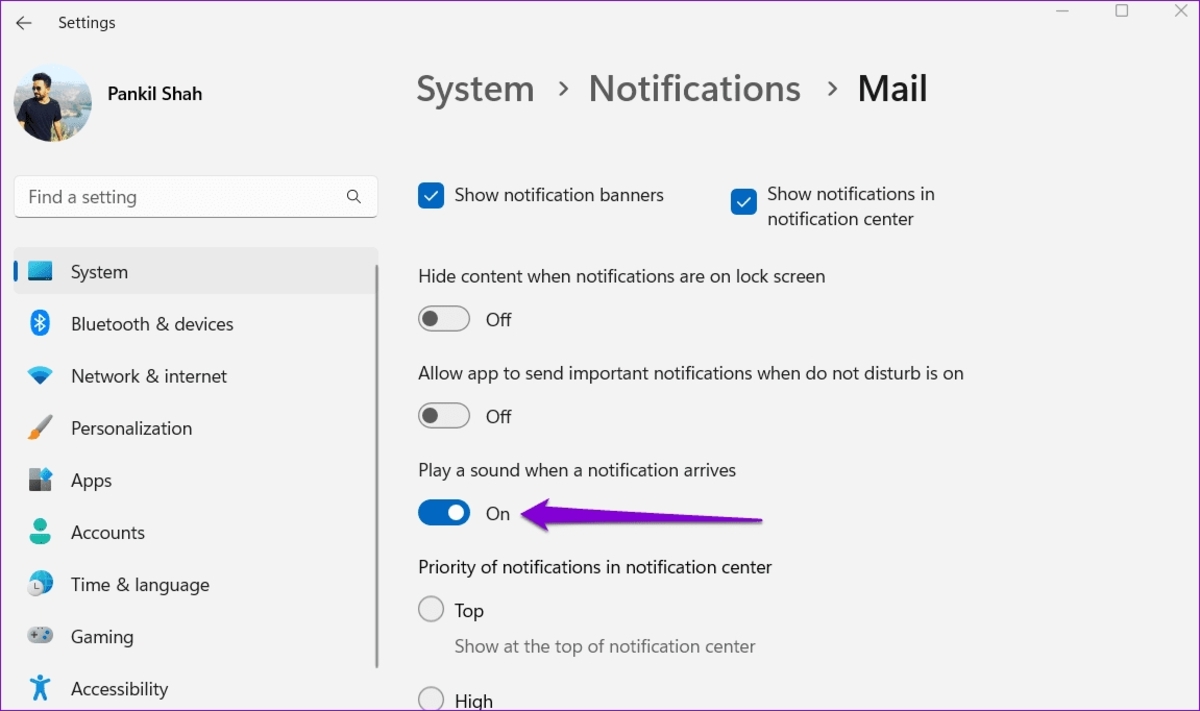
Within the Options screen, locate the “Notifications” section. This section controls all the notification settings for the Mail app, including the new mail sound. Click on “Notifications” to expand the options.
In the Notifications section, you will find the “New Email” option, which allows you to enable or disable the new mail sound. By default, this option is usually set to “On”, meaning the new mail sound is enabled. If you wish to disable the sound, simply toggle the switch to the “Off” position.
Once you have made the desired changes, close the Settings menu by clicking on the “X” button in the top right corner of the window. Now, whenever a new email arrives in your inbox, Windows Mail will either play the new mail sound (if enabled) or remain silent (if disabled), giving you the flexibility to manage your email notifications according to your preference.
In summary, enabling or disabling the new mail sound in Windows Mail is a straightforward process. By following the steps outlined in this article, you can easily customize your email notification settings to suit your needs. Whether you prefer the alert of the new mail sound or a more peaceful email experience, Windows Mail provides the flexibility to enable or disable this feature. Take control of your email notifications and enjoy a more personalized email experience with Windows Mail.
Checking the Mail App Version
Before you can enable or disable the new mail sound in Windows Mail, it’s important to ensure that you have the latest version of the Mail app installed on your computer. Keeping your app up to date ensures that you have access to the latest features and improvements. In this section, we will guide you through the steps to check the version of the Mail app on your Windows 10 computer.
To begin, open the Mail app by clicking on the Start menu and searching for “Mail”. Once you see the Mail app in the search results, click on it to launch the app. The Mail app window will appear on your screen, displaying your email accounts and inbox.
Next, locate the Settings icon in the bottom left corner of the Mail app window. The Settings icon looks like a gear. Click on it to open the Settings menu. A dropdown menu will appear with various options.
In the Settings menu, click on the “About” option located in the left sidebar. The About screen will now be displayed, showing you information about the Mail app, including the version number.
Take note of the version number displayed in the About screen. If the version number matches the latest version available from Microsoft, then you are already using the most up-to-date Mail app version. However, if the version number is different, it means that an update is available.
To update the Mail app to the latest version, click on the Microsoft Store icon in the taskbar or type “Microsoft Store” in the search bar and open the store. Once the Microsoft Store opens, click on the three dots in the top-right corner of the window and choose “Downloads and updates” from the dropdown menu.
In the Downloads and updates section, click on the “Get updates” button. This will initiate a search for available updates for your installed apps, including the Mail app. If an update for the Mail app is found, it will be displayed in the list of available updates. Click on the “Update” button next to the Mail app to install the latest version.
After the update is installed, you can double-check the Mail app version by repeating the earlier steps to access the About screen. Ensure that the version number matches the latest version available from Microsoft.
In summary, checking the Mail app version is a crucial step in enabling or disabling the new mail sound in Windows Mail. By following the steps outlined in this section, you can easily determine if your Mail app is up to date or if an update is required. Keeping your Mail app updated ensures that you have access to the latest features and improvements. Stay on top of your email experience by checking and updating the Mail app version on your Windows 10 computer.
Opening the Mail App Settings
To enable or disable the new mail sound in Windows Mail, you need to access the settings of the Mail app. The settings menu provides you with various options to customize your email experience. In this section, we will guide you through the steps to open the Mail app settings on your Windows 10 computer.
To begin, open the Mail app by clicking on the Start menu and searching for “Mail”. Once you see the Mail app in the search results, click on it to launch the app. The Mail app window will appear on your screen, displaying your email accounts and inbox.
Next, locate the Settings icon in the bottom left corner of the Mail app window. The Settings icon looks like a gear. Click on it to open the Settings menu. A dropdown menu will appear with various options.
In the dropdown menu, you will see different sections such as “Manage accounts”, “Reading”, “Compose and reply”, “Notifications”, and more. These sections contain settings related to different aspects of the Mail app.
To access the general settings of the Mail app, click on the “Settings” option located at the top of the dropdown menu. This will open the Settings menu in a separate window.
Alternatively, you can directly access the Mail app settings by using the keyboard shortcut. Simply press the “Ctrl” and “,” (comma) keys together on your keyboard. This will instantly open the Settings menu without the need to click on the Settings icon.
Once the Settings menu is open, you can explore the various options available to customize your Mail app experience. The settings are organized into different sections, making it easy to navigate and find the specific setting you want to modify.
In addition to the general settings, you can also access account-specific settings by clicking on the “Manage accounts” section in the dropdown menu. This will allow you to manage your email accounts, sync settings, and other account-related configurations.
Remember to click on the “Save” or “Apply” button after making any changes to ensure that the modified settings are implemented.
In summary, opening the Mail app settings is a crucial step in enabling or disabling the new mail sound in Windows Mail. By following the steps outlined in this section, you can easily access the settings menu of the Mail app on your Windows 10 computer. Take control of your email experience by exploring and customizing the various options available in the settings menu of the Mail app.
Finding the Notifications Section in the Settings
The Notifications section in the Mail app settings allows you to manage the various notification options, including the new mail sound. By locating this section, you can easily enable or disable the sound notification according to your preference. In this section, we will guide you through the steps to find the Notifications section in the settings of the Mail app on your Windows 10 computer.
To begin, open the Mail app by clicking on the Start menu and searching for “Mail”. Once you see the Mail app in the search results, click on it to launch the app. The Mail app window will appear on your screen, displaying your email accounts and inbox.
Next, locate the Settings icon in the bottom left corner of the Mail app window. The Settings icon looks like a gear. Click on it to open the Settings menu. A dropdown menu will appear with various options.
In the dropdown menu, you will see different sections such as “Manage accounts”, “Reading”, “Compose and reply”, and more. These sections contain settings related to different aspects of the Mail app.
To find the Notifications section, scroll down the dropdown menu until you see the “Notifications” option. Click on “Notifications” to expand the options.
Within the Notifications section, you will find various settings related to notifications in the Mail app. This includes options to enable or disable different types of notifications, such as new email notifications, calendar reminders, and more.
The specific options available in the Notifications section may vary depending on the version of the Mail app you are using. However, the option we are interested in for enabling or disabling the new mail sound is typically labeled as “New Email” or “Sound for New Mail”. This option controls the sound played when a new email arrives in your inbox.
Take note of the current settings for the “New Email” or “Sound for New Mail” option. By default, it is usually set to “On”, indicating that the new mail sound is enabled. However, if you wish to disable the sound notification, simply toggle the switch to the “Off” position.
Once you have made the desired changes, you can proceed to close the Settings menu by clicking on the “X” button in the top right corner of the window.
In summary, locating the Notifications section in the settings of the Mail app is essential to enable or disable the new mail sound in Windows Mail. By following the steps outlined in this section, you can easily find the Notifications section and access the options related to notifications in the Mail app settings. Customize your email notification preferences with just a few clicks and tailor the Mail app to suit your needs.
Locating the New Mail Sound Option
Once you have accessed the Notifications section in the Mail app settings, the next step is to locate the specific option that controls the new mail sound. By finding this option, you can easily enable or disable the sound notification for new emails. In this section, we will guide you through the steps to locate the new mail sound option in the settings of the Mail app on your Windows 10 computer.
To begin, open the Mail app by clicking on the Start menu and searching for “Mail”. Once you see the Mail app in the search results, click on it to launch the app. The Mail app window will appear on your screen, displaying your email accounts and inbox.
Next, locate the Settings icon in the bottom left corner of the Mail app window. The Settings icon looks like a gear. Click on it to open the Settings menu. A dropdown menu will appear with various options.
In the dropdown menu, you will see different sections such as “Manage accounts”, “Reading”, “Compose and reply”, and more. These sections contain settings related to different aspects of the Mail app.
Scroll down the dropdown menu until you find the “Notifications” option. Click on “Notifications” to expand the options. The Notifications section will now be visible, showing various settings related to notifications in the Mail app.
Within the Notifications section, look for the specific option related to the new mail sound. This option is usually labeled as “New Email Sound”, “Sound for New Mail”, or something similar. It controls whether the sound notification is played when a new email arrives in your inbox.
Once you have located the new mail sound option, take note of its current setting. By default, it is usually set to “On”, meaning the sound notification is enabled. If you wish to disable the sound notification, simply toggle the switch to the “Off” position.
In some cases, the new mail sound option may offer additional customization settings. For example, you might be able to choose from different sound options or adjust the volume of the sound. If such customization options are available, feel free to explore them and make the desired changes according to your preferences.
After making the necessary changes to the new mail sound option, you can proceed to close the Settings menu by clicking on the “X” button in the top right corner of the window.
In summary, locating the new mail sound option in the settings of the Mail app is crucial to enable or disable the sound notification for new emails. By following the steps outlined in this section, you can easily find this option and customize the new mail sound according to your preference. Take control of your email experience and personalize the notification settings in the Mail app on your Windows 10 computer.
Enabling the New Mail Sound
If you prefer to be alerted by a sound whenever a new email arrives in your inbox, you can easily enable the new mail sound in the Mail app settings. This feature adds an auditory notification to help you stay on top of your emails. In this section, we will guide you through the steps to enable the new mail sound in the Mail app on your Windows 10 computer.
To begin, open the Mail app by clicking on the Start menu and searching for “Mail”. Once you see the Mail app in the search results, click on it to launch the app. The Mail app window will open, displaying your email accounts and inbox.
Next, locate the Settings icon in the bottom left corner of the Mail app window. The Settings icon looks like a gear. Click on it to open the Settings menu. A dropdown menu will appear with various options.
In the dropdown menu, scroll down until you find the “Notifications” option. Click on “Notifications” to expand the options. The Notifications section will now be visible, showing various notification settings for the Mail app.
Within the Notifications section, locate the option related to the new mail sound. It is typically labeled as “New Email Sound”, “Sound for New Mail”, or something similar. By default, this option is set to “Off”, meaning the new mail sound is currently disabled.
To enable the new mail sound, simply toggle the switch to the “On” position. Once enabled, a sound notification will play whenever a new email arrives in your inbox.
Additionally, you might have the option to customize the new mail sound further. Check if there are options to choose from different sound options or adjust the volume of the sound. If available, make the desired changes to personalize your notification experience.
After enabling the new mail sound, close the Settings menu by clicking on the “X” button in the top right corner of the window.
From now on, whenever a new email arrives in your inbox, the Mail app will play the selected sound notification, alerting you to check your email. Take advantage of this feature to stay informed and promptly respond to important messages in a timely manner.
In summary, enabling the new mail sound in the Mail app is a simple process. By following the steps outlined in this section, you can easily enable the sound notification for new emails on your Windows 10 computer. Customize your notification settings and enhance your email experience with the audible alert of the new mail sound in the Mail app.
Disabling the New Mail Sound
If you find the new mail sound notification in the Mail app distracting or prefer a more silent email experience, you can easily disable the sound. By turning off this feature, you can still receive email notifications visually without any audible alert. In this section, we will guide you through the steps to disable the new mail sound in the Mail app on your Windows 10 computer.
To begin, open the Mail app by clicking on the Start menu and searching for “Mail”. Once the Mail app appears in the search results, click on it to launch the app. The Mail app window will open, displaying your email accounts and inbox.
Next, locate the Settings icon in the bottom left corner of the Mail app window. The Settings icon looks like a gear. Click on it to open the Settings menu. A dropdown menu will appear with various options.
In the dropdown menu, scroll down until you find the “Notifications” option. Click on “Notifications” to expand the options. The Notifications section will now be visible, showing various notification settings for the Mail app.
Within the Notifications section, look for the option related to the new mail sound. It is typically labeled as “New Email Sound”, “Sound for New Mail”, or something similar. By default, this option is set to “On”, meaning the new mail sound is currently enabled.
To disable the new mail sound, simply toggle the switch to the “Off” position. Once disabled, you will no longer hear a sound notification when a new email arrives in your inbox.
After disabling the new mail sound, close the Settings menu by clicking on the “X” button in the top right corner of the window.
With the new mail sound disabled, you can still receive visual notifications for new emails in the Mail app. The sound notification will no longer interrupt your workflow, allowing you to focus on other tasks without any audible distractions.
If you change your mind and decide to re-enable the new mail sound, you can follow the same steps outlined in this section, but toggle the switch to the “On” position instead.
In summary, disabling the new mail sound in the Mail app is a straightforward process. By following the steps outlined in this section, you can easily turn off the sound notification for new emails on your Windows 10 computer. Personalize your email experience and enjoy a more peaceful inbox without the audible interruption of the new mail sound in the Mail app.
Testing the New Mail Sound Setting
Once you have enabled or disabled the new mail sound in the Mail app settings, it’s a good idea to test the new settings to ensure they are working as expected. By testing the new mail sound, you can confirm whether the sound notification is playing or not when a new email arrives in your inbox. In this section, we will guide you through the steps to test the new mail sound setting in the Mail app on your Windows 10 computer.
To begin, open the Mail app by clicking on the Start menu and searching for “Mail”. Once the Mail app appears in the search results, click on it to launch the app. The Mail app window will open, displaying your email accounts and inbox.
Next, ensure that you have enabled the new mail sound in the Mail app settings. If you have disabled the sound notification, follow the steps outlined earlier to enable it.
With the new mail sound enabled, send a test email to your own email address. You can do this by composing a new email and addressing it to your own email account.
Once the test email is sent, wait for a moment. If the new mail sound is enabled, you should hear the selected sound playing when the email arrives in your inbox. Take note of the sound and adjust the volume accordingly to your preference.
Alternatively, you can ask someone to send you an email to test the new mail sound. This way, you can experience the notification sound in real-time when an email is received.
If the new mail sound does not play when a test email arrives, double-check the Mail app settings to ensure that the sound notification is enabled and the correct sound option is selected. You can also adjust the volume settings to make sure it is audible.
After testing the new mail sound, you can make any necessary adjustments to the settings if desired. To modify the settings, follow the steps outlined in the earlier sections of this article to access and modify the new mail sound option in the Mail app settings.
By testing the new mail sound setting, you can confirm whether the sound notification is functioning properly in the Mail app. This allows you to ensure that you will be properly alerted when new emails arrive, enabling you to stay on top of your inbox and respond promptly.
In summary, testing the new mail sound setting is a crucial step to verify that the sound notification is working as expected in the Mail app. By following the steps outlined in this section, you can easily test the new mail sound and confirm its functionality on your Windows 10 computer. Tailor your email notification experience and ensure that you are promptly notified of new emails with the tested and reliable new mail sound in the Mail app.