
Setting up a New Email Account
Setting up a new email account on your iPhone 10 is a straightforward process that allows you to seamlessly access your emails on the go. Whether you're setting up a personal or professional email account, the iPhone 10's intuitive interface makes the setup process a breeze. Here's a comprehensive guide to help you get started:
-
Navigate to Settings: Begin by tapping the "Settings" icon on your iPhone 10's home screen. The Settings icon resembles a gear and is typically located on the first page of your apps.
-
Select Mail: Once in the Settings menu, scroll down and select "Mail." This will open a new window with various mail settings and options.
-
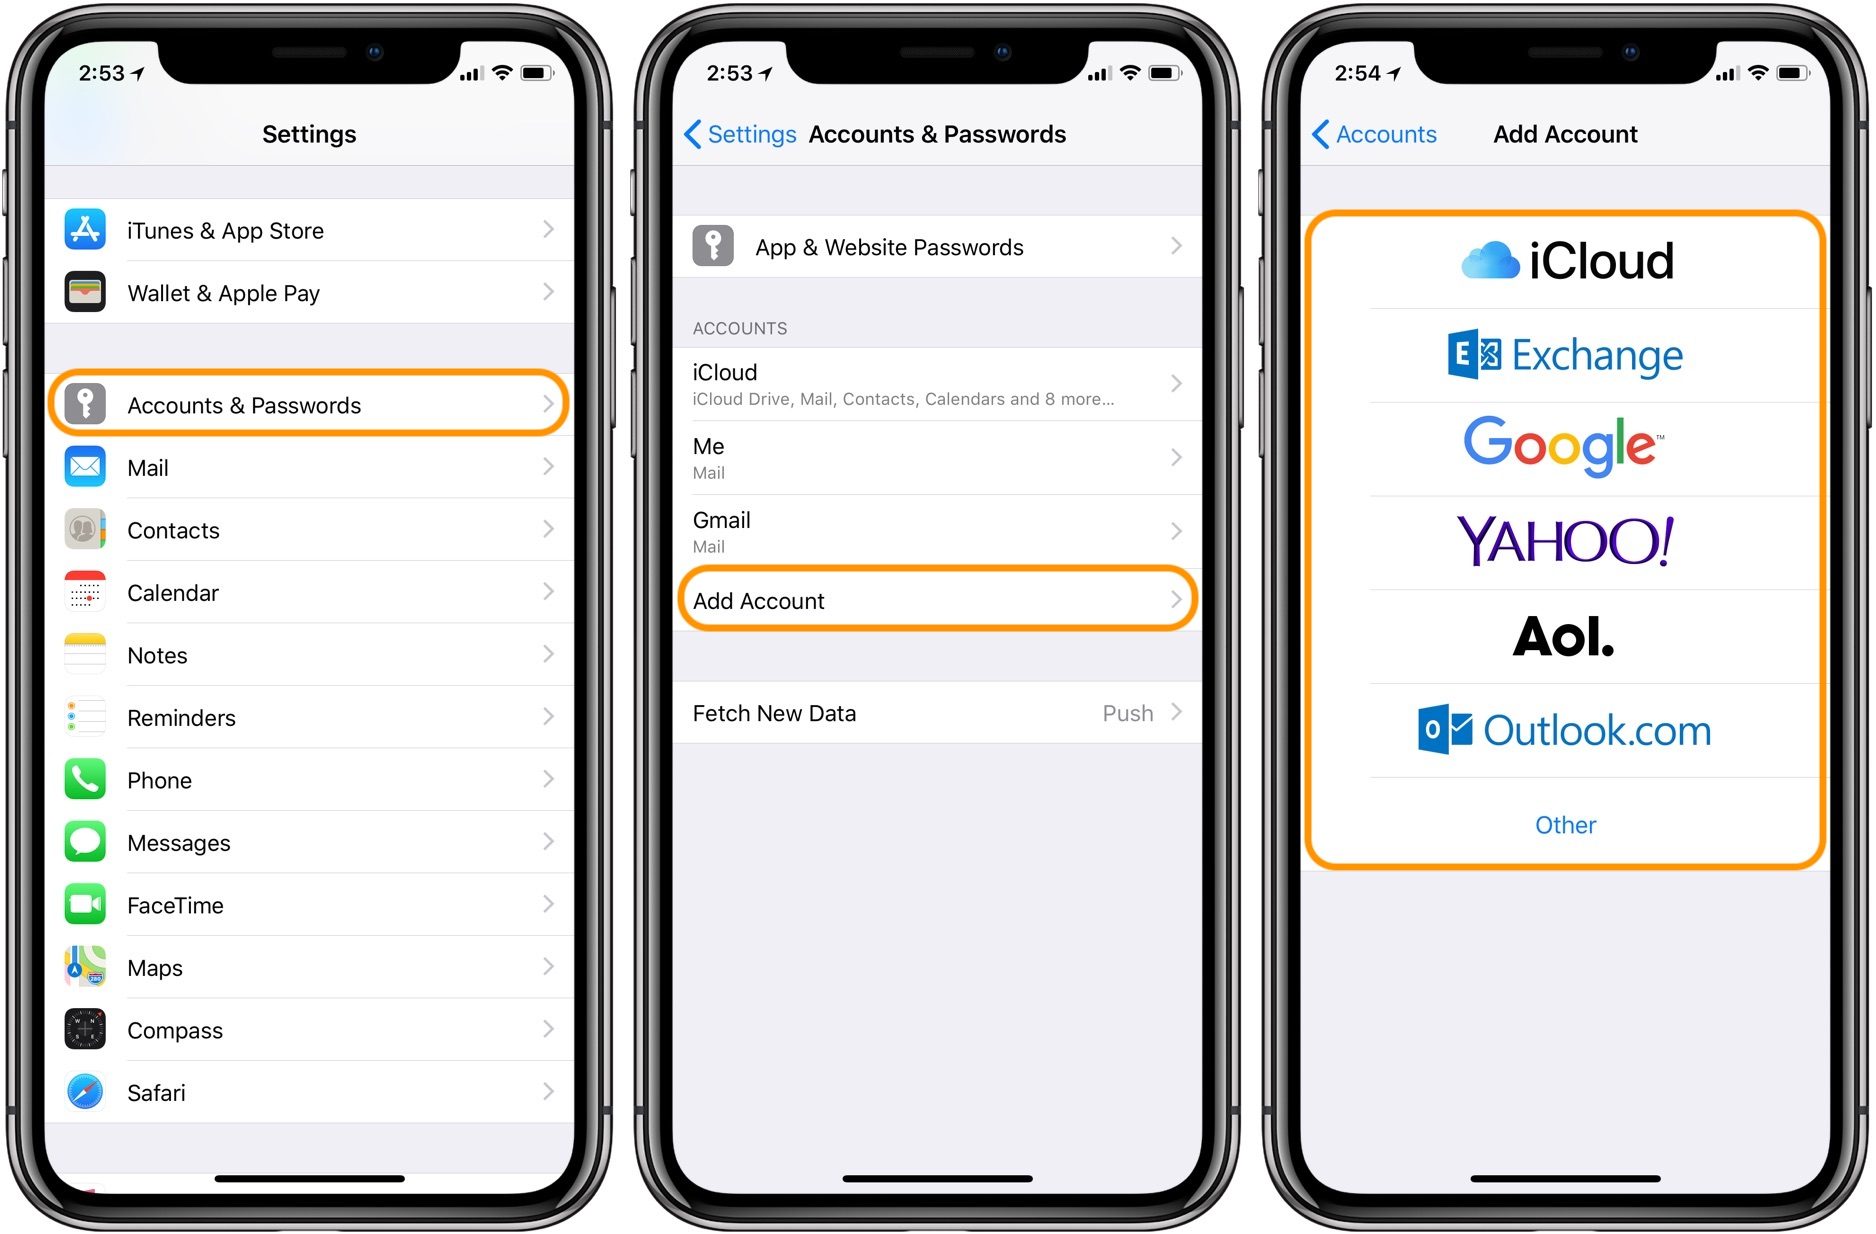
Choose Accounts: Within the Mail settings, tap "Accounts" to access the existing email accounts linked to your device. If this is your first time setting up an email account on your iPhone 10, this section will be empty.
-
Add Account: To add a new email account, tap "Add Account." You will be presented with a list of popular email service providers such as Google, Yahoo, Outlook, and more. Select your email service provider from the list. If your email provider is not listed, tap "Other" to manually configure the account.
-
Enter Account Details: After selecting your email service provider, enter your email address and password in the designated fields. Once done, tap "Next" to proceed.
-
Verify Settings: Your iPhone 10 will automatically attempt to configure the email settings based on the information provided. If the settings are successfully verified, you will be prompted to select the content you want to sync, such as Mail, Contacts, Calendars, and Notes.
-
Customize Sync Settings: Customize your sync settings based on your preferences. For instance, you can choose to sync only your email or include additional content such as contacts and calendars. Once you've made your selections, tap "Save" to complete the setup process.
-
Access Your Email: With the new email account successfully added to your iPhone 10, you can now access your emails by tapping the "Mail" app on your home screen. Your newly added email account will appear alongside any existing accounts, allowing you to effortlessly switch between multiple accounts with ease.
By following these simple steps, you can efficiently set up a new email account on your iPhone 10, ensuring that you stay connected and productive while on the move.
Configuring Email Settings on iPhone 10
Configuring email settings on your iPhone 10 is essential to ensure a seamless and personalized email experience. By customizing the settings to align with your preferences, you can optimize the way you send, receive, and manage emails directly from your device. Here's a detailed guide on how to configure email settings on your iPhone 10:
Accessing Mail Settings
To begin configuring your email settings, navigate to the "Settings" app on your iPhone 10's home screen. Once in the Settings menu, scroll down and tap "Mail." This will open a window where you can access various mail settings and options.
Selecting Email Account
Under the "Mail" settings, tap "Accounts" to view the list of email accounts linked to your iPhone 10. Select the email account for which you want to configure the settings. If you have multiple email accounts set up on your device, ensure that you choose the specific account you wish to customize.
Customizing Account Settings
Upon selecting the desired email account, you will be presented with a range of customization options. These settings may include options to adjust the email signature, notification preferences, mailbox behaviors, and more. Take the time to review each setting and tailor them to suit your individual requirements.
Email Signature
One of the key settings to personalize is the email signature. This feature allows you to create a custom sign-off that will be appended to all outgoing emails from the selected account. You can input your name, job title, contact information, or any other details you wish to include in your email signature.
Notification Preferences
Configuring notification preferences enables you to manage how you receive alerts for new emails. You can choose to enable or disable email notifications, select the notification style (banners, alerts, or none), and customize the sound or vibration pattern for email notifications.
Mailbox Behaviors
Adjusting mailbox behaviors allows you to specify how your iPhone 10 handles emails within the selected account. You can set preferences for drafts, sent, and deleted messages, as well as choose the default mailbox for viewing emails.
Advanced Settings
For more advanced customization, you can explore additional settings such as server port configurations, SSL settings, and other technical parameters. These settings are typically used when troubleshooting email connectivity issues or when specific server configurations are required.
Save Changes
Once you have customized the email settings to your satisfaction, ensure to save the changes by tapping the "Save" or "Done" button, depending on the specific setting you are modifying. Your iPhone 10 will then apply the updated settings to the selected email account.
By following these steps, you can effectively configure the email settings on your iPhone 10, tailoring the email experience to align with your preferences and requirements. Whether it's fine-tuning notification preferences or customizing mailbox behaviors, taking the time to personalize your email settings can significantly enhance your overall email management experience.
Managing Multiple Email Accounts on iPhone 10
Managing multiple email accounts on your iPhone 10 empowers you to stay organized and efficient, whether it's for personal communication, work-related correspondence, or both. With the iPhone 10's user-friendly interface, juggling multiple email accounts is a seamless experience. Here's a comprehensive guide on how to effectively manage multiple email accounts on your iPhone 10:
Accessing Email Accounts
To manage multiple email accounts, begin by accessing the "Mail" app on your iPhone 10's home screen. Upon launching the Mail app, you will be able to view all the email accounts that are currently linked to your device. Each account will be listed separately, allowing for easy navigation and management.
Unified Inbox
The iPhone 10 offers the convenience of a unified inbox, which consolidates emails from all linked accounts into a single view. This feature eliminates the need to switch between different inboxes, providing a centralized location to access and respond to emails from multiple accounts seamlessly.
Individual Account Management
While the unified inbox offers a consolidated view, you can also manage each email account individually. By tapping on a specific account within the Mail app, you can access and manage the emails, drafts, sent items, and other folders specific to that account. This allows for focused management tailored to each account's unique requirements.
Customizing Notifications
Customizing notifications for each email account enables you to differentiate between incoming emails from various sources. You can set distinct notification sounds, vibration patterns, and alert styles for each account, providing a clear indication of which account has received a new email.
Switching Between Accounts
The ability to seamlessly switch between multiple email accounts is a valuable feature of the iPhone 10. With just a few taps, you can navigate between different accounts within the Mail app, making it effortless to compose, reply to, or forward emails from the desired account.
Signature Management
Individualized email signatures for each account can be configured within the Mail settings. This allows you to personalize the sign-off for emails sent from each account, adding a professional touch to your correspondence while maintaining consistency across multiple accounts.
Account-Specific Settings
Each email account can have its own set of customized settings, including mailbox behaviors, sync preferences, and server configurations. This level of granularity ensures that each account operates according to its unique requirements, optimizing the email management experience.
By leveraging these features and functionalities, you can efficiently manage multiple email accounts on your iPhone 10, streamlining your communication and ensuring that you stay on top of your emails, whether they are personal, professional, or both.