
Creating an Apple ID
Creating an Apple ID is an essential step for anyone diving into the Apple ecosystem, especially if you're a Google Gmail user transitioning to an iPhone 10. Your Apple ID is the key to accessing various Apple services, including the App Store, iTunes, iCloud, and more. Here's a comprehensive guide to help you set up your Apple ID seamlessly.
-
Accessing the Apple ID Creation Page: To begin, open the App Store on your iPhone 10 and navigate to the "Create Apple ID" option. Alternatively, you can visit the Apple ID account website using a web browser on your computer.
-
Personal Information: You'll be prompted to enter your personal details, including your name, date of birth, and email address. Since you're a Google Gmail user, you can use your existing Gmail address as your Apple ID email.
-
Security and Verification: Next, you'll need to set up security questions and verify your identity. This step is crucial for protecting your account and ensuring that you can regain access in case you forget your password.
-
Password Creation: Choose a strong password for your Apple ID. It's advisable to use a unique password that you haven't used for any other accounts to enhance security.
-
Agree to Terms and Conditions: After entering your details, you'll need to agree to Apple's terms and conditions. Take the time to review these terms to understand your rights and responsibilities as an Apple user.
-
Verification Email: Once you've completed the form, Apple will send a verification email to the Gmail address you provided. Simply open the email and click on the verification link to confirm your Apple ID.
-
Two-Factor Authentication: For added security, consider enabling two-factor authentication for your Apple ID. This feature provides an extra layer of protection by requiring a verification code in addition to your password when signing in.
By following these steps, you can successfully create your Apple ID and gain access to a myriad of Apple services. With your Apple ID in place, you'll be ready to explore the full potential of your iPhone 10 and seamlessly integrate your Google Gmail account with Apple's ecosystem.
Setting Up Google Gmail on iPhone 10
Setting up your Google Gmail account on your iPhone 10 is a straightforward process that allows you to seamlessly access your emails, contacts, and calendar events while on the go. As a Google Gmail user, integrating your account with your iPhone 10 enables you to stay connected and organized across platforms. Here's a step-by-step guide to help you set up Google Gmail on your iPhone 10 effortlessly.
-
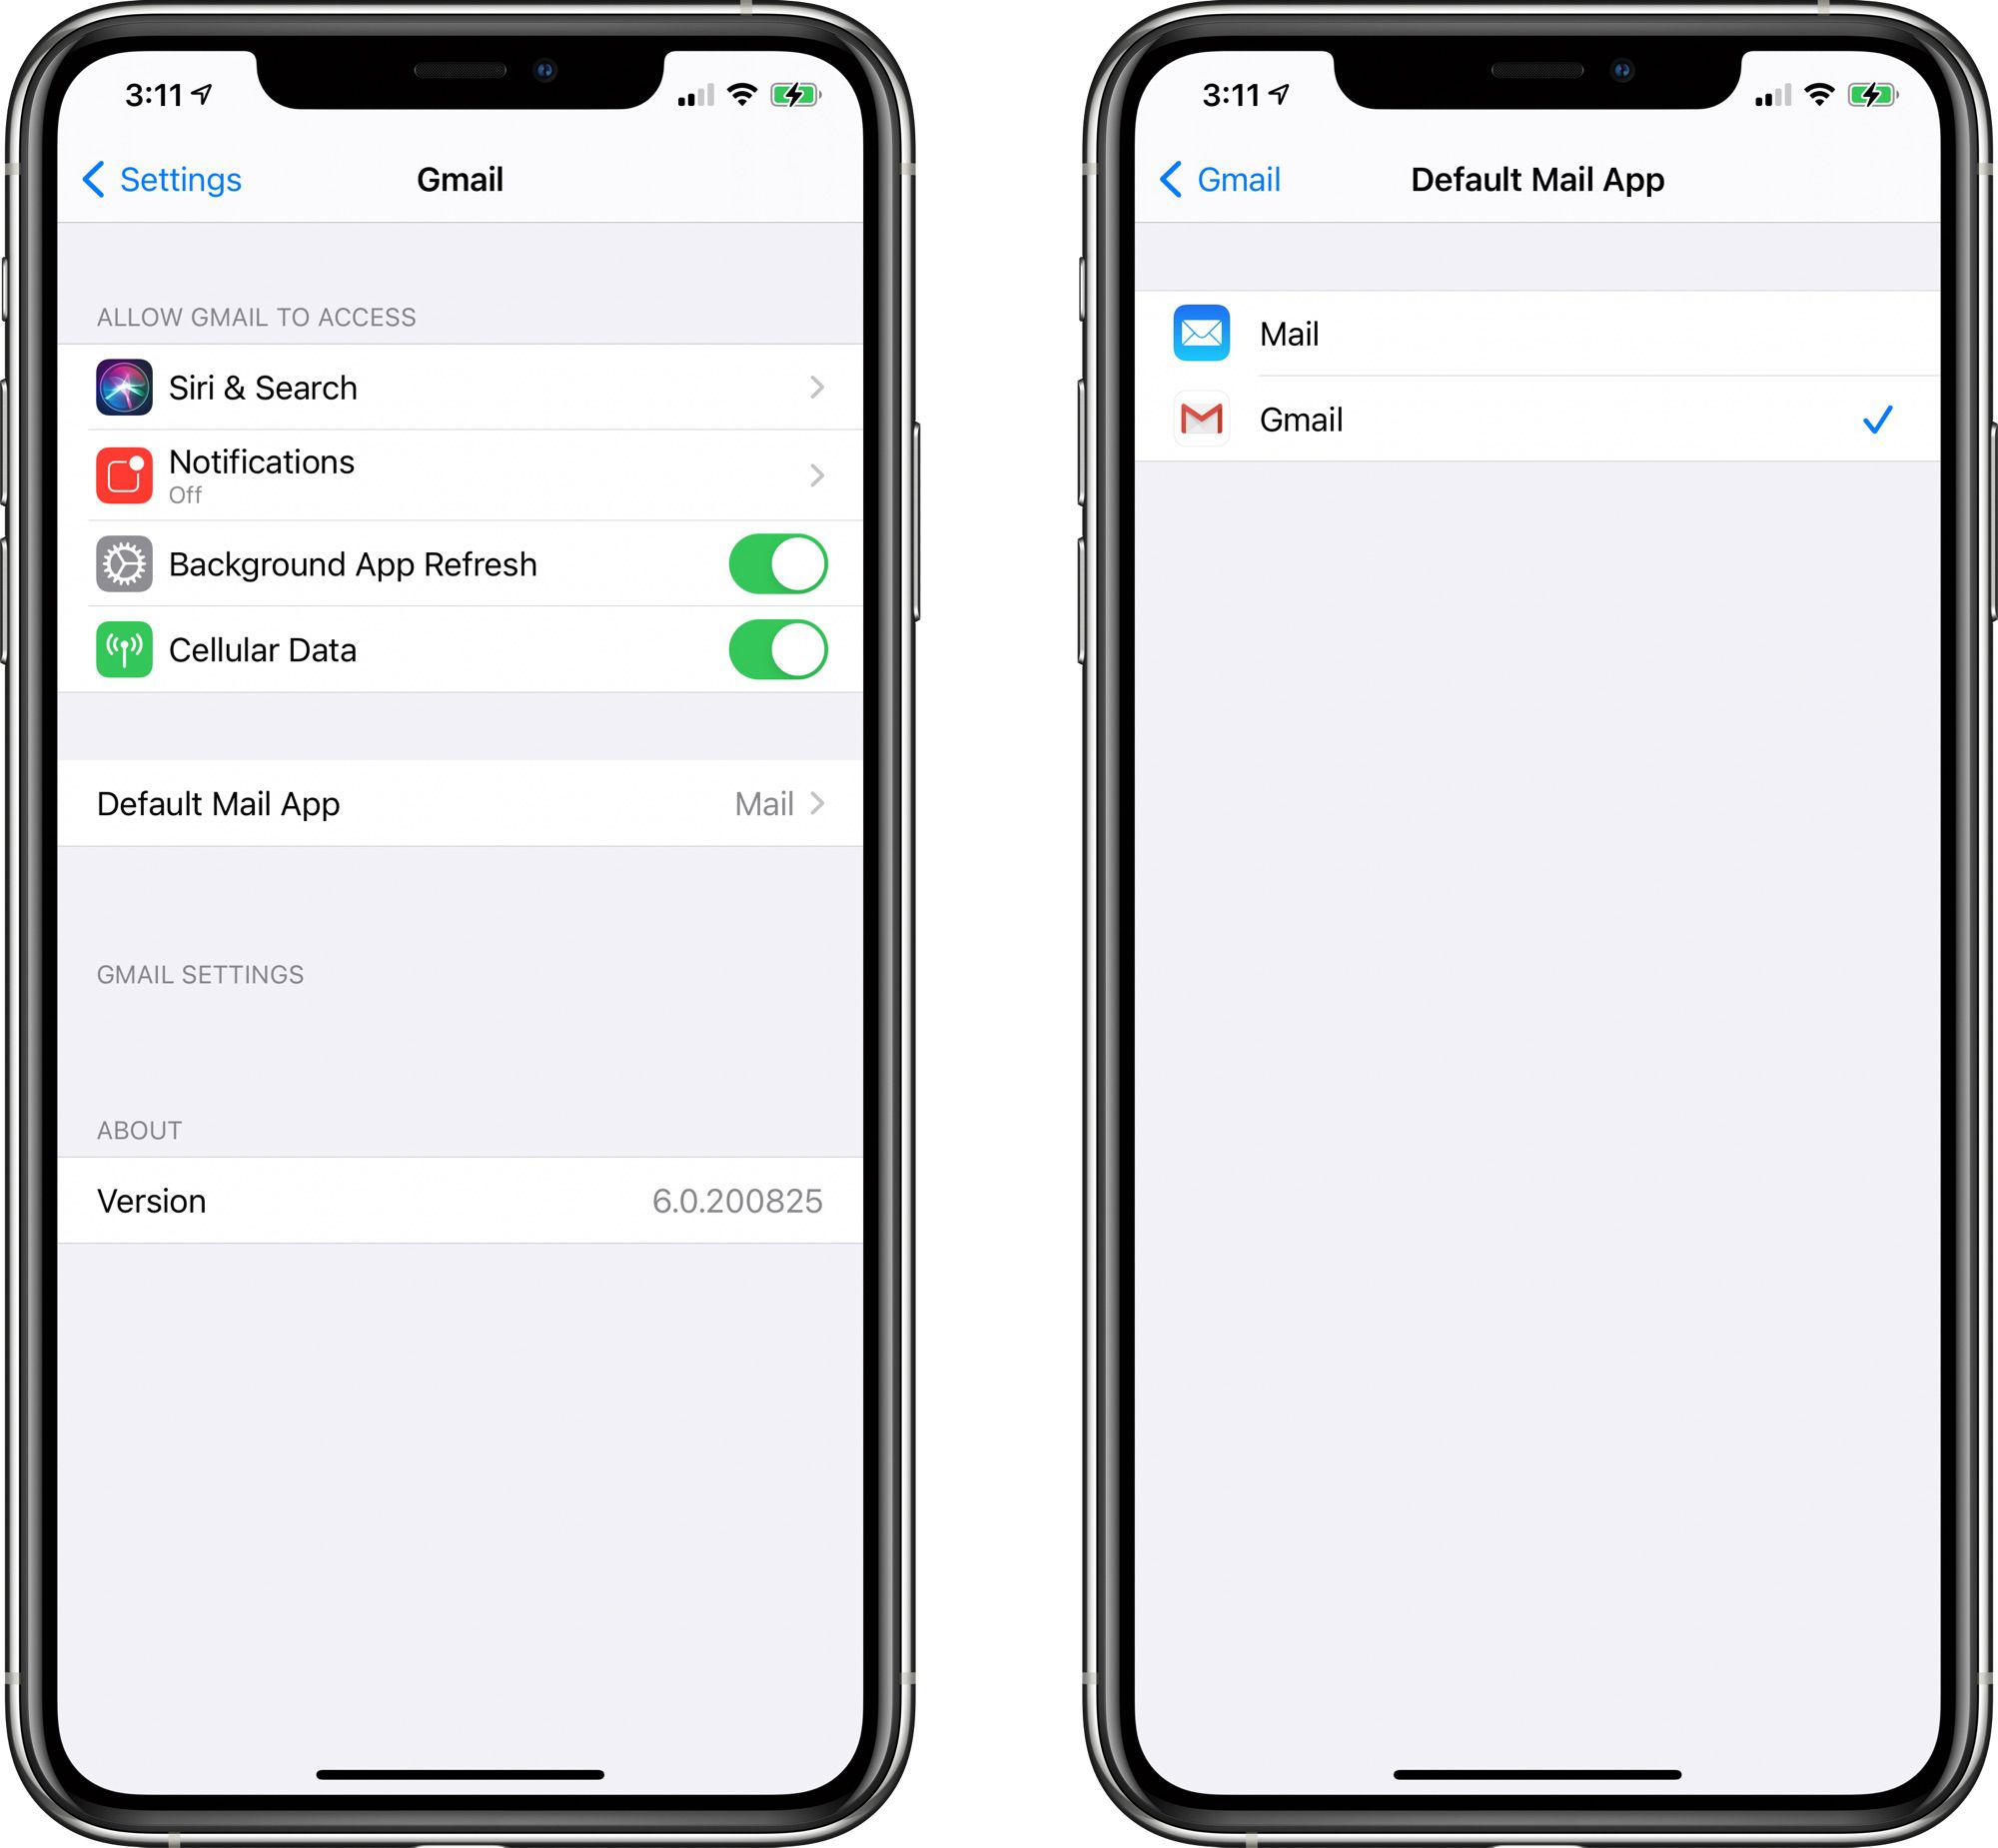
Accessing the Settings: Begin by unlocking your iPhone 10 and locating the "Settings" app on the home screen. The Settings app is represented by a gear icon and serves as the control center for various configurations on your device.
-
Selecting Mail: Within the Settings menu, scroll down and tap on "Mail." This will open a new window where you can manage your email accounts and settings related to the Mail app on your iPhone 10.
-
Adding Account: Under the Mail settings, select "Accounts" and then tap on "Add Account." You will be presented with a list of email service providers, including Google. Tap on "Google" to initiate the setup process for your Gmail account.
-
Signing In: Enter your Google account credentials, including your Gmail address and password, in the designated fields. Once you've provided the required information, tap "Next" to proceed to the next step.
-
Granting Permissions: Your iPhone 10 will request permission to access your Google account. This includes your email, contacts, and calendar. Grant the necessary permissions to ensure that your Gmail account is fully integrated with your device.
-
Sync Options: After granting permissions, you can customize the sync settings for your Gmail account. This allows you to choose which data, such as emails, contacts, and calendar events, you want to sync with your iPhone 10. Once you've made your selections, tap "Save" to confirm the settings.
-
Verification: Depending on your security settings, you may be required to complete a verification step to ensure the security of your Google account. This could involve entering a verification code sent to your registered mobile number or email address.
-
Completion: Once you've successfully completed the setup process, your Google Gmail account will be added to the Mail app on your iPhone 10. You can now access your Gmail emails, contacts, and calendar events directly from your device.
By following these steps, you can seamlessly integrate your Google Gmail account with your iPhone 10, ensuring that you stay connected and organized while leveraging the capabilities of both platforms. With your Gmail account set up on your iPhone 10, you'll be ready to harness the power of seamless communication and productivity across your devices.
Syncing Google Contacts and Calendar with iPhone 10
Syncing your Google Contacts and Calendar with your iPhone 10 is a pivotal step in ensuring that your essential contact information and upcoming events are readily accessible across both platforms. By seamlessly integrating these elements, you can streamline your communication and stay organized with ease. Here's a detailed guide to help you sync your Google Contacts and Calendar with your iPhone 10 effortlessly.
Syncing Google Contacts
-
Accessing Settings: Begin by navigating to the "Settings" app on your iPhone 10's home screen. Scroll down and tap on "Contacts" to access the Contacts settings.
-
Adding Account: Under the Contacts settings, tap on "Accounts" and then select "Add Account." Choose "Google" from the list of account types to initiate the setup process for syncing your Google Contacts.
-
Signing In: Enter your Google account credentials, including your Gmail address and password, in the provided fields. Once you've provided the required information, tap "Next" to proceed.
-
Enabling Contacts Sync: After signing in, you'll be prompted to enable the sync for your Google Contacts. Toggle the "Contacts" option to enable synchronization between your Google Contacts and your iPhone 10.
-
Verification: Depending on your security settings, you may need to complete a verification step to ensure the security of your Google account. This could involve entering a verification code sent to your registered mobile number or email address.
-
Completion: Once you've successfully completed the setup process, your Google Contacts will be synced with the Contacts app on your iPhone 10. You can now access and manage your Google Contacts seamlessly from your device.
Syncing Google Calendar
-
Accessing Settings: Similar to the process for syncing Google Contacts, start by accessing the "Settings" app on your iPhone 10's home screen. Scroll down and tap on "Calendar" to access the Calendar settings.
-
Adding Account: Under the Calendar settings, tap on "Accounts" and then select "Add Account." Choose "Google" from the list of account types to initiate the setup process for syncing your Google Calendar.
-
Signing In: Enter your Google account credentials, including your Gmail address and password, in the provided fields. Tap "Next" to proceed to the next step.
-
Enabling Calendar Sync: After signing in, you'll be prompted to enable the sync for your Google Calendar. Toggle the "Calendar" option to enable synchronization between your Google Calendar and your iPhone 10.
-
Verification: As with the Contacts sync, you may need to complete a verification step based on your security settings to ensure the security of your Google account.
-
Completion: Once you've successfully completed the setup process, your Google Calendar will be synced with the Calendar app on your iPhone 10. You can now view and manage your Google Calendar events seamlessly from your device.
By following these steps, you can seamlessly sync your Google Contacts and Calendar with your iPhone 10, ensuring that your essential contact information and upcoming events are readily accessible across both platforms. This integration empowers you to stay organized and connected, leveraging the capabilities of both Google and Apple ecosystems to enhance your productivity and communication.
Using Google Gmail with Apple Mail App
Integrating your Google Gmail account with the Apple Mail app on your iPhone 10 offers a seamless and convenient way to manage your emails while harnessing the capabilities of both platforms. The Apple Mail app provides a user-friendly interface and robust features that complement the functionality of your Gmail account. Here's a detailed exploration of how you can effectively use Google Gmail with the Apple Mail app on your iPhone 10.
Adding Gmail Account to Apple Mail
To begin using Google Gmail with the Apple Mail app, you'll need to add your Gmail account to the Mail app on your iPhone 10. Start by opening the Settings app and scrolling down to select "Mail." Under the Accounts section, tap "Add Account" and choose "Google" as the account type. Enter your Gmail address and password, and the Mail app will automatically configure the settings to sync your Gmail account.
Accessing Gmail Features
Once your Gmail account is added to the Apple Mail app, you can seamlessly access your inbox, sent items, drafts, and other folders directly from the Mail interface. The app provides a unified view of all your email accounts, allowing you to effortlessly switch between your Gmail and other accounts, if any, with just a few taps.
Managing Emails
The Apple Mail app offers robust email management features that enhance your Gmail experience. You can easily compose new emails, reply to messages, forward emails, and organize your inbox using folders and labels. The intuitive interface of the Mail app ensures that you can efficiently navigate through your Gmail messages and perform various actions with ease.
Integration with Apple Ecosystem
By using Google Gmail with the Apple Mail app, you can leverage the seamless integration with other Apple services and apps. For instance, you can directly share content from other apps via email, and the Mail app seamlessly integrates with the Calendar app, allowing you to create events and set reminders based on your Gmail communications.
Notifications and Sync
The Apple Mail app ensures that you stay updated with real-time notifications for your Gmail account. You can customize the notification settings to receive alerts for new emails, ensuring that you never miss important messages. Additionally, the app's synchronization capabilities keep your Gmail account data up to date, providing a consistent experience across devices.
Security and Privacy
The Apple Mail app prioritizes the security and privacy of your Gmail account. It employs robust encryption protocols to safeguard your email communications and ensures that your Gmail credentials are securely stored on your iPhone 10. This commitment to security enhances the overall Gmail experience within the Apple ecosystem.
By effectively using Google Gmail with the Apple Mail app on your iPhone 10, you can streamline your email management and enjoy a cohesive experience that seamlessly integrates the functionalities of both platforms. This integration empowers you to stay connected, organized, and productive while leveraging the strengths of Google Gmail and the Apple ecosystem.
Managing Google Gmail Notifications on iPhone 10
Managing Google Gmail notifications on your iPhone 10 is essential for staying informed about new emails and ensuring that you can promptly attend to important messages. By customizing the notification settings for your Gmail account, you can optimize your email management experience and ensure that you receive timely alerts without being overwhelmed by unnecessary distractions.
Configuring Notification Settings
To manage Gmail notifications on your iPhone 10, start by accessing the Settings app and scrolling down to select "Mail." Under the Mail settings, tap on "Notifications" to access the notification preferences for your email accounts. Locate your Gmail account from the list of accounts and tap on it to customize the notification settings specifically for your Gmail account.
Enabling Notifications
Within the Gmail notification settings, you can enable various types of notifications, including banners, sounds, badges, and alerts. Banners provide a temporary visual notification at the top of the screen, while sounds and badges offer auditory and visual cues, respectively. Alerts, on the other hand, display a pop-up notification that requires user interaction to dismiss.
Customizing Notification Style
You can further customize the notification style for your Gmail account by choosing how notifications are displayed when your iPhone 10 is unlocked. You have the option to display notifications as banners or in the notification center, allowing you to tailor the notification presentation based on your preferences and usage patterns.
Managing Notification Previews
The Mail app on iPhone 10 allows you to manage notification previews for your Gmail account. You can choose to show or hide the email content in notifications, providing flexibility in balancing privacy and convenience. By customizing notification previews, you can ensure that sensitive email content remains private while still receiving essential alerts.
Notification Grouping
With the introduction of iOS 12 and later versions, the Mail app supports notification grouping, which organizes notifications from the same app into stacks. This feature streamlines the notification experience, preventing your screen from being cluttered with individual alerts and allowing you to manage Gmail notifications more efficiently.
Do Not Disturb
The iPhone 10's Do Not Disturb feature enables you to temporarily silence notifications, ensuring uninterrupted focus during specific times or activities. By utilizing Do Not Disturb, you can establish quiet periods during which Gmail notifications are muted, allowing you to concentrate on tasks without interruptions.
By effectively managing Google Gmail notifications on your iPhone 10, you can optimize your email management experience and ensure that you stay informed about important messages while maintaining control over your notification preferences. Customizing the notification settings empowers you to strike a balance between staying informed and minimizing distractions, ultimately enhancing your productivity and communication efficiency.