
Advancements in Technology
Rapid technological advancements have revolutionized the world of projection. Gone are the days of bulky film projectors and dimly lit screenings. In their place, we now have the cutting-edge technology of digital projection, which has significantly enhanced the quality and versatility of projected images.
One of the major advancements in digital projection is the shift from using traditional film reels to digital files. This transition has eliminated the need for physical film prints, which were prone to deterioration and required frequent replacement. Digital files, on the other hand, can be stored and transmitted easily, ensuring consistent quality and longevity.
The evolution of display resolutions has also contributed to the advancements in digital projection. High-definition (HD) projectors, with resolutions of 1920×1080 pixels or higher, have become the norm, offering crisp and detailed images. Additionally, the emergence of 4K and even 8K projectors has further heightened the visual experience, bringing unparalleled clarity and depth to projected content.
Another notable advancement is the improvement in color reproduction. Digital projectors now employ advanced color enhancement technologies, such as High Dynamic Range (HDR) and Wide Color Gamut (WCG), resulting in more vibrant and lifelike colors on the screen. This enhancement is particularly beneficial in applications such as movie theaters and auditoriums, where visual impact plays a crucial role.
Furthermore, the advent of laser projection technology has brought major breakthroughs in brightness and contrast levels. Laser projectors produce significantly higher light output compared to traditional lamp-based projectors, resulting in brighter and more impactful images, even in well-lit environments. Additionally, laser projectors offer superior contrast ratios, enabling deeper blacks and sharper image details.
Lastly, advancements in connectivity options have greatly enhanced the versatility of digital projection. Projectors now come equipped with various input ports, allowing seamless integration with a wide range of devices, including laptops, smartphones, and gaming consoles. Additionally, wireless connectivity options, such as Wi-Fi and Bluetooth, have made it easier to stream and display content without the need for physical connections.
Definition of Digital Projection
Digital projection is a technology that utilizes digital files to project images, videos, and other forms of visual content onto a screen or surface. It replaces the traditional method of using film reels, offering numerous advantages in terms of quality, versatility, and convenience.
At its core, digital projection involves converting digital files into visible images. These digital files can be in various formats, such as JPEG, MPEG, or AVI, and they can be stored on various storage devices like hard drives, USB flash drives, or even cloud storage.
Unlike traditional film projection, which required the physical handling and storage of film reels, digital projection eliminates the need for physical media. Instead, the digital files are stored electronically, allowing for easy access and seamless distribution. This makes it more convenient for filmmakers, content creators, and movie distributors to produce, distribute, and showcase their work.
One of the key components of digital projection is the digital projector itself. This device uses advanced technology to display the digital files as projected images on a screen. The digital projector takes the digital information from the file and processes it to generate the visual output.
The digital projection process involves several steps. First, the digital files are loaded onto a media player or connected device that is compatible with the projector. The projector receives the digital signal and processes it, converting the binary code into visual pixels. These pixels are then projected onto the screen, creating a detailed and vibrant representation of the original digital content.
Furthermore, digital projection offers the flexibility to adjust various aspects of the projected image, such as size, aspect ratio, and brightness, to meet the specific requirements of the setting or audience. This adaptability makes digital projection suitable for a wide range of applications, including movie theaters, conference rooms, classrooms, museums, and entertainment venues.
How Digital Projection Works
Digital projection is a complex process that involves a series of steps to convert digital files into visible images. Understanding how digital projection works can provide insights into the technology behind this transformative visual display method.
The process of digital projection begins with the preparation of the digital content. This content can be in the form of videos, images, or presentations, and it needs to be stored in a compatible format, such as JPEG, MPEG, or AVI. The digital files are typically stored on a media player, a computer, or a storage device connected to the projector.
Once the digital content is ready, it is sent to the digital projector for display. The projector receives the digital signal and processes it using advanced technology. The first step is to convert the digital information into pixels, which are the building blocks of the projected image.
The projector’s imaging system, consisting of a light source and an imaging panel, plays a crucial role in the conversion process. The light source, which can be a lamp or a laser diode, produces a beam of light. This light passes through the imaging panel, which is typically an LCD (Liquid Crystal Display) or DLP (Digital Light Processing) panel.
The imaging panel modulates the light beam by selectively allowing or blocking certain portions of the light. This modulation is based on the digital information it receives, representing the colors and brightness levels of the projected image. The modulated light beam then passes through a lens system, which focuses and projects the image onto a screen or surface.
The projected image consists of millions of pixels, each representing a small portion of the overall content. The speed and precision at which these pixels are projected onto the screen determine the image’s overall quality and clarity.
In addition to displaying the pixels accurately, digital projectors also have the ability to enhance the image quality. They use various image processing techniques, such as color correction, edge enhancement, and noise reduction, to optimize the visual representation of the digital content.
Moreover, digital projectors offer flexibility in terms of adjusting the size, aspect ratio, and brightness of the projected image. This allows for customization according to the specific requirements of the environment or audience.
Benefits of Digital Projection
Digital projection has gained immense popularity due to the numerous benefits it offers over traditional projection methods. From enhanced image quality to increased versatility, digital projection has transformed the way visual content is displayed. Here are some key benefits of digital projection:
1. Image Quality: Digital projectors provide stunning image quality, with high-resolution displays and vibrant colors. The use of advanced imaging panels and image processing techniques ensures sharpness, clarity, and accurate color reproduction, resulting in a visually captivating experience.
2. Versatility: Digital projection offers unparalleled versatility, as it can display not only movies but also various forms of visual content such as presentations, images, and interactive media. The ability to project a wide range of content makes it ideal for classrooms, conference rooms, museums, and entertainment venues.
3. Accessibility: With digital projection, accessing and distributing content becomes significantly easier. Digital files can be stored electronically and easily transferred between devices, eliminating the need for physical reels or prints. This accessibility allows for quick and efficient content sharing, making it convenient for content creators, distributors, and consumers.
4. Scalability: Digital projection systems can be seamlessly scaled up or down to accommodate different screen sizes. From small classrooms to large auditoriums, the image size can be adjusted to fit the viewing area, maintaining the quality and clarity of the projected image at any scale.
5. Cost Efficiency: While the initial investment in digital projection equipment may be higher, digital projection offers long-term cost savings. Digital files are reusable and have a longer lifespan compared to traditional film reels, which require frequent replacements. Additionally, the maintenance and operational costs of digital projectors are generally lower compared to traditional projection systems.
6. Improved Audiovisual Integration: Digital projection systems can be seamlessly integrated with advanced audio systems, creating a complete immersive experience. With synchronized audio and visual elements, digital projection enhances the impact of movies, presentations, and live performances.
7. Environmental Friendliness: Digital projection significantly reduces environmental impact by eliminating the need for physical film prints. This reduces excess waste and the use of hazardous chemicals in the film development process. Furthermore, digital projectors use energy-saving technologies, contributing to a greener and more sustainable approach to projection.
Applications of Digital Projection
Digital projection has found numerous applications across various industries and settings, transforming the way visual content is presented and experienced. From entertainment to education, here are some key applications of digital projection:
1. Movie Theaters: Digital projection has revolutionized the movie industry, replacing traditional film projectors with digital cinema systems. The high-resolution displays and immersive audiovisual experiences provided by digital projection enhance the movie-watching experience, attracting audiences to theaters.
2. Educational Institutions: Digital projection has become an invaluable tool in education. With interactive whiteboards and digital projectors, teachers can deliver engaging lessons, showcase multimedia content, and create immersive learning environments. Visual aids and digital presentations enable students to grasp complex concepts more effectively.
3. Business Presentations: Digital projection is widely used in boardrooms and conference rooms for business presentations. Digital projectors allow professionals to showcase their ideas, products, and data on larger screens, enhancing audience engagement and understanding. The versatility of digital projection enables seamless integration with various devices and presentation software.
4. Museums and Galleries: Digital projection has transformed the museum and gallery experience, bringing art and history to life. Digital projectors are used to display high-resolution images and videos, enabling visitors to interact with immersive exhibits and multimedia installations. This creates a dynamic and engaging environment for learning and appreciation.
5. Entertainment Venues: Digital projection is utilized in entertainment venues such as concert halls and theaters to deliver captivating live performances. The combination of digital projection with synchronized audio systems creates mesmerizing visual displays that enhance the overall entertainment value.
6. Advertising and Marketing: Digital projection is an effective tool for advertising and marketing campaigns. Digital projectors can be used to display advertisements on large buildings, screens, or even projection mapping on unique surfaces. The dynamic and eye-catching nature of digital projection helps brands capture the attention of the audience in a memorable way.
7. Virtual Reality and Simulation: Digital projection plays a crucial role in virtual reality (VR) and simulation applications. High-resolution projection systems combined with VR technology create immersive environments for training, simulations, and gaming. The realistic visuals generated by digital projection provide an unparalleled virtual experience.
8. Live Events and Performances: From music concerts to theatrical performances, digital projection adds a captivating visual dimension to live events. It can be used for backdrop projections, stage visuals, and even to create interactive experiences with the audience. The versatility and flexibility of digital projection enhance the overall impact and engagement of the event.
9. Home Theater Systems: Digital projection has also made its way into home entertainment setups. Home theater projectors allow individuals to enjoy the immersive cinematic experience in the comfort of their homes. The big-screen visuals and high-quality display of digital projection systems elevate movie nights and gaming experiences.
The applications of digital projection continue to expand as technology advances and new creative possibilities emerge. Its versatility, enhanced visual quality, and immersive experiences make it a valuable tool in a wide range of industries and settings.
Digital Projection vs. Traditional Projection
When it comes to projecting images and videos, there are two primary methods: digital projection and traditional projection. While both methods aim to display visual content, there are significant differences between the two. Here’s a comparison of digital projection and traditional projection:
1. Image Quality: Digital projection offers superior image quality compared to traditional projection methods. Digital projectors can display high-definition and even 4K content, resulting in sharper visuals with more vibrant colors and finer details. Traditional projection, on the other hand, may suffer from image degradation due to film wear-and-tear or lower resolution limitations.
2. Content Storage and Accessibility: Traditional projection relies on physical film reels that require careful handling, storage, and transportation. Digital projection, however, utilizes digital files that can be easily stored, transferred, and duplicated. This accessibility allows for quick and efficient content sharing and eliminates the risk of film damage or loss.
3. Flexibility: Digital projection offers greater flexibility in terms of content versatility and customization. Digital projectors can display a wide range of media types, such as videos, images, and presentations, allowing for a seamless transition between different types of content. Traditional projection, on the other hand, is primarily limited to film reels and typically requires dedicated projectors for specific formats.
4. Scalability: Digital projection systems can be easily scaled up or down to accommodate different screen sizes and viewing distances. The size and position of the projected image can be adjusted to fit the specific requirements of the venue or audience. Traditional projection, on the other hand, may require different lenses or projectors to achieve similar adjustments.
5. Cost Efficiency: While the initial investment in digital projection equipment may be higher, digital projection offers long-term cost savings. Digital files are reusable and have a longer lifespan compared to film reels, which require frequent replacements. Additionally, the maintenance and operational costs of digital projectors are generally lower than those of traditional projection systems.
6. Integration and Connectivity: Digital projection systems offer seamless integration with other digital devices and technologies. They can easily connect to computers, laptops, media players, and other devices via various input ports or wireless connections. Traditional projection may require additional equipment or adapters to achieve the same level of connectivity.
7. Environmental Impact: Digital projection has a significantly smaller environmental impact compared to traditional projection. Digital files eliminate the need for physical film production, reducing waste and the use of chemicals in the film development process. Digital projectors also incorporate energy-saving technologies, contributing to a greener and more sustainable projection solution.
Components of a Digital Projection System
A digital projection system consists of several key components that work together seamlessly to create a captivating visual experience. Understanding these components can help in selecting and setting up an efficient and effective digital projection system. Here are the main components of a digital projection system:
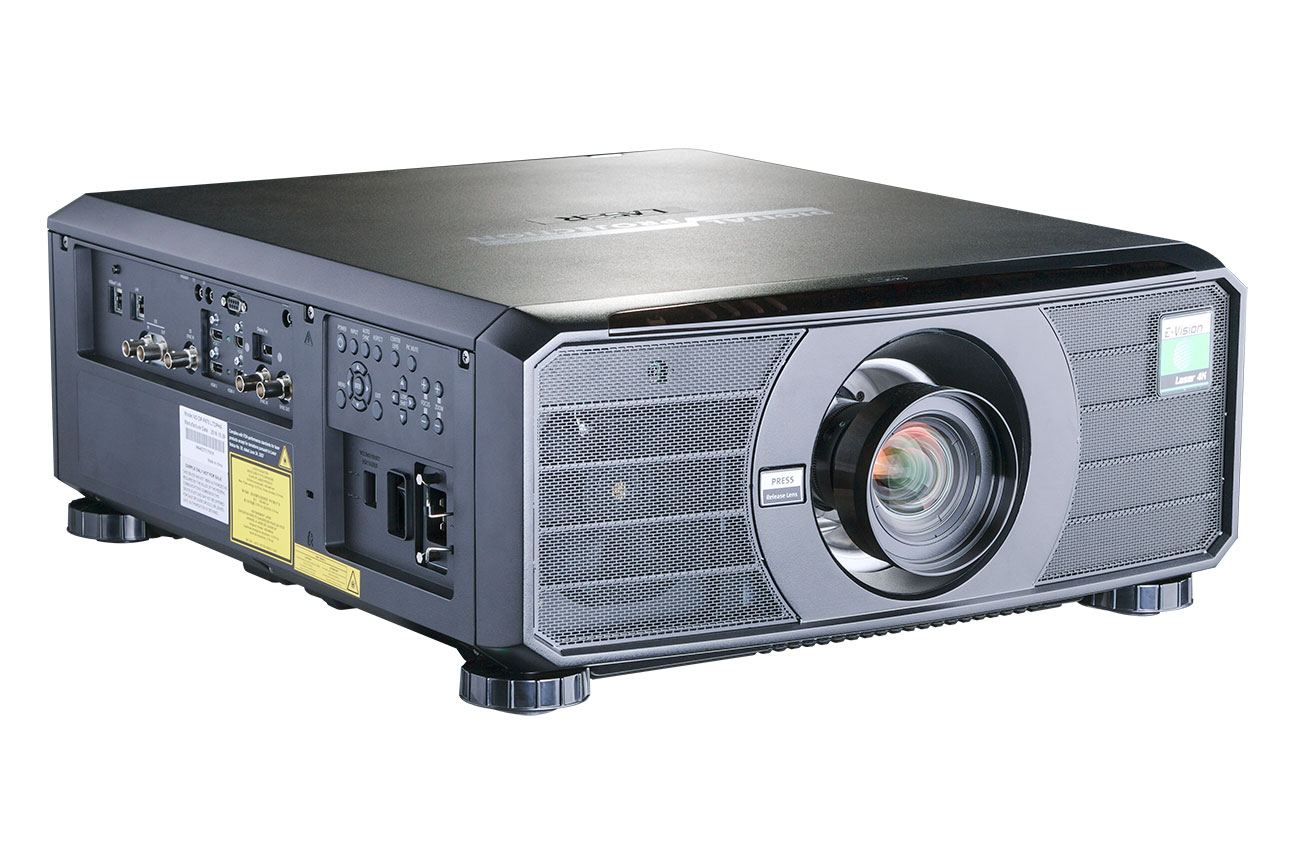
1. Digital Projector: The digital projector is the central component of the system. It receives digital input signals and converts them into visible images. Digital projectors come in various types and models, including LCD, DLP, and laser projectors. They have different specifications and features that affect image quality, brightness, contrast, and connectivity options.
2. Media Player or Content Source: The media player or content source is responsible for storing and delivering the digital content to the digital projector. It can be a computer, a streaming device, a Blu-ray player, or any other device capable of playing digital files. The media player should be compatible with the projection system and have the necessary output ports for connecting to the projector.
3. Screen or Projection Surface: The screen or projection surface plays a crucial role in displaying the projected images. It should be carefully selected to complement the projector and optimize the image quality. Factors to consider when choosing a screen include size, aspect ratio, gain, and viewing angles. Screens can be fixed or retractable, and they are available in various materials and designs.
4. Mounting and Positioning Equipment: Mounting and positioning equipment includes brackets, ceiling mounts, and other accessories that secure and position the projector. Proper mounting ensures stability and allows for precise alignment of the projected image onto the screen. Mounting equipment should be chosen based on the projector’s weight and the desired location for installation.
5. Cables and Connectors: Cables and connectors are essential for connecting the various components of the digital projection system. HDMI cables are commonly used for transmitting video and audio signals between the media player and the projector. Other types of cables used may include VGA, DisplayPort, or DVI cables, depending on the compatibility of the devices being connected.
6. Audio System: An audio system is often necessary to complement the visual experience of the digital projection system. This may include speakers, amplifiers, and sound processing equipment. The audio system should be capable of delivering clear and immersive sound, synchronizing with the projected images to create a complete audiovisual experience.
7. Control Systems: Control systems allow for easy operation and management of the digital projection system. This may involve remote control devices, touch panels, or computer-based control interfaces. Control systems facilitate functions such as adjusting volume, switching inputs, managing settings, and controlling multiple projectors simultaneously.
8. Ambient Lighting Control: In environments where ambient lighting can impact image quality, ambient lighting control devices or techniques may be used. These can include curtains or blinds to darken the space, light diffusion materials to optimize the screen’s performance, or ambient light sensors that automatically adjust the projector’s brightness and contrast based on the ambient lighting conditions.
9. Power Management: A digital projection system requires proper power management to ensure the reliable operation of all components. This may involve surge protectors, power conditioning devices, and uninterruptible power supply (UPS) units. Power management systems help protect the equipment from electrical fluctuations and provide backup power during power outages.
Overall, by considering the specific requirements and selecting the right components, a digital projection system can deliver exceptional visual experiences in diverse settings, including cinemas, classrooms, conference rooms, and entertainment venues.
Choosing the Right Digital Projector
Choosing the right digital projector is essential for achieving optimal image quality and performance in a digital projection system. With a range of options available, it’s important to consider several factors before making a decision. Here are key considerations when selecting a digital projector:
1. Resolution: The resolution of the projector determines the level of detail and clarity in the projected image. Higher resolutions, such as Full HD (1920×1080 pixels) or 4K UHD (3840×2160 pixels), offer sharper and more lifelike visuals. Select a projector with a resolution that suits the intended usage and the available content.
2. Brightness: The brightness of the projector is measured in ANSI lumens and determines how well the projected image will be visible in various environments. Consider the lighting conditions and the size of the projection screen when choosing the brightness level. A higher lumen output is suitable for well-lit spaces or larger screens, while a lower brightness may suffice for smaller rooms with controlled lighting.
3. Contrast Ratio: The contrast ratio represents the difference between the darkest and brightest areas of the projected image. A higher contrast ratio provides more defined details and a better depth of color. Consider the desired level of image richness and the lighting conditions in the projection space when evaluating the contrast ratio of a projector.
4. Throw Ratio and Projection Distance: The throw ratio indicates the ratio of the distance between the projector and the screen to the width of the projected image. It determines the size of the image for a given projection distance. Understanding the throw ratio helps in selecting a projector that can accommodate the desired screen size within the available space.
5. Connectivity Options: Consider the connectivity options provided by the projector to ensure compatibility with other devices. Common connection ports include HDMI, DisplayPort, VGA, and USB. Check if the projector supports the input types required for your media player, computer, or other devices that will be connected to the system.
6. Lens Options and Zoom Range: Depending on the desired projection setup, consider the lens options and zoom range offered by the projector. Some projectors have interchangeable lenses, allowing for flexibility in choosing the appropriate lens for specific throw distances and screen sizes. A projector with a wide zoom range provides more flexibility in positioning and adjustments.
7. Durability and Maintenance: Evaluate the durability and maintenance requirements of the projector. Consider factors such as lamp life, filter maintenance, and ease of access for cleaning or replacing parts. Opt for a projector that offers a reasonable lamp life and requires minimal maintenance to ensure longer-term cost efficiency and hassle-free operation.
8. Budget: Determine a realistic budget for the projector and prioritize features based on your needs. While higher-end projectors may offer superior image quality and advanced features, they might not always be necessary for every application. Strike a balance between performance and cost to choose a projector that best suits your requirements.
9. Reviews and Recommendations: Research and read reviews from reliable sources or consult experts to gather insights about the performance and reliability of different projector models. Consider seeking recommendations from trusted professionals who have experience with digital projection systems.
By carefully considering these factors, you can make an informed decision and choose the right digital projector that meets your specific requirements and delivers the desired performance in your digital projection system.
Tips for Setting up a Digital Projection System
Setting up a digital projection system requires careful planning and consideration to ensure optimal performance and user experience. Here are some important tips to keep in mind when setting up a digital projection system:
1. Determine the Projection Space: Choose a suitable location for the projection system. Consider factors such as room size, ceiling height, and ambient lighting conditions. Ensure that the space provides adequate room for the projected image, proper ventilation for the projector, and easy access to power sources.
2. Plan the Placement of the Projector: Determine the position of the projector based on the desired projection size and throw ratio. Consider the mounting options and any necessary adjustments to align the projector with the screen or projection surface. Ensure that there is enough clearance and suitable support for the projector to be securely mounted.
3. Calibrate the Projector: Properly calibrate the projector to optimize image quality. Use the built-in calibration settings or advanced calibration tools to adjust parameters such as brightness, contrast, color temperature, and gamma. Calibrating the projector ensures accurate color reproduction and a balanced image across the entire projection area.
4. Set Up the Screen or Projection Surface: Choose a high-quality projection screen or surface that complements the projector’s specifications. Install the screen securely and position it appropriately for optimal viewing angles. Ensure that the screen is free from any wrinkles or creases that could distort the projected image.
5. Establish Proper Cable Management: Organize and manage the cables connecting the projector, media player, and audio systems. Use cable management solutions such as cable trays, clips, or conduit to keep the cables neat and prevent them from becoming a tripping hazard. Proper cable management also helps in troubleshooting and maintenance tasks.
6. Adjust Lighting and Ambient Conditions: Create an environment conducive to the best viewing experience. Control ambient lighting to minimize glare on the screen and maximize image contrast. Use window coverings, curtains, or blinds to block external light sources. Consider installing light diffusion materials to enhance image quality and mitigate any hotspots or uneven lighting in the projection area.
7. Optimize Audio System and Acoustics: Ensure the audio system is set up correctly to enhance the audiovisual experience. Position speakers strategically to achieve balanced sound distribution and clarity. Consider acoustic treatments such as sound-absorbing panels or curtains to improve sound quality and reduce echoes or reverberations in the room.
8. Test and Fine-Tune the System: Perform thorough testing and fine-tuning of the entire projection system before any important presentations or events. Adjust the projector settings, audio levels, and other system parameters as needed. Test the system with various types of content to ensure the desired image quality, audio clarity, and overall functionality.
9. Establish Maintenance Procedures: Develop a regular maintenance schedule for the projection system. This includes cleaning filters, inspecting and replacing lamps when necessary, and ensuring proper ventilation for the projector. Keep track of maintenance tasks and any manufacturer-recommended guidelines to prolong the lifespan of the system and maintain optimal performance.
10. Stay Up to Date: Stay informed about software updates, firmware upgrades, and advancements in technology related to the projection system. Regularly check for any system updates or improvements provided by the projector manufacturer and implement them as recommended.
By following these tips, you can ensure that your digital projection system is properly set up, optimized for performance, and ready to deliver exceptional visual and audio experiences.
Maintenance and Troubleshooting
Maintenance and regular upkeep are crucial for the optimal performance and longevity of a digital projection system. Additionally, knowing how to troubleshoot common issues can help resolve problems quickly and minimize downtime. Here are some maintenance and troubleshooting tips:
1. Regular Cleaning: Keep the projector and its components clean to prevent dust buildup and maintain image quality. Follow manufacturer guidelines for cleaning procedures, including using appropriate cleaning tools and solutions. Regularly clean projector filters to ensure proper ventilation and prevent overheating.
2. Lamp Replacement: Monitor the lamp life of the projector and replace the lamp when necessary. Check the projector’s lamp hour meter or refer to the manufacturer’s recommendations for lamp replacement intervals. Timely lamp replacement ensures optimal brightness and prevents sudden failure during important presentations or events.
3. Ventilation and Cooling: Ensure proper ventilation and cooling for the projector to prevent overheating. Clean projector vents regularly to remove dust or debris that could obstruct airflow. Avoid blocking the projector’s intake and exhaust vents, and maintain appropriate room temperature and humidity levels to prevent heat-related performance issues.
4. Check Connections: Regularly inspect and secure all cable connections to ensure proper signal transmission and prevent connectivity issues. Check for loose connections or damaged cables that may affect the quality of the projected image or audio. Replace faulty cables or connectors as needed.
5. Software and Firmware Updates: Stay up to date with the latest software and firmware updates provided by the projector manufacturer. These updates often include bug fixes, performance enhancements, and new features. Regularly check the manufacturer’s website or use their dedicated software tools to download and install any available updates.
6. Test and Calibrate: Periodically test and calibrate the projector to maintain accurate color reproduction and optimal image quality. Use calibration tools or consult professional calibration services to fine-tune the projector’s settings, including brightness, contrast, color temperature, and gamma. Regular testing ensures consistent performance and allows for adjustments when needed.
7. Troubleshooting Common Issues: Familiarize yourself with common troubleshooting techniques for your projector model. Consult the user manual or manufacturer’s website for troubleshooting guides specific to your device. Some common issues include image flickering, distorted colors, artifacts, or audio problems. Follow recommended steps to identify and resolve the issue, or contact technical support if needed.
8. Technical Support and Warranty: Keep track of the warranty period and contact the manufacturer or authorized service centers for assistance with complex technical issues or hardware failures. Follow their instructions for repair or maintenance procedures. If the projector is outside the warranty period, consider seeking professional repair services from reputable technicians or service providers.
9. Document and Organize: Maintain documentation of the projector’s specifications, purchase date, warranty information, and any service or repair records. Keep user manuals, reference guides, and important contact information easily accessible. This documentation aids in troubleshooting, warranty claims, and any future maintenance or upgrades.
10. Professional Maintenance: Consider periodic professional maintenance and cleaning if required, especially for larger installations or high-demand environments. Professional technicians can perform deep cleaning, system calibration, and thorough inspections to ensure peak performance and extend the lifespan of the projection system.
By adhering to these maintenance practices and troubleshooting fundamentals, you can minimize technical issues, maximize the lifespan of your digital projection system, and enjoy consistently optimal performance for years to come.