
Benefits of using a yarn bowl
When it comes to knitting or crocheting, having a yarn bowl can significantly enhance your crafting experience. This simple yet effective tool comes with numerous benefits that every yarn enthusiast should know about. Here are some of the key advantages of using a yarn bowl:
- Easy yarn management: One of the main benefits of a yarn bowl is that it helps keep your yarn organized and tangle-free. With a yarn bowl, you no longer have to worry about your skeins rolling off the table or getting tangled on themselves.
- Prevents yarn from rolling away: Yarn can be notorious for its tendency to roll away, causing frustration and wasted time. A yarn bowl provides a stable and secure place to hold your yarn, preventing it from unravelling and rolling across the floor.
- Ensures consistent tension: Consistent tension is crucial for producing even stitches in your knitting or crochet projects. A yarn bowl allows you to pass the yarn smoothly through the bowl’s guide, ensuring that it maintains the correct tension throughout your work.
- Reduces hand tension and fatigue: Holding onto a yarn skein for extended periods can strain your hand and fingers, leading to discomfort and fatigue. A yarn bowl eliminates the need for constantly gripping the yarn, allowing your hand to relax and reducing the risk of hand strain.
- Keeps your yarn clean: Yarn bowls are designed to keep your yarn clean and free from dirt, dust, and pet hair. They provide a protective barrier that shields your yarn from external elements, ensuring that your projects remain pristine.
Overall, using a yarn bowl offers practical advantages that can enhance your knitting or crocheting experience. It not only keeps your yarn organized and easily accessible but also helps maintain consistent tension and reduces hand strain. Additionally, a yarn bowl ensures that your yarn stays clean and untangled, saving you time and frustration in your crafting endeavors.
Types of yarn bowls
Yarn bowls come in various shapes, sizes, and materials, each with its own unique features and benefits. Understanding the different types of yarn bowls available can help you choose the right one for your specific needs. Here are some common types of yarn bowls:
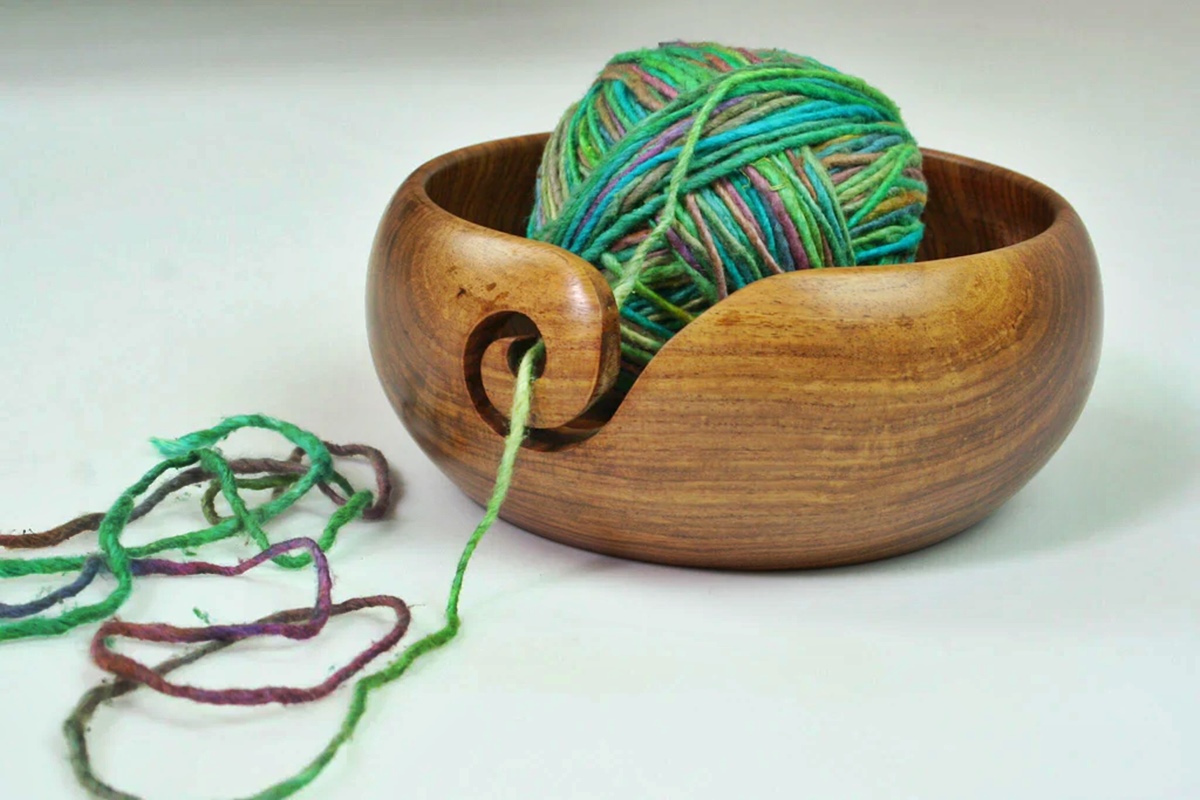
- Wooden yarn bowls: Wooden yarn bowls are popular for their natural beauty and durability. They are often handcrafted and feature smooth surfaces to prevent snagging or splitting of yarn. Wooden bowls also have a timeless appeal and can add a touch of elegance to your crafting space.
- Ceramic yarn bowls: Ceramic yarn bowls are highly sought after for their artistic designs and eye-catching colors. These bowls are typically hand-painted or glazed, making each piece a unique work of art. Ceramic bowls are heavier than other options, providing stability and preventing them from slipping as you pull the yarn.
- Plastic yarn bowls: Plastic yarn bowls are lightweight, affordable, and easy to clean. They are a great option for crafters on a budget or those who prefer a more portable yarn bowl. Plastic bowls also come in various colors and designs, allowing you to choose one that matches your style.
- Metal yarn bowls: Metal yarn bowls, often made of stainless steel or aluminum, offer a sleek and modern look. They are durable, lightweight, and easy to maintain. Metal bowls often feature cutouts or patterns that provide a sleek guide for the yarn to feed through.
- Stone yarn bowls: Stone yarn bowls, such as those made of marble or granite, are known for their sturdy construction and natural beauty. These bowls are heavier than other materials, ensuring stability and minimizing the risk of tipping. Stone bowls also have a cool surface that can help keep your yarn from overheating.
Choosing the right type of yarn bowl largely depends on your personal preferences, budget, and crafting needs. Consider factors such as aesthetics, functionality, and portability when selecting a yarn bowl that complements your style and enhances your crafting experience.
Choosing the right yarn bowl for your needs
When it comes to choosing a yarn bowl, there are several factors to consider to ensure it meets your specific needs and preferences. Here are some key considerations to help you select the right yarn bowl:
- Size: Consider the size of your yarn skeins or balls to determine the appropriate size of the yarn bowl. You want the bowl to comfortably accommodate your yarn without it being too tight or too loose.
- Material: Decide which material appeals to you the most. Consider factors such as durability, aesthetics, and weight. Wooden bowls offer a classic and natural look, while ceramic bowls can add a touch of artistry. Plastic bowls are lightweight and affordable, while metal bowls provide a modern touch. Stone bowls are sturdy and have a unique beauty.
- Design: Yarn bowls come in various designs, from simple and minimalistic to intricately patterned or decorative. Consider your personal style and how the design of the yarn bowl will fit into your crafting space.
- Functionality: Look for features that enhance the functionality of the yarn bowl. This can include a spiral or guide to feed the yarn through, smooth surfaces to prevent snagging, and a stable base to prevent tipping. Some yarn bowls may also have additional compartments or hooks for holding your crochet hooks or knitting needles.
- Portability: Consider whether you need a yarn bowl that is easily portable. If you often take your crafting projects on the go, a lightweight and compact yarn bowl may be more suitable for your needs.
- Budget: Set a budget for your yarn bowl purchase. Yarn bowls come in a wide price range, so determining your budget beforehand can help narrow down your options and make the decision-making process easier.
Ultimately, choosing the right yarn bowl is a personal decision based on your preferences and specific needs. Take the time to explore different options, read reviews, and consider the factors mentioned above. By selecting the perfect yarn bowl, you can enjoy a more organized and enjoyable knitting or crocheting experience.
How to set up your yarn bowl
Setting up your yarn bowl properly can help you maximize its benefits and ensure a smooth and hassle-free knitting or crocheting session. Here are some steps to guide you in setting up your yarn bowl:
- Choose a stable surface: Find a flat and stable surface where you can place your yarn bowl. This will prevent the bowl from tipping over or moving around as you work.
- Position the yarn bowl: Place the yarn bowl in a convenient location within your reach while working on your project. The bowl should be positioned so that the yarn can easily feed through the guide or notch without any obstructions.
- Place the yarn inside the bowl: Take your yarn and place the skein or ball inside the yarn bowl. Make sure it sits securely in the bowl and doesn’t roll or move around excessively.
- Feed the yarn through the guide: Depending on the design of your yarn bowl, there may be a guide or notch that allows the yarn to smoothly pass through. Take the end of the yarn and feed it through the guide, ensuring it is securely held, but not too tight.
- Adjust tension: Check the tension of the yarn as it feeds through the yarn bowl. Make any necessary adjustments to ensure that the yarn flows smoothly without being too loose or too tight. Proper tension is crucial for achieving even and consistent stitches in your project.
- Start your project: Once everything is set up, you can start knitting or crocheting. The yarn will smoothly unwind from the bowl as you work, and the bowl will keep it tidy and tangle-free.
Keep in mind that every yarn bowl may have slight variations in setup, depending on its design. Always refer to the manufacturer’s instructions if provided, to ensure proper setup and usage of your specific yarn bowl.
By following these simple steps to set up your yarn bowl, you can enjoy a more organized and streamlined crafting experience, without the hassle of tangled or unruly yarn.
Using a yarn bowl with center-pull yarn
A yarn bowl is a valuable tool for managing center-pull yarn, offering convenience and preventing tangles that can occur when using this type of yarn. Here’s a step-by-step guide on how to use a yarn bowl with center-pull yarn:
- Prepare your center-pull yarn: Locate the end of the yarn from the center of the skein or ball. Carefully pull it out and untangle any loose fibers or knots.
- Place the yarn in the yarn bowl: Take the end of the yarn and place it inside the yarn bowl, letting it rest on the bottom. Ensure that the ball or skein fits comfortably inside the bowl without any excessive tension or tightness.
- Position the guide: If your yarn bowl has a guide or notch, position the end of the yarn through it. This will help guide the yarn smoothly and prevent it from tangling as you pull it.
- Begin your project: With the yarn properly set up in the yarn bowl, you can start knitting or crocheting. As you work, gently pull the yarn from the center-pull end, allowing it to unwind smoothly from the bowl. The yarn bowl will ensure that the ball or skein remains anchored, preventing it from rolling away or tangling in the process.
- Adjust tension if needed: As you progress with your project, monitor the tension of the yarn. If it feels too loose or tight, make any necessary adjustments by gently pulling or releasing the yarn from the center of the skein. The yarn bowl will help maintain consistent tension as you work, resulting in even and balanced stitches.
- Continue throughout your project: Throughout your knitting or crocheting session, regularly check the yarn in the bowl to ensure it remains untangled and free-flowing. Adjust the tension as needed and enjoy the convenience of using center-pull yarn with the assistance of a yarn bowl.
Using a yarn bowl with center-pull yarn can revolutionize your crafting experience, providing organization, preventing tangles, and ensuring a smooth flow of yarn. By following these steps, you can enjoy the benefits of center-pull yarn while keeping your projects neat and hassle-free.
Using a yarn bowl with hand-wound yarn
Using a yarn bowl can greatly simplify the process of working with hand-wound yarn, ensuring that it stays neat and organized as you knit or crochet. Here’s a step-by-step guide on how to effectively use a yarn bowl with hand-wound yarn:
- Prepare your hand-wound yarn: Before starting your project, make sure your hand-wound yarn is untangled and in a convenient shape for placement in the yarn bowl. If needed, gently rewind any loose sections to ensure a smooth and consistent ball of yarn.
- Position the yarn in the yarn bowl: Take your hand-wound ball of yarn and place it inside the yarn bowl. Ensure that it sits securely in the bowl, with the end of the yarn accessible for easy retrieval as you work.
- Feed the yarn through the guide: If your yarn bowl features a guide or notch, carefully feed the end of the yarn through it. This will provide a guiding path for the yarn, preventing it from rolling around the bowl and becoming tangled.
- Start working on your project: With the yarn properly set up in the yarn bowl, you can begin knitting or crocheting. As you work, gently pull the yarn from the ball, allowing it to smoothly unwind from the bowl. The yarn bowl will keep the ball stable and prevent it from rolling away or tangling in the process.
- Adjust tension if necessary: Throughout your project, monitor the tension of the yarn. If it feels too loose or tight, make any necessary adjustments by gently pulling or releasing the yarn from the ball. The yarn bowl will help maintain consistent tension as you work, ensuring even and balanced stitches.
- Periodically check the yarn: As you progress with your project, periodically check the yarn in the bowl. Make sure it remains untangled and smoothly feeding out of the bowl. Adjust the position or tension of the yarn as needed to ensure a continuous and hassle-free knitting or crocheting experience.
Using a yarn bowl with hand-wound yarn can greatly enhance your crafting process, keeping your yarn tidy and easily accessible. By following these steps, you can enjoy the convenience and organization provided by a yarn bowl while working with your hand-wound yarn.
Tips for preventing tangles and knots
When working with yarn, preventing tangles and knots is essential to maintain a smooth and enjoyable knitting or crocheting experience. Here are some helpful tips to prevent tangles and knots while using a yarn bowl:
- Use a well-designed yarn bowl: Invest in a yarn bowl that has a smooth and spacious design, with a guide or notch to help the yarn flow easily without getting caught on any edges or corners.
- Keep the yarn bowl stable: Ensure that the yarn bowl is placed on a stable surface, free from any obstructions or potential hazards that may cause it to tip over or move around. A stable yarn bowl reduces the risk of sudden jerking or pulling on the yarn, which can lead to tangles or knots.
- Avoid excessive tension: Be mindful of the tension in the yarn as it feeds through the yarn bowl. Excessive tension can cause the yarn to become tangled or knotted. Adjust the tension as needed to keep the yarn flowing smoothly.
- Avoid twisting the yarn: When working from a center-pull yarn ball, be careful not to twist the yarn as you pull it from the ball. Twisting can cause the yarn to tangle or knot, leading to frustration and wasted time. Pay attention to any twisting and make adjustments when necessary.
- Check for snags or obstructions: Regularly inspect the yarn bowl and the path of the yarn for any snags or obstructions that may cause the yarn to catch or tangle. Smooth out any rough edges or clear any obstacles to ensure a smooth flow of yarn.
- Keep your work area tidy: A clutter-free work area reduces the chances of the yarn getting entangled with other objects. Keep your working space clean and organized to minimize the risk of accidental tangles or knots.
- Take breaks to untwist and untangle: If you notice any twists or tangles in the yarn, take a break to untwist and untangle it before continuing with your project. Detangling the yarn as soon as you spot it will prevent the issue from worsening and save you time in the long run.
By following these tips, you can minimize the occurrence of tangles and knots while using a yarn bowl and enjoy a seamless and frustration-free knitting or crocheting experience.
Techniques for feeding yarn through the yarn bowl
Feeding yarn through a yarn bowl is a key step in utilizing this tool effectively. Here are some techniques to help you feed yarn through a yarn bowl for a smooth knitting or crocheting experience:
- Guided loop technique: This technique involves turning the yarn into a loose loop or circle. Place the loop over the guide or notch in the yarn bowl, then pull the working yarn through the loop. This creates a secure yet flexible setup that allows the yarn to unwind smoothly as you work.
- Single-strand technique: For simpler yarn bowls without a guide or notch, the single-strand technique works well. Simply thread the end of the yarn through the opening or any available gap in the bowl, ensuring that it is loose enough to allow the yarn to flow freely as you pull it.
- Double-strand technique: In cases where the yarn has a tendency to slip out of the yarn bowl or if the bowl has a wider opening, the double-strand technique adds some extra security. Thread the yarn through the opening twice, creating a double loop, before pulling the end to secure it in place.
- Placing yarn outside the bowl: If you prefer to keep the yarn bowl purely as a decorative holder for your yarn, you can position the yarn outside of the bowl. Place the yarn ball or skein next to the bowl and feed the end of the yarn through the guide or notch, allowing it to unwind naturally as you pull it.
- Alternative feeding methods: Depending on the design of the yarn bowl, there may be alternative feeding methods available. Some yarn bowls feature side holes or slots where you can thread the yarn through, ensuring it stays in place and feeds smoothly as you work. Be sure to explore the unique features of your yarn bowl and experiment with different feeding techniques.
Remember to adjust the tension of the yarn as you work, ensuring it is not too loose or too tight. The yarn should flow smoothly through the yarn bowl, allowing you to create even and consistent stitches in your project.
Experiment with different techniques to find the one that works best for you and your specific yarn bowl. By mastering the art of feeding yarn through the yarn bowl, you can enhance your knitting or crocheting experience and enjoy the benefits of this practical and functional tool.
Using a yarn bowl for multiple colors or projects
A yarn bowl can be a versatile tool that not only helps with organizing yarn but also comes in handy when working with multiple colors or projects. Here are some ways you can effectively use a yarn bowl for managing multiple colors or projects:
- Separate yarn by color: If you’re working on a project that involves multiple colors, use separate yarn bowls for each color. This will keep the yarn neatly organized and prevent colors from getting tangled or mixed up.
- Label or mark bowls: To easily identify which yarn bowl corresponds to a specific color or project, consider labeling or marking the bowls. You can use colored stickers, yarn scraps, or attach small tags to indicate which yarn goes with which bowl.
- Assign bowls to different projects: If you’re simultaneously working on multiple projects, assign each project with its dedicated yarn bowl. This way, you can easily switch between projects without getting yarns mixed up or tangled.
- Utilize compartments or dividers: Some yarn bowls come with compartments or dividers that allow you to separate different colors or projects within the same bowl. This is particularly useful when you have limited space or want to keep everything compact and organized.
- Rotate between bowls: If you’re using a yarn bowl for multiple colors or projects, periodically rotate between the bowls as you progress in your work. This ensures that all the yarn balls receive equal use and doesn’t leave one yarn neglected or tangled at the bottom of the bowl.
- Manage yarn ends: When working with multiple colors, keep track of the yarn ends and prevent them from tangling with each other. Use separate notches, guides, or compartments within the yarn bowl to keep each color’s yarn end neatly secured and easily accessible.
- Keep the bowls organized: Regularly tidy up your yarn bowls, especially when you’re switching between colors or projects. Keep the yarn neatly wound and properly placed in the bowls, minimizing the chances of tangles, knots, or confusion.
By utilizing a yarn bowl for multiple colors or projects, you can maintain a sense of order and prevent yarn-related mishaps. Whether you’re juggling different projects or incorporating various colors into your work, a yarn bowl can be a valuable tool in keeping your knitting or crocheting process efficient and enjoyable.
Cleaning and caring for your yarn bowl
Keeping your yarn bowl clean and well-maintained is important for ensuring its longevity and continued effectiveness. Here are some tips on how to clean and care for your yarn bowl:
- Regular dusting: Dust your yarn bowl regularly to prevent accumulation of dirt and debris. Use a soft cloth or a brush to gently wipe the surface of the bowl, including any crevices or decorative patterns. Avoid using abrasive materials or harsh chemicals that could scratch or damage the bowl.
- Hand wash if necessary: If your yarn bowl is made of a material that allows for gentle hand washing, such as ceramic or plastic, you can clean it with mild soap and warm water when needed. Rinse thoroughly and dry with a soft cloth or let it air dry completely before using it again.
- Avoid direct exposure to moisture: While some yarn bowls may be resistant to water, it’s generally best to keep them away from direct exposure to moisture. This will help prevent any potential warping, discoloration, or damage to the bowl. Store your yarn bowl in a dry and well-ventilated area.
- Handle with care: Treat your yarn bowl with care to avoid any accidental drops or impacts that could lead to chips or cracks. When transporting or moving the bowl, hold it securely with both hands to prevent it from slipping out of your grasp. Avoid placing heavy objects on top of the yarn bowl to prevent any unnecessary pressure that could cause damage.
- Store yarn bowls properly: When not in use, store your yarn bowl in a safe place where it won’t be exposed to excessive heat, direct sunlight, or extreme temperatures. Consider using a dust cover or placing it inside a clean, dry bag to further protect it from dust or potential scratches.
- Inspect for any damage: Regularly inspect your yarn bowl for any signs of damage, such as chips, cracks, or loose parts. If you notice any issues, handle the bowl with caution and consider repairing or replacing it if necessary. Addressing any damage early on will help maintain the functionality and beauty of your yarn bowl.
By following these cleaning and care tips, you can ensure that your yarn bowl remains in excellent condition and continues to provide you with an organized and enjoyable knitting or crocheting experience for years to come.
Creative ways to repurpose a yarn bowl
Once you’ve finished using your yarn bowl for its intended purpose, you may be surprised to discover that it can serve various other functions beyond holding yarn. Here are some creative ways to repurpose a yarn bowl:
- Home decor accent: Yarn bowls often feature beautiful designs and patterns that can be displayed as decorative accents in your home. Place them on shelves, coffee tables, or mantels to add a touch of artistic flair to your living space.
- Small storage container: Use a yarn bowl to hold small items or trinkets around your house. You can keep jewelry, hair accessories, buttons, or even small office supplies neatly organized within the bowl’s spacious and stylish interior.
- Plant holder: Repurpose a yarn bowl as a unique and eye-catching planter for small succulents or air plants. Its wide shape and charming design make it an excellent container for adding a touch of greenery and nature to your home or workspace.
- Serving dish: Depending on the material and design, some yarn bowls can be repurposed as serving dishes for small snacks or appetizers. Clean the bowl thoroughly beforehand and use it to serve nuts, candies, or even dipping sauces for small gatherings or parties.
- Bathroom organizer: Place a yarn bowl on your bathroom counter or vanity to hold toiletries like cotton balls, q-tips, or even small tubes of lotion or lip balm. The bowl’s organizational capabilities will keep your essentials within reach while adding a touch of elegance to your bathroom decor.
- Desk accessory holder: Use a yarn bowl to keep your desk or workspace tidy and organized. It can serve as a stylish holder for pens, pencils, paperclips, or other small office supplies. The bowl’s depth and design make it an excellent addition to any productive workspace.
- Candle holder: Repurpose a yarn bowl as a unique candle holder. Simply place a pillar candle or a small votive candle inside the bowl and light it for a cozy and atmospheric ambiance. The bowl’s material can create beautiful reflections and patterns when the candle is lit.
With a little creativity and imagination, you can find numerous ways to repurpose a yarn bowl in your home. Whether it’s for organization, decoration, or practical use, repurposing a yarn bowl adds both functionality and character to your living space.