Types of Pitcher Plants
Pitcher plants are unique and fascinating carnivorous plants that capture and digest insects for nutrients. There are several different types of pitcher plants, each with its own distinctive characteristics and requirements. Below, we’ll explore some of the most popular pitcher plant varieties:
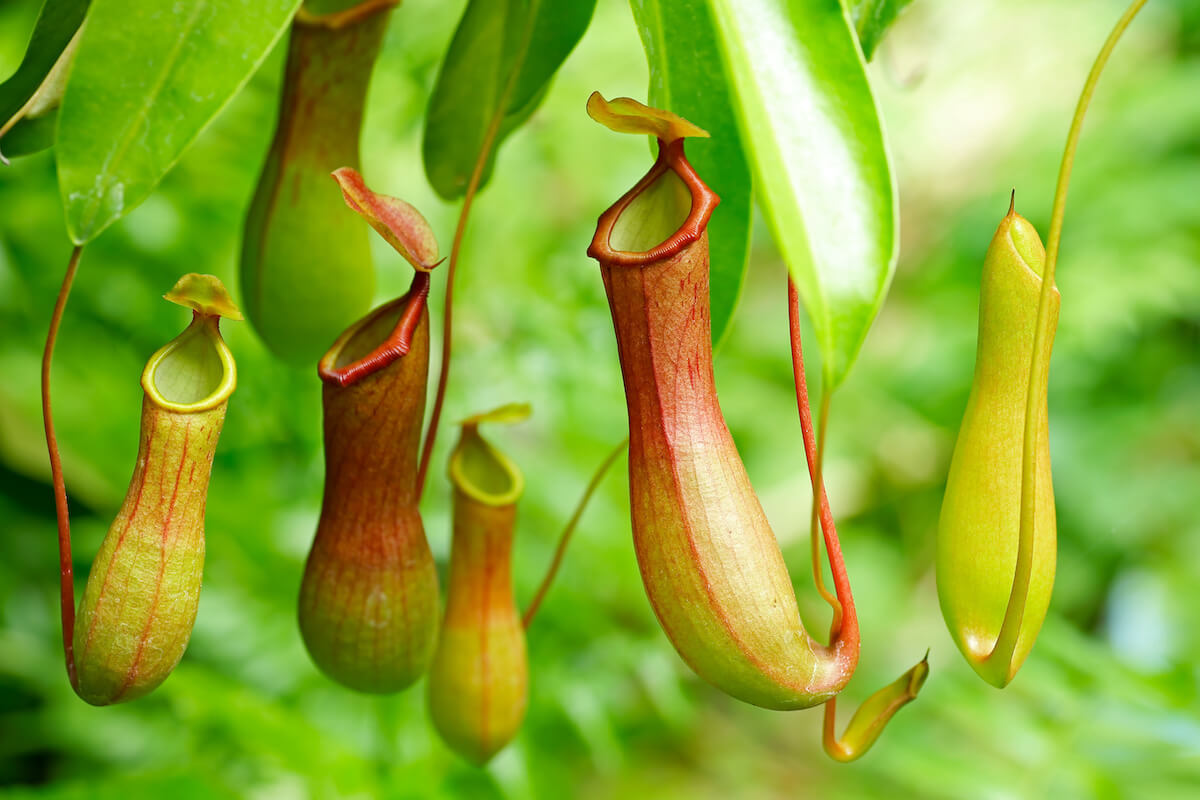
1. Nepenthes: Also known as tropical pitcher plants, Nepenthes are native to Southeast Asia. They possess large, beautiful pitchers that can hold a significant amount of liquid. These plants thrive in warm and humid conditions, making them ideal for terrariums or greenhouse cultivation.
2. Sarracenia: Native to North America, Sarracenia pitcher plants are known for their vibrant colors and extensive variations. The pitchers of Sarracenia plants have a distinct hooded structure that provides shelter for unsuspecting insects. They prefer a cool and sunny environment, making them suitable for outdoor gardens in temperate regions.
3. Cephalotus: Also called the Albany pitcher plant, Cephalotus is a small but striking carnivorous plant native to Australia. Its unique feature is the tubular pitcher that resembles a clenched fist. Cephalotus requires a cool and humid environment and is best suited for dedicated terrariums or indoor cultivation.
4. Darlingtonia: Darlingtonia, or the cobra lily, is a fascinating pitcher plant species native to the United States. Its pitchers have a distinctive shape resembling a cobra’s head. Darlingtonia plants thrive in cool and moist conditions, making them suitable for outdoor gardens or bog habitats.
5. Heliamphora: Heliamphora, commonly known as sun pitchers, are native to South America. These plants have a unique rosette shape with pitchers that face upwards. Heliamphora plants require cool temperatures and high humidity, making them suitable for terrariums or specialized growing setups.
These are just a few examples of the diverse range of pitcher plants available. Each species has its own specific care requirements, so it’s essential to research and understand the needs of your chosen plant to ensure its health and longevity.
Choosing the Right Location
When it comes to growing pitcher plants, selecting the right location is crucial for their overall health and growth. Here are some important factors to consider when choosing the perfect spot for your pitcher plants:
1. Light: Most pitcher plant species thrive in bright but indirect light. Place them near a window where they can receive ample natural light but avoid direct sunlight, which can scorch their delicate leaves. If you’re growing pitcher plants indoors, consider using artificial grow lights that mimic natural daylight.
2. Temperature: Pitcher plants have specific temperature requirements depending on their species. Generally, they prefer cooler temperatures ranging from 50°F to 80°F (10°C to 27°C). Ensure that the location you choose provides a consistent temperature within this range to promote healthy growth and pitcher development.
3. Humidity: Pitcher plants are native to humid environments, so maintaining adequate humidity levels is essential for their well-being. If you live in a dry climate, consider using a humidifier or placing a tray filled with water near the plants to increase humidity. Terrarium cultivation is also an excellent option for creating a controlled humid environment.
4. Air Circulation: While pitcher plants enjoy a humid atmosphere, it’s equally important to provide good air circulation. Stagnant air can lead to the growth of mold and fungus. Place your pitcher plants in an area with gentle air movement or use a small fan to ensure proper ventilation.
5. Soil Drainage: Pitcher plants require a well-draining soil mix to prevent waterlogged roots. Avoid using heavy clay or compacted soils that can retain excess moisture. Instead, opt for a mixture of sphagnum moss, perlite, and sand to create a loose and well-aerated growing medium.
6. Pest Control: Consider the presence of pests like ants, slugs, or snails in the chosen location. These creatures may damage the delicate pitchers or prey on the insects that are attracted to them. Take preventative measures such as clearing away potential nesting sites or using organic pest control methods as needed.
By carefully evaluating these factors and finding the best location for your pitcher plants, you will create an environment that supports their growth and allows them to thrive. Remember to monitor their progress regularly and make any necessary adjustments to maintain optimal conditions.
Watering and Humidity
Proper watering and humidity levels are crucial for the health and well-being of pitcher plants. These unique carnivorous plants have specific moisture requirements that must be met to ensure their survival. Here are some guidelines to follow when it comes to watering and maintaining humidity levels for your pitcher plants:
1. Watering: Pitcher plants prefer to be consistently moist but not waterlogged. Use distilled water, rainwater, or purified water to avoid minerals and chemicals found in tap water that can harm the sensitive roots. Water the plants thoroughly, allowing the excess water to drain from the pot or container. Avoid letting the plants sit in standing water, as this can lead to root rot.
2. Humidity: Pitcher plants thrive in high humidity, replicating their native tropical environments. Aim for humidity levels between 50% to 70%. To increase humidity, you can mist the plants daily with water or use a humidity tray filled with water and pebbles placed beneath the plants. Terrariums or placing the plants in a closed environment can also help maintain higher humidity levels.
3. Monitoring Moisture: Regularly check the moisture levels of the soil to ensure it remains consistently moist. Stick your finger into the soil (up to the knuckle) and if it feels dry, it’s time to water the plant. Avoid letting the soil completely dry out or become overly saturated with water.
4. Seasonal Adjustments: Adjust your watering and humidity routine according to the seasons. During warmer months, pitcher plants may require more frequent watering and higher humidity levels due to increased evaporation. In colder months, reduce watering and misting to prevent waterlogged soil and create a drier winter dormancy period.
5. Avoiding Tap Water: As mentioned earlier, tap water may contain minerals and chemicals that can harm pitcher plants. These plants are sensitive to the build-up of salts and minerals in the soil. If you must use tap water, allow it to sit out overnight in an open container to allow chlorine and other chemicals to evaporate before using it to water your plants.
By providing consistent moisture levels and maintaining adequate humidity, you can ensure the health and vitality of your pitcher plants. Remember to closely monitor their watering needs and make adjustments as necessary to help them thrive in their carnivorous habitat.
Soil Requirements
The soil composition plays a vital role in the growth and overall health of pitcher plants. These carnivorous plants have specific soil requirements that must be met to support their unique needs and ensure optimal growth. Here are some important factors to consider when it comes to the soil requirements for your pitcher plants:
1. Acidic pH: Pitcher plants thrive in acidic soil conditions with a pH range of 4 to 6. It’s crucial to provide a soil mix that is slightly acidic to mimic their natural habitat. You can achieve this by using a combination of acidic components such as sphagnum peat moss or coco coir in your potting mix.
2. Well-Draining: Pitcher plants require a well-draining soil mix to prevent waterlogged roots, which can lead to root rot. Avoid using heavy clay or compacted soils that retain excess moisture. Instead, create a loose and well-aerated mixture by combining sphagnum moss, perlite, and sand. This mixture allows for proper drainage of excess water while retaining necessary moisture.
3. Low Nutrient Levels: Pitcher plants obtain their nutrients from the insects they capture, rather than the soil. Therefore, it is essential to use soil mixes that are low in nutrients. Avoid using regular potting soils or fertilizers, as the high nutrient levels can harm the plants. Opt for carnivorous plant-specific soil mixes or create your own by avoiding nutrient-rich additives.
4. Avoiding Minerals: Pitcher plants are sensitive to minerals found in tap water, which can accumulate in the soil over time and cause harm. It is recommended to water pitcher plants with distilled water, rainwater, or purified water to prevent the build-up of harmful minerals. Avoid using tap water if possible, or allow it to sit out overnight for chlorine to dissipate before using it.
5. Pot Size: Choose an appropriately sized pot for your pitcher plants. A pot that is too small can restrict root growth and lead to overcrowding, while a pot that is too large can cause excessive moisture retention. Opt for a pot that allows for adequate drainage and provides enough space for the plant to grow comfortably.
Taking the time to create a suitable soil mix and providing the correct conditions for your pitcher plants will contribute to their long-term health and thriving growth. Remember to regularly monitor the moisture levels, pH, and drainage of the soil, and make any necessary adjustments to maintain the optimal growing environment for your unique and fascinating carnivorous plants.
Feeding Your Pitcher Plant
Pitcher plants are carnivorous plants that naturally obtain their nutrients by trapping and digesting insects. While they are capable of catching their own prey, it is necessary to provide supplemental feeding for optimal growth. Here are some important considerations and guidelines when it comes to feeding your pitcher plant:
1. The Importance of Feeding: Feeding your pitcher plant helps provide the essential nutrients that may be lacking in their environment. The captured insects serve as a source of nitrogen and other essential elements that aid in their growth and overall health. Supplemental feeding is particularly important if the plant is not able to catch enough insects on its own.
2. Suitable Prey: Offer small, live insects as food for your pitcher plant. Suitable prey options include fruit flies, gnats, small ants, and other small flying or crawling insects. Avoid feeding your pitcher plant with insects that are too large, as they may not fit properly into the pitchers and can cause clogging or damage to the plant.
3. Feeding Frequency: How often you should feed your pitcher plant depends on factors such as the species, size of the plant, and the availability of natural prey. As a general guideline, feeding every two to four weeks during the growing season is recommended. Be mindful not to overfeed, as this can lead to excessive trap damage or even rot.
4. Feeding Techniques: There are a few methods you can use for feeding your pitcher plant. One approach is to place the live insect directly onto the inner walls of the pitcher. The insect’s struggles will attract the plant, encouraging it to produce digestive enzymes. Another method is to gently dangle the insect above the pitcher, encouraging the plant to catch and consume it naturally.
5. Avoid Overfeeding: It is essential not to overfeed your pitcher plant. Overfeeding can lead to the accumulation of undigested prey, clogging of the pitcher, or deterioration of the trap. If you notice uneaten prey or the presence of mold, it is a sign that you may be overfeeding. Adjust the feeding frequency accordingly to maintain a healthy balance.
6. Natural Insect Attraction: Creating an environment that attracts insects naturally can supplement the feeding of your pitcher plants. Place the plants near windows or outdoor areas where insects are commonly present. Open windows, use outdoor lighting, or even consider using insect traps to provide a continuous source of prey for your plants.
Feeding your pitcher plants is essential for their overall health and growth. By offering suitable prey and adjusting the feeding frequency, you provide the necessary nutrients that help your plants thrive in their carnivorous nature. Remember to monitor your plants closely and make adjustments accordingly to ensure a healthy and balanced diet for your pitcher plants.
Pruning and Trimming
Pruning and trimming are essential maintenance tasks to keep your pitcher plants healthy and looking their best. Regularly attending to these tasks helps promote optimal growth, prevent overcrowding, and maintain the overall aesthetics of your plants. Here are some important tips and considerations when it comes to pruning and trimming your pitcher plants:
1. Removing Dead or Dying Pitchers: Pitcher plants naturally shed old and dying pitchers over time. These pitchers may turn brown or become desiccated. It is important to remove these dead or dying pitchers using clean and sharp scissors or pruning shears. Removing them helps redirect the plant’s energy to new growth and promotes a healthier appearance.
2. Controlling Plant Size: Some pitcher plants can grow quite large and may outgrow their designated space. If you want to restrict the size of your plants or maintain a compact form, consider pruning back the vine or pitchers. Trim the vine by cutting it back to the desired height, or trim the pitchers by removing the upper portion of the pitcher tube. Be sure to leave enough green foliage to support the plant’s overall health.
3. Pruning Overcrowded Growth: Over time, pitcher plants can produce multiple offshoots or create a dense cluster of pitchers. If the plant becomes overcrowded, it can lead to poor air circulation and increased susceptibility to disease. Thin out overcrowded growth by selectively removing some of the offshoots or pitchers. This allows the remaining growth to receive ample light and airflow.
4. Timing of Pruning: The best time to prune your pitcher plants is during their active growing season, typically in spring or early summer. Avoid pruning during the winter dormancy period, as the plant may be more susceptible to damage or slow recovery. However, if there are any diseased or damaged pitchers, they should be promptly removed regardless of the season.
5. Disinfecting Tools: Before and after pruning your pitcher plants, it is important to disinfect your tools to prevent the spread of disease. Clean and sterilize your scissors or pruning shears using rubbing alcohol or a diluted bleach solution. This helps avoid introducing pathogens that could harm your plants.
6. Trimming Brown or Diseased Foliage: If you notice any brown, wilted, or diseased foliage on your pitcher plants, it’s important to trim them back to prevent the spread of infection. Cut the affected leaves or parts of the plant using sterile tools, making sure to remove any affected material. Regularly monitor your plants for signs of disease or pest infestation and take appropriate action promptly.
Pruning and trimming your pitcher plants not only ensures their longevity and vigor but also enhances their visual appeal. By following these guidelines and performing regular maintenance, you’ll be able to enjoy healthy, well-maintained pitcher plants that thrive in their unique carnivorous nature.
Controlling Pests and Diseases
Like any other plant, pitcher plants are susceptible to pests and diseases that can hinder their growth and overall health. It is essential to proactively control and prevent these issues to ensure the long-term well-being of your plants. Here are some effective methods for managing pests and diseases in your pitcher plants:
1. Common Pests: The most common pests that can affect pitcher plants include aphids, mealybugs, scale insects, and fungus gnats. Regularly inspect your plants for signs of infestation, such as sticky residue, discolored leaves, or tiny insects on the foliage or within the pitchers.
2. Natural Remedies: Non-chemical methods can often effectively control pests on your pitcher plants. Use a soft brush or a strong jet of water to dislodge and remove small insects. Introduce beneficial insects like ladybugs or predatory mites that feed on pests. You can also use insecticidal soap or neem oil, following the package instructions carefully, to treat and control pests.
3. Preventing Fungal and Bacterial Diseases: Pitcher plants are relatively resistant to diseases, but under certain conditions, fungal and bacterial infections can occur. To prevent these issues, avoid overhead watering, as excess moisture can create a favorable environment for disease development. Ensure proper air circulation and spacing between plants to prevent the spread of pathogens.
4. Orchestrating a Winter Dormancy: Most pitcher plants require a period of winter dormancy to rest and prepare for new growth. During this time, reduce watering and keep the temperature cool (around 40°F to 50°F). This reduces the risk of diseases and allows your plants to rejuvenate for the next growing season.
5. Quarantine New Plants: When introducing new pitcher plants to your collection, it’s important to quarantine them for a few weeks to observe for any signs of pests or diseases. This helps prevent the spread of any potential issues to your existing plants. Treat and isolate any infected plants promptly to prevent the infestation from spreading.
6. Clean and Sterilize: Regularly clean and sterilize your tools, such as pruning shears, between uses to prevent cross-contamination. Remove any dead foliage or fallen debris around the plants, as they can harbor pests or disease-causing organisms.
Keeping a vigilant eye on your pitcher plants and implementing proactive pest and disease control measures will help maintain their health and vitality. By promptly addressing any potential issues and adopting preventive practices, you can enjoy a thriving and pest-free collection of pitcher plants.
Propagation Methods
Propagating pitcher plants is an exciting way to expand your collection or share these unique plants with others. There are several effective methods you can use to propagate pitcher plants, each with its own advantages and requirements. Here are some common propagation methods for pitcher plants:
1. Leaf Cuttings: Leaf cuttings are a popular method for propagating pitcher plants. Select a healthy and mature leaf from the parent plant and cut it into sections, making sure each section has a portion of the leaf blade and the petiole. Place the cuttings in a tray or pot filled with a moist, well-draining medium, such as a mix of sphagnum moss and perlite. Keep the cuttings warm, humid, and in a bright but indirect light location. After a few weeks, new shoots will develop from the leaf sections, eventually forming new plants.
2. Rhizome Division: Rhizome division is a technique used for plants that have developed a clumping growth habit. Carefully remove the pitcher plant from its pot and separate the clumps into several individual plants. Ensure each divided clump has sufficient roots and pitchers. Replant the divisions in separate pots filled with an appropriate potting mix. Provide the newly divided plants with the same care and conditions as the mature plants.
3. Tissue Culture: Tissue culture is a more advanced propagation method that involves growing pitcher plants in a controlled laboratory environment. It requires specialized equipment and knowledge. Small tissue samples from the parent plant are taken and placed in a sterile culture medium. Under specific conditions, the tissue will grow and develop into new plants. Tissue culture allows for the production of a large number of plants in a relatively short period and ensures genetic consistency.
4. Seed Germination: Propagating pitcher plants from seeds offers the excitement of growing plants from scratch, but it requires patience and time. Collect fresh seeds from mature pitcher plants and sow them on a soil mix specifically formulated for carnivorous plants. Keep the soil consistently moist and provide a warm and humid environment. Germination can take several weeks to several months. Once the seedlings have developed a few true leaves, carefully transplant them into individual pots and continue to care for them as you would with mature pitcher plants.
5. Natural Division: Some pitcher plants naturally produce new growth points or “pups” around the base of the plant. These pups can be gently separated from the parent plant once they have developed a robust root system and a few pitchers of their own. Plant the new divisions in separate pots, ensuring they have enough space to grow and thrive.
Regardless of the propagation method you choose, patience and attention to detail are key. Provide the newly propagated plants with appropriate care, including the right light, temperature, and watering conditions. With time and proper care, you will have a flourishing collection of pitcher plants propagated through your chosen methods.
Common Mistakes to Avoid
While growing pitcher plants can be a rewarding experience, it’s important to be aware of common mistakes that can hinder their growth and overall health. By avoiding these pitfalls, you can ensure that your pitcher plants thrive and remain vibrant. Here are some common mistakes to avoid when caring for pitcher plants:
1. Overwatering: One of the most common mistakes is overwatering pitcher plants. These plants require consistently moist soil, but allowing them to sit in waterlogged conditions can cause root rot. Be mindful of their moisture needs and maintain a proper watering schedule, keeping the soil just moist but not soggy.
2. Using Tap Water: Pitcher plants are sensitive to minerals and chemicals found in tap water. Using tap water can lead to the build-up of minerals in the soil, which can harm the plants over time. Instead, use distilled water, rainwater, or purified water to water your pitcher plants to avoid mineral accumulation.
3. Insufficient Light: Pitcher plants require bright, indirect light to thrive. Insufficient light can result in weak growth and poor pitcher development. Place your plants near a window that receives adequate light or consider using artificial grow lights to supplement natural light, especially if you’re growing them indoors.
4. Lack of Humidity: Pitcher plants are native to humid environments, and low humidity can negatively impact their growth. Ensure that you provide adequate humidity levels by misting plants regularly or using a humidity tray. Consider using a terrarium or a closed environment to maintain high humidity levels.
5. Using Inappropriate Soil: Using the wrong soil mixture can lead to inadequate drainage or nutrient imbalances. Avoid using regular potting soil or heavy clay-based mixtures that retain too much moisture. Instead, create a well-draining soil mix using components like sphagnum moss, perlite, and sand to mimic their natural habitat.
6. Neglecting Winter Dormancy: Many pitcher plants require a winter dormancy period to rest and prepare for new growth. Neglecting this dormancy can result in weakened plants. Provide your pitcher plants with a cool, unheated location with reduced watering during their dormancy to ensure their overall health and longevity.
7. Ignoring Pests and Diseases: Pests and diseases can quickly spread and damage pitcher plants if not addressed promptly. Regularly inspect your plants for signs of infestation or disease, such as discolored leaves, sticky residue, or pests on the foliage. Take immediate action to control pests or treat diseases to prevent further damage.
Avoiding these common mistakes through careful attention and understanding of the specific needs of pitcher plants will enable you to cultivate a thriving collection. With proper care, your pitcher plants will flourish, showcasing their unique and captivating carnivorous nature.
Frequently Asked Questions
Here are some frequently asked questions about caring for pitcher plants:
1. How often should I water my pitcher plants?
Pitcher plants prefer to be consistently moist but not waterlogged. Water them thoroughly when the top inch of the soil feels dry. It’s important to avoid letting the plants sit in standing water, as this can lead to root rot.
2. Can I use tap water to water my pitcher plants?
Pitcher plants are sensitive to minerals and chemicals found in tap water. It is recommended to use distilled water, rainwater, or purified water to avoid the build-up of harmful minerals in the soil. If using tap water is necessary, allow it to sit out overnight to let chlorine and other chemicals evaporate before using it to water your plants.
3. Do I need to feed my pitcher plants?
Pitcher plants are carnivorous and can capture their own prey, but supplemental feeding is beneficial, especially if they are not able to catch enough insects on their own. Feeding them small, live insects like fruit flies or gnats every two to four weeks during the growing season helps provide necessary nutrients.
4. How much light do pitcher plants need?
Pitcher plants need bright, indirect light to thrive. Place them near a window where they can receive ample natural light, but avoid direct sunlight, as it can scorch their delicate leaves. If growing them indoors, consider using artificial grow lights to provide adequate light.
5. How do I increase humidity for my pitcher plants?
Pitcher plants prefer high humidity levels. Increase humidity by misting the plants regularly or using a humidity tray filled with water and pebbles placed beneath the plants. Terrarium cultivation or placing the plants in a closed environment can also help maintain higher humidity levels.
6. How do I control pests on my pitcher plants?
If you notice pest infestation, such as aphids or mealybugs, you can try using a soft brush or a strong jet of water to dislodge and remove the insects. Introducing beneficial insects like ladybugs is another option. If necessary, you can use insecticidal soap or neem oil following the instructions on the package.
7. Do pitcher plants require a winter dormancy period?
Many pitcher plants require a winter dormancy period to rest and prepare for new growth. During this time, reduce watering and provide the plants with a cool (around 40°F to 50°F) location. This dormant period is essential for their overall health.
By understanding the specific care requirements of pitcher plants and addressing common concerns, you can cultivate healthy and thriving plants that showcase their unique carnivorous nature.