
Tools and Materials Needed
When replacing the water filter in your KitchenAid side-by-side refrigerator, it’s important to have the right tools and materials on hand. This will ensure a smooth and hassle-free process. Here are the essential items you’ll need:
1. Replacement Water Filter: Check your refrigerator’s manual or model number to determine the correct water filter to purchase. It’s important to use a genuine KitchenAid filter or a compatible one that meets the manufacturer’s specifications.
2. Adjustable Wrench: A wrench will be necessary to disconnect and reconnect the water supply line. Choose a wrench with an adjustable size to accommodate various fittings.
3. Towels or Rags: Keep some absorbent towels or rags nearby to catch any water that may leak during the filter replacement process. This will help minimize mess and prevent any potential damage to your kitchen floor or surrounding surfaces.
4. Bucket or Container: Have a bucket or a container ready to collect any water that may drain from the filter or water lines. This will prevent water from spilling onto your kitchen floor and make cleanup easier.
5. Cleaning Supplies (Optional): You may want to have some cleaning supplies on hand to wipe down any areas that may have collected dirt or residue. This will help ensure a clean and sanitary environment for your refrigerator.
By gathering these tools and materials before starting the replacement process, you will save time and ensure a successful and hassle-free filter replacement. Now that you’re equipped with everything you need, let’s move on to the step-by-step process of replacing the water filter in your KitchenAid side-by-side refrigerator.
Step 1: Locate the Water Filter
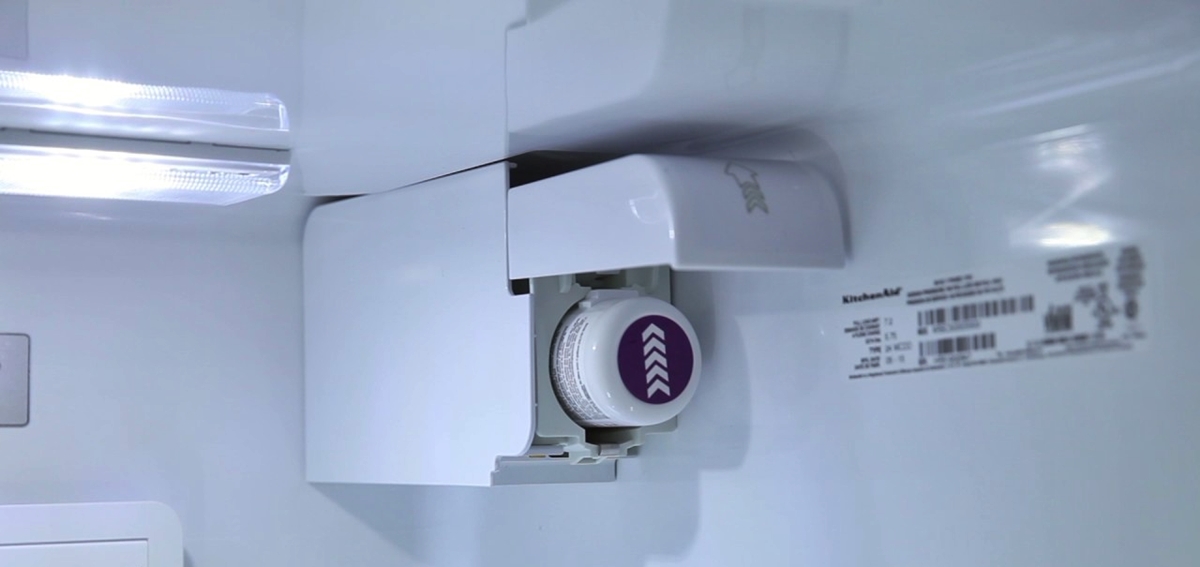
The first step in replacing the water filter in your KitchenAid side-by-side refrigerator is to locate its position. The exact location may vary depending on the specific model, but it is typically found in one of two places:
- Inside the Refrigerator: Some KitchenAid refrigerator models have the water filter located inside the refrigerator compartment. Look for a small compartment or housing usually located at the top right corner or the bottom grille area of the refrigerator. This housing may have a push-button or a twist cap for easy removal.
- Behind the Grille: For other models, the water filter is located behind the grille at the bottom of the refrigerator. The grille can be removed by applying gentle pressure on the sides and pulling it forward. Once the grille is removed, you should see the water filter housing.
To ensure you are looking at the correct part, refer to your refrigerator’s manual or the manufacturer’s website for specific instructions and diagrams for your model.
It’s important to note that some refrigerators have a bypass plug installed in place of a water filter. This bypass plug allows water to flow freely even if a filter is not present. If your refrigerator has a bypass plug, it will be located in the same position as the water filter. Simply remove the plug before installing the new filter.
Take a moment to familiarize yourself with the location of the water filter in your refrigerator. This will help you navigate the replacement process smoothly. With the water filter location identified, you’re ready to move on to the next step.
Step 2: Shut Off the Water Supply
Before replacing the water filter in your KitchenAid side-by-side refrigerator, it’s important to shut off the water supply to prevent any water leakage. Follow these steps to safely turn off the water supply:
- Locate the water supply valve: The water supply valve is typically located behind the refrigerator. It may be located on the wall, under the sink, or in a nearby cabinet. Look for a valve with a lever or a knob.
- Turn off the water supply: Once you’ve located the valve, turn it clockwise or to the “Off” position to shut off the water flow. This will prevent water from flowing into the refrigerator during the filter replacement process.
- Test the water supply: After shutting off the valve, test the water supply to ensure it’s completely shut off. This can be done by dispensing water from the refrigerator’s water dispenser. If no water flows, then the supply is successfully turned off.
Shutting off the water supply is crucial to prevent any accidents or water damage during the filter replacement. If you’re unsure about the location of the water supply valve or how to turn it off, refer to your refrigerator’s manual or consult a professional plumber.
By taking the time to shut off the water supply, you can proceed with confidence to the next step of replacing the water filter in your KitchenAid side-by-side refrigerator.
Step 3: Prepare the New Water Filter
Now that you have shut off the water supply, it’s time to prepare the new water filter for installation in your KitchenAid side-by-side refrigerator. Follow these steps to ensure the filter is ready:
- Check the packaging: Carefully remove the new water filter from its packaging. Inspect the filter for any signs of damage or defects. Ensure that it is compatible with your refrigerator model and meets the manufacturer’s specifications.
- Remove any protective covers: Some water filters come with protective covers or seals. If your new filter has one, remove it before installation. These covers are designed to keep the filter clean and prevent any contaminants from entering the filter.
- Flush the filter (if required): Certain water filters require a flushing process before installation. Refer to the instructions provided with the filter to determine if flushing is necessary. If required, follow the recommended flushing procedure to remove any impurities and ensure optimal performance of the filter.
- Soak the filter (if required): In some cases, the new filter may need to be soaked in water before installation. This step helps to activate the filter media and remove any air trapped inside. If soaking is recommended, follow the instructions provided by the manufacturer.
It’s important to follow the preparation instructions specific to your new water filter to ensure proper functioning and longevity. Taking the time to properly prepare the filter will help deliver clean and refreshing water from your KitchenAid side-by-side refrigerator.
Step 4: Remove the Old Water Filter
With the new water filter prepared, it’s time to remove the old one from your KitchenAid side-by-side refrigerator. Follow these steps to safely and easily remove the old water filter:
- Locate the filter housing: Refer to the previous step where you identified the location of the water filter. In most cases, the filter housing will be found either inside the refrigerator or behind the grille at the bottom of the refrigerator.
- Unlock the filter housing: Depending on your refrigerator model, the filter housing may have a locking mechanism to secure the filter in place. Look for a button, lever, or knob that can be twisted or pushed to release the filter housing.
- Remove the old filter: Once you have unlocked the filter housing, carefully pull the old water filter out of the housing. Some water may drip, so be prepared with a towel or rag to catch any spills.
- Discard the old filter: Promptly dispose of the old water filter. It’s important to properly dispose of old filters as they may contain contaminants. Follow local regulations or recycling guidelines for appropriate disposal methods.
Keep in mind that the process of removing the old water filter may vary slightly depending on your refrigerator model. Always refer to your refrigerator’s manual or the manufacturer’s instructions for specific guidance.
By following these steps, you have successfully removed the old water filter from your KitchenAid side-by-side refrigerator. Now, you’re ready to proceed to the next step of installing the new water filter.
Step 5: Install the New Water Filter
With the old water filter removed, it’s time to install the new one in your KitchenAid side-by-side refrigerator. Follow these steps to ensure a proper installation:
- Position the new filter: Take the new water filter and align it with the slot or housing where the old filter was removed. Ensure that the filter is properly oriented, with any arrow or label indicating the correct direction of installation.
- Insert the new filter: Gently push the new filter into the housing until it is fully seated. Depending on your refrigerator model, you may need to twist or lock the filter into place to secure it.
- Lock the filter housing (if applicable): If your filter housing has a locking mechanism, follow the manufacturer’s instructions to securely lock the housing with the new filter installed.
- Check for a snug fit: Ensure that the new water filter is securely in place and there are no gaps or loose connections. A proper fit is important for the filter to work effectively.
It’s essential to properly install the new water filter to ensure optimal performance and filtration of your KitchenAid side-by-side refrigerator. Take your time to ensure the filter is correctly positioned and securely fastened.
Once the new water filter is successfully installed, you’re ready to proceed to the next step of resetting the water filter indicator.
Step 6: Reset the Water Filter Indicator
After installing the new water filter in your KitchenAid side-by-side refrigerator, it’s important to reset the water filter indicator. This indicator notifies you when it’s time to replace the filter for optimal performance. Follow these steps to reset the water filter indicator:
- Locate the water filter indicator: The water filter indicator is usually located on the refrigerator control panel or display. It may be labeled as “Filter Reset” or have a specific icon or symbol indicating the filter.
- Press and hold the indicator button: Press and hold the water filter indicator button for approximately 3-5 seconds. Some refrigerator models may require a combination of buttons to be pressed simultaneously. Refer to your refrigerator’s manual for specific instructions.
- Wait for the indicator to change: After holding the button, wait for the water filter indicator to change. This can vary depending on the model but may involve a light turning off or a message disappearing from the display.
- Confirm the reset: Verify that the water filter indicator has been successfully reset. This can be done by dispensing water from the refrigerator’s water dispenser and checking if the indicator remains off or does not display any messages related to the filter.
By resetting the water filter indicator, you’ll ensure accurate monitoring of the filter’s lifespan and receive timely reminders for future replacements. It’s important to note that the reset process may differ from model to model, so consult your refrigerator’s manual for precise instructions.
With the water filter indicator reset, you’re almost done. The next step is to turn on the water supply and check for any leaks.
Step 7: Turn On the Water Supply
After successfully installing the new water filter in your KitchenAid side-by-side refrigerator and resetting the water filter indicator, it’s time to turn on the water supply. Follow these steps to ensure a smooth and leak-free process:
- Locate the water supply valve: Refer to Step 2 where you shut off the water supply. The valve should be in the same location. Remember to turn it counterclockwise or to the “On” position to restore the water flow.
- Check for leaks: Once the water supply is turned on, carefully inspect the area around the water filter and connections for any signs of leaks. Look for drips, puddles, or moisture. If you notice any leaks, immediately turn off the water supply and address the issue before proceeding.
- Run water through the dispenser: To flush out any air or impurities from the new filter, dispense water from the refrigerator’s water dispenser for a few minutes. This will also help ensure the proper functioning of the filter and enhance the taste and quality of the water.
Turning on the water supply is a crucial step in the water filter replacement process. Ensuring there are no leaks and running water through the dispenser will help you confirm that the new filter is installed correctly and functioning properly.
With the water supply turned on and any potential leaks addressed, you’re almost done. The next step is to check for any additional leaks and validate the successful replacement of the water filter.
Step 8: Check for Leaks
After turning on the water supply and running water through the dispenser, it’s crucial to check for any leaks to ensure a successful water filter replacement in your KitchenAid side-by-side refrigerator. Follow these steps to perform a thorough leak check:
- Inspect the filter connections: Carefully examine the area around the filter connections, both at the filter housing and the water supply line. Look for any signs of leaks, such as dripping water, wet spots, or moisture.
- Check the water dispenser area: Take a close look at the water dispenser area on the front of the refrigerator. Look for any water collecting on or around the dispenser, as this may indicate a leak in the water filter or dispenser line.
- Observe the floor under the refrigerator: Check the floor beneath the refrigerator for any signs of water pooling or dripping. This could be an indication of a leak further up in the water filter system.
- Run your hand along the connections: Carefully run your hand along the filter connections, feeling for any moisture or water droplets. Pay close attention to the fittings and seals to detect any leaks that may not be immediately visible.
- Monitor for any changes: Leave the refrigerator running with the water supply on for a few minutes while continuing to observe the areas mentioned above. If you notice any sudden changes or new signs of leaks, promptly address the issue.
It’s essential to thoroughly check for leaks to prevent water damage to your refrigerator or surrounding areas. Be diligent in your inspection and take immediate action if you identify any leaks during this process.
Once you’ve completed the leak check and confirmed that there are no leaks, you can be confident in the successful replacement of the water filter in your KitchenAid side-by-side refrigerator.
Step 9: Dispose of the Old Water Filter
With the new water filter successfully installed in your KitchenAid side-by-side refrigerator, it’s important to properly dispose of the old filter. Follow these steps to ensure safe and responsible disposal:
- Remove the old water filter: If you haven’t done so already, carefully remove the old water filter from your refrigerator following the instructions provided in Step 4.
- Seal the filter: To prevent any potential leakage or contamination, it’s recommended to seal the old water filter in a plastic bag or wrap it in plastic wrap. This will help contain any residual water or contaminants inside the filter.
- Check local guidelines: Consult your local waste management authority or recycling center to determine the appropriate method of disposal for water filters. Different regions may have specific regulations or guidelines for disposing of water filters.
- Follow recycling options: Many water filters contain materials that can be recycled. Look for recycling programs or options in your area that accept water filters. Some manufacturers or retailers may also have recycling programs available.
- Dispose of properly: Once you have identified the appropriate method of disposal, follow the recommended steps. This may involve placing the sealed filter in your regular trash bin, dropping it off at a recycling center, or participating in a designated recycling program.
Properly disposing of the old water filter helps prevent environmental pollution and ensures the responsible management of waste. Be sure to check local guidelines and take advantage of recycling options whenever possible.
With the removal and disposal of the old water filter completed, you have successfully completed all the steps necessary to replace the water filter in your KitchenAid side-by-side refrigerator. Enjoy clean and refreshing water from your freshly installed filter!