
Measuring and Selecting the Right Curtain Rods
When it comes to hanging curtains, selecting the right curtain rods is an essential step to ensure a proper fit and aesthetic appeal. Before making any purchases, you need to measure your windows accurately. Here’s a step-by-step guide to help you measure and select the right curtain rods:
- Measure the window width: Using a measuring tape, measure the width of your window frame from one end to the other. Make sure to take the measurements at the top, middle, and bottom of the window to account for any variations.
- Account for curtain overlap: To create a fuller look and allow the curtains to drape properly, add approximately 4 to 8 inches to each side of the window width measurement. This will give you the ideal curtain rod width.
- Determine the curtain length: Measure the desired length of your curtains from the top of the curtain rod down to where you want them to hang. Take into consideration any floor-length requirements or personal preferences for how much the curtains should puddle on the floor.
- Select the curtain rod type: There are various types of curtain rods available, each with its own unique features and installation requirements. Choose between tension rods, standard rods, decorative rods, or traverse rods based on your specific needs and style preferences.
- Consider the weight of your curtains: If you have heavier curtains or drapes, make sure to choose a curtain rod that can support their weight. Look for curtain rods with sturdy brackets and a higher weight capacity.
- Choose the rod material: Curtain rods are available in a wide range of materials, including metal, wood, and plastic. Consider the overall style of your room and the durability of the material when making your selection.
By following these steps and accurately measuring your windows, you can confidently select the right curtain rods that not only fit perfectly but also complement your curtains and enhance the overall look of your space.
Gathering the Necessary Tools and Materials
Before you embark on the process of assembling and attaching curtain rods, it’s essential to gather all the necessary tools and materials. Having everything ready will make the installation process much smoother. Here’s a list of the tools and materials you’ll need:
- Curtain rods: Make sure you have the correct size and type of curtain rods that you measured and selected in the previous step. Ensure that they come with all the necessary brackets, finials, and any additional hardware.
- Mounting hardware: Depending on your window and wall type, you may need screws, anchors, or wall mounts to securely attach the curtain rod brackets. Check the packaging of your curtain rods to determine the specific hardware required.
- Level: A level will help you ensure that your curtain rods are straight and even. Choose a level that is long enough to cover the width of your window for accurate results.
- Measuring tape: You’ll need a measuring tape to double-check the distance between the brackets and ensure that they are positioned correctly.
- Pencil: Use a pencil to mark the precise spots where you’ll be installing the curtain rod brackets. This will help you maintain accuracy during the installation process.
- Power drill or screwdriver: If your curtain rod requires mounting screws, you’ll need a power drill or screwdriver to securely attach the brackets to the wall. Make sure you have the appropriate drill or screwdriver bits.
- Curtains and curtain rings: Lastly, make sure you have the curtains that you plan to hang and any necessary curtain rings or hooks if required. This will allow you to ensure that the curtain rods are positioned correctly and provide a proper fit for your curtains.
By gathering all the necessary tools and materials in advance, you’ll save time and frustration during the installation process. Double-checking your checklist will ensure a smooth and efficient installation of your curtain rods.
Assembling and Attaching the First Curtain Rod
Now that you have all the necessary tools and materials ready, it’s time to assemble and attach the first curtain rod. Follow these step-by-step instructions to ensure a proper installation:
- Prepare the brackets: Start by attaching the brackets to the ends of the curtain rod. Follow the manufacturer’s instructions for your specific curtain rod to ensure proper assembly. Some brackets may require screws to secure them in place, while others may have a clip-on mechanism.
- Mark the bracket placement: Use a pencil to mark the exact spots where you’ll be installing the brackets. Measure the distance from the window frame or wall, depending on your preference, and ensure that the marks are level and aligned.
- Attach the brackets: If you’re working with wood or drywall, you may need to use anchors or wall mounts for added stability. Use a power drill or screwdriver to securely attach the brackets to the wall using the appropriate hardware. Make sure to double-check the levelness of the brackets as you install them.
- Place the curtain rod on the brackets: Once the brackets are securely attached, place the assembled curtain rod onto the brackets. Ensure that it sits snugly and evenly on the brackets.
- Tighten the brackets: If your curtain rod brackets have any tightening mechanisms, use them to secure the curtain rod in place. This will prevent any movement or slippage once the curtains are hung.
With the first curtain rod properly assembled and attached, you’re one step closer to completing your curtain hanging project. Take a moment to admire your progress, but remember that there’s still more work to be done!
Preparing the Second Curtain Rod
Now that you’ve successfully assembled and attached the first curtain rod, it’s time to prepare the second curtain rod for installation. Here’s what you need to do to get the second rod ready:
- Measure and mark the placement: Using the same measurements as you did for the first rod, mark the exact spots where the brackets for the second rod will be installed. Ensure that the marks are level and aligned with the first rod.
- Double-check the alignment: Before proceeding, double-check that the brackets for the second rod are aligned properly with the brackets for the first rod. This will ensure a symmetrical and visually appealing installation.
- Repeat the assembly process: Just like the first rod, assemble the brackets onto the ends of the second curtain rod following the manufacturer’s instructions. Make sure that everything is securely attached and tightened.
- Attach the brackets: Using the appropriate hardware, attach the brackets for the second rod to the marked spots on the wall or window frame. Similar to the first rod, ensure that the brackets are level and securely fastened.
- Place the second rod on the brackets: Once the brackets are attached, place the assembled second curtain rod onto the brackets. Ensure that it sits evenly and securely.
- Tighten the brackets: If there are any tightening mechanisms on the brackets, use them to secure the second rod in place.
By carefully preparing the second curtain rod, you’ll ensure a seamless and professional-looking installation. Taking the time to measure, align, and securely attach the brackets will contribute to a visually balanced and harmonious final result.
Attaching the Second Curtain Rod to the First
With both curtain rods prepared and in place, the next step is to securely attach the second rod to the first rod. Follow these instructions to ensure a stable and aligned connection between the two rods:
- Align the brackets: Start by aligning the brackets of the second rod with the brackets of the first rod. Ensure that they are positioned properly to create a seamless connection and maintain the desired distance between the rods.
- Secure the connection: Depending on the type of curtain rod you have, there may be specific connectors or hardware designed to attach multiple rods together. Follow the manufacturer’s instructions to secure the connection between the rods using the provided connectors or hardware. Double-check that the connection is tight and secure.
- Level the rods: Once the second rod is attached to the first, use a level to ensure that both rods are straight and align evenly. Adjust the connection and brackets if needed to achieve a level and visually appealing result.
- Tighten the brackets: If there are any tightening mechanisms on the brackets where the rods are connected, use them to tighten and secure the rods together. This will prevent any movement or slippage.
By attaching the second curtain rod to the first, you’ve successfully created a unified and sturdy structure to hang your curtains. Take a step back to admire the aligned and connected rods before moving on to the next steps.
Adjusting and Leveling the Curtain Rods
Now that both curtain rods are securely attached, it’s time to make any necessary adjustments and ensure that they are level. Here’s how you can adjust and level the curtain rods:
- Check for levelness: Use a level to determine if both individual rods and the connection between them are straight and level. Adjust the brackets and connectors as needed to achieve a horizontal alignment.
- Double-check the alignment: Step back and visually inspect the rods to ensure that they are aligned properly both horizontally and vertically. Make any minor adjustments to ensure a visually balanced and symmetrical appearance.
- Tighten any loose connections: If you notice any loose connections or brackets, tighten them to ensure stability. This will prevent any movement or shifting of the curtain rods once the weight of the curtains is applied.
- Ensure smooth curtain movement: Slide the curtains along the rods to ensure that they move smoothly without any obstructions or snags. If needed, make slight adjustments to the brackets or rods to ensure fluid movement.
- Consider using a curtain rod leveler: If you’re struggling to achieve an even and level setup, you may want to invest in a specialized curtain rod leveler. These tools are designed to help you easily adjust and align curtain rods for a professional finish.
By taking the time to adjust and level the curtain rods, you’ll achieve a visually appealing and stable installation. A well-aligned and level curtain rod setup will provide a solid foundation for hanging your curtains and ensure a polished look for your window treatments.
Hanging the Curtains on the Rods
With the curtain rods properly adjusted and level, it’s time to hang your curtains. Follow these steps to ensure a smooth and effortless curtain hanging process:
- Prepare the curtains: If your curtains have rod pockets, slide the curtain rod through the pocket, ensuring that the curtain fabric is evenly distributed along the rod. For curtains with grommets or loops, simply thread the rod through the openings.
- Evenly distribute the fabric: Once the curtains are on the rod, evenly distribute the fabric along its length. This will ensure a balanced appearance when the curtains are hung.
- Slide the curtains onto the rods: Carefully lift the curtain rods and slide them into the brackets, ensuring that the rods rest securely in the brackets’ grooves or holders.
- Smooth out any wrinkles: After hanging the curtains, gently smooth out any wrinkles or creases in the fabric. You can use your hands or a fabric steamer to remove any stubborn wrinkles for a clean, polished look.
- Test the curtain movement: Slide the curtains back and forth along the rods to test their movement. Ensure that they glide smoothly without getting stuck or catching on any brackets or obstructions.
Take a step back and admire your perfectly hung curtains. Ensure that they hang evenly and drape nicely, enhancing the overall aesthetic of your space.
With the curtains now adorning the rods, your window treatment project is almost complete. The final step is to make some minor adjustments, if necessary, to achieve a professional finish.
Tips and Tricks for a Professional Finish
To ensure a professional finish for your curtain rod installation, consider implementing these helpful tips and tricks:
- Use curtain holdbacks or tiebacks: If you want to showcase your curtains or let more light into your space, consider using curtain holdbacks or tiebacks. These decorative accessories can hold the curtains to the side when open, adding style and functionality to your window treatments.
- Opt for curtain rings or hooks: For curtains that require movement and pleating, consider using curtain rings or hooks instead of threading the rod through a pocket or loops. This will allow for smoother and more fluid curtain movement.
- Add curtain finials: Finials are decorative end caps that can be added to the rod to enhance its visual appeal. Choose finials that match your design style and complement the overall look of your curtains and room decor.
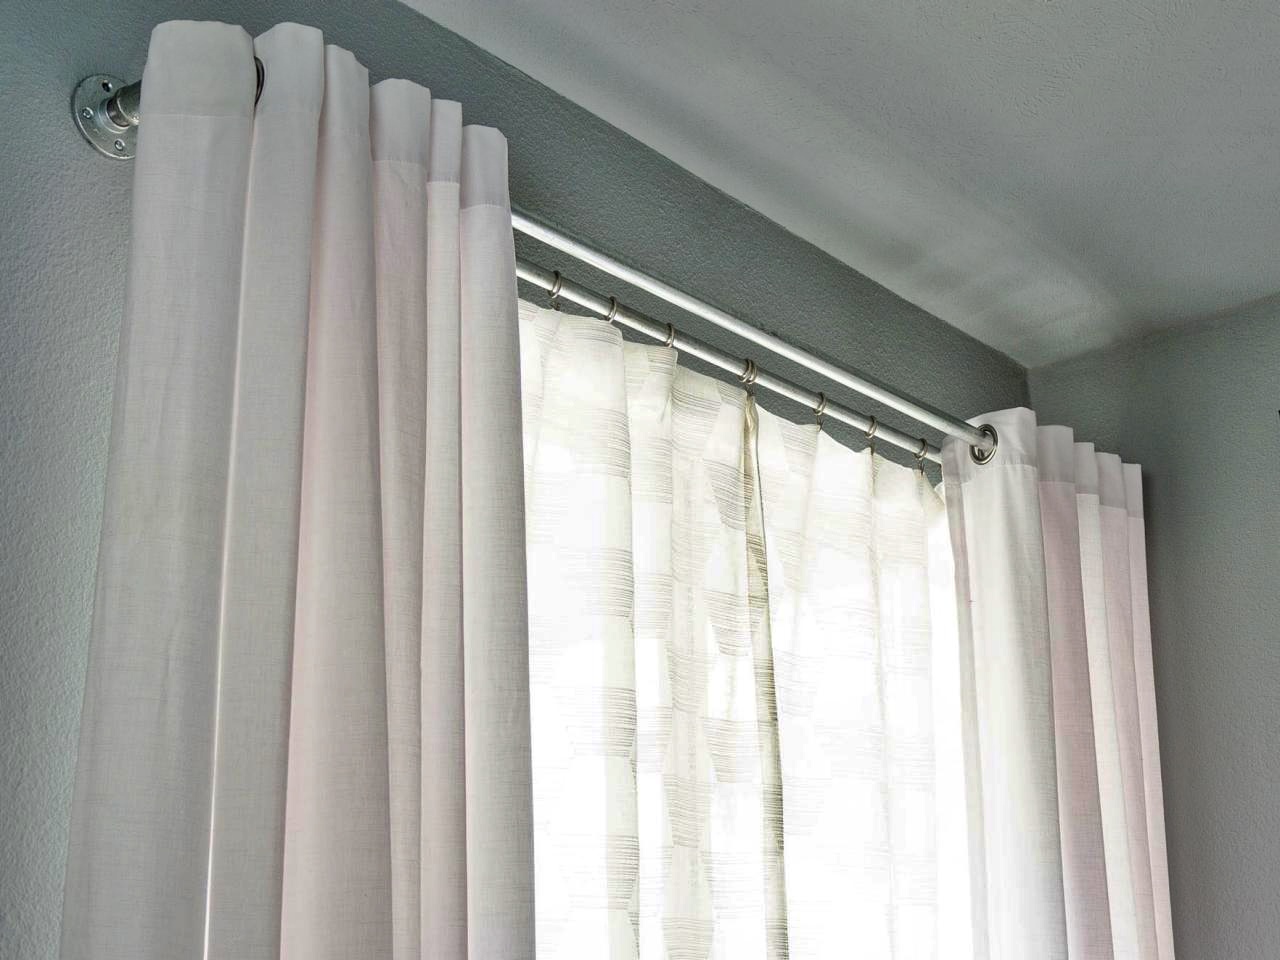
- Consider double curtain rods: If you want to layer multiple curtains or sheers and drapes, consider using double curtain rods. This will allow you to easily hang two layers of curtains and control the amount of light and privacy in your space.
- Use a stud finder for added support: If you’re working with heavy curtains or drapes, it’s essential to ensure that your brackets are securely fastened to wall studs. Use a stud finder to locate the strongest points to anchor your curtain rod brackets for added stability.
- Add extra support if needed: If you find that your curtain rods are sagging or not holding up well under the weight of your curtains, consider adding additional support brackets in the middle of the rod. This will provide added stability and prevent any bowing or bending.
- Regularly clean and maintain your curtains: To keep your curtains looking their best, be sure to regularly clean and maintain them according to the manufacturer’s instructions. This will help preserve their color, texture, and overall appearance.
By following these tips and incorporating these tricks, you’ll achieve a professional and polished finish for your curtain rod installation. Your curtains will not only enhance the visual appeal of your space but also provide the desired functionality in terms of privacy and light control.