
Materials Needed
Before you begin creating your own magnetic knife block, make sure you have gathered all the necessary materials. Here is a list of what you will need:
- A wooden block: Choose a sturdy and durable wood, such as oak or maple, with a thickness of at least 1 inch.
- Magnets: Select strong neodymium magnets, preferably cylindrical or rectangular in shape, that will securely hold your knives.
- A drill: Make sure to have a drill with the appropriate drill bit size for the magnets you have chosen.
- Sandpaper or sanding block: You will need this to smooth out the surface of the wooden block.
- Stain or paint (optional): If you want to add some color or enhance the aesthetics of your knife block, you can choose a stain or paint of your preference.
- Mounting system (optional): If you want to hang your magnetic knife block on the wall, you will need a suitable mounting system, such as brackets or hooks.
- Protective finish: To protect the wooden block from moisture and wear, consider applying a food-safe protective finish, such as mineral oil or beeswax.
- Safety goggles and gloves: Always prioritize safety and wear goggles and gloves when working with tools and materials.
With these materials ready, you are well-equipped to embark on the journey of creating your very own magnetic knife block. Let’s move on to the next step!
Step 1: Gather the Necessary Materials
Before you dive into making your magnetic knife block, it’s essential to gather all the necessary materials. Having everything prepared ahead of time will ensure a smooth and efficient crafting process. Here’s a breakdown of what you’ll need:
- Wooden Block: Start by choosing a high-quality wooden block that is both sturdy and durable. Opt for hardwoods like oak, maple, or walnut, with a thickness of at least 1 inch. You can purchase pre-cut blocks or cut them to your desired size.
- Magnets: Select strong neodymium magnets for this project. These powerful magnets will securely hold your knives in place. Consider using cylindrical or rectangular magnets, depending on your desired aesthetic.
- Drill: Make sure you have a drill with a bit that matches the diameter of your magnets. The drill will be used to create small holes in the wooden block for securely inserting the magnets.
- Sandpaper or Sanding Block: Smooth out the surface of your wooden block with sandpaper or a sanding block. This will not only create a polished finish but also remove any rough edges.
- Stain or Paint (Optional): If you want to add a touch of personalization to your magnetic knife block, consider using stain or paint. Choose a color that complements your kitchen’s aesthetic or matches your personal style.
- Mounting System (Optional): If you prefer to have your knife block mounted on the wall, you’ll need a suitable mounting system. This could be as simple as brackets or hooks that can support the weight of the block and knives.
- Protective Finish: To keep your wooden block protected from moisture and daily wear, apply a food-safe protective finish. Options include mineral oil or beeswax, which will not only enhance the block’s appearance but also improve its longevity.
- Safety Equipment: Prioritize your safety by wearing protective goggles and gloves while working on this project. This will help prevent any accidents and ensure your fingers remain intact.
Now that you have gathered all the necessary materials, you’re ready to move on to the next step: preparing the wooden block. Let’s get started!
Step 2: Prepare the Wooden Block
Now that you have all the materials ready, it’s time to prepare the wooden block that will serve as the foundation for your magnetic knife block. Follow these steps to ensure a solid base for your project:
- Clean the Block: Start by cleaning the wooden block to remove any dirt, dust, or debris. Wipe it down with a damp cloth and allow it to dry completely.
- Smooth the Surface: Use sandpaper or a sanding block to smooth out the surface of the wooden block. Start with a coarse grit sandpaper to remove any roughness or imperfections, then gradually move to finer grits for a polished finish. Ensure that all sides and edges are smooth and even.
- Round the Corners (Optional): If you prefer a more aesthetic look, you can use sandpaper or a router to round the corners of the block. This step adds a touch of elegance to the final product.
- Wipe Clean: Once you have finished sanding, wipe the block with a clean, dry cloth to remove any residual sawdust. This will create a clean surface for the next steps.
The preparation phase is a crucial step in ensuring the quality and longevity of your magnetic knife block. By cleaning and smoothing the wooden block, you create an ideal surface for the magnets to adhere to and prevent any potential damage to your knives. With the block prepared, you are now ready to move on to the next step: measuring and marking the placement of the magnets. Exciting times lie ahead!
Step 3: Measure and Mark the Placement of the Magnets
With the wooden block prepared, it’s time to measure and mark the precise placement of the magnets. This step is crucial for ensuring that your knives will be securely held in place. Follow these steps for accurate placement:
- Decide on the Configuration: Determine how you want to arrange the magnets on the wooden block. You can choose a straight row, a diagonal pattern, or any other configuration that suits your preferences.
- Measure the Magnet Spacing: Measure the length of your wooden block and divide it by the number of magnets you want to install. This will give you an equal spacing between each magnet.
- Mark the Measurement: Use a pencil or marker to make precise marks on the wooden block, indicating where each magnet will be placed. Ensure that the marks are evenly spaced and aligned according to your chosen configuration.
- Consider Knife Sizes: Keep in mind the sizes of the knives you plan to store in your magnetic knife block. Place the marks in such a way that the magnets will allow for easy and secure placement of a variety of knife sizes.
It is important to take your time with this step to ensure accuracy and functionality. The proper placement of the magnets will determine how securely your knives will be held in the block. By measuring and marking the placement of the magnets, you will achieve a well-organized and efficient storage solution for your knives. Now, let’s move on to the next step: drilling holes for the magnets!
Step 4: Drill Holes for the Magnets
Now that you have marked the placement of the magnets on your wooden block, it’s time to drill holes that will accommodate the magnets securely. Follow these steps to ensure precise and accurate drilling:
- Select the Drill Bit: Choose a drill bit that matches the diameter of your magnets. It’s crucial to use a bit that is slightly smaller than the magnets to create a snug fit.
- Insert the Drill Bit: Attach the selected drill bit to your drill and tighten it securely in place.
- Drill the Holes: Place the wooden block on a stable work surface and, using the marks as your guide, carefully drill holes at the designated spots. Apply gentle and even pressure as you drill, ensuring the holes are deep enough to insert the magnets.
- Clean the Holes: After drilling all the holes, use a small brush or a compressed air canister to remove any wood shavings or debris from the holes. This will ensure the magnets can fit properly.
Precision is key when drilling the holes for the magnets. Take your time and double-check the alignment of the holes with the marks you made earlier. With careful execution, you will create evenly spaced and aligned holes that are ready to receive the magnets. Now that the holes are drilled, let’s move on to the next step: inserting the magnets into the drilled holes!
Step 5: Insert the Magnets into the Drilled Holes
With the holes drilled into the wooden block, you are now ready to insert the magnets. Follow these steps to ensure a secure and stable placement:
- Apply Adhesive (Optional): If you want to add an extra layer of stability, you can apply a small amount of strong adhesive inside each drilled hole before inserting the magnets. Be sure to use a food-safe adhesive if you plan on placing your knives directly on the magnets.
- Insert the Magnets: Take the neodymium magnets and carefully slide them one by one into the drilled holes. Make sure the magnets fit snugly into the holes and are flush with the surface of the wooden block.
- Adjust the Magnets (If Needed): If any of the magnets are not sitting flush or are protruding slightly, use a small hammer or a mallet to gently tap them until they are aligned with the surface of the block.
It’s important to handle the magnets with care as they are extremely strong. Ensure that you work slowly and cautiously to avoid any accidents or injuries. By inserting the magnets into the drilled holes, you create a magnetic surface that will securely hold your knives in place. With the magnets in position, the next step is to secure them in place. Let’s move on to step 6!
Step 6: Secure the Magnets in Place
Now that you have inserted the magnets into the drilled holes, it’s time to ensure their stability and prevent them from coming loose. Follow these steps to securely hold the magnets in place:
- Apply Wood Glue (Optional): If you want to provide an extra layer of security, you can apply a small amount of wood glue around each magnet’s perimeter before it fully dries. This will help bond the magnets to the wooden block, creating additional stability.
- Allow the Glue to Dry: If you have applied wood glue, allow it to dry completely according to the manufacturer’s instructions. This step ensures the magnets are held firmly in place.
- Test for Stability: Give the magnetic areas a gentle tap or shake to ensure that the magnets are securely attached. If any magnets feel loose, apply a small amount of adhesive or glue to reinforce their bond with the wooden block.
Securing the magnets is a crucial step to prevent them from moving or falling out over time. By applying wood glue and testing for stability, you can ensure that the magnets remain firmly in place, ready to securely hold your knives. With the magnets secured, it’s time to refine and finish the wooden block. Let’s move on to step 7!
Step 7: Sand and Finish the Wooden Block
With the magnets securely in place, it’s time to give your wooden block a final touch of refinement and protection. Follow these steps to sand and finish the wooden block:
- Sand the Block: Begin by using sandpaper or a sanding block to smooth out any rough edges or imperfections on the wooden block. Start with a coarse grit sandpaper and gradually work your way up to a finer grit for a polished finish.
- Remove Dust: After sanding, wipe away any dust or debris from the surface of the wooden block with a clean, dry cloth.
- Apply Stain or Paint (Optional): If you desire a different aesthetic or want to protect the wood, you can apply a stain or paint of your choice. Use a brush or applicator to evenly coat the block and allow it to dry completely according to the instructions on the stain or paint product.
- Apply Protective Finish: To protect the wooden block from moisture and daily wear, consider applying a food-safe protective finish such as mineral oil or beeswax. Apply the finish according to the manufacturer’s instructions and allow it to dry completely.
- Inspect the Block: Once the finish has dried, inspect the wooden block for any rough patches or areas that need further sanding or touch-up. Sand or make necessary touch-ups until the block has a smooth and consistent appearance.
Sanding and finishing the wooden block not only enhance its aesthetic appeal but also provide added protection. The protective finish helps to preserve the wood’s integrity and prolong the life of your magnetic knife block. With the block sanded and finished, you are now ready to explore optional steps such as attaching a mounting system or proceeding to hang and arrange your knives. Let’s move on to the next steps and complete your homemade magnetic knife block!
Step 8: Attach a Mounting System (Optional)
If you prefer to have your magnetic knife block mounted on the wall, you can add a mounting system for easy storage and accessibility. Follow these steps to attach a mounting system:
- Select the Mounting System: Choose a suitable mounting system that can support the weight of the wooden block and the knives. This can include brackets, hooks, or a custom-made mounting solution.
- Mark the Mounting Position: Decide on the ideal placement for your magnetic knife block on the wall. Use a level and pencil to mark the position for mounting.
- Install the Mounting System: Follow the instructions provided with your chosen mounting system to securely attach it to the wall. Make sure it is level and firmly anchored.
- Mount the Magnetic Knife Block: Align the back of the wooden block with the mounted system on the wall. Using screws or other appropriate fasteners, attach the block to the mounting system. Ensure that the block is level and securely fixed.
Attaching a mounting system allows you to maximize space in your kitchen and keep your knives within easy reach. It also adds a stylish and organized touch to your kitchen décor. However, it’s important to ensure that the mounting system is strong and secure to prevent any accidents. With the mounting system attached, you’re ready to move on to the next step: hanging and arranging your knives.
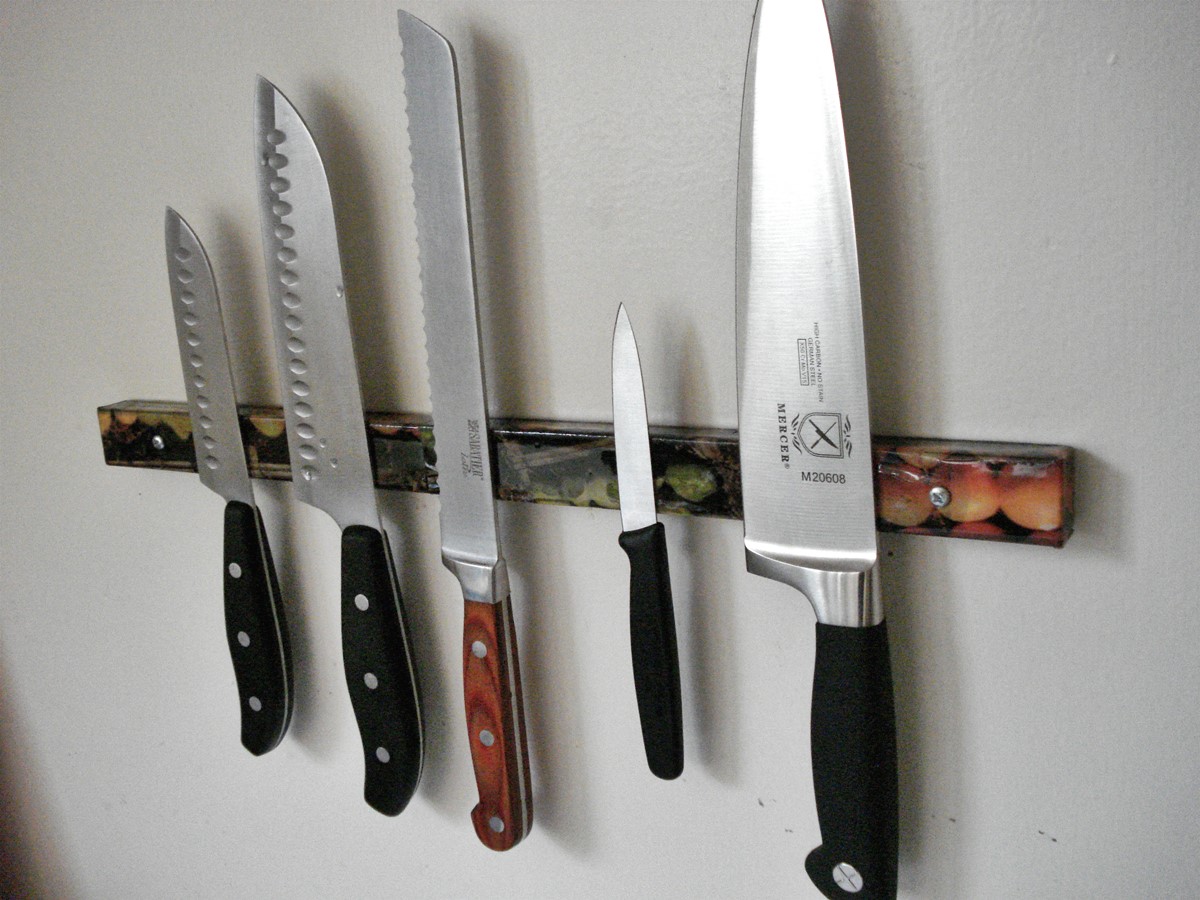
Step 9: Hang and Arrange Your Knives
Now that your magnetic knife block is complete and ready to be used, it’s time to hang and arrange your knives. Follow these steps to organize and display your knives in the most convenient and appealing way:
- Clean and Dry Your Knives: Before placing your knives on the magnetic block, make sure they are clean and completely dry. This helps to prevent any moisture-related issues and ensures a hygienic storage solution.
- Arrange the Knives: Begin by arranging your knives on the magnetic block according to their sizes and shapes. Place larger knives towards the back and smaller ones in front for easy access.
- Ensure Proper Alignment: Align the blades of your knives with the magnets, ensuring they are securely attached. This prevents any accidental slips or falls.
- Avoid Overcrowding: Ensure that there is enough space between each knife to prevent them from touching or scratching one another. This also allows for easy retrieval when selecting a specific knife.
- Showcase Your Collection: Use the magnetic knife block as an opportunity to showcase your knife collection. Arrange the knives in a visually appealing manner, allowing their unique designs and craftsmanship to shine.
By hanging and arranging your knives on the magnetic block, you not only create a practical storage solution but also turn them into a decorative element in your kitchen. This allows for easy access while adding a touch of elegance to your countertop or wall. With your knives neatly displayed, you can now enjoy the convenience and beauty of your homemade magnetic knife block!
Step 10: Enjoy Your Homemade Magnetic Knife Block!
Congratulations! You have successfully completed your DIY magnetic knife block. Now, it’s time to revel in the fruits of your labor and enjoy the benefits of having a customized and functional storage solution for your knives. Follow these final steps to fully appreciate your creation:
- Admire Your Handiwork: Take a moment to step back and admire the beauty and functionality of your homemade magnetic knife block. Be proud of the effort you put into crafting a unique piece for your kitchen.
- Access Your Knives with Ease: Experience the convenience of having your knives easily accessible and organized. With the magnetic block, you can quickly grab the knife you need, making meal preparation a breeze.
- Maintain the Block: Regularly clean and dust the surface of your magnetic knife block to keep it looking its best. Avoid using harsh chemicals that could damage the wood or magnets.
- Keep Safety in Mind: Always exercise caution when handling knives. Ensure that the knives are firmly attached to the magnets to avoid any accidents or injuries.
- Share Your Creation: Show off your homemade magnetic knife block to friends and family. They’ll surely be impressed by your craftsmanship and may even ask you to make one for them!
By following these final steps, you can truly enjoy the benefits of your homemade magnetic knife block. Embrace the convenience, organization, and aesthetics it adds to your kitchen. Whether you hang it on the wall or display it on the countertop, your magnetic knife block will be a conversation starter and a practical addition to your culinary space. Congratulations once again on your achievement!