
Materials Needed
To make a dentil shelf for a door, you will need the following materials:
- 1. Wood: Select a high-quality wood that matches the aesthetics of your door. Popular choices include oak, pine, or mahogany.
- 2. Measuring tools: A tape measure, ruler, and level are essential for accuracy in measuring the dimensions.
- 3. Saw: Choose a saw suitable for cutting the wood, such as a table saw or a handheld circular saw.
- 4. Sandpaper: Different grits of sandpaper (ranging from coarse to fine) will be needed to smooth the wood surface.
- 5. Clamps: Clamps are useful for holding the wood pieces together during assembly.
- 6. Wood glue: Invest in a strong wood glue to ensure a sturdy construction.
- 7. Nails: Depending on your preference and the type of wood, you may need finishing nails or brad nails to secure the pieces.
- 8. Paint or stain: Consider the desired look for your dentil shelf and choose an appropriate paint or stain.
- 9. Brushes or rollers: These will be needed for applying the paint or stain to the dentil shelf.
- 10. Protective equipment: Safety goggles, gloves, and a dust mask are essential for your protection during the woodworking process.
Make sure to have all the necessary materials on hand before starting the project. This will ensure a smooth and efficient process, allowing you to create a beautiful dentil shelf that will enhance the overall appearance of your door.
Step 1: Measure the Dimensions
Before you begin constructing your dentil shelf for the door, it is crucial to accurately measure the dimensions. This will ensure that the shelf fits perfectly and enhances the overall aesthetic appeal of your door. Follow these steps:
- Start by measuring the width and height of the door where you plan to install the dentil shelf. Use a tape measure or a ruler to obtain precise measurements.
- Take note of any specific measurements or restrictions that need to be considered, such as the clearance needed for the door to open and close smoothly.
- Consider the desired depth of the dentil shelf. Typically, a depth of 4 to 6 inches works well for most doors, providing enough space for decorative items or functional objects.
- Make allowances for the dentil design. Dentil patterns are typically evenly spaced rectangular blocks that extend along the length of the shelf. Measure the width and height of each dentil block and determine the spacing between them.
- Record these measurements accurately and double-check them to ensure precision.
By taking the time to measure the dimensions carefully, you will save yourself from potential problems during the construction process. Accurate measurements are crucial for creating a dentil shelf that fits seamlessly, enhancing the overall appeal of your door.
Step 2: Gather the Necessary Tools
Before you begin building your dentil shelf for the door, it’s important to gather all the necessary tools. Having the right tools on hand will ensure a smoother and more efficient construction process. Here are the essential tools you’ll need:
- 1. Tape Measure: This is crucial for accurate measurements of the dimensions.
- 2. Ruler: A ruler is helpful for marking straight lines and ensuring precise cuts.
- 3. Level: Use a level to ensure that the dentil shelf is installed evenly and straight.
- 4. Saw: Choose a saw that is suitable for cutting the chosen wood, such as a table saw or a handheld circular saw.
- 5. Sandpaper: Have a selection of sandpaper with different grits (coarse to fine) to smooth the wood surfaces.
- 6. Clamps: Clamps are useful for securely holding the wood pieces together during assembly.
- 7. Wood Glue: Invest in a high-quality wood glue that will provide a strong and durable bond.
- 8. Nails: Depending on the chosen wood and personal preference, you may need finishing nails or brad nails to secure the pieces together.
- 9. Paint or Stain: Determine whether you want to paint or stain your dentil shelf and gather the necessary tools for your chosen finish, such as brushes or rollers.
- 10. Safety Gear: Always prioritize safety by wearing goggles, gloves, and a dust mask to protect yourself during the woodworking process.
Having these tools readily available will ensure that you can proceed with the construction smoothly, without any unnecessary delays. It’s important to have everything you need within reach to make the process as efficient and enjoyable as possible.
Step 3: Select the Type of Wood
Choosing the right type of wood for your dentil shelf is essential for both its structural stability and aesthetic appeal. Depending on your personal preference and the style of your door, here are some popular options to consider:
- 1. Oak: Oak is a traditional and durable hardwood, known for its strength and beautiful grain patterns. It is an excellent choice if you want a dentil shelf with a classic look.
- 2. Pine: Pine is a softwood that is readily available and more affordable than hardwood options. It is easy to work with and can be stained or painted to match your door’s style.
- 3. Mahogany: Mahogany is a premium hardwood that offers exceptional durability and a rich, luxurious appearance. It is a popular choice for high-end dentil shelves.
- 4. Cherry: Cherry wood has a warm, reddish-brown hue and a smooth grain pattern. It ages beautifully over time and can add a touch of elegance to your dentil shelf.
- 5. Maple: Maple wood is known for its light color and fine texture. It provides a clean and contemporary look, making it a versatile choice for various door styles.
When selecting the wood, consider factors such as the door’s style, the overall design aesthetic you’re trying to achieve, and your budget. It’s essential to choose a wood type that complements the door and enhances its appearance.
Additionally, be mindful of the wood’s quality and ensure that it is properly dried and treated to prevent warping or shrinkage over time. This will help ensure the longevity and stability of your dentil shelf.
Take the time to explore different wood options and choose the one that best suits your preferences and requirements for your dentil shelf.
Step 4: Cut the Wood to the Correct Dimensions
Once you have selected the type of wood for your dentil shelf, it’s time to cut the wood pieces to the correct dimensions. Follow these steps for precise and accurate cuts:
- Refer to the measurements you took in Step 1 and mark them on your selected wood. Use a ruler or tape measure to ensure accuracy.
- Double-check your measurements to ensure they align with your desired dimensions for the dentil shelf.
- Using a saw appropriate for the chosen wood, carefully cut the wood pieces along the marked lines. Take your time and make smooth, steady cuts to achieve clean edges.
- If your dentil shelf design includes decorative dentil blocks, measure and mark their dimensions on the wood pieces according to your desired spacing.
- Make the necessary cuts to create the dentil blocks, ensuring they are the same size and shape.
- Once all the wood pieces are cut to the correct dimensions, use sandpaper with a fine grit to smooth any rough edges or surfaces.
Remember to work in a well-ventilated area and wear safety gear, including goggles and a dust mask, to protect yourself from sawdust and debris.
Take your time when cutting the wood to ensure precision and accuracy. It’s better to measure twice and cut once to avoid any mistakes and ensure a better fit during assembly.
With the wood pieces cut to the correct dimensions, you’re one step closer to creating your dentil shelf for the door.
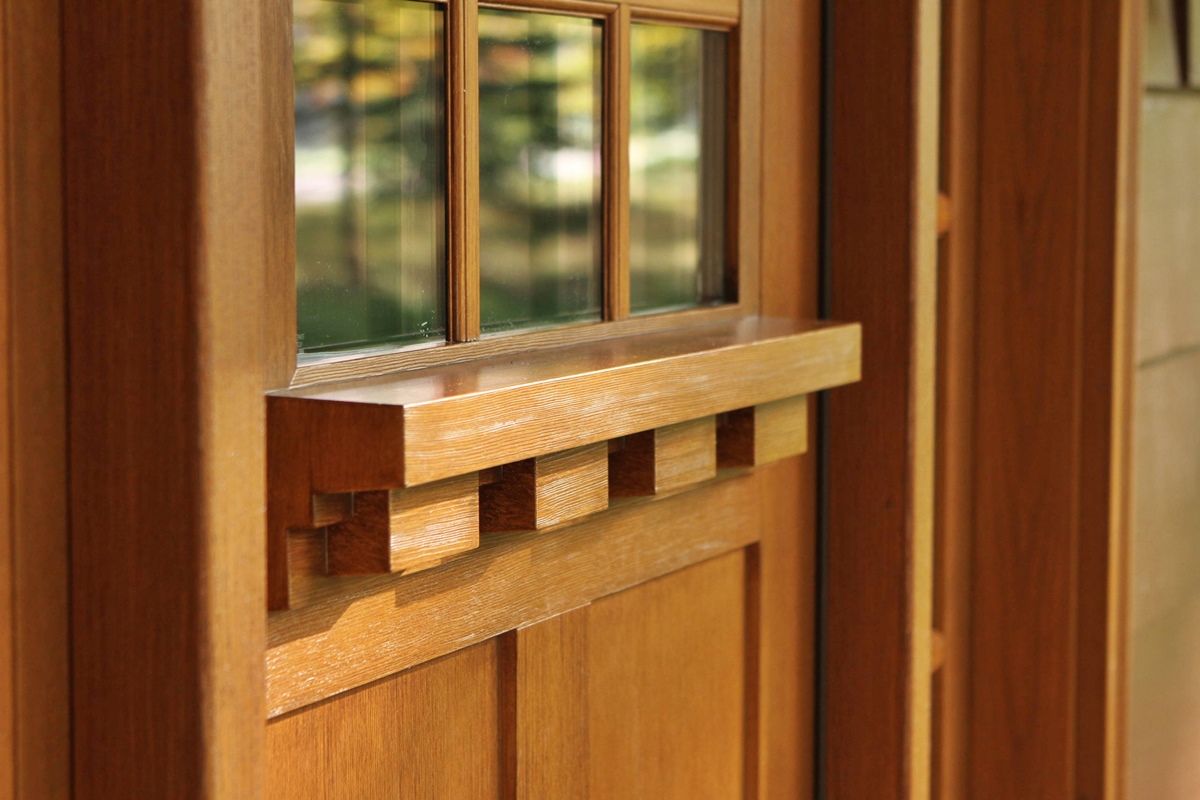
Step 5: Create the Dentil Pattern
One of the defining features of a dentil shelf is the dentil pattern. This step involves creating the evenly spaced rectangular blocks that will run along the length of the shelf. Follow these steps to create the dentil pattern:
- Measure and mark the starting point and spacing for the dentil blocks along the length of the wood piece. Use a ruler or tape measure to ensure equal spacing between each block.
- Decide on the width and height of each dentil block. Typically, these blocks are rectangular in shape, with a uniform size and spacing.
- Using a saw, carefully cut along the marked lines to create the rectangular dentil blocks. Ensure that the cuts are straight and aligned with the markings.
- Repeat this process for each dentil block, making sure that they are all the same size and shape.
- Once all the dentil blocks are cut, sand the edges and surfaces of each block to achieve smoothness and uniformity.
It’s important to take your time during this step to ensure that the dentil pattern is precise and consistent. Accurate measurements and clean cuts will contribute to the overall quality and visual appeal of your dentil shelf.
Remember to work in a well-ventilated area and wear appropriate safety gear, such as goggles and a dust mask, to protect yourself during the cutting and sanding process.
Creating the dentil pattern is a crucial step in constructing your dentil shelf, as it adds character and visual interest to the overall design.
Step 6: Sand the Wood
After cutting the wood and creating the dentil pattern, it’s essential to sand the wood to achieve a smooth and polished surface. Follow these steps to ensure the wood is properly sanded:
- Start with coarse-grit sandpaper to remove any rough edges, splinters, or imperfections on the wood surface. Be sure to sand in the direction of the grain to avoid damaging the wood.
- Gradually switch to finer-grit sandpaper to achieve a smoother finish. This will help in removing any remaining roughness and creating a more refined surface.
- Pay attention to the dentil blocks and other intricate areas, ensuring that they are evenly sanded to maintain a consistent appearance.
- Use a sanding block or a small piece of sandpaper to reach tight or curved areas that are difficult to access with larger sanding tools.
- Wipe away any sanding dust or debris with a clean cloth or a tack cloth. This will allow you to better see any imperfections that may still require sanding.
- Continue sanding until the wood feels perfectly smooth to the touch and all visible imperfections are removed.
Remember to wear a dust mask to protect yourself from inhaling any dust particles produced during the sanding process. Additionally, work in a well-ventilated area to minimize exposure to airborne particles.
Sanding the wood not only improves its appearance but also prepares it for finishing, such as painting or staining, in the next steps. Take your time and be thorough to achieve a professional-looking result.
Step 7: Assemble the Dentil Shelf
With the wood pieces cut, the dentil pattern created, and the wood sanded, it’s time to assemble the dentil shelf. Follow these steps to successfully put the shelf together:
- Arrange the wood pieces in the desired order, ensuring that the dentil blocks are evenly spaced and aligned.
- Apply a thin, even layer of wood glue to the joints where the pieces will be joined together.
- Use clamps to secure the pieces in place, applying gentle pressure to create a tight bond.
- Double-check the alignment of the pieces to ensure the dentil blocks are straight and properly positioned.
- Allow the glue to dry according to the manufacturer’s instructions, ensuring a strong and durable bond.
Depending on your design, you may also choose to reinforce the joints by using finishing nails or brad nails. Pre-drill the holes for the nails before inserting them to prevent splitting the wood.
Take your time during the assembly process to ensure the pieces are aligned correctly. Use a level to verify that the dentil shelf is straight, especially if it will be mounted on a door that may require it to be level.
Once the glue has dried and the joints are secure, remove the clamps and inspect the shelf for any gaps or imperfections. Make any necessary adjustments or repairs before proceeding to the next step.
By properly assembling the dentil shelf, you’ll ensure its stability and structural integrity, allowing it to withstand the test of time.
Step 8: Attach the Dentil Shelf to the Door
Once the dentil shelf is assembled, it’s time to attach it to the door. Follow these steps to securely mount the shelf:
- Position the dentil shelf on the door at the desired height and alignment. Consider the door’s style and any other architectural elements when determining the best placement for the shelf.
- Use a pencil to mark the locations where the shelf will be attached to the door. Make sure the marks are level and aligned to keep the shelf straight.
- Pre-drill pilot holes at the marked locations to prevent the wood from splitting when attaching screws or nails.
- Apply a thin layer of wood glue to the back of the dentil shelf in the areas that will make contact with the door. This will provide additional stability and strength to the attachment.
- Align the pilot holes on the shelf with the pre-drilled holes on the door and attach the shelf using wood screws or finishing nails. Ensure that the shelf is level and flush against the door.
- If using nails, countersink them slightly below the surface of the wood and fill the holes with wood putty for a seamless finish.
- Double-check the alignment and stability of the dentil shelf before moving on to the next step.
Take your time when attaching the dentil shelf to the door to ensure a secure and professional-looking installation. Use a level to confirm that the shelf is straight, making any necessary adjustments before fully securing it.
Once properly attached, the dentil shelf will enhance the aesthetic appeal of your door and provide a functional and decorative space for display or storage.
Step 9: Finish the Dentil Shelf
After the dentil shelf is securely attached to the door, it’s time to give it a proper finish to enhance its appearance and protect the wood. Follow these steps to finish the dentil shelf:
- If desired, fill any visible nail or screw holes with wood putty or filler. Smooth out the putty and allow it to dry completely.
- Once the putty is dry, use sandpaper to gently sand the filled areas, ensuring a seamless and smooth finish.
- Choose a finish that complements your door and aligns with your desired aesthetic. Options include paint, stain, or a clear protective sealant.
- If painting the dentil shelf, apply a primer to ensure even coverage and better adhesion of the paint.
- Apply the chosen finish to the dentil shelf, following the manufacturer’s instructions. Use a brush or roller to achieve a consistent and smooth application.
- Allow the finish to dry completely between coats, if necessary, and lightly sand in between coats for a professional finish.
- Once the finish is dry, inspect the dentil shelf for any missed spots or imperfections. Touch up as needed.
The finish will not only enhance the appearance of the dentil shelf but also protect the wood from moisture, sunlight, and general wear and tear.
Consider the overall style and aesthetic of your door, as well as the surrounding decor, when selecting the finish for the dentil shelf. It should harmonize with the existing elements in the space.
Take your time during the finishing process, ensuring that each coat is applied evenly and the final result is to your satisfaction.
With a proper finish, the dentil shelf will look polished and well-crafted, adding a touch of elegance to your door.
Step 10: Paint or Stain the Dentil Shelf
One of the final steps in completing your dentil shelf is to paint or stain it, adding the desired color and finish. Follow these steps to achieve a beautiful and professional result:
- Prepare the dentil shelf by ensuring it is clean and free from any dust or debris. Use a cloth or brush to remove any particles.
- If you choose to paint the dentil shelf, apply a primer first to ensure better adhesion and a more even finish. Use a brush or roller to apply the primer, following the manufacturer’s instructions.
- After the primer has dried, lightly sand the surface of the dentil shelf using a fine-grit sandpaper. This will help smooth out any imperfections and create a better surface for the paint or stain.
- If you prefer to stain the dentil shelf, select the appropriate wood stain color that matches your desired look. Test the stain on a small, inconspicuous area of the wood to ensure it achieves the desired result.
- Apply the paint or stain to the dentil shelf using a brush or a clean cloth, following the manufacturer’s instructions for application and drying times.
- Ensure even coverage by applying multiple coats if needed. Allow each coat to dry fully before applying the next, and lightly sand between coats for a smooth and professional finish.
- Once the final coat is dry, inspect the dentil shelf for any touch-ups or uneven spots. Make any necessary corrections to achieve the desired look.
Painting or staining the dentil shelf allows you to customize its appearance and coordinate it with the overall style of the door and the surrounding space. Choose colors that complement or contrast with the door, depending on your aesthetic preferences.
Take your time during the painting or staining process to ensure a precise and uniform finish. A well-painted or stained dentil shelf will not only enhance the visual appeal but also protect the wood from wear and tear.
With the dentil shelf beautifully painted or stained, it is now ready to be installed and enjoyed as a decorative and functional addition to your door.
Step 11: Install the Dentil Shelf to the Door
Now that your dentil shelf is fully prepared and finished, it’s time to install it onto the door. Follow these steps to ensure a secure and proper installation:
- Determine the placement of the dentil shelf on the door. Use a tape measure and level to mark the desired position accurately.
- Hold the dentil shelf against the door at the marked position and use a pencil to mark the locations for the mounting holes.
- Pre-drill pilot holes at the marked locations on the door. The size of the pilot holes should match the screws or nails you will be using for the installation.
- If using screws, place the dentil shelf against the door again and line up the mounting holes with the pilot holes. Securely attach the shelf to the door by driving the screws into the pilot holes.
- If using nails, apply a thin layer of wood glue to the back of the dentil shelf in addition to lining up the mounting holes with the pilot holes. Gently tap the nails into place using a hammer, making sure they are flush with the wood.
- Double-check the alignment and make any necessary adjustments to ensure the dentil shelf is level and securely attached to the door.
When installing the dentil shelf, take care not to over-tighten the screws or drive the nails too forcefully, as this can cause damage to the wood or weaken the attachment. Ensure that the shelf is level and securely fastened without compromising its structural integrity.
Once the dentil shelf is successfully installed, give it a gentle tug or push to ensure it is firmly attached and doesn’t wobble or move. If needed, make any final adjustments to ensure a secure and stable installation.
With the dentil shelf fully installed, you can now enjoy its decorative and functional benefits, enhancing the overall appearance of your door.
Step 12: Enjoy Your New Dentil Shelf
Congratulations! You have successfully completed the construction, finishing, and installation of your dentil shelf. Now, it’s time to sit back, relax, and enjoy the beauty and functionality it adds to your door. Here are some ways to make the most of your new dentil shelf:
- Decorate: Arrange decorative items such as vases, picture frames, or small plants on the dentil shelf to add a personal touch and enhance the aesthetic appeal of your door.
- Showcase Collections: Display your favorite collection of books, figurines, or other small items on the dentil shelf to create a focal point and showcase your unique interests.
- Create Storage: Utilize the dentil shelf to store everyday essentials such as keys, phones, or wallets, keeping them easily accessible as you enter or leave your home.
- Add Seasonal Decor: Switch up the décor on the dentil shelf according to the seasons or holidays. Incorporate festive elements or themed decorations to reflect the time of year.
- Make it Functional: Use the dentil shelf as a convenient place to store mail, to-do lists, or a small chalkboard for notes, keeping your life organized and clutter-free.
- Admire the Craftsmanship: Take a moment to appreciate the workmanship that went into creating your dentil shelf. The attention to detail and the effort put into its construction will be evident every time you look at it.
With its elegant dentil pattern, the dentil shelf adds charm, character, and a touch of sophistication to your door. It not only enhances the overall aesthetic appeal of your home but also provides a functional space for display and storage.
Regularly clean and maintain the dentil shelf by dusting or wiping it with a soft cloth to keep it looking its best. This will help preserve its beauty and ensure its longevity.
Enjoy your new dentil shelf and the positive impact it brings to your door and home!