
Choosing the Right Materials and Tools
When building a media storage cabinet, it’s crucial to start with the right materials and tools to ensure a sturdy and functional end result. Here are some key considerations for choosing the right materials and tools:
- Wood: Select a sturdy and durable wood species such as oak, birch, or maple for the cabinet’s frame. You can also choose plywood for the shelves, as it provides stability and reduces the risk of sagging.
- Measurement Tools: A tape measure, a combination square, and a level are essential for accurately measuring and marking the wood pieces to ensure precise cuts and a properly aligned cabinet.
- Circular Saw or Table Saw: These power tools are ideal for making straight and precise cuts in the wood. A circular saw is portable and suitable for smaller projects, while a table saw offers more versatility and accuracy for larger projects.
- Miter Saw or Miter Box with Backsaw: These tools are essential for making angled cuts, especially when constructing the cabinet’s frame or adding decorative elements. A miter saw provides precision and speed, while a miter box with a backsaw offers more affordability for occasional use.
- Drill: A power drill with various drill bits and screwdriver attachments is necessary for drilling holes and driving screws during the assembly process. Make sure to use the appropriate size of drill bit and screwdriver attachment to match your chosen fasteners.
- Clamps: Clamps are essential for holding the wood pieces securely in place during assembly, ensuring tight joints without gaps. Consider using pipe clamps, bar clamps, or quick-grip clamps, depending on the size and complexity of your project.
- Sandpaper and Sanding Block: Smooth out rough edges and surfaces of the wood with sandpaper or a sanding block. Start with a coarser grit to remove imperfections and gradually move to finer grits for a smooth and professional finish.
- Wood Glue and Wood Filler: Wood glue is necessary for bonding the joints firmly together during the assembly process. Wood filler helps to fill any gaps, cracks, or imperfections in the wood surface before sanding and finishing.
- Finishing Materials: Choose your preferred finish for the cabinet, such as paint, stain, or clear coat. Additionally, consider using a brush or roller, along with a paint tray or a sprayer, based on your desired finish and technique.
By carefully selecting the right materials and tools for your media storage cabinet project, you’ll be setting yourself up for success. Remember to prioritize quality, durability, and functionality to ensure a long-lasting and aesthetically pleasing result.
Measuring and Planning the Cabinet Design
Before you start cutting and assembling the wood, it’s essential to take accurate measurements and plan the design of your media storage cabinet. Proper planning will ensure that the cabinet fits your space and meets your storage needs. Here’s a step-by-step guide on measuring and planning the cabinet design:
- Measure the Available Space: Measure the height, width, and depth of the area where you intend to place the media storage cabinet. Consider any existing furniture or fixtures nearby to ensure the cabinet will fit comfortably.
- Determine the Cabinet Dimensions: Based on the available space, decide on the overall dimensions of your cabinet. Consider the size and quantity of media items you plan to store to determine the number and height of the shelves.
- Create a Sketch or Blueprint: Use graph paper or a digital design tool to create a rough sketch or blueprint of your cabinet. Include the overall dimensions, the placement of shelves, and any additional features like doors or glass panels.
- Consider Cable Management: If you plan to store media devices like game consoles or DVD players in the cabinet, think about incorporating cable management solutions. Include holes or notches in the design to route cables through the back of the cabinet for a clean and organized look.
- Account for Ventilation: If you plan to store electronic devices that generate heat, ensure that your cabinet design allows for proper ventilation. Incorporate ventilation holes or slots in the back or sides of the cabinet to prevent overheating.
- Review and Revise: Carefully examine your sketch or blueprint and make any necessary revisions. Consider functionality, aesthetics, and practicality during this stage. Ensure that the design aligns with your vision and requirements.
By taking the time to measure and plan your cabinet design, you can avoid costly mistakes and ensure a smooth construction process. Accurate measurements and a well-thought-out design will give you a clear roadmap for building a media storage cabinet that perfectly suits your needs and enhances your living space.
Cutting and Preparing the Wood
Once you have your measurements and design plan in place, it’s time to move on to the next step: cutting and preparing the wood for your media storage cabinet. Attention to detail and accurate cuts are essential to ensure proper assembly and a polished final product. Here’s the process of cutting and preparing the wood:
- Gather the Necessary Tools: Before you begin, make sure you have all the required tools for cutting wood, including a circular saw or table saw, miter saw or miter box with backsaw, and a measuring tape. Additionally, ensure that you have a stable work surface and appropriate safety gear, such as goggles and gloves.
- Mark the Wood: Based on your measurements and design plan, mark the wood pieces accordingly. Use a pencil or a marking tool to indicate where each cut should be made.
- Set Up the Saw: Set the appropriate blade height and angle on your saw according to the cuts you need to make. Ensure that the saw is securely fastened to the work surface to prevent any accidents during the cutting process.
- Cut the Wood: Using the marked lines as a guide, carefully cut the wood pieces with the appropriate saw. Take your time to ensure accurate cuts and smooth edges. For angled cuts, use a miter saw or a miter box with backsaw.
- Sand the Edges: After cutting, use sandpaper or a sanding block to smooth any rough edges or splinters. This step helps in preventing injuries and ensures a professional finish for your media storage cabinet.
- Label the Wood Pieces: To avoid confusion during the assembly process, label each wood piece with a corresponding mark or number. This labeling system will make it easier to follow your design plan and ensure that each piece is used correctly.
- Prepare the Shelf Supports: If your cabinet design includes adjustable shelves, prepare the shelf supports. Measure and mark the locations for shelf holes on the cabinet sides and use a drill with an appropriate bit to create the holes. Ensure that the holes are evenly spaced and align with each other.
By carefully cutting and preparing the wood, you lay the foundation for a well-constructed media storage cabinet. Accurate cuts and smooth edges will make the subsequent steps of assembly much easier and contribute to a professional-looking end result.
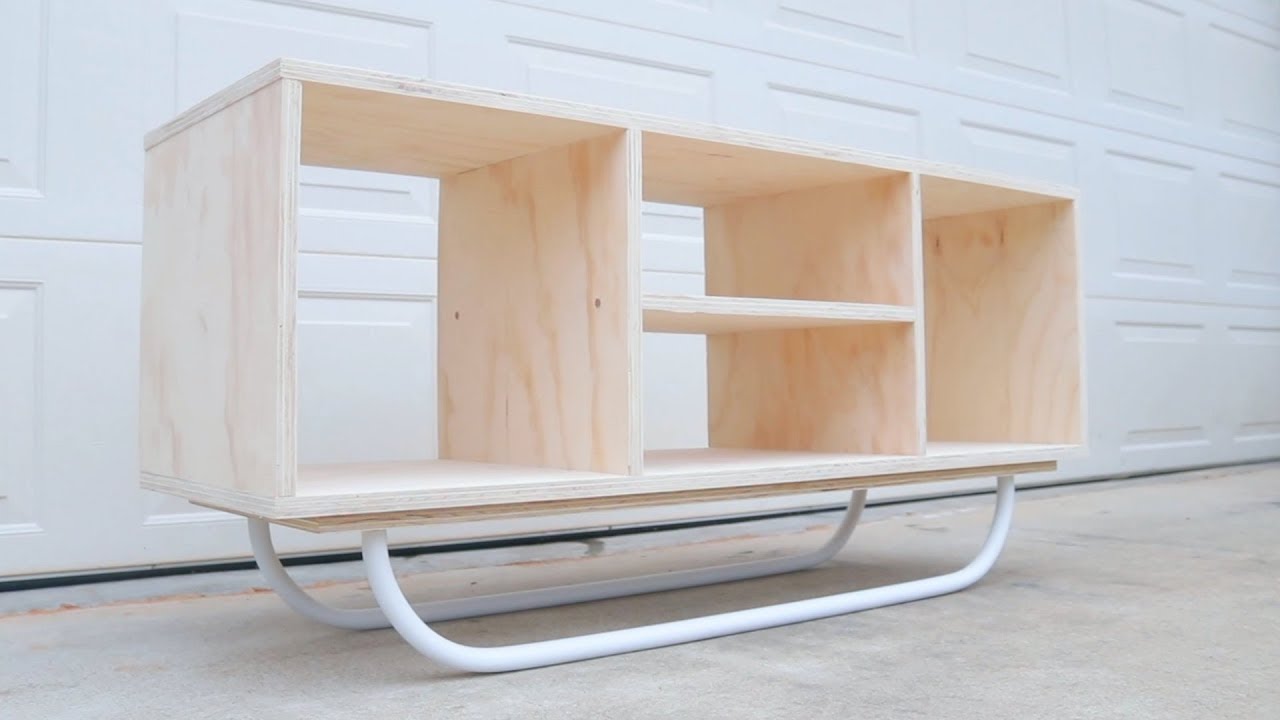
Assembling the Cabinet Frame
With the wood pieces cut and prepared, it’s time to move on to the exciting step of assembling the frame of your media storage cabinet. The frame serves as the structural backbone of the cabinet, providing stability and support. Here’s a step-by-step guide on how to assemble the cabinet frame:
- Gather the Necessary Tools: Before you begin, ensure that you have all the required tools for assembly, including a drill, screws, wood glue, clamps, and a measuring tape.
- Start with the Base: Lay out the bottom panel of the cabinet on a stable work surface. Apply wood glue along the edges where the sides of the cabinet will attach. Position the side panels perpendicular to the bottom panel and align them with the edges. Use clamps to hold the pieces together securely.
- Secure the Sides: Pre-drill pilot holes through the bottom panel into the side panels, and then insert screws to attach them. Ensure that the screws penetrate both the bottom panel and the side panels without splitting or damaging the wood.
- Attach the Back Panel: Once the sides are securely attached, position the back panel of the cabinet and apply wood glue along the edges where it will connect to the sides. Pre-drill pilot holes and use screws to attach the back panel to the sides. This step adds stability and reinforces the structure of the cabinet.
- Add the Top Panel: Apply wood glue along the edges of the side and back panels where the top panel will attach. Carefully position the top panel and secure it to the sides and back panel using screws. This completes the basic frame of the cabinet.
- Double-Check Alignment: During assembly, periodically check the alignment and squareness of the frame. Use a combination square or measuring tape to ensure that the corners form right angles and that the cabinet is not twisted or warped.
- Reinforce with Brackets: For extra stability, you can reinforce the corners of the cabinet frame with corner brackets. Pre-drill holes and attach the brackets using screws.
- Allow for Drying Time: After assembling the frame, allow sufficient time for the wood glue to dry completely before progressing to the next steps. Follow the instructions on the wood glue bottle for the recommended drying time.
Assembling the cabinet frame is a crucial step that establishes the foundation for the rest of the construction process. By following these steps carefully, you can ensure a sturdy and well-constructed frame for your media storage cabinet.
Building the Shelves
After assembling the cabinet frame, the next step in constructing your media storage cabinet is building the shelves. The shelves are where you will store your media items, so it’s important to ensure they are sturdy, adjustable if desired, and properly aligned. Here’s how to build the shelves:
- Determine Shelf Size: Based on your design plan and desired storage needs, measure and mark the desired width and depth of each shelf. Consider leaving enough space between shelves to accommodate various media item heights.
- Cut the Shelf Pieces: Using a circular saw or table saw, cut the shelf pieces from the chosen wood material. Ensure accurate cuts and smooth edges for a professional finish.
- Add Shelf Supports: If your cabinet design includes adjustable shelves, install shelf supports inside the cabinet. These can be in the form of shelf pins or brackets. Measure and mark the desired locations for the supports and install them accordingly.
- Position the Shelves: Carefully position the cut shelf pieces inside the cabinet, resting them on the installed shelf supports. Ensure they are level and properly aligned.
- Secure the Shelves: To secure the shelves in place, you have a couple of options. You can use wood screws to attach the shelves to the sides of the cabinet, or you can use shelf brackets or cleats placed underneath each shelf for added support.
- Test Shelf Stability: After securing the shelves, test their stability by applying light pressure and ensuring they can support the weight of your media items. Make any necessary adjustments or additional reinforcements if needed.
- Sand and Finish: Sand any rough edges or surfaces on the shelves with sandpaper or a sanding block. Apply your chosen finish, such as stain or paint, to match the overall aesthetic of the media storage cabinet.
- Consider Shelf Organization: Depending on your storage needs, consider incorporating additional features such as dividers, bins, or wire racks to help with organizing your media items. This can enhance the functionality and efficiency of your media storage cabinet.
Building the shelves is an important step in creating a functional and organized media storage cabinet. By following these steps and paying attention to detail, you can ensure that your shelves are sturdy, properly aligned, and tailored to meet your specific storage requirements.
Adding Doors or Glass Panels
Adding doors or glass panels to your media storage cabinet can enhance its aesthetics and functionality. Doors can provide a clean and streamlined look, while glass panels can showcase your media items and add a touch of elegance. Here’s how you can add doors or glass panels to your cabinet:
- Measure and Plan: Measure the dimensions of the cabinet openings where you want to install the doors or glass panels. Consider the style and size of doors or panels that will complement your cabinet design.
- Select the Right Material: Choose a material for the doors, such as wood, MDF, or plywood, that matches the overall aesthetic of your media storage cabinet. For glass panels, select tempered glass for safety and durability.
- Cut the Material: Using appropriate tools like a circular saw or table saw, cut the doors or panels to fit the measured dimensions. Ensure smooth edges and precise cuts for a professional finish.
- Create Door Openings: If you’re adding doors, measure and mark the location of the hinges on the cabinet frame. Use a chisel or router to carefully create the hinge mortises. Ensure the doors fit snugly and open and close smoothly.
- Install Hinges and Handles: Attach the hinges to the doors and then mount them onto the cabinet frame. Make sure the doors align properly and open and close smoothly. Add handles or knobs to the doors for easy access.
- Add Glass Panels: If you’re using glass panels, carefully place the cut glass into the openings. Use glass clips or silicone adhesive to securely hold the glass in place. Make sure to follow proper safety precautions during this step.
- Consider Decorative Elements: To enhance the appearance of the doors or glass panels, consider adding decorative elements such as trim, molding, or glass inserts. These details can elevate the overall look of your media storage cabinet.
- Sand and Finish: Sand any rough edges on the doors or glass panels, then apply a coat of paint, stain, or clear finish to match the rest of the cabinet. This will provide a polished and cohesive look for your media storage solution.
Adding doors or glass panels to your media storage cabinet not only enhances its visual appeal but also protects your media items and allows for easy access and display. By following these steps, you can seamlessly incorporate doors or glass panels into your cabinet design and create a stylish and functional storage solution.
Fitting the Cabinet Back
Fitting the cabinet back is an important step in the construction process of your media storage cabinet. The back provides structural support, stability, and a clean, finished look to your cabinet. Here’s how you can fit the cabinet back:
- Select the Right Material: Choose a suitable material for the cabinet back, such as plywood or MDF. Consider the thickness and durability of the material based on the size and weight of your cabinet.
- Measure and Cut the Back Panel: Measure the dimensions of the back of your cabinet and transfer those measurements onto the selected material. Use a circular saw or table saw to carefully cut the back panel to size.
- Ensure Proper Alignment: Position the back panel against the cabinet frame, ensuring that it is flush with the top, bottom, and sides of the cabinet. Make any necessary adjustments to ensure a perfect fit.
- Secure the Back Panel: Use screws or nails to attach the back panel to the cabinet frame. Space them evenly along the edges, ensuring they penetrate the back panel and securely hold it in place. Consider using a drill or nail gun for efficiency.
- Reinforce the Corners: To provide additional strength and stability, reinforce the corners where the back panel meets the sides of the cabinet. You can use corner braces or L-brackets to ensure a secure connection.
- Consider Cable Management: If you have media devices inside your cabinet, it’s essential to plan for cable management. Cut or drill holes in the back panel to allow for proper routing of cables and wires to keep them organized and avoid tangling.
- Sand and Finish: After attaching the back panel, sand any rough edges or surfaces using sandpaper or a sanding block. Apply a suitable finish, such as paint or stain, to match the rest of the cabinet and provide a cohesive look.
- Inspect and Make Adjustments: Take a step back and carefully inspect the fitted back panel. Ensure that it is securely attached, aligned, and provides a tight seal. Make any necessary adjustments or reinforcements as needed.
Fitting the cabinet back ensures the structural integrity and a clean appearance of your media storage cabinet. By following these steps and paying attention to detail, you can achieve a professional and finished look for your cabinet while ensuring it remains sturdy and functional.
Sanding and Finishing
Once the major construction of your media storage cabinet is complete, it’s time to focus on sanding and finishing. This step is crucial for achieving a smooth and polished appearance while also ensuring the durability and longevity of your cabinet. Here’s how to sand and finish your cabinet:
- Prepare the Workspace: Set up a well-ventilated area or outdoor space to carry out the sanding and finishing process. Cover the workspace with a drop cloth or newspaper to protect from dust and spills.
- Sand the Wood Surfaces: Use sandpaper or a sanding block to smooth out any rough patches, edges, or imperfections on the wood surfaces of your cabinet. Start with a coarser grit, such as 80 or 100, and gradually move to finer grits, such as 150 and 220, for a smooth finish.
- Round Edges and Corners: To avoid sharp edges and give your cabinet a more refined look, use sandpaper to gently round off the corners and edges of the wood pieces. Be sure to maintain consistency throughout the cabinet.
- Remove Dust: After sanding, use a soft cloth or a vacuum cleaner with a brush attachment to remove all the dust particles from the wood surfaces. This ensures a clean surface for the next step.
- Apply Wood Stain (Optional): If you want to enhance the natural color of the wood or achieve a different hue, apply wood stain evenly to the cabinet surfaces. Follow the manufacturer’s instructions for application and drying time.
- Apply Finish: Whether you used wood stain or not, it’s important to apply a protective finish to seal and preserve the wood. Choose a finish that suits your desired look, such as polyurethane, lacquer, or varnish. Apply the finish in thin, even coats using a brush or a sprayer.
- Allow Drying Time: Follow the manufacturer’s instructions for drying time between coats. Typically, it’s recommended to apply multiple coats, allowing each coat to dry completely before applying the next one. This ensures a smooth and durable finish.
- Lightly Sand Between Coats: To achieve a smooth and flawless finish, lightly sand the dried coat with fine-grit sandpaper before applying subsequent coats. This helps remove any imperfections or bumps and promotes proper adhesion of the next layer.
- Buff and Polish (Optional): If you want a glossy or satin sheen, buff the final dried coat of finish with a soft cloth or an electric buffer. This step enhances the shine and smoothness of the cabinet’s surface.
- Allow Full Cure Time: After completing the finishing process, allow the cabinet to cure fully. Follow the manufacturer’s instructions for recommended curing time before moving or using the cabinet.
Sanding and finishing are essential steps in creating a visually appealing and long-lasting media storage cabinet. By taking the time to properly sand and apply a finish, you can enhance the beauty of the wood and protect your cabinet from wear, allowing it to withstand the test of time.
Installing Hardware and Accessories
Installing hardware and accessories is the final touch in completing your media storage cabinet. These elements not only add functionality but also contribute to the overall aesthetics of the cabinet. Here’s how to properly install hardware and accessories:
- Choose Appropriate Hardware: Select hardware that matches your cabinet design and complements the style you want to achieve. This may include hinges, handles, knobs, drawer slides, and magnetic catches.
- Measure and Mark: Measure and mark the desired locations for the hardware on the cabinet. Use a pencil or a marking tool to ensure accurate placement.
- Pre-drill Pilot Holes: Before installing hardware, it’s essential to pre-drill pilot holes to prevent wood from splitting. Use an appropriate drill bit size that matches the recommended screw size for the specific hardware.
- Attach Hinges: If your cabinet has doors, attach the hinges to the door and then align and secure them to the cabinet frame using screws. Ensure that the doors open and close smoothly without any obstructions.
- Install Handles or Knobs: Mark the locations for handles or knobs on the cabinet doors or drawers. Pre-drill holes and attach the hardware securely. Check that the handles or knobs are aligned and provide a comfortable grip.
- Add Drawer Slides (If Applicable): For cabinets with drawers, install drawer slides according to the manufacturer’s instructions. Make sure the slides are level and aligned to ensure smooth opening and closing of the drawers.
- Apply Magnetic Catches (If Applicable): If you have cabinet doors that need to stay closed, install magnetic catches. Position the catches on the door and the corresponding location on the cabinet frame, ensuring a secure hold when closed.
- Secure Adjustable Shelves (If Applicable): For cabinets with adjustable shelves, install shelf pins or brackets in the predetermined locations. Ensure proper alignment by using a level or measuring tape.
- Test and Adjust: After installing the hardware, test the functionality of doors, drawers, and any movable components. Make any necessary adjustments to ensure smooth operation and proper alignment.
- Consider Additional Accessories: Depending on your needs, consider installing additional accessories such as wire racks, dividers, or drawer organizers to maximize space and enhance organization within the cabinet.
By carefully installing hardware and accessories, you can add the finishing touches to your media storage cabinet. Follow these steps precisely to ensure proper functionality, durability, and a cohesive design that aligns with your vision.
Organizing and Storing Media
Once your media storage cabinet is fully constructed and all hardware and accessories are in place, it’s time to focus on organizing and storing your media items. By implementing effective organization strategies, you can maximize the storage capacity of your cabinet and ensure easy accessibility to your media collection. Here’s how to organize and store your media:
- Categorize your Media: Begin by categorizing your media items, such as DVDs, CDs, Blu-rays, or video games. Organize them based on genre, alphabetically, or any other system that makes sense to you.
- Choose Storage Solutions: Consider using storage solutions such as media sleeves, dividers, or bins to keep your collection organized and protected. Utilize storage boxes or baskets for smaller media items and accessories.
- Utilize Adjustable Shelves: If your cabinet has adjustable shelves, customize the height of each shelf to accommodate different media item sizes. This will ensure efficient use of space and prevent wasted vertical storage.
- Consider Display Options: Reserve a section of your cabinet for displaying favorite media items or collectibles. Install glass panels or open shelving to showcase these items while adding a decorative element to your cabinet.
- Label or Sort by Genre: Label your shelves or use dividers to sort your media items by genre. This will make it easier to locate specific items quickly and maintain a neat organization system.
- Create a Digital Inventory: Consider creating a digital inventory of your media collection. This can be a simple spreadsheet or dedicated software where you keep track of the titles, formats, and other relevant details.
- Arrange by Preference or Frequency of Use: Think about arranging your media items based on your preferences, such as keeping your favorite movies or music albums within easy reach. You can also organize them based on the frequency of use.
- Take Advantage of Vertical Space: If your cabinet has ample height, utilize the topmost shelves for less frequently accessed items or items that are more decorative in nature.
- Keep Cables and Accessories Organized: Use cable management solutions such as cable ties or cable clips to keep cords and cables tidy and prevent tangling. Assign a designated area or drawer in the cabinet for storing media-related accessories.
- Maintain Regular Cleaning and Maintenance: Dust and clean your media storage cabinet regularly to keep it looking pristine and prevent damage to your media items. Use a gentle cleaning solution and a soft cloth to avoid scratching delicate surfaces.
By implementing these organizational strategies, you can ensure that your media storage cabinet becomes a functional and aesthetically pleasing asset in your home. Take pride in a well-organized collection that is easily accessible and reflects your personal taste and style.