
Assessing Your Wall
Before you begin the process of hanging a shelf on a plaster wall, it’s important to assess the condition of the wall and determine if it can support the weight of the shelf and the items you plan to place on it. Taking the time to properly assess your wall will ensure a secure and long-lasting installation.
First, visually inspect the wall for any visible signs of damage, cracks, or unevenness. If you notice any major issues, it may be necessary to repair the wall before proceeding. Minor cracks or imperfections can typically be addressed during the installation process.
Next, locate the studs in the wall. Studs provide the necessary support for heavy shelves and help distribute the weight evenly. Use a stud finder to locate the studs or try tapping along the wall until you hear a solid, rather than hollow, sound. Mark the stud locations with a pencil for reference during the installation.
Consider the weight capacity of your wall and the shelf you plan to install. Different types of plaster walls have varying weight-bearing capacities. To determine the maximum weight your wall can support, consult the manufacturer’s specifications or seek advice from a professional if needed.
Another factor to consider is the location of power outlets or other electrical fixtures on the wall. Ensure that the shelf and brackets will not obstruct or interfere with these fixtures. It’s also important to consider the overall aesthetic of the room and choose a location for the shelf that complements the existing decor.
Assessing your wall before beginning the installation process will help you determine any potential challenges or considerations you need to keep in mind. By taking these steps, you can ensure a safe and secure installation of your shelf on a plaster wall.
Gathering the Necessary Tools and Materials
Before you start hanging a shelf on a plaster wall, it’s crucial to gather all the necessary tools and materials. Having everything prepared in advance will save you time and frustration during the installation process. Here’s a list of tools and materials you’ll need:
1. Shelf and brackets: Choose a shelf that suits your needs in terms of size, style, and weight capacity. Ensure that the brackets are compatible with the chosen shelf.
2. Stud finder: This tool will help you locate the studs in your plaster wall, which are essential for secure installation.
3. Pencil or marker: Use a pencil or marker to mark the desired location of the shelf on the wall.
4. Level: A level is necessary to ensure that the shelf is straight and level during installation.
5. Measuring tape: Use a measuring tape to determine the exact desired placement of the shelf on the wall.
6. Drill: A drill with the appropriate drill bits will be needed to create pilot holes for the brackets.
7. Wall anchors (if necessary): If your plaster wall does not have studs in the desired location for the shelf, you may need to use wall anchors to provide extra support.
8. Screws and screwdriver: These will be required to attach the brackets to the wall and the shelf to the brackets.
9. Safety equipment: It’s essential to prioritize safety, so don’t forget to wear safety goggles and gloves when handling tools and materials.
It is recommended to gather all the tools and materials in one place before you start the actual installation. This way, you won’t waste time searching for items while in the middle of the process.
By ensuring you have all the necessary tools and materials on hand, you’ll be well-prepared to hang your shelf on a plaster wall efficiently and effectively.
Choosing the Right Shelf and Brackets
When it comes to hanging a shelf on a plaster wall, selecting the right shelf and brackets is crucial for a successful installation. Here are some factors to consider when making your choices:
1. Weight capacity: Determine the weight capacity you need for your shelf. Consider what items you plan to place on the shelf and ensure that both the shelf and brackets can support the weight. It’s always better to choose a shelf and brackets with a higher weight capacity than you think you’ll need.
2. Size and style: Consider the size of the available space on your wall and choose a shelf that fits well in that area. Additionally, consider the style and design of the room and select a shelf and brackets that complement the existing decor.
3. Material: The material of the shelf and brackets can affect both the aesthetics and durability. Common options include wood, metal, and glass. Choose a material that suits your preferences and the intended purpose of the shelf.
4. Bracket type: There are various types of brackets available, including L-shaped brackets, floating shelf brackets, and decorative brackets. Consider the desired look and level of support when choosing the bracket type.
5. Adjustability: Some brackets offer adjustability, allowing you to change the position or angle of the shelf. This can be useful if you want the flexibility to modify the placement or use of the shelf in the future.
6. Ease of installation: Consider the complexity of installation. Choose brackets that are easy to install and come with clear instructions to ensure a smooth process.
7. Budget: Keep your budget in mind when selecting a shelf and brackets. There are options available for various price ranges, so determine how much you are willing to spend before making your decision.
By carefully considering these factors, you can choose the right shelf and brackets that meet your needs, fit well in your space, and provide the necessary support for your items. Take your time to research and compare options to make an informed decision and achieve a successful installation on your plaster wall.
Locating the Studs
When hanging a shelf on a plaster wall, it’s crucial to locate and utilize the studs for secure and reliable support. Studs are vertical wooden or metal beams within the wall that provide a solid foundation for attaching heavy items. Here’s how you can locate the studs:
1. Use a stud finder: A stud finder is a handy tool designed to locate studs behind the plaster wall. Place the stud finder against the wall and slowly move it horizontally until it indicates the presence of a stud. Follow the manufacturer’s instructions for accurate stud detection.
2. Look for visual clues: Sometimes, there may be visual indicators that can help you locate studs. These clues include electrical outlets, light switches, or trim/molding, which are typically attached to stud frames. Studs are usually spaced 16 or 24 inches apart, so once you find one stud, you can measure or estimate the distance to find the others.
3. Perform a tapping test: This method involves lightly tapping the wall surface with your knuckles or a small hammer. When you hit a stud, you’ll hear a solid and firm sound, compared to a hollow sound when you tap on the spaces between the studs. Tap along the wall horizontally, placing marks where you suspect a stud may be located.
4. Measure from corners and openings: Studs are typically positioned near corners and openings such as doors or windows. By measuring a specific distance from these reference points, you can estimate the location of studs in between.
Once you’ve identified the studs, mark their location using a pencil or marker. This will guide you during the installation process and ensure that the brackets are attached securely to the wall.
By locating the studs in your plaster wall, you can ensure a strong and stable installation for your shelf. Remember to double-check the stud locations and measure multiple times to ensure accuracy before proceeding with the installation.
Marking the Desired Location for the Shelf
Once you have located the studs on your plaster wall, the next step in hanging a shelf is to mark the desired location. Properly marking the wall ensures that the brackets are positioned accurately and that your shelf will be level.
Here’s how to mark the desired location for your shelf:
1. Measure and mark the height: Use a measuring tape to determine the desired height of your shelf. Consider the items you plan to display and the overall aesthetic of the room. Make a small pencil mark on the wall at the desired height for the top of the shelf.
2. Measure and mark the width: Measure the width of your shelf and determine the center point. Using a measuring tape, measure from the center mark outward to each side, marking the width of the shelf. This will help you position the brackets accurately.
3. Align with the studs: Using the stud locations you identified earlier, align the marks for the width of the shelf with the nearest studs. This will ensure that the brackets are securely attached to the wall for proper support.
4. Use a level: Place a level horizontally along the line you marked for the top of the shelf. Adjust the pencil mark if needed to ensure that the shelf will be level once installed.
5. Double-check the measurements: Before proceeding with the installation, double-check all the measurements and marks to ensure accuracy. This step is crucial to avoid any mistakes that may affect the stability or alignment of the shelf.
By marking the desired location for your shelf, you can ensure that it is positioned correctly and level on your plaster wall. Taking the time to measure accurately and align with the studs will result in a secure installation and a visually pleasing outcome.
Preparing the Wall for Installation
Before you begin installing the shelf on your plaster wall, it’s essential to prepare the wall to ensure a successful and stable installation. Proper preparation will help to prevent damage to the plaster and ensure that the brackets and shelf are securely attached. Here’s how to prepare the wall:
1. Clear the area: Remove any decorative items, artwork, or furniture from the vicinity where you will be installing the shelf. This will give you a clear and unobstructed workspace.
2. Clean the wall surface: Dust and debris can interfere with the adhesion of the brackets and affect the stability of the shelf. Use a soft cloth or brush to gently clean the wall surface where the brackets will be attached. This will create a clean and smooth surface for optimal attachment.
3. Patch any holes or cracks: If there are any noticeable holes or cracks in the plaster, it’s important to patch and repair them before proceeding. Use a plaster patching compound or filler to fill in any imperfections. Smooth the surface and allow it to dry completely before moving forward with the installation.
4. Apply primer (if necessary): If you’ve repaired any areas on the wall, you may need to apply a coat of primer to ensure a uniform surface and better adhesion of the brackets. Follow the instructions on the primer product for application and drying time.
5. Consider using a backing board: If you are concerned about the weight of the shelf or the condition of the plaster wall, you can install a backing board to provide additional support. A backing board is a sturdy piece of wood that is attached to the studs, serving as a stable foundation for the shelf.
Taking the time to prepare the wall before installing the shelf will contribute to a more secure and long-lasting installation. By removing obstacles, cleaning the surface, patching any imperfections, and considering additional support options, you can ensure that your shelf is installed on a stable and prepared surface.
Drilling Pilot Holes
When hanging a shelf on a plaster wall, drilling pilot holes is a crucial step that ensures a secure and stable installation. Pilot holes help to guide the screws into the wall, prevent the plaster from cracking or splitting, and make it easier to attach the brackets. Here’s how to drill pilot holes:
1. Choose the right drill bit: Select a drill bit that matches the size of the screws you’ll be using to attach the brackets. It should be slightly smaller in diameter than the screws to provide a snug fit.
2. Mark the pilot hole locations: Refer to the marks you made earlier to determine where the pilot holes should be drilled. Make sure to align them with the studs for maximum support.
3. Set the drill to a low speed: Plaster walls are relatively fragile, so it’s crucial to set your drill to a low speed setting. This will prevent excessive force that could damage the plaster.
4. Start drilling: Position the drill bit over the mark and gently apply pressure. Begin drilling slowly and steadily, allowing the drill bit to penetrate the plaster. Be careful not to push too hard or go too fast, as this may cause the plaster to chip or crack.
5. Drill to the appropriate depth: Drill the pilot hole to a depth that is slightly shorter than the length of the screw. This ensures a tight and secure fit for the brackets.
6. Repeat for remaining pilot holes: Continue drilling the pilot holes at the marked locations for each bracket. Take your time and maintain a steady hand to ensure accuracy and consistency.
7. Clean up any debris: After drilling the pilot holes, use a soft cloth or brush to remove any dust or debris that may have accumulated. This will ensure a clean and smooth surface for attaching the brackets.
By drilling pilot holes, you create a solid foundation for attaching the brackets to your plaster wall. This step not only prevents damage to the plaster but also improves the overall stability and longevity of your shelf installation.
Installing the Brackets
Installing the brackets is a critical step in hanging a shelf on a plaster wall. The brackets provide the support and stability needed to hold the weight of the shelf and its contents. Here’s a step-by-step guide on how to install the brackets:
1. Align the brackets: Hold the first bracket against the wall, aligning it with the pilot holes you drilled earlier. Ensure that the bracket is level and centered on the marked lines for the shelf’s width.
2. Insert screws into the pilot holes: Insert the screws through the bracket and into the pilot holes. Use the appropriate screwdriver or drill to tighten the screws, but be careful not to overtighten, as it can damage the plaster. Repeat this process for all the brackets.
3. Check for stability: Once all the brackets are attached, gently shake them to ensure they are secure. If any bracket feels loose, remove the screw and reposition the bracket, ensuring it aligns with the pilot hole. Then, reinsert and tighten the screw.
4. Double-check levelness: Use a level to verify that the brackets are installed correctly and the shelf will be level. Adjust the brackets as needed to achieve a level position.
5. Test weight-bearing capacity: Before adding the shelf, apply some pressure to the brackets to ensure they can support the weight. Place your hands on the brackets and press down gently. If the brackets feel stable and show no signs of bending or flexing, they are ready for the shelf.
6. Repeat the process for additional brackets: If your shelf requires multiple brackets, follow the same steps to install each one, making sure they are evenly spaced and aligned.
By properly installing the brackets, you create a solid foundation for your shelf on the plaster wall. Take the time to align them correctly, tighten the screws securely, and double-check the stability and levelness. This will ensure that your shelf is securely attached and capable of supporting the desired weight.
Attaching the Shelf to the Brackets
After the brackets are securely installed on the plaster wall, the next step in hanging a shelf is attaching it to the brackets. This step ensures that the shelf is properly supported and allows you to enjoy its functionality and aesthetic appeal. Here’s how to attach the shelf to the brackets:
1. Lift the shelf: Carefully lift the shelf and align it with the brackets. Ensure that the shelf sits evenly and securely on top of the brackets. Take your time to ensure proper alignment before proceeding.
2. Check for levelness: Use a level to confirm that the shelf is level. If adjustments are needed, lift the shelf slightly and reposition it on the brackets until it is level. This step is important to maintain a visually pleasing and functional shelf.
3. Secure the shelf to the brackets: Once the shelf is level and aligned, use screws or fasteners provided with the brackets to secure the shelf to the brackets. Insert the screws through the holes in the brackets and into the shelf or pre-drilled holes, depending on the design of the shelf and brackets.
4. Tighten the screws: Use a screwdriver or drill to tighten the screws, ensuring that they are secure but not overtightened. Be mindful of the material of the shelf to avoid damaging it while tightening the screws. Check the stability of the shelf by gently pressing down on it to ensure it doesn’t wobble or shift.
5. Double-check alignment and stability: Once the shelf is attached, step back and visually check its alignment and stability. Confirm that the shelf is level and securely attached to the brackets. Make any necessary adjustments by loosening the screws and repositioning the shelf.
6. Test weight-bearing capacity: Before loading the shelf with items, apply some pressure to the shelf with your hands to ensure it can withstand the weight. Gradually increase the weight by adding items and monitor the stability of the shelf. If any issues arise, recheck the installation and make any necessary adjustments.
By securely attaching the shelf to the brackets, you ensure a stable and functional installation. Take care to align the shelf properly, check for levelness, and tighten the screws appropriately. This will result in a shelf that not only looks great but also provides reliable support for your belongings.
Double-Checking the Stability and Levelness of the Shelf
After installing the shelf on the brackets, it’s crucial to double-check its stability and levelness. This final step ensures that the shelf is secure, properly balanced, and visually appealing. Here’s how to double-check the stability and levelness of the shelf:
1. Test for Wobbling: Gently apply pressure to the shelf from various angles to check for any wobbling or movement. If you notice any instability, it may indicate that the brackets need to be adjusted or tightened.
2. Load Test: Gradually add weight to the shelf, simulating the typical load it will bear. This can be done by placing items on the shelf. Observe the shelf carefully to ensure it can support the weight without sagging or becoming unstable.
3. Check Levelness: Use a level to verify that the shelf is still level. Place the level on top of the shelf and adjust as needed. This step is important for both the functionality of the shelf and its aesthetic appeal.
4. Monitor Over Time: After installing the shelf, keep an eye on its stability and levelness over time. Check regularly to ensure that the brackets remain secure and that the shelf stays level. In case of any issues, address them promptly to avoid further problems.
5. Make Adjustments if Necessary: If you encounter any instability or levelness issues, make the necessary adjustments promptly. This may involve tightening screws, repositioning brackets, or redistributing weight on the shelf.
By double-checking the stability and levelness of the shelf, you can ensure that it not only looks great but also functions effectively. Regular monitoring and timely adjustments will help maintain the integrity of the installation and ensure the longevity of your shelf on the plaster wall.
Adding Finishing Touches
After completing the installation of the shelf on your plaster wall, taking the time to add some finishing touches can elevate the overall look and functionality of the space. Here are some ideas to consider:
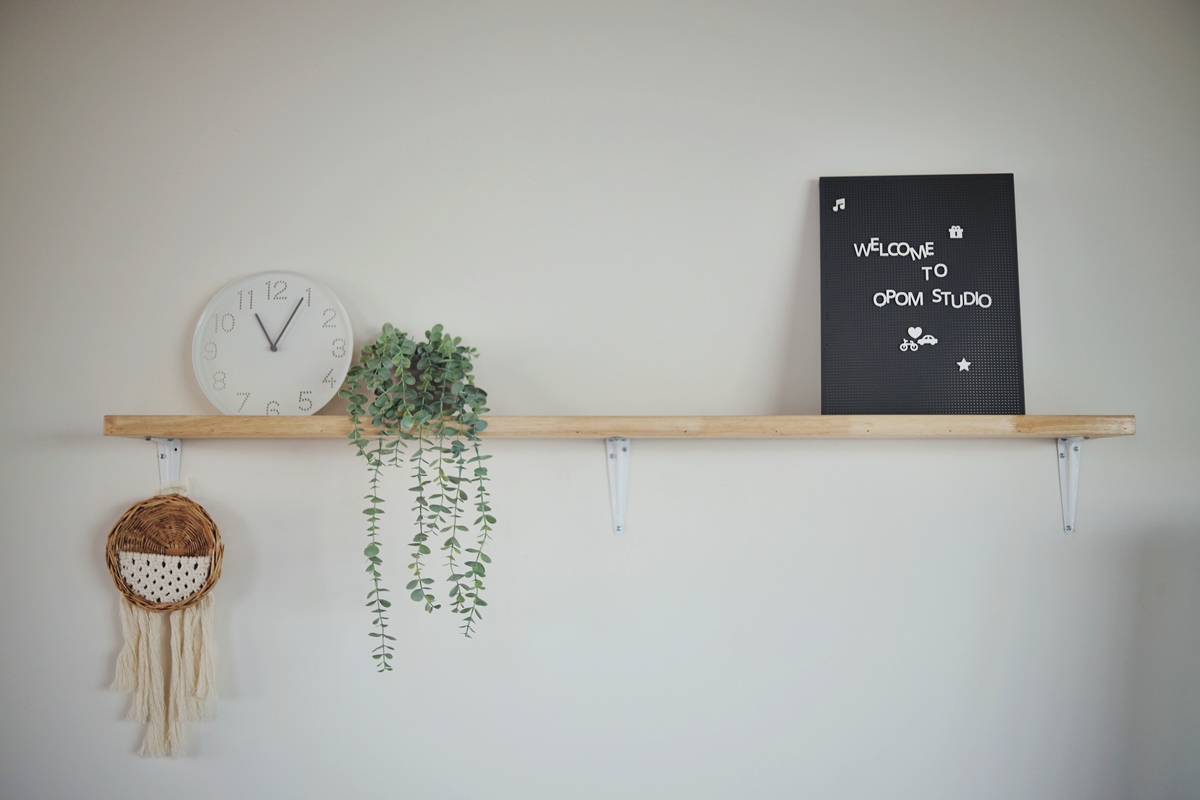
1. Decorate the shelf: Arrange books, plants, picture frames, or other decorative items on the shelf to personalize the space and showcase your unique style. Be mindful of the weight and balance of the items to ensure the stability of the shelf.
2. Conceal brackets: If the brackets are visible beneath the shelf and do not align with your desired aesthetic, consider using decorative bracket covers or painting the brackets to match the color of the wall or the shelf itself.
3. Install lighting: If you want to highlight the shelf and the items displayed on it, consider installing under-shelf lighting or wall sconces. These can add both functionality and an extra layer of visual appeal to the space.
4. Cable management: If you have any wires or cables running behind or near the shelf, consider using cable management solutions to hide or organize them. This will help maintain a clean and clutter-free look.
5. Regular maintenance: Keep the shelf and the items displayed on it clean and dust-free. Regularly wipe down the shelf surface, remove any dust or debris from the items, and make sure to clean the brackets as well.
6. Reassess periodically: Periodically reassess the shelf’s stability, levelness, and overall condition. Check for any signs of wear or damage and make any necessary repairs or adjustments to maintain a safe and reliable installation.
Remember, the finishing touches you choose to add to your shelf installation can significantly enhance the overall aesthetic appeal and functionality of the space. Consider your personal preferences, the style of the room, and how you intend to use the shelf when making these final decisions.
By adding these finishing touches, you can transform your shelf into a visually pleasing and practical element of your plaster wall, creating a space that is both functional and aesthetically pleasing.