
Tools You’ll Need
Before you begin hanging curtain rods, it’s important to gather all the necessary tools. Having the right tools on hand will make the installation process much smoother. Here’s a list of the essential tools you’ll need:
- Tape Measure: A tape measure will help you accurately measure the length and height of the window or wall where you’ll be hanging the curtain rod.
- Pencil: Use a pencil to mark the desired placement of the curtain rod on the wall.
- Screwdriver: Depending on the type of mounting hardware, you may need a flathead or Phillips screwdriver to secure the curtain rod brackets to the wall.
- Level: A level will ensure that your curtain rod is properly aligned and not crooked.
- Drill: If you’re hanging curtain rods on hard surfaces like brick or concrete, a drill will be necessary to create pilot holes for the screws.
- Wall Anchors: If you’re mounting the curtain rod on drywall, it’s important to use wall anchors to provide extra support and prevent the brackets from pulling out of the wall.
- Screws: Use screws that are appropriate for your type of mounting hardware and the wall material.
- Stud Finder: If you’re hanging curtain rods on plaster walls, a stud finder will help you locate the wooden studs, which provide added support for the brackets.
- Step stool or Ladder: Depending on the height of your windows, you may need a step stool or ladder to reach the higher areas.
Having these tools on hand will ensure that you are prepared for the curtain rod installation process. With the right tools, you’ll be able to hang your curtains securely and accurately.
Choosing the Right Curtains
When it comes to choosing curtains, there are several factors to consider. The style, color, fabric, and length all play a significant role in determining the overall look and feel of your space. Here are some tips to help you choose the right curtains for your needs:
1. Determine the Purpose: Consider the function of the curtains. Are you looking for curtains that provide privacy, block out light, or simply add a decorative touch to your room? This will help you narrow down your options.
2. Consider the Style: Think about the overall style and aesthetic of your room. Are you going for a modern, minimalist look, or do you prefer a more traditional or ornate style? Choose curtains that complement the existing decor and enhance the overall ambiance of the space.
3. Choose the Color: Curtains come in a wide range of colors and patterns. Consider the color scheme of your room and choose curtains that either blend in seamlessly or make a bold statement. Keep in mind that lighter-colored curtains tend to make a room feel brighter and more spacious, while darker colors add drama and coziness.
4. Select the Right Fabric: The fabric of your curtains can affect the way they drape and how they filter light. Thicker fabrics like velvet or silk will provide better insulation and privacy, while sheer or lightweight fabrics like linen or voile allow more natural light to filter through.
5. Measure for Length: Curtains should typically hang down to the floor, but the exact length will depend on your preference and the style of your room. Measure from the curtain rod to the desired length and add a few extra inches for a polished look.
6. Consider Maintenance: Take into account the upkeep and cleaning requirements of the curtains. Some fabrics may require dry cleaning, while others can be easily washed at home. Choose curtains that align with your maintenance preferences.
By taking these factors into consideration, you can choose curtains that not only enhance the aesthetics of your space but also fulfill the functional needs of the room. Don’t forget to consider your personal style and preferences when making your decision.
Choosing the Right Curtain Rod
Choosing the right curtain rod is just as important as selecting the curtains themselves. The curtain rod provides the structure and support for your curtains, ensuring they hang properly and look visually appealing. Here are some factors to consider when choosing the right curtain rod:
1. Size and Length: Measure the width of your window or wall space to determine the appropriate size and length of the curtain rod. Make sure the rod extends past the window frame on each side to allow the curtains to hang freely when open.
2. Style and Material: Consider the overall style and decor of your room. Choose a curtain rod that matches or complements the existing design elements. Curtain rods come in various materials like wood, metal, and plastic, each offering a different aesthetic appeal. Pick a material that complements the overall theme of your space.
3. Curtain Hanging Option: Decide on the type of hanging option you prefer. Curtain rods can have rings, hooks, or grommets to attach the curtains. Consider which type will best suit the curtains you have chosen and the visual look you want to achieve.
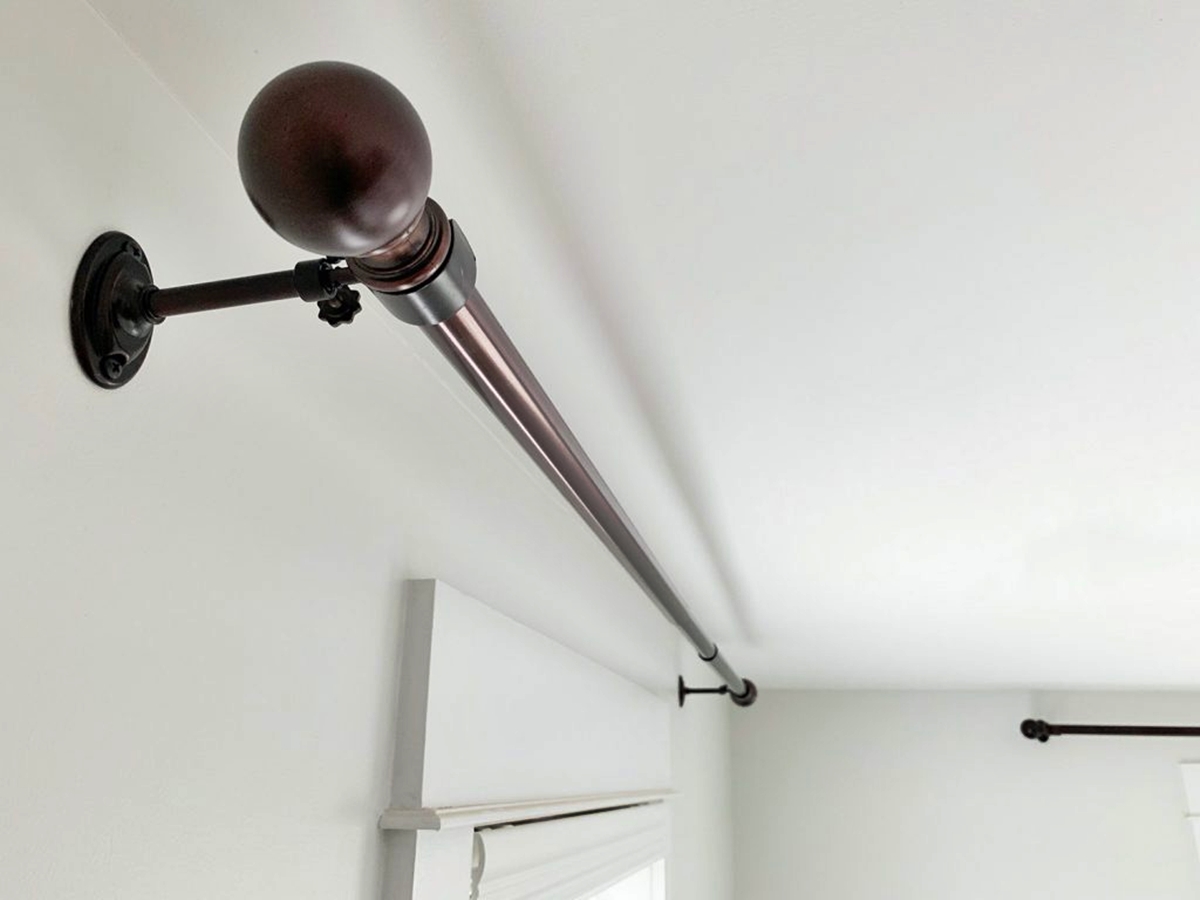
4. Finials and Decorative Elements: Finials are the decorative pieces that cap the ends of the curtain rod. They come in various shapes and designs, offering an opportunity to add a personal touch to your window treatment. Choose finials that enhance your overall decor and complement the style of your curtains.
5. Weight Capacity: Consider the weight of your curtains and make sure the curtain rod has a sufficient weight capacity to support them. Heavy curtains may require stronger and sturdier rods, while lightweight curtains may not require as much support.
6. Installation Method: Determine how you want to install the curtain rod. There are various installation methods, including wall-mounted, ceiling-mounted, or inside-mounted options. Choose the method that best suits your window and the desired look you want to achieve.
7. Budget: Consider your budget when choosing a curtain rod. Prices can vary depending on the material, design, and brand. Set a budget and explore options that fit within your price range.
By considering these factors, you can choose a curtain rod that not only complements your curtains but also enhances the overall aesthetics of your space. Take your time to research and select the perfect curtain rod that meets both your functional and decorative needs.
Measuring for Curtain Placement
Properly measuring for curtain placement is crucial to ensure a balanced and visually appealing look. Here are the steps to follow when measuring for curtain placement:
1. Measure the Window Width: Use a tape measure to measure the width of the window frame or the entire wall if you prefer the curtains to cover a larger area. Note down the measurement.
2. Determine the Curtain Width: Decide on the fullness of the curtains you want. Generally, curtains should be 1.5 to 3 times the width of the window or wall for a luxurious, full look. Multiply the window width measurement by the desired fullness factor to determine the curtain width.
3. Measure the Curtain Length: Decide on the desired curtain length. Depending on your personal preference and the room’s style, curtains can be measured to floor length, sill length, or even puddle on the floor for a dramatic effect. Measure from the curtain rod to the desired length and add any necessary extra inches for clearance.
4. Consider Curtain Header and Hem: Take into account the additional length that the curtain header and hem will add. Curtain headers and hems vary depending on the type of curtain, so factor in any additional inches to ensure the desired curtain length when hanging them.
5. Determine Curtain Rod Placement: Decide on the height at which you want to mount the curtain rod. Typically, curtain rods are mounted 4 to 6 inches above the top edge of the window frame for a balanced look. Measure and mark the desired height for the curtain rod.
6. Find Bracket Placement: Measure the distance between the curtain rod brackets. The brackets should be evenly spaced, with the first bracket placed about 2 to 3 inches from the outer edge of the window frame or wall. Mark the placement of each bracket accordingly.
7. Check for Obstructions: Consider any obstacles near the window, such as light switches, outlets, or furniture. Make sure the curtain placement allows for easy access and does not interfere with any existing fixtures or objects.
By following these steps and taking accurate measurements, you can ensure that your curtains are placed at the right height and have the perfect width and length. Taking the time to measure properly will result in a well-balanced and visually appealing window treatment.
Standard Mounting Height for Curtain Rods
Choosing the correct mounting height for your curtain rods is essential for achieving a polished and balanced look. While there’s no one-size-fits-all answer since it can vary depending on factors such as window height and personal preference, here are some general guidelines to consider:
1. Above the Window Frame: As a standard practice, it is recommended to mount the curtain rod a few inches above the window frame. This creates an illusion of height and makes the windows and room appear larger. A mounting height of 4 to 6 inches above the frame is a good starting point.
2. Distance from the Ceiling: For a dramatic and luxurious look, you may consider mounting the curtain rod closer to the ceiling. This gives the illusion of higher ceilings and adds an elegant touch to the space. Aim for a distance of 1 to 2 inches from the ceiling, but adjust as needed based on your room proportions.
3. Eye Level: Mounting the curtain rod at eye level is another option, especially if you have shorter windows or prefer a more modern and streamlined look. This height can also work well in rooms with low ceilings. Keep in mind that this height may limit the natural light entering through the top of the windows.
4. Remember Clearance: Ensure that there is enough clearance between the curtain rod and any furniture, molding, or obstructions below or beside the windows. This will allow the curtains to hang freely and function properly.
5. Consistency: It’s important to maintain consistency throughout a room or an entire house. If you have multiple windows in the same room, try to keep the curtain rod height consistent for a cohesive and visually appealing look.
6. Personal Preference: Ultimately, your personal preference should guide the mounting height choice. Consider your specific needs and the desired look you want to achieve for the room. Experiment with different heights and visually assess the impact before settling on the final placement.
While these guidelines can serve as a starting point, it’s important to take into consideration your specific space and style preferences. Feel free to adjust the mounting height as needed to create a look that complements your windows and enhances the overall aesthetic of the room.
Hanging Curtain Rods on Drywall
When it comes to hanging curtain rods on drywall, it’s important to ensure a secure and stable installation. Here are the steps to follow:
1. Find Studs: Use a stud finder to locate the wooden studs in the wall. Studs provide a stronger and more stable anchor for the curtain rod brackets. Mark the stud locations with a pencil.
2. Measure and Mark: Measure and mark the desired placement of the curtain rod brackets on the wall, ensuring they align with the stud locations. Use a level to make sure the marks are straight and even.
3. Use Wall Anchors: If the desired curtain rod placement does not align with studs, you will need to use wall anchors to provide additional support. Choose wall anchors appropriate for your wall type and weight requirements. Follow the manufacturer’s instructions for installation.
4. Drill Pilot Holes: For both stud and wall anchor installations, use a drill with the appropriate drill bit size to create pilot holes at the marked locations. This will make it easier to insert screws or wall anchors and prevent the drywall from cracking.
5. Install Brackets: Attach the curtain rod brackets to the wall using either screws or wall anchors. Start with the brackets that align with the stud locations, if possible, for maximum stability. Tighten the screws or anchor bolts securely, but avoid overtightening to prevent damaging the drywall.
6. Install Curtain Rod: Once the brackets are securely in place, insert the curtain rod into the brackets. Double-check that the rod is level and adjust if necessary.
7. Test and Adjust: Test the curtain rod by gently pulling on the curtains to ensure they are secure and properly installed. If you encounter any issues, such as the rod sagging or the brackets becoming loose, make the necessary adjustments to ensure a stable installation.
8. Finishing Touches: Finally, hang your curtains on the curtain rod and arrange them to your desired position. Make any necessary adjustments to achieve the desired look and functionality.
Remember to follow the specific instructions provided with your curtain rod and mounting hardware for the best results. By following these steps, you can confidently hang curtain rods on drywall and enjoy beautiful window treatments in your space.
Hanging Curtain Rods on Plaster Walls
Hanging curtain rods on plaster walls requires a slightly different approach compared to drywall. Plaster walls are more delicate and prone to cracking if not handled properly. Here’s a step-by-step guide to hanging curtain rods on plaster walls:
1. Find Studs: Start by using a stud finder to locate the wooden studs in the plaster wall. Mark the stud locations with a pencil. Studs provide the most secure anchor points for the curtain rod brackets.
2. Measure and Mark: Measure and mark the desired placement of the curtain rod brackets on the wall, ensuring they align with the stud locations. Use a level to make sure the marks are straight and even.
3. Pre-drill Pilot Holes: To minimize the risk of cracking the plaster, pre-drill pilot holes at the marked locations using a drill with a masonry drill bit that matches the size of the wall anchors or screws you’ll be using.
4. Insert Wall Anchors: If the desired bracket placement does not align with studs, use wall anchors suited for plaster walls. Gently tap the wall anchors into the pre-drilled holes until they are flush with the wall surface.
5. Install Brackets: Attach the curtain rod brackets to the wall using screws or the appropriate fasteners for the wall anchors. Tighten the screws securely, but be cautious not to overtighten and risk damaging the plaster.
6. Test and Adjust: Test the curtain rod by gently pulling on the curtains to ensure the brackets are securely attached to the plaster walls. If needed, make any adjustments to the brackets or screws to ensure stability and proper installation.
7. Install Curtain Rod: Once the brackets are securely in place, insert the curtain rod into the brackets. Double-check that the rod is level and adjust if necessary.
8. Hang Curtains: Finally, hang your curtains on the curtain rod and adjust them to your desired position. Take a step back and ensure everything is level and aesthetically pleasing.
Remember that plaster walls are more fragile compared to drywall, so it’s important to handle them with care. Take your time, use the appropriate tools, and apply gentle pressure to avoid damaging the plaster during installation.
If you’re unsure about hanging curtain rods on plaster walls, it can be helpful to consult a professional or seek guidance from experienced individuals who have worked with plaster walls before. With the right techniques and precautions, you can successfully hang curtain rods and enjoy beautiful window treatments on your plaster walls.
Hanging Curtain Rods on Brick or Concrete Walls
Hanging curtain rods on brick or concrete walls requires a different approach compared to drywall or plaster walls. These sturdy surfaces can provide a durable foundation for your curtains. Follow these steps to hang curtain rods on brick or concrete walls:
1. Plan and Measure: Determine the desired placement of the curtain rod on the wall. Measure and mark the precise location where you want to mount the brackets. Use a level to ensure accuracy.
2. Drill Pilot Holes: Use a power drill with a masonry bit that matches the size of the wall anchors or screws you’ll be using. Carefully drill pilot holes at the marked locations on the brick or concrete wall. Be sure to wear safety goggles and follow proper safety precautions.
3. Insert Wall Anchors: For better support and stability, insert wall anchors into the pilot holes. Wall anchors specifically designed for concrete or brick walls should be used. Gently tap them into place using a hammer until they are flush with the wall surface.
4. Attach Brackets: Screw the curtain rod brackets directly into the wall anchors. Make sure they are securely fastened to the wall. Use a screwdriver or drill with the appropriate bit to tighten the screws, being careful not to overtighten and strip the screws or anchors.
5. Test and Adjust: Test the strength and stability of the brackets by gently pulling on them. Ensure they are securely attached to the brick or concrete wall. If needed, make any necessary adjustments to ensure proper installation.
6. Install Curtain Rod: Once the brackets are securely in place, insert the curtain rod into the brackets. Ensure that the rod is level and adjust if necessary. Double-check the stability of the rod and make sure it is securely held by the brackets.
7. Hang Curtains: With the curtain rod securely installed, hang your curtains on the rod and adjust them to the desired position. Make any necessary adjustments to ensure your curtains hang evenly and drape properly.
Remember to use appropriate tools and take necessary precautions when working with brick or concrete walls. Wear protective gear for your safety and follow the manufacturer’s instructions for the specific hardware and anchors you are using.
If you’re uncertain or uncomfortable with drilling into brick or concrete walls, it may be advisable to seek assistance from a professional handyman or contractor with experience in working with these materials. With proper installation, you’ll be able to enjoy your curtains on your brick or concrete walls with confidence and style.
Types of Curtain Rod Mounting Hardware
When it comes to hanging curtain rods, there are various types of mounting hardware available to choose from. The type of hardware you select will depend on your specific needs and the type of curtain rod you have. Here are some common types of curtain rod mounting hardware:
1. Wall-Mount Brackets: Wall-mount brackets are the most common type of mounting hardware for curtain rods. They attach directly to the wall and provide support for the rod. These brackets can be adjustable or fixed, depending on the desired placement of the curtain rod.
2. Ceiling-Mount Brackets: Ceiling-mount brackets are used when you want to hang curtains from the ceiling rather than the wall. They are ideal for creating a dramatic effect, adding height to a room, or concealing unsightly features above a window.
3. Inside-Mount Brackets: Inside-mount brackets are designed to mount the curtain rod inside a window frame or recess. They are suitable for windows that have limited wall space or for a clean and minimalistic appearance.
4. Magnetic Mounting Hardware: Magnetic mounting hardware is a convenient option for hanging curtain rods, especially on metal surfaces. Magnetic brackets attach to the metal surface without the need for screws, making installation quick and easy.
5. Tension Rods: Tension rods are a popular choice for lightweight curtains or temporary installations. They use spring-loaded tension to hold the rod in place between two walls or surfaces, eliminating the need for brackets or hardware.
6. Double Rod Brackets: Double rod brackets are used when you want to hang two sets of curtains on separate rods. These brackets are designed to support two curtain rods, allowing you to layer curtains for added privacy or aesthetics.
7. Corner Elbows: Corner elbows are used when you have a window or area that requires a curtain rod to make a turn around a corner. These specialized brackets allow the rods to join at a 90-degree angle while providing stability and support.
8. Mount Removable Hooks: Mount removable hooks are a temporary and non-damaging alternative for hanging curtains. They adhere to the wall or window frame using adhesive strips, making them a great option for rental properties or situations where drilling is not permitted.
These are just a few examples of the different types of mounting hardware available for curtain rods. Consider the specific requirements of your space and the type of curtains you have when choosing the appropriate hardware. Always follow the manufacturer’s recommendations for proper installation and weight capacity to ensure a secure and successful curtain rod installation.
How to Install a Single Curtain Rod
Installing a single curtain rod is a straightforward process that can be accomplished with a few simple steps. Here’s a step-by-step guide to help you install a single curtain rod:
1. Gather Your Tools: Collect all the necessary tools, including a tape measure, pencil, level, drill, appropriate drill bit, screwdriver, wall anchors (if needed), and the curtain rod with brackets.
2. Measure and Mark: Measure the desired height and width for the curtain rod installation. Use a tape measure to mark the appropriate positions on the wall for the brackets. Use a level to ensure accuracy and straight lines.
3. Determine Bracket Placement: Decide on the appropriate distance from the window frame or wall edge for the brackets. Typically, brackets are placed a few inches from the edge of the window for a balanced look.
4. Pre-drill Holes: If necessary, pre-drill holes at the marked positions using a drill and appropriate drill bit. This will depend on the wall type and the requirement of using wall anchors.
5. Install Wall Anchors (If Needed): For added stability on drywall or other similar surfaces, insert wall anchors into the pre-drilled holes. Gently tap them in using a hammer until they are flush with the wall.
6. Mount Brackets: Place the brackets over the pre-drilled holes or wall anchors and align them with the marks on the wall. Use a screwdriver or drill to secure the brackets into place, ensuring they are straight and level.
7. Insert Curtain Rod: Once the brackets are securely mounted, insert the curtain rod into the brackets. Adjust the rod if necessary to ensure it is level and centered between the brackets.
8. Secure Brackets and Rod: Tighten any screws or fasteners on the brackets to securely hold the curtain rod in place. Double-check that the rod is stable and does not wobble or move when slight pressure is applied.
9. Hang Curtains: Finally, hang your curtains onto the rod and adjust them as desired. Make any necessary adjustments to the rod or curtains to achieve the desired position and appearance.
Remember to follow the specific instructions provided with your curtain rod and mounting hardware for the best results. Take your time during the installation process to ensure a secure and accurate placement. With a little patience and the right tools, you can easily install a single curtain rod and enjoy beautiful window treatments in your space.
How to Install Double Curtain Rods
Installing double curtain rods allows you to hang two sets of curtains, enabling you to layer different fabrics or hang sheer curtains with heavier drapes. Here’s a step-by-step guide to help you install double curtain rods:
1. Gather Your Tools: Collect all the necessary tools, including a tape measure, pencil, level, drill, appropriate drill bit, screwdriver, wall anchors (if needed), and the double curtain rod set with brackets.
2. Measure and Mark: Measure the desired height and width for both curtain rods. Use a tape measure to mark the appropriate positions on the wall for the brackets. Use a level to ensure accuracy and straight lines.
3. Determine Bracket Placement: Decide on the appropriate distance from the window frame or wall edge for the brackets. Typically, brackets are placed a few inches from the edge of the window for a balanced look. Make sure to note which rod will be the front and which will be the back.
4. Pre-drill Holes: If necessary, pre-drill holes at the marked positions using a drill and appropriate drill bit. This will depend on the wall type and the requirement of using wall anchors.
5. Install Wall Anchors (If Needed): For added stability on drywall or other similar surfaces, insert wall anchors into the pre-drilled holes. Gently tap them in using a hammer until they are flush with the wall.
6. Mount Brackets: Place the brackets over the pre-drilled holes or wall anchors and align them with the marks on the wall. Use a screwdriver or drill to secure the brackets into place, ensuring they are straight and level. Repeat this step for both the front and back rod brackets.
7. Insert Curtain Rods: Once the brackets are securely mounted, insert the front curtain rod into the front brackets and the back curtain rod into the back brackets. Adjust the rods if necessary to ensure they are level and centered between the brackets.
8. Secure Brackets and Rods: Tighten any screws or fasteners on the brackets to securely hold both the front and back curtain rods in place. Double-check that the rods are stable and do not wobble or move when slight pressure is applied.
9. Hang Curtains: Finally, hang your curtains onto both the front and back rods, layering them as desired. Adjust the curtains and curtain rings as needed to achieve the desired position and appearance.
Remember to follow the specific instructions provided with your double curtain rod set and mounting hardware for the best results. Take your time during the installation process to ensure a secure and accurate placement of both rods. With the right tools and technique, you can easily install double curtain rods and create a stylish and functional window treatment in your space.
How to Install Ceiling-Mounted Curtain Rods
Installing ceiling-mounted curtain rods can create a unique and dramatic look for your window treatments. Here’s a step-by-step guide to help you install ceiling-mounted curtain rods:
1. Gather Your Tools: Collect all the necessary tools, including a tape measure, pencil, level, drill, appropriate drill bit, screwdriver, wall anchors (if needed), ceiling-mount brackets, and the curtain rods.
2. Measure and Mark: Measure the desired width and height for the curtain rod installation. Use a tape measure and pencil to mark the precise positions on the ceiling for the brackets. Use a level to ensure accuracy and straight lines.
3. Determine Bracket Placement: Decide on the appropriate distance from the wall or window frame for the brackets. Typically, brackets are placed a few inches away from the wall to allow the curtains to hang freely and drape properly. Make sure to consider the clearance needed for the curtain panels.
4. Pre-drill Holes: If necessary, pre-drill holes at the marked positions on the ceiling using a drill and appropriate drill bit. This will depend on the type of ceiling material and the requirement of using wall anchors.
5. Install Wall Anchors (If Needed): For added stability, insert wall anchors into the pre-drilled holes if your ceiling requires them. Gently tap them in using a hammer until they are flush with the ceiling surface.
6. Mount Brackets: Place the ceiling-mount brackets over the pre-drilled holes or wall anchors and align them with the marks on the ceiling. Use a screwdriver or drill to secure the brackets into place, ensuring they are straight and level.
7. Insert Curtain Rod: Once the brackets are securely mounted, insert the curtain rod into the brackets. Adjust the rod if necessary to ensure it is level and centered between the brackets.
8. Secure Brackets and Rod: Tighten any screws or fasteners on the brackets to securely hold the curtain rod in place. Double-check that the rod is stable and does not wobble or move when slight pressure is applied.
9. Hang Curtains: Finally, hang your curtains onto the rod and adjust them as desired. Make any necessary adjustments to the rod or curtains to achieve the desired position and appearance. Ensure that the curtains hang evenly and drape properly on both sides.
Remember to follow the specific instructions provided with your ceiling-mount brackets and curtain rods for the best results. Take your time during the installation process to ensure a secure and accurate placement. With the right tools and technique, you can easily install ceiling-mounted curtain rods and achieve a stylish and eye-catching window treatment in your space.
Common Mistakes to Avoid When Hanging Curtain Rods
When hanging curtain rods, it’s important to avoid common mistakes that can compromise the stability and appearance of your window treatments. Here are some key mistakes to avoid:
1. Incorrect Measurement: Failing to measure accurately can lead to curtain rods that are too long or too short for your windows. Take the time to measure the width and height properly to ensure a precise fit.
2. Choosing the Wrong Mounting Height: Mounting the curtain rod too low or too high can throw off the balance and proportion of the curtains in relation to the window. Follow guidelines or consider the aesthetics of your space when determining the mounting height.
3. Uneven or Sloping Installation: Make sure the curtain rod is level and straight during installation. Uneven rods can cause the curtains to hang crookedly and create an unbalanced look.
4. Insufficient Support: Neglecting to use proper support, such as wall anchors or stud mounting, can lead to brackets that are not secure. This can result in sagging curtain rods or brackets that become loose over time.
5. Overloading the Rod: Be mindful of the weight capacity of the curtain rod and avoid overloading it with heavy curtains. Exceeding the weight limit can cause the rod to bend or become unstable.
6. Ignoring Clearance: Failing to consider clearance when installing curtain rods can result in curtains that get caught on window or wall features when opening and closing. Ensure there is enough space for the curtains to move freely without obstruction.
7. Neglecting to Use a Level: Relying on the naked eye to determine if the rod is level can lead to inaccurate installation. Always use a level during the installation process to ensure proper alignment.
8. Rushing the Installation: Taking the time to carefully install the curtain rod is crucial. Rushing can result in mistakes, such as uneven brackets or improperly secured hardware.
9. Forgetting to Secure Bracket Screws: Ensure that all screws or fasteners on the brackets are securely tightened. Loose screws can cause brackets to become unstable and curtains to fall.
10. Neglecting Maintenance: Once the curtain rods are installed, it’s important to periodically check for any signs of wear or loosening. Tighten screws if necessary and inspect the overall condition of the hardware.
By avoiding these common mistakes, you’ll be able to hang your curtain rods properly and enjoy well-dressed windows that enhance the overall aesthetics of your space.
Creative Ways to Hang Curtain Rods
When it comes to hanging curtain rods, there are more creative options beyond the traditional methods. These unique approaches can add a touch of style and pizzazz to your window treatments. Here are some creative ways to hang curtain rods:
1. Branches: For a rustic or nature-inspired look, consider using decorative branches as curtain rods. Choose sturdy branches of the desired length and diameter, and mount them securely on the wall.
2. Rope or Twine: Use thick rope or twine to hang your curtains in a bohemian or nautical style. Attach hooks to the wall or ceiling and string the rope or twine through them, creating a unique and visually appealing curtain rod alternative.
3. Decorative Hooks: Instead of traditional brackets, choose decorative hooks that complement your curtain rods. Install the hooks on the wall or ceiling and hang the rods from them. This can add an extra element of charm and elegance to your window treatments.
4. Shower Curtain Tension Rods: Extendable tension rods typically used for shower curtains can also be used for hanging curtains in unconventional spaces. These rods can be adjusted to fit between two walls or surfaces, eliminating the need for brackets or hardware.
5. Ladder Rods: Repurpose a small ladder as a unique way to hang curtains. Lean the ladder against the wall, and drape the curtains over the rungs. This creates a visually interesting and eclectic display for your window treatments.
6. Vintage Hooks or Knobs: Hunt for vintage hooks or knobs at flea markets or antique stores. Mount them on the wall and hang your curtains from these charming and one-of-a-kind pieces for a nostalgic touch.
7. S-hooks and Chains: Use S-hooks and chains to hang your curtains for an industrial or modern aesthetic. Attach the S-hooks to the curtain panels and hang them from ceiling-mounted chains, adding an edgy and unique look to your window treatments.
8. Curtain Clips: Replace traditional rod pockets or grommets with curtain clips. These clips can be attached directly to the curtain panels and hung from a simple, minimalistic rod, giving your curtains a clean and modern appearance.
These creative ways to hang curtain rods offer alternatives to the standard methods, allowing you to add personality and character to your window treatments. Experiment with different styles and materials to find the one that best complements your overall décor and aesthetic preferences.
Maintenance and Tips for Hanging Curtain Rods
Maintaining and properly caring for your curtain rods is essential to ensure they remain functional and visually appealing over time. Here are some maintenance tips and suggestions for hanging curtain rods:
1. Regular Cleaning: Dust and debris can accumulate on curtain rods and brackets. Regularly clean them with a soft cloth or duster to keep them looking fresh and free from dirt.
2. Inspect for Damage: Periodically inspect your curtain rods for any signs of damage, such as loose screws, bent rods, or worn-out brackets. Promptly repair or replace any damaged components to maintain the structural integrity of the rods.
3. Check for Stability: Ensure that your curtain rods are securely mounted and stable. Periodically check the brackets and screws to ensure they are tight and aligned. This prevents the rods from sagging or falling over time.
4. Adjust and Straighten: Occasionally, curtain rods and brackets might shift or become slightly crooked. Take the time to adjust and straighten them as needed to maintain a polished and balanced appearance.
5. Prevent Curtain Snags: Avoid rough handling or yanking on the curtains, as this can lead to snags or tears. Gently open and close the curtains using the designated pulling mechanisms to prevent any damage to the fabric.
6. Consider Curtain Weight: Be mindful of the weight of your curtains and ensure that your curtain rods can adequately support the load. Overloading the rods can lead to bending or even detachment from the wall. Choose appropriate rods that are sturdy enough for the curtain weight.
7. Lubricate Moving Parts: If your curtain rods have moving parts, such as those with adjustable sections or telescopic rods, apply a small amount of lubricant to keep them operating smoothly. This prevents any sticking or difficulty in adjusting the length of the rods.
8. Test Curtain Operation: Regularly test the operation of your curtains by opening and closing them to ensure they move smoothly along the rod. If you notice any issues, such as resistance or uneven movement, address the problem promptly to prevent further damage.
9. Use Proper Hardware: When installing curtain rods, always use the appropriate hardware and mounting method based on the type of walls you have. This ensures a secure and durable installation that can handle the weight of the curtains.
10. Follow Manufacturer’s Instructions: Always refer to the manufacturer’s instructions for specific care and maintenance guidelines for your curtain rods. Different materials and finishes may require different cleaning methods or products.
By following these maintenance tips and taking proper care of your curtain rods, you can prolong their lifespan and keep them looking and functioning their best. Regular maintenance and attention to detail will ensure that your window treatments continue to enhance the aesthetics of your space for years to come.
Frequently Asked Questions (FAQs)
Here are some frequently asked questions about hanging curtain rods:
Q: Can I hang curtain rods without using screws?
A: Yes, there are alternatives to using screws for curtain rod installation. You can use adhesive hooks, tension rods, or magnetic rods for a non-permanent or damage-free option.
Q: How do I determine the proper width for my curtain rod?
A: Measure the width of your window or the area you want to cover with curtains. Add a few inches to each side to allow the curtains to fully cover the window when open.
Q: How high should I mount the curtain rod?
A: As a general guideline, mount the curtain rod 4 to 6 inches above the window frame. However, you can adjust the height based on your specific preferences and the desired look for your space.
Q: How can I make my curtains look fuller?
A: To make your curtains look fuller, choose curtains that are wider than the window. Opt for a curtain rod that is 1.5 to 3 times the width of the window. This extra fabric will create a more voluminous and luxurious appearance when the curtains are closed.
Q: Can I hang different types of curtains on the same rod?
A: Yes, you can hang different types of curtains on the same rod. For example, you can layer sheer curtains with heavier drapes or hang a valance with full-length curtains. Use double curtain rods or adjustable brackets to accommodate multiple sets of curtains.
Q: How do I level the curtain rod if the wall is uneven?
A: If the wall is uneven, use a level to align the brackets with the floor or ceiling rather than the wall itself. This will help to create a visually balanced appearance, even if the wall surface is not perfectly straight.
Q: How do I remove curtain rods without damaging the wall?
A: To remove curtain rods without damaging the wall, first, remove the curtains and any hardware attached to the rod. Then, gently unscrew or unclip the brackets from the wall. If any holes are left behind, fill them with a patching compound or putty and sand the area smooth.
Q: How often do I need to replace curtain rods?
A: The lifespan of curtain rods can vary based on the quality of the materials and the amount of wear and tear they experience. With proper maintenance and care, curtain rods can last for many years. However, if you notice signs of damage or instability, it may be time to consider replacing them.
Q: Can I install curtain rods on a bay window?
A: Yes, it is possible to install curtain rods on a bay window. However, it may require specialized curtain rod sets that are designed for curved or angled windows. These sets typically include flexible or adjustable rods to accommodate the unique shape of the bay window.
If you have any other questions or concerns about hanging curtain rods, be sure to consult the manufacturer’s instructions or seek advice from a professional to ensure a successful installation process.