
Ways to Dry an Area Rug After Washing
After washing an area rug, it is crucial to properly dry it to prevent mold, mildew, and damage to the fibers. Here are several effective methods to consider:
Air Drying
One of the simplest ways to dry an area rug is to lay it flat on a clean, dry surface in a well-ventilated area. Ensure that both sides of the rug are exposed to air to promote even drying. This method is ideal for smaller rugs and those made of delicate materials.
Using a Clothesline
If you have access to an outdoor space, hanging the rug on a clothesline can be an excellent drying option. Make sure to secure it properly to prevent it from falling or being blown away by the wind. Avoid direct sunlight to prevent fading and consider flipping the rug once one side is dry.
Using a Drying Rack
A drying rack is a convenient option for drying smaller area rugs indoors. Place the rug on the rack, ensuring it is spread out evenly. Allow sufficient time for drying, flipping the rug if needed, to promote drying on both sides.
Hanging Over a Shower Rod
If you don’t have access to an outdoor space or a drying rack, hanging the rug over a sturdy shower rod can work well. Just make sure to use hangers or clips to secure it in place. Keep the bathroom well-ventilated to prevent excessive moisture buildup.
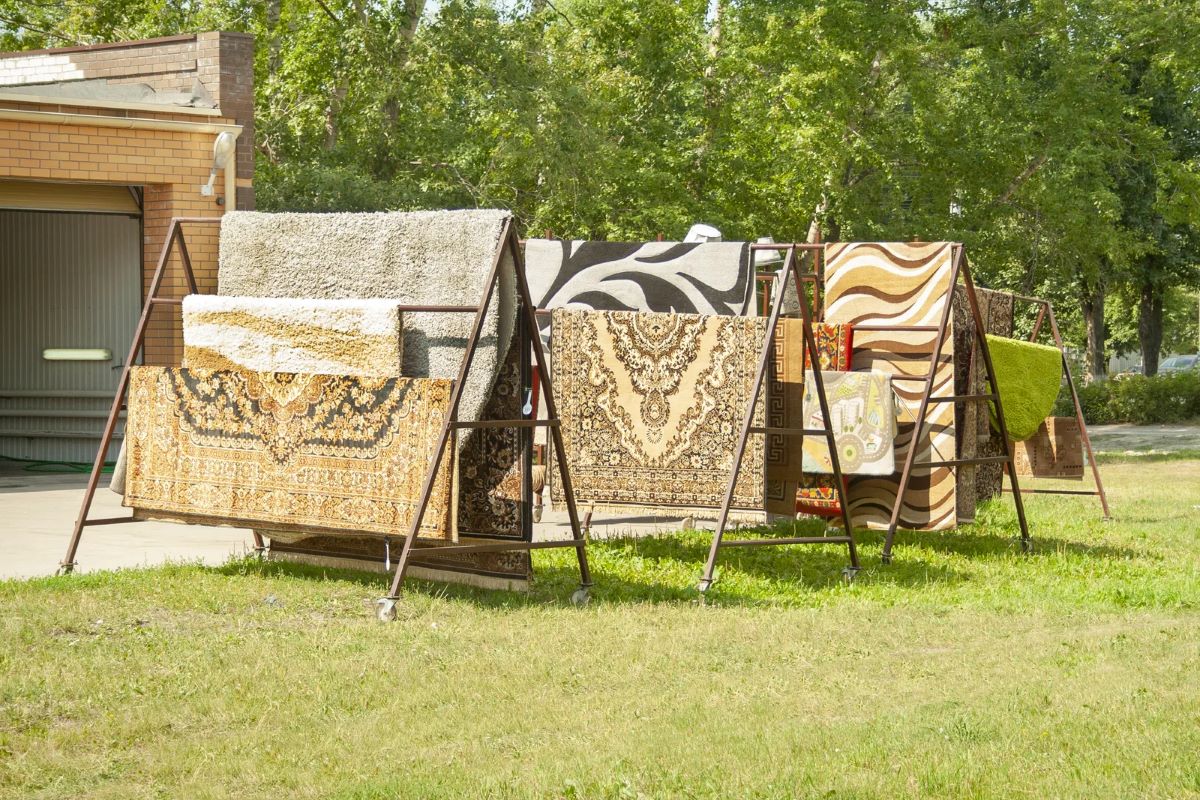
Outdoor Drying
If the weather permits, laying the rug flat on a clean surface outdoors can speed up the drying process. Choose a shady area to protect the rug from direct sunlight. Flip the rug periodically to ensure both sides dry evenly.
Using a Fan or Blower
Using a fan or blower can help accelerate the drying process by increasing air circulation. Position the fan or blower near the rug, ensuring it is not too close to avoid damaging the fibers. This method is particularly useful for thicker rugs or larger ones that require faster drying.
Using a Vacuum
If your vacuum cleaner has a “blow” function, you can use it to blow air onto the rug, helping to speed up the drying process. Ensure the rug is spread out evenly and use the lowest setting to prevent damage.
Using a Hairdryer
For smaller rugs or specific areas that need targeted drying, a hairdryer can be handy. Set it to a low heat and hold it a few inches away from the rug while drying. Keep the hairdryer in constant motion to prevent overheating.
Using a Dehumidifier
If you live in a humid environment, using a dehumidifier in the room where the rug is drying can help remove excess moisture from the air, promoting faster drying. Ensure that the dehumidifier is set to the appropriate level to prevent overly dry conditions.
Using a Dry Cleaning Service
If you prefer a professional approach or have a valuable or delicate rug, utilizing the services of a dry cleaning professional is recommended. They have the expertise and equipment to effectively clean and dry your area rug safely.
Choose the drying method that best suits your needs and the type of rug you are drying. Remember to check the manufacturer’s guidelines for specific drying instructions to ensure the best results. With proper drying, your area rug will be clean, fresh, and ready to enhance your living space once again.
Air Drying
Air drying is one of the simplest and most natural ways to dry an area rug after washing. This method is particularly suitable for smaller rugs or those made of delicate materials that may be susceptible to damage from other drying methods.
To air dry your rug, begin by finding a clean, dry surface where you can lay it flat. It’s important to choose a well-ventilated area to promote proper air circulation and prevent the growth of mold or mildew. Consider placing the rug outside on a sunny day or indoors in a room with good airflow.
Once you have chosen the drying location, gently lay the rug down and ensure that both sides are exposed to air. This allows for even drying and helps to eliminate any remaining moisture. If possible, elevate the rug slightly off the ground by using blocks or a mesh drying rack to improve airflow.
It’s also important to periodically flip the rug to ensure that both sides receive adequate drying time. This will help to prevent any trapped moisture from causing damage or odors. Depending on the size and thickness of the rug, air drying may take anywhere from a few hours to a couple of days.
When air drying, it is essential to avoid direct sunlight. Prolonged exposure to the sun’s rays can lead to fading or discoloration of the rug. If you’ve chosen an outdoor drying spot, make sure to find a shaded area or cover the rug with a light-colored sheet or cloth to protect it from the sun.
While air drying is a convenient and straightforward method, it may not be the fastest option, especially for thicker or larger rugs. In such cases, you may need to consider alternative drying methods or complement air drying with additional techniques, such as using fans or blowers to promote faster evaporation.
Overall, air drying is an effective and gentle way to dry your area rug after washing. By allowing the natural air circulation to do the work, you ensure that your rug dries thoroughly without any damage. Just remember to choose a well-ventilated area, periodically flip the rug, and protect it from direct sunlight. With patience and care, your rug will be clean, fresh, and ready to grace your living space once again.
Using a Clothesline
Using a clothesline is an excellent option for drying your area rug, especially if you have access to an outdoor space. This method allows for proper air circulation and can help speed up the drying process. Here’s how to effectively dry your rug using a clothesline:
1. Find a suitable location: Look for a sturdy clothesline in your yard or patio where you can hang the rug. Make sure that it is secured tightly and can bear the weight of the rug without sagging or breaking.
2. Prepare the rug: Shake off any excess water from the rug before hanging it. This will help remove some of the moisture and make it easier for the rug to dry. If the rug is large, have someone assist you in hanging it to avoid strain or damage.
3. Hang the rug: Carefully drape the rug over the clothesline, ensuring that it is evenly spread out. If necessary, use clothespins or clips to secure the rug in place and prevent it from sliding or shifting in the wind.
4. Flip and rotate: After some time, depending on the weather conditions, flip the rug over to allow the other side to dry. You can also rotate the rug to ensure that all areas receive equal air exposure. This will prevent any pockets of moisture from forming and ensure thorough drying.
5. Consider shading the rug: If the sun is too hot or intense, it might be beneficial to cover the rug with a light-colored sheet or cloth. This will provide shade and prevent potential fading or discoloration of the rug’s fibers.
6. Monitor the drying progress: Regularly check the rug to see how it’s drying. Depending on the material and thickness of the rug, it may take several hours or even a full day to dry completely. Be patient and allow sufficient time for the rug to air dry properly.
7. Bring the rug indoors if necessary: If rain or inclement weather is approaching, or if you’re concerned about overnight dew, it’s advisable to bring the rug indoors and continue drying it in a well-ventilated area. Hanging it near an open window can help expedite the drying process.
Using a clothesline to dry your area rug is a reliable and environmentally friendly option. The fresh air and gentle breeze aid in removing excess moisture from the rug’s fibers, leaving it clean and dry. Just make sure to secure the rug properly and monitor the weather conditions. With a bit of patience, your rug will be ready to return to its designated spot, bringing comfort and style to your living space.
Using a Drying Rack
If you’re looking for an effective indoor drying solution for your area rug, using a drying rack is a convenient option. Drying racks provide a stable and elevated platform for your rug to air dry, allowing for efficient moisture evaporation. Here’s how to properly use a drying rack to dry your rug:
1. Select a suitable drying rack: Choose a drying rack that can accommodate the size and weight of your rug. Look for a rack that is sturdy and made of durable materials to ensure it can support the rug without sagging or collapsing.
2. Prepare the rug: Shake off any excess water or shake the rug gently to remove dirt and debris before placing it on the drying rack. This will prevent any residue from accumulating on the rack or the rug as it dries.
3. Lay the rug on the drying rack: Carefully place the rug onto the drying rack, ensuring it is spread out evenly and flat. Smooth out any wrinkles or folds to allow proper airflow between the rug’s fibers, which aids in the drying process.
4. Flip the rug periodically: After a certain amount of time, depending on the size and thickness of the rug, flip it over to ensure that both sides have the opportunity to dry. This helps to prevent moisture from being trapped within the rug’s layers and ensures thorough drying.
5. Ensure good airflow: Position the drying rack in a well-ventilated area to allow for proper air circulation around the rug. This will help speed up the drying process and prevent odors or mildew from developing. Placing a fan nearby can also enhance airflow and expedite drying.
6. Monitor the drying progress: Check the rug regularly to assess its drying progress. Depending on the material and thickness, it may take several hours or even a day or two for the rug to dry completely. Be patient and avoid rushing the process to ensure optimal results.
7. Consider additional measures: If the room is particularly humid or lacks sufficient airflow, using a dehumidifier can help remove excess moisture from the air, promoting faster drying. However, be mindful of the humidity level to prevent over drying.
Using a drying rack is a simple and effective method for drying your area rug indoors. It allows for proper airflow, resulting in even and thorough drying. By following these steps and being patient, you can ensure that your rug is dried to perfection, ready to be enjoyed once again in your living space.
Hanging Over a Shower Rod
If you don’t have access to outdoor space or a drying rack, hanging your area rug over a shower rod is a practical alternative. This method allows for efficient drying indoors and utilizes the existing structure of the bathroom. Follow these steps to effectively dry your rug using a shower rod:
1. Clean the bathroom: Before hanging your rug, ensure that the bathroom is clean and free of any excess moisture. Wipe down surfaces and remove any items that could obstruct the drying process.
2. Choose a sturdy shower rod: Verify that the shower rod is securely mounted and can support the weight of the rug. Ensure that it is tightly fastened to the wall to prevent any accidents or damage.
3. Remove excess water: Shake off any excess water or gently squeeze the rug to remove excess moisture. This step will help expedite the drying process and prevent water from dripping onto the bathroom floor.
4. Hang the rug over the shower rod: Carefully drape the rug over the shower rod, ensuring that it is evenly spread out. If the rug is larger, you may need to fold or bunch it slightly to fit within the space. Make sure it hangs freely without any parts touching the floor.
5. Promote airflow: Ensure that the bathroom is well-ventilated by opening windows or turning on the exhaust fan. This will facilitate air circulation and help the rug dry more quickly. Leave the bathroom door open to prevent moisture buildup.
6. Flip the rug if needed: Depending on the size and thickness of the rug, you may need to flip it over to allow both sides to dry evenly. This will prevent any trapped moisture from causing damage or odors.
7. Monitor the drying progress: Regularly check the rug to see how it’s drying. Depending on its material and thickness, it may take several hours or even a day to dry completely. Be patient and allow sufficient time for the rug to air dry effectively.
8. Keep the bathroom dry: As the rug dries, moisture may accumulate in the bathroom. Wipe down any surfaces that may become damp, especially near the rug, to prevent mold or mildew growth.
Hanging your area rug over a shower rod is a practical and convenient method for indoor drying. By utilizing the existing structure of the bathroom, you can ensure that your rug dries thoroughly without the need for outdoor space or specialized equipment. Just remember to promote airflow, monitor the drying progress, and maintain a dry environment. Soon enough, your rug will be clean, dry, and ready to be displayed once again.
Outdoor Drying
If weather conditions permit, outdoor drying is an excellent option for ensuring efficient and thorough drying of your area rug. Outdoor drying provides natural ventilation and ample sunshine, which help remove moisture and eliminate any lingering odors. Here are some steps to effectively dry your rug outdoors:
1. Choose an appropriate location: Select a clean and dry outdoor area where you can lay your rug flat. It could be a patio, deck, or even a clean patch of grass. Make sure the ground is free of dirt, debris, or anything that could transfer onto the rug.
2. Shake off excess water and dirt: Before taking your rug outside, shake it briskly to remove any loose dirt and excess water. This helps prevent the rug from becoming too heavy and aids in the drying process by eliminating any excess moisture.
3. Lay the rug flat: Carefully lay the rug flat on the chosen outdoor surface, ensuring it is evenly spread out. Smooth out any wrinkles or folds to ensure optimal airflow and drying. If necessary, use weights or rocks to secure the corners and prevent the rug from being blown away by the wind.
4. Flip the rug periodically: Depending on the weather conditions and the size of the rug, it’s advisable to flip it over periodically to ensure even drying. This allows both sides of the rug to receive sufficient sunlight and air exposure. Aim to flip the rug every few hours or as needed.
5. Protect the rug from direct sunlight: While sunlight helps with the drying process, prolonged exposure to direct sunlight can cause colors to fade or the rug to become brittle. If the sun is too intense, you can shade the rug by placing a light-colored sheet or fabric over it. This will provide some protection while still allowing air circulation.
6. Check the weather forecast: Before opting for outdoor drying, it’s crucial to check the weather forecast. Avoid drying your rug outside on rainy or excessively humid days, as it can prolong the drying process or even lead to mold growth. If rain or inclement weather is predicted, it’s better to choose an alternative drying method.
7. Observe for complete drying: Monitor the rug’s drying progress over the course of several hours or days, depending on its size and thickness. The drying time can vary based on various factors, including sunlight intensity, humidity levels, and rug material. Ensure that the rug feels dry to the touch and free of any dampness before bringing it back indoors.
Outdoor drying provides an effective and natural way to dry your area rug, utilizing the power of sunlight and fresh air. By following these steps and keeping an eye on the weather, you can ensure that your rug dries thoroughly, leaving it clean, fresh, and ready to enhance your living space.
Using a Fan or Blower
If you’re looking to speed up the drying process for your area rug, utilizing a fan or blower can be a highly effective method. By increasing the air circulation and evaporation rate, a fan or blower helps to remove moisture from the rug’s fibers more quickly. Follow these steps to properly use a fan or blower for drying your rug:
1. Select the right fan or blower: Choose a fan or blower that provides sufficient airflow without being too powerful. A regular household fan or a floor blower with adjustable speeds is typically suitable for this purpose. Position the fan or blower near the rug, ensuring it’s not too close to avoid damaging the fibers.
2. Set up the fan or blower: Place the fan or blower in a location that allows for maximum air circulation. Position it so that it blows air directly towards the rug. If possible, elevate the rug slightly by propping it up on a drying rack or by placing blocks underneath to improve airflow to the underside of the rug.
3. Aim for even coverage: Ensure that the fan or blower covers the entire surface of the rug. For larger rugs, you may need to use multiple fans or adjust the position of the fan periodically to make sure all areas receive adequate airflow. This helps to prevent any pockets of moisture from remaining trapped within the rug.
4. Monitor the drying progress: Regularly check the rug’s drying progress while the fan or blower is running. Depending on the size and thickness of the rug, it may take several hours or longer to dry completely. Be patient and allow sufficient time for the rug to dry thoroughly.
5. Flip the rug if necessary: If the fan or blower is not providing even airflow to both sides of the rug, periodically flip the rug to ensure each side receives adequate drying. This helps to prevent any moisture accumulation or uneven drying patterns.
6. Consider using multiple fans or blowers: If you’re drying a larger rug or one with thicker fibers, using multiple fans or blowers can expedite the drying process. Position them strategically to create a crossflow of air over the rug for more efficient evaporation.
7. Maintain a well-ventilated space: To ensure optimal drying, ensure the room is well-ventilated. Open windows or doors to allow for additional air circulation. This helps to prevent the accumulation of moisture in the room and aids in the drying process.
Using a fan or blower is an effective way to accelerate the drying time of your area rug. By increasing air circulation and evaporation, the fan or blower helps to remove moisture from the rug’s fibers more quickly. Just remember to monitor the drying progress, adjust the position of the fan or blower as needed, and maintain a well-ventilated space. With the help of a fan or blower, your rug will be dry and ready to be enjoyed again in no time.
Using a Vacuum
Using a vacuum for drying your area rug may seem counterintuitive, but certain models come with a “blow” or “reverse” function that can be utilized to assist in the drying process. This method is particularly useful for smaller rugs or specific areas that require targeted drying. Here’s how to properly use a vacuum for drying your rug:
1. Check if your vacuum has a blow function: Not all vacuum cleaners have a blow or reverse function, so check the user manual or consult the manufacturer to determine if your vacuum can be used for drying. If the vacuum has this feature, make sure it is clean and free of any debris or dust before using it.
2. Prepare the rug: Before using the vacuum’s blow function, ensure that the rug is clean and free of excess water or dirt. Shake off any loose debris or gently squeeze the rug to remove any remaining water. This helps to prevent any clogging or damage to the vacuum.
3. Set the vacuum to blow: Switch the vacuum to the blow or reverse function, following the instructions provided by the manufacturer. Make sure the vacuum is set to the lowest blowing setting to prevent any damage to the rug’s fibers.
4. Position the vacuum: Place the vacuum at a suitable distance from the rug, ensuring that it covers the desired area that needs to be dried. Hold the vacuum nozzle a few inches above the rug’s surface, moving it back and forth in a gentle, sweeping motion. Avoid pressing down on the rug as this may cause the fibers to flatten or stretch.
5. Target specific areas: If you’re trying to dry a particular spot or section of the rug, focus the airflow from the vacuum on that area. Move the vacuum nozzle closer to the rug but maintain a safe distance to avoid any damage. Continue the sweeping motion until the targeted area is dry.
6. Aid with airflow: To assist in the drying process, open windows or doors to increase air circulation. Proper ventilation helps to remove moisture from the rug and promotes faster drying. If necessary, position a fan nearby to further enhance airflow.
7. Monitor the drying progress: Regularly check the rug as you vacuum to ensure that it is drying evenly and to prevent over-drying. Depending on the size and thickness of the rug, it may take some time for it to dry completely.
Using a vacuum’s blow function can be a convenient way to target specific areas and expedite the drying process of your area rug. By following these steps and being cautious not to damage the rug’s fibers, you can effectively utilize your vacuum to aid in drying. With proper drying, your rug will be clean, fresh, and ready to enhance your living space once again.
Using a Hairdryer
For smaller rugs or specific areas that require targeted drying, a hairdryer can be a handy tool. This method allows you to apply directed heat and airflow to speed up the drying process. Here’s how to properly use a hairdryer to dry your area rug:
1. Select a suitable hairdryer: Choose a hairdryer with adjustable heat and airflow settings. It’s important to use a low or medium heat setting to avoid damaging the rug’s fibers. Make sure the hairdryer’s nozzle is clean and free of any debris that could clog the airflow.
2. Prepare the rug: Shake off any excess water or gently squeeze the rug to remove as much moisture as possible. This will help to minimize the time it takes for the rug to dry. Ensure that the rug is clean and free of any loose dirt or debris.
3. Position the hairdryer: Set the hairdryer to the desired heat and airflow settings and position it a few inches away from the rug’s surface. Hold the hairdryer nozzle perpendicular to the rug, directing the airflow across the wet area. Keep the hairdryer in constant motion to avoid overheating or scorching the rug.
4. Move slowly and evenly: Slowly move the hairdryer across the wet area, maintaining a consistent distance from the rug’s surface. Pay close attention to any specific spots that require more drying. Avoid focusing the hairdryer on one area for too long to prevent overheating or damaging the rug.
5. Flip and repeat: After drying one side or area of the rug, flip it over to ensure even drying on both sides. Repeat the process, using the hairdryer to apply directed heat and airflow to the wet areas. This helps to prevent any residual moisture from causing mildew or odor.
6. Monitor the drying progress: Keep a close eye on the rug as you use the hairdryer to ensure that it is drying evenly and to prevent any damage. Test the rug’s dryness by touching it gently. If it still feels damp, continue drying with the hairdryer until completely dry.
7. Be cautious with delicate materials: Some rugs, especially those made of delicate materials like silk or wool, may require extra caution when using a hairdryer. Test a small, inconspicuous area of the rug first to ensure that the heat and airflow do not cause any damage or discoloration.
Using a hairdryer can be a practical method for targeted drying of smaller rugs or specific areas. By applying directed heat and airflow, you can expedite the drying process and prevent moisture-related issues. Just remember to use a low or medium heat setting, keep the hairdryer in constant motion, and monitor the drying progress to avoid any damage. With proper care and attention, your rug will be dry and ready to adorn your living space once again.
Using a Dehumidifier
If you reside in a humid environment or are facing high levels of indoor humidity, using a dehumidifier can help expedite the drying process of your area rug. By reducing the moisture content in the air, a dehumidifier aids in promoting faster evaporation and preventing mold or mildew growth. Here’s how to effectively use a dehumidifier for drying your rug:
1. Set up the dehumidifier: Position the dehumidifier in the room where the rug is drying. Ensure that the dehumidifier is placed near the wet rug but not too close to prevent direct airflow. Follow the manufacturer’s instructions to properly set up and configure the dehumidifier.
2. Adjust the humidity level: Set the dehumidifier to maintain a humidity level suitable for drying, usually between 30% to 50%. Lower humidity levels promote faster evaporation. The optimal setting may depend on your specific circumstances, so monitor the drying progress and adjust the humidity level accordingly.
3. Close windows and doors: To prevent excess moisture from entering the room, keep the windows and doors closed while the dehumidifier is in operation. This helps to maintain a controlled environment and focuses on drying the rug effectively.
4. Monitor the water collection bucket: Most dehumidifiers have a water collection bucket that fills up as it extracts moisture from the air. Regularly check the bucket to ensure it doesn’t overflow. Empty it as needed to allow the dehumidifier to continue operating efficiently.
5. Evaluate room ventilation: Ensure that the room where the rug is drying has adequate ventilation. If possible, leave the door open or use a fan to promote air circulation. This aids in faster drying as the dehumidifier removes moisture from the air.
6. Monitor the drying progress: Regularly check the rug to assess its drying progress. Depending on the size and thickness of the rug, it may take several hours or even days for it to dry completely. Be patient and allow sufficient time for the rug to dry thoroughly.
7. Observe safety precautions: Always follow the safety guidelines provided by the dehumidifier manufacturer. Avoid placing the dehumidifier near water sources or in areas where it could be exposed to moisture. Additionally, ensure that the dehumidifier is in good working condition and its filters are clean and well-maintained.
Using a dehumidifier can be beneficial when drying an area rug, especially in humid environments. By reducing the overall humidity in the room, the dehumidifier assists in faster moisture evaporation and prevents potential issues like mold or mildew. Just remember to set up and adjust the dehumidifier properly, monitor the drying progress, and ensure adequate room ventilation. With the aid of a dehumidifier, your rug will be dry and ready to enhance your living space once again.
Using a Dry Cleaning Service
If you prefer a professional approach or have a valuable or delicate area rug that requires special care, utilizing the services of a dry cleaning service is highly recommended. Professional dry cleaners have the expertise and equipment to effectively clean and dry your area rug safely. Here’s how using a dry cleaning service can benefit you:
1. Professional expertise: Dry cleaning services specialize in handling various types of rugs and fabrics, ensuring that your area rug receives the appropriate care and treatment. They have the knowledge and experience to identify the best cleaning methods and drying techniques for your specific rug.
2. Proper cleaning process: Dry cleaning services use specialized equipment and solvents that are gentle yet effective in removing dirt, stains, and odors from your area rug. They ensure thorough cleaning without causing any damage or discoloration to the rug’s fibers.
3. Customized approach: Dry cleaners assess the condition of your area rug and tailor their cleaning methods to suit its specific needs. They take into account factors such as the rug’s material, construction, and any particular stains or spots that require special attention. This personalized approach ensures excellent results.
4. Professional drying methods: After cleaning, the dry cleaning service will employ proper drying techniques to ensure that your rug dries thoroughly and without any moisture buildup. They have access to specialized drying equipment that aids in the efficient drying process.
5. Time-saving and convenient: Utilizing a dry cleaning service saves you time and effort. Rather than manually drying and caring for your rug, you can trust professionals to handle the entire process, giving you peace of mind and allowing you to focus on other tasks.
6. Care for delicate or valuable rugs: If you have a valuable, antique, or delicate area rug, entrusting it to a dry cleaning service is a wise choice. Professionals understand how to handle these rugs delicately, taking into account their fragility and ensuring their preservation throughout the cleaning and drying process.
7. Additional repairs or treatments: Dry cleaning services can often provide additional repairs or treatments for your area rug if needed. This includes services such as fringe repair, color restoration, or mothproofing. Discuss these options with the dry cleaner for any specific concerns or desired additional treatments.
When using a dry cleaning service for your area rug, it is essential to choose a reputable and reliable provider. Research and read reviews to ensure their expertise and customer satisfaction. This will guarantee that your rug receives the best care and attention it deserves.
By opting for a professional dry cleaning service, you can have peace of mind knowing that your area rug is in capable hands. With their expertise and specialized equipment, they will ensure that your rug is thoroughly cleaned, carefully dried, and returned to you in excellent condition.