
Choosing the Right Materials for Rug Tufting
When it comes to rug tufting, selecting the proper materials is key to achieving the best results. From the rug canvas to the yarn, each component plays a crucial role in the overall quality and durability of your finished rug. Here are some important factors to consider when choosing the right materials for your rug tufting project.
Rug Canvas: Start by selecting a sturdy and durable rug canvas that can withstand the wear and tear of everyday use. Look for a canvas specifically designed for rug tufting, as it will have a tight weave and the appropriate weight to support the tufting process.
Yarn: The type of yarn you use will greatly impact the texture and appearance of your rug. Wool yarn is a popular choice for its softness and durability, while acrylic yarn offers a wide range of colors and is more affordable. Experiment with different yarn types to achieve the desired look and feel.
Tufting Needle: Invest in a quality tufting needle that fits comfortably in your hand. A pointed needle allows for precise stitching, while a bent latch hook needle can be used for creating intricate designs.
Tapestry Scissors: These small, sharp scissors are essential for trimming excess yarn and giving your finished rug a polished look. Look for a pair with a fine tip to easily navigate tight corners and edges.
Tufting Frame: A sturdy tufting frame is essential for keeping the rug canvas taut and in place as you work. Look for a frame that can be adjusted to different sizes to accommodate various rug dimensions.
Rug Backing: Consider using a rug backing to ensure added stability and longevity to your tufted rug. This can be applied to the back of the rug after the tufting process is complete, providing a non-slip surface and protecting the underside of your rug from wear and tear.
By carefully selecting the right materials for your rug tufting project, you set yourself up for success. Investing in high-quality materials not only leads to a more visually appealing final product but also ensures that your rug will withstand the test of time. Take the time to research and experiment with different materials to find the perfect combination for your unique rug tufting creations.
Getting Started: Preparing Your Work Space
Before diving into rug tufting, it’s essential to set up a dedicated work space that provides comfort, organization, and efficiency. By preparing your work space properly, you can streamline the rug tufting process and ensure a smooth and enjoyable experience. Here are some tips for creating an ideal work space for rug tufting.
Clean and Clear: Start by decluttering your work area and removing any unnecessary items. A clean and clear space allows you to focus better and minimizes distractions. It’s also important to have enough room to maneuver the rug canvas and yarn without feeling cramped.
Good Lighting: Adequate lighting is crucial when working on detailed rug tufting projects. Natural light is ideal, but if that’s not possible, invest in a good quality desk lamp or overhead light that illuminates your work area without causing shadows or glare.
Ergonomic Considerations: Rug tufting can be a time-consuming process, so it’s important to prioritize your comfort. Use a chair or stool that provides good support for your back and consider using a cushion or foam mat to stand on if you prefer a standing work position.
Organization and Accessibility: Keep your materials and tools well-organized and within reach. Use storage containers, drawers, or shelves to store yarn, tufting needles, scissors, and other supplies. This way, you can easily find what you need without wasting time searching for items.
Protective Measures: Since rug tufting can get messy, consider laying down a protective covering on your work surface. This could be a plastic tablecloth, a drop cloth, or even an old sheet. This not only protects your work surface from spills and stains but also makes cleanup much easier.
Inspiring Surroundings: Create a space that inspires creativity and keeps you motivated. Hang up artwork, photos, or examples of rug tufting designs that inspire you. Surrounding yourself with visual cues can ignite your imagination and help you stay focused on your rug tufting project.
By taking the time to prepare your work space, you can set yourself up for a successful and enjoyable rug tufting experience. A well-organized and comfortable work area allows you to fully immerse yourself in the process, leading to beautifully crafted rugs with ease and efficiency.
Preparing the Rug Canvas for Tufting
Before you begin the exciting process of rug tufting, it’s crucial to properly prepare the rug canvas. Preparing the canvas ensures that your tufts are secure and that the rug will be durable and long-lasting. Here are the steps to follow when preparing the rug canvas for tufting.
Unroll and Flatten: Start by unrolling the rug canvas and laying it flat on a clean surface. Use weights or heavy objects to hold down the corners and edges, allowing the canvas to flatten completely. This step prevents any unwanted wrinkles or creases from forming in your finished rug.
Measure and Mark: Measure and mark the dimensions of your desired rug size on the canvas using a ruler and a light pencil or chalk. This will serve as a guide for your tufting process and ensure that your rug remains evenly rectangular in shape.
Hem the Edges: To prevent fraying and unraveled threads, it’s recommended to hem the edges of the rug canvas. Fold about half an inch of the canvas towards the back and secure it with stitch witchery or fabric glue. Press the folded edge firmly to ensure a clean and neat hem.
Secure the Corners: When tufting, the corners of the rug canvas can be prone to coming loose. To prevent this, fold and secure each corner with a few stitches or small pieces of tape. This ensures that the corners remain in place and the tufting process goes smoothly.
Stabilize the Canvas: To keep the rug canvas taut and steady while tufting, consider attaching it to a padded frame or a plywood board. This provides stability and prevents the canvas from shifting or warping as you work on your tufted design.
Stretch and Test: Before you start tufting, give the canvas a gentle stretch in all directions to ensure it’s properly secured and tight. This removes any remaining wrinkles and allows for a smooth and even tufting process.
By properly preparing the rug canvas, you set a solid foundation for your rug tufting project. Taking the time to carefully flatten, measure, hem, and secure the canvas ensures that your tufts will be secure and that your finished rug will be of the highest quality. Once your canvas is prepared, you’re ready to move on to the next step – selecting the perfect rug design and pattern.
Selecting the Perfect Rug Design and Pattern
Selecting the right design and pattern for your rug tufting project is an exciting and essential step in the creative process. It sets the tone for your rug and allows you to showcase your personal style and artistic flair. Here are some tips to help you choose the perfect rug design and pattern for your tufted masterpiece.
Consider Your Space: Think about where your rug will be placed and the overall aesthetic of the room. Consider the existing colors, textures, and patterns in the space and choose a rug design that complements and enhances the overall décor.
Draw Inspiration: Look for inspiration in various sources, such as nature, art, fabrics, or even architectural elements. Pinterest and design magazines can be excellent sources of inspiration. Take note of the designs, patterns, and color combinations that catch your eye and resonate with your personal style.
Simplify or Elaborate: Determine whether you want a simple and minimalist design or a more complex and intricate pattern. Keep in mind your skill level and the time you’re willing to invest in the tufting process. Simple geometric shapes or abstract designs can be elegant and timeless, while elaborate floral or intricate patterns can make a bold statement.
Play with Colors: Experiment with different color combinations to create a rug that truly stands out. Consider the mood you want to evoke in your space – warm and cozy, vibrant and energetic, or calm and serene. You can opt for bold and contrasting colors or go for a more monochromatic and subtle palette.
Test, Sketch, and Adjust: Before committing to a design, it’s always a good idea to test it out. Create a small mock-up of your design using yarn on a piece of paper or a small canvas. This allows you to visualize how the design will look and make any necessary adjustments before starting the tufting process.
Personal Touch: Inject your own personality and individuality into your rug design. Incorporate elements or symbols that hold personal meaning or represent your interests and passions. This will make your tufted rug not only a functional piece but also a unique reflection of yourself.
Seek Feedback: Don’t be afraid to ask for feedback from friends, family, or fellow rug tufting enthusiasts. Sometimes, a fresh perspective can provide valuable insight and help you make the best design choices.
Remember, selecting the perfect rug design and pattern is a creative journey. Allow yourself to explore different ideas, take risks, and trust your instincts. Enjoy the process and let your imagination run wild as you create a rug that’s truly one-of-a-kind.
Transferring the Design onto the Rug Canvas
Once you have chosen the perfect design and pattern for your rug tufting project, the next step is to transfer it onto the rug canvas. This step is crucial to ensure that your design is accurately represented and that you have a clear guide to follow during the tufting process. Here are some methods you can use to transfer the design onto the rug canvas.
Graph Paper: If your design consists of geometric shapes or patterns, using graph paper can be a helpful tool. Draw out your design on the graph paper, with each square representing a stitch on the canvas. This method allows for precise placement of tufts and helps maintain symmetry in your design.
Tracing Paper: For more complex or intricate designs, tracing paper can be used to transfer the design onto the canvas. Place the tracing paper over the design and secure it in place. Use a stylus or a pencil with firm pressure to trace the design onto the canvas. The pressure will leave a faint impression on the canvas, which can serve as a guide for tufting.
Free-Hand Drawing: If you prefer a more organic and artistic approach, you can free-hand draw the design directly onto the canvas. Use a light pencil or chalk to sketch out the design, focusing on the main outlines and major details. This method allows for more creativity and improvisation in your tufting process.
Stencils or Templates: Another option is to use stencils or templates to transfer the design. This is especially useful for repetitive patterns or motifs. Secure the stencil or template onto the canvas and trace the design using a pencil or marker. Move the stencil or template along the canvas as needed to complete the entire design.
Digital Transfer: If you have a digital design, you can print it out and transfer it onto the canvas using transfer paper. Simply place the transfer paper between the printout and the canvas, with the colored side facing down onto the canvas. Trace over the design with a stylus or pencil, applying firm pressure. The transfer paper will leave a faint outline on the canvas, which you can then use as a guide for tufting.
Regardless of the method you choose, it’s important to ensure that the design is accurately transferred onto the canvas before starting the tufting process. Take your time and double-check the transferred design to make sure all the details are clear and aligned properly. This will help you create a beautifully tufted rug with precision and accuracy.
Setting up Your Tufting Frame
Setting up a tufting frame is an essential step in the rug tufting process. A frame provides stability and tension to the rug canvas, ensuring that your tufts are secure and evenly spaced. Here are the steps to follow when setting up your tufting frame.
Choose a Suitable Frame: Select a tufting frame that suits the size of your rug canvas and meets your specific needs. Frames can vary in size, materials, and adjustability. Consider whether you prefer a freestanding frame, a table-mounted frame, or a wall-mounted frame.
Assemble the Frame: Follow the manufacturer’s instructions to assemble your tufting frame. Make sure all the parts fit together securely, and the frame is stable and level. If necessary, use any provided hardware or tools to properly secure the frame.
Adjust the Frame Size: If your frame is adjustable, set it to the desired size to accommodate the dimensions of your rug canvas. Tighten any screws or knobs to ensure that the frame remains in the fixed position during the tufting process.
Attach the Canvas: Place the rug canvas on the tufting frame, ensuring that it’s centered and taut. Secure the canvas to the frame using clips, clamps, or cords, making sure it’s evenly stretched in all directions. This prevents any wrinkles or sagging that could affect the tufting process.
Check the Tension: Once the canvas is attached, check the tension by gently tugging on the canvas in different areas. The canvas should be tight without excessive give. Adjust the tension as needed by tightening or loosening the clips or cords.
Position the Frame: Place the tufting frame in a comfortable and well-lit area where you can work easily on the rug. Consider your posture and the angle at which you will be tufting to ensure a comfortable and ergonomic setup.
Test the Stability: Before you start tufting, give the frame a gentle shake and ensure that it remains steady and secure. Any wobbling or instability can affect the accuracy and quality of the tufting. Adjust the frame or make any necessary modifications to improve its stability.
Properly setting up your tufting frame is essential for a successful rug tufting experience. A well-assembled and stable frame ensures that your rug canvas is taut and in the correct position throughout the tufting process. Take the time to properly adjust and secure your frame to create beautifully tufted rugs with ease and precision.
Preparing the Yarn for Tufting
Preparing the yarn for rug tufting is a crucial step that ensures smooth and efficient tufting process, as well as achieving the desired texture and appearance of your rug. Properly prepared yarn will make tufting easier and produce beautiful results. Here are some essential steps to follow when preparing the yarn for tufting.
Choose the Right Yarn: Select yarn that is appropriate for rug tufting. Wool and acrylic yarn are commonly used for their durability and versatility. Consider the thickness and texture of the yarn as well, as it will play a role in the overall look and feel of your finished rug.
Measure and Cut Yarn: Measure and cut your yarn into manageable lengths for tufting. The length of the yarn will depend on the height of the tufts you desire. Longer yarn will create taller tufts, while shorter yarn will produce shorter tufts.
Organization and Combing: Keep your yarn organized and tangle-free by winding it into small skeins or cones. This will make it easier to handle during the tufting process. Additionally, comb the yarn gently with your fingers or a wide-toothed comb to remove any knots or tangles.
Prevent Fraying: To prevent the ends of the yarn from fraying, you can apply a thin layer of fabric glue or clear nail polish to the cut ends. This helps to seal the yarn and keeps it intact during tufting, ensuring crisp and clean tufts.
Sort and Arrange Colors: If you are using multiple colors in your tufted design, take the time to arrange your yarn colors in a logical and organized way. This will help you access the desired colors easily as you work through your design, preventing unnecessary pauses.
Tension and Control: It is essential to maintain consistent tension when working with the yarn. Hold the yarn firmly but not too tightly between your fingers to ensure proper control during tufting. Experiment with different tensions to find the one that works best for you.
Prepare Extra Yarn: It’s always a good idea to have extra yarn on hand in case you run out while tufting. Make sure to cut and prepare more yarn than you anticipate needing to avoid any interruptions in your tufting process.
Keep Yarn Close By: Have a small container or tray nearby to hold your prepared yarn. This keeps your workspace tidy and allows for easy access to the yarn as you work.
By following these steps, you can ensure that your yarn is well-prepared and ready for the tufting process. Taking the time to organize, measure, and condition your yarn will make the tufting process smoother and more enjoyable, resulting in a beautifully tufted rug.
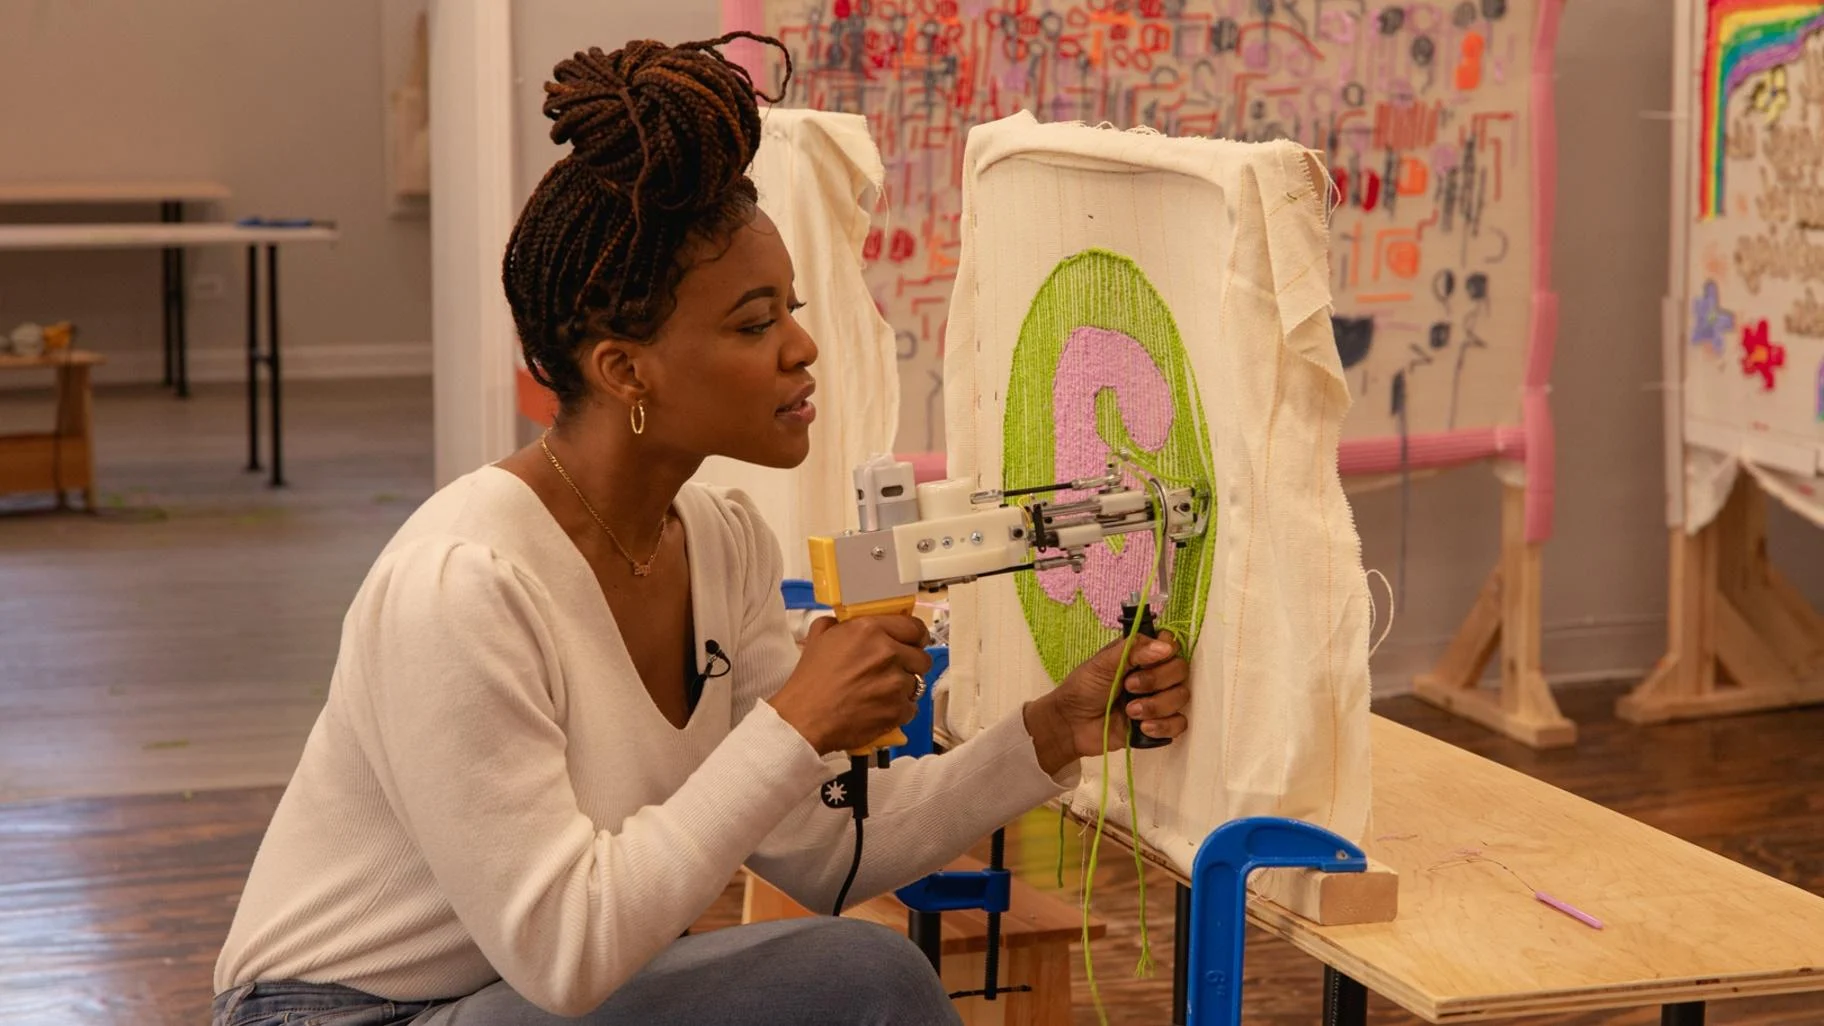
Starting the Tufting Process: Making the First Stitch
Once you have prepared your rug canvas and yarn, you are ready to begin the tufting process! Making the first tuft stitch is an exciting milestone in creating your tufted rug. Here are the essential steps to follow when starting the tufting process and making the first stitch.
Thread the Needle: Begin by threading your tufting needle with a length of prepared yarn. Make sure to leave enough yarn to secure the end later on. Insert the yarn through the eye of the needle, ensuring it is held securely.
Select the Starting Point: Choose a starting point for your first tuft stitch on the rug canvas. This can be anywhere on the canvas, typically near an edge or corner. Position the needle above the canvas, with the yarn extending underneath.
Push and Pull: Push the needle through the rug canvas from the front to the back, ensuring it goes all the way through. Use a steady and firm motion to prevent the needle from getting stuck. Pull the needle and yarn through until you have a small loop on the front side of the canvas.
Secure the Loop: Hold the loop of yarn with one hand while gently tugging the needle and remaining yarn with the other hand. This will tighten the loop and secure it in place, creating the first tuft stitch. Make sure the loop is snug against the canvas.
Create Additional Stitches: Once you have made the first stitch, continue making additional tuft stitches following your design and pattern. With each stitch, ensure they are evenly spaced and consistent in height. Use the initial loops as a guide to maintain the desired height of the tufts.
Trim Excess Yarn: As you progress with tufting, you may accumulate excess yarn between stitches. To maintain a clean and tidy look, periodically trim the excess yarn with tapestry scissors. This keeps the tufts well-defined and makes it easier to see where the next stitch should be placed.
Secure and Tie Off: Once you have completed your desired section or reached the end of a length of yarn, secure the last stitch by inserting the needle through the canvas and creating a loop. Pull the loop tight to secure the yarn. Trim any excess from the end of the yarn and tuck it under adjacent stitches to hide the loose end.
Remember, the first stitch is just the beginning of your tufting journey. Take your time, practice patience, and enjoy the process. With each tufted stitch, your rug will come to life, and you’ll see your design emerge. The key is to take it one stitch at a time.
Continuing the Tufting Process: Creating Rows
After making the first tuft stitch in your rug tufting project, it’s time to continue the process and create rows of tufts. Creating rows ensures that your tufted rug has a consistent and uniform appearance. Here are the steps to follow when continuing the tufting process and creating rows.
Plan Your Rows: Before you start tufting, take a moment to plan the direction and layout of your rows. Consider the design, pattern, and texture you want to achieve. This initial planning helps you stay focused and maintain a consistent approach as you create each row.
Space Your Rows: Determine the spacing between each row of tufts based on your design and desired overall look. Use a ruler or measuring tape to ensure equal spacing between rows. Mark the starting points for each row lightly with a pencil or chalk to guide your tufting.
Follow Your Design: Refer to your chosen design or pattern as you create each row. Ensure that each tuft stitch is placed accurately and aligns with the design. This attention to detail helps maintain the integrity of your design and ensures a visually pleasing result.
Consistency in Tuft Height: Maintain consistent tuft heights as you create each row. Use the initial loops and stitches as a reference for the desired height. This consistency gives your rug a polished and professional look. Adjust your tension and pressure on the tufting needle to achieve the desired height.
Fill in Empty Spaces: As you progress with tufting rows, you may notice gaps or empty spaces between the tufts. Fill in these empty spaces by placing additional tuft stitches to achieve the desired density and coverage. Pay attention to the overall balance and symmetry of the design.
Take Breaks: Tufting can be a time-consuming process, so it’s essential to take breaks to prevent fatigue and maintain focus. Give yourself short breaks to rest your hands and eyes, preventing strain. Additionally, reviewing your work with fresh eyes after a break can help you spot any inconsistencies or areas that may need adjustment.
Carefully Handle the Canvas: As you tuft rows, be mindful of the canvas’s tension and position. Avoid tugging or pulling too forcefully on the canvas, as it can distort the overall shape of your rug. The canvas should remain taut and secure within the tufting frame throughout the process.
Regularly Inspect and Adjust: Periodically step back and inspect your tufted rows to ensure they align with the design and pattern. Make any necessary adjustments or corrections to maintain consistency and overall aesthetic. It’s always better to catch and fix any issues early on.
By following these steps and approaching your tufting process with consistency and attention to detail, you’ll create rows of beautifully tufted stitches that build upon each other. Remember to be patient and enjoy the process, as each row brings you closer to completing your stunning tufted rug.
Tips for Creating Different Textures and Patterns
One of the exciting aspects of rug tufting is the ability to create various textures and patterns that add depth, visual interest, and uniqueness to your tufted rug. By incorporating different techniques and approaches, you can achieve a wide range of effects. Here are some tips and ideas for creating different textures and patterns in your tufted rugs.
Vary the Tuft Height: By adjusting the height of your tuft stitches, you can create texture and dimension in your rug. Experiment with different tuft heights to achieve a layered and textured appearance. Combining shorter tufts with taller tufts can create a visually appealing pattern and tactile experience.
Try Different Yarn Weights: Experiment with different weights of yarn to create contrasting textures. Thicker yarns can create chunky and plush tufts, while finer yarns can produce a smoother and more delicate look. Mixing different yarn weights in the same rug can add visual interest and variety.
Incorporate Loop Pile: Instead of cutting the tufted yarn, leave some stitches as loops to create a loop pile texture. This can add a unique dimension and softness to your design. Experiment with different placement and spacing of loop pile tufts to achieve various patterns and textures.
Explore Pattern Variations: Play with different patterns and designs by mixing colors, alternating rows, or incorporating different stitch angles. You can create stripes, chevron patterns, geometric shapes, or even intricate motifs. Sketch out your pattern beforehand or experiment directly on the canvas to see what works best for your design.
Experiment with Intricate Designs: If you’re up for a challenge, try creating more intricate designs and patterns. This may involve using smaller tufts, utilizing different colors, or incorporating more complex shapes. Take your time and plan out the design carefully, working row by row to ensure accuracy.
Add Embellishments: Consider adding embellishments to your tufted rug for a unique and personalized touch. This can include attaching beads, sequins, or fabric pieces to certain tufts, creating texture and visual interest. Just ensure that the embellishments are securely attached to withstand regular use.
Experiment with Different Techniques: Explore other tufting techniques such as sculpting or carving. Sculpting involves shaping the tufts using your fingers or a tufting tool to create three-dimensional effects. Carving involves trimming or sculpting the tufts after tufting to create patterns or texture.
Practice and Patience: Creating different textures and patterns in your tufted rug requires practice and patience. It’s important to experiment, learn from your experiences, and embrace the creative process. Don’t be afraid to make mistakes and iterate until you achieve the desired effect.
By applying these tips and techniques, you can unlock a world of possibilities in your tufted rug designs. Embrace your creativity, push your boundaries, and have fun exploring different textures and patterns in your tufted creations.
Cleaning and Finishing Your Tufted Rug
Once you have completed the tufting process and created a beautiful rug, it’s important to properly clean and finish your tufted masterpiece to ensure its longevity and pristine appearance. Here are some steps to follow when cleaning and finishing your tufted rug.
Prepare for Cleaning: Begin by removing any excess yarn or loose threads from the surface of the rug. Gently tap or lightly vacuum the rug to remove any dust or loose dirt. This prepares the rug for a thorough cleaning.
Spot Clean: Address any visible stains or spots on the rug with a gentle carpet cleaner or a mixture of mild detergent and water. Blot the stained area with a clean cloth, working from the outside in to prevent spreading the stain further. Avoid vigorously scrubbing or rubbing the stained area, as this may damage the tufted yarn.
Deep Clean: Depending on the size of your tufted rug, you may choose to deep clean it by using a carpet cleaning machine or seeking professional rug cleaning services. Follow the instructions provided with the carpet cleaner or consult a professional to ensure the rug is cleaned effectively without causing any damage.
Air Dry: After cleaning, it’s crucial to allow your tufted rug to air dry completely. Avoid placing it in direct sunlight or using excessive heat, as this may cause the yarn fibers to shrink or fade. Hang the rug or lay it flat on a clean surface to dry naturally.
Trim and Shape: Once your rug is dry, inspect it for any uneven or longer tufts. Use a pair of sharp scissors to carefully trim the tufts, creating an even and uniform look. Shape the edges of the rug by trimming any loose or stray yarn to achieve a neat and finished appearance.
Secure Loose Yarn: Check the rug for any loose or stray yarn and secure them by applying a small amount of fabric glue or clear nail polish to the base of the tuft. This prevents fraying and ensures that the tufts stay in place, maintaining the rug’s overall integrity.
Protect the Underside: Consider adding a rug pad or backing to the underside of your tufted rug to provide extra cushioning, stability, and protection. This helps prevent sliding or shifting and adds longevity to your rug.
Regular Maintenance: To keep your tufted rug looking its best, regularly vacuum it on a gentle setting or use a soft-bristle brush attachment to remove any surface dirt or debris. Avoid using harsh chemicals or abrasive cleaners that could damage the yarn or affect the colors of your rug.
By following these steps, you can ensure that your tufted rug remains clean, fresh, and beautiful for years to come. Taking the time to properly clean and finish your rug after tufting not only enhances its appearance but also preserves its quality and durability.
Additional Tips and Tricks for Successful Rug Tufting
While rug tufting is an enjoyable and creative process, it can also pose some challenges. Here are some additional tips and tricks to help you achieve successful rug tufting results:
Practice on Scraps: Before starting your main rug tufting project, practice on small scraps of canvas and yarn. This allows you to refine your technique, experiment with different stitch lengths and tensions, and build confidence before tackling the larger project.
Use High-Quality Yarn: Investing in high-quality yarn ensures a better tufting experience and a superior final result. Poor quality yarns can fray, shed, or lack the desired texture and visual appeal. Choose yarns specifically designed for rug tufting to ensure durability and longevity.
Maintain Consistent Tension: Consistent tension is key to achieving uniform tufts. Be mindful of your hand and finger placement as you tuft, and aim for consistent pressure on the yarn to ensure even tuft heights throughout the rug.
Take Breaks and Rest: Rug tufting can be a time-consuming process, so it’s important to listen to your body and take breaks when needed. Rest your hands and eyes to avoid fatigue and maintain focus. Stepping away from your project for a while can also provide fresh perspective when you return to it.
Pay Attention to Knots: Keep an eye on the backside of your tufted rug and check for any knots or loops that may have formed. These can cause uneven tension and affect the overall appearance. Regularly inspect the backside and adjust any loose or tight knots to ensure a smooth and consistent front surface.
Experiment with Different Needles: Explore different tufting needles to achieve specific effects and textures. A pointed needle is ideal for precise tufting, while a latch hook needle can create loop pile or shaggy textures.
Embrace Imperfections: While striving for perfection is natural, remember that rug tufting is a handmade art form. Embrace the uniqueness and occasional imperfections that add character to your rug.
Document and Learn: Take photos or keep a journal throughout your tufting journey. Documenting your progress, techniques, and lessons learned will not only help you track your growth but also serve as a valuable resource for future projects.
Join a Community: Connect with other rug tufting enthusiasts by joining online forums or social media groups. Sharing ideas, experiences, and tips with like-minded individuals can be inspiring and helpful on your tufting journey.
Remember, rug tufting is a creative and rewarding process. With patience, practice, and these additional tips and tricks, you’ll continue to refine your skills and create stunning tufted rugs to be proud of.
Inspiring Ideas for Your Next Rug Tufting Project
When it comes to rug tufting, the possibilities are endless! Let your imagination run wild and explore new ideas for your next tufting project. Here are some inspiring ideas to help fuel your creativity:
Nature-Inspired Designs: Take inspiration from the natural world around you. Consider tufting rugs with floral patterns, leaf motifs, or even landscapes that reflect the beauty of nature. Capture the delicate details of flowers, the texture of tree bark, or the colors of a mesmerizing sunset.
Abstract Artistry: Embrace abstract art and create rugs with bold geometric shapes, splashes of vibrant colors, or intricate patterns that defy conventional expectations. Let your creativity shine through by exploring unique combinations and designs that express your artistic vision.
Quirky and Playful Themes: Inject some fun and whimsy into your tufted rug project. Create rugs with themes like animals, food, or pop culture icons. Think outside the box and design imaginative rugs that bring a smile to your face and spark conversations.
Tribal and Ethnic Patterns: Draw inspiration from different cultures and ethnicities around the world. Research traditional patterns and motifs from various regions and create rugs that celebrate the rich diversity and history of different cultures.
Monochrome Minimalism: Embrace the elegance of minimalism by tufting rugs in monochrome color schemes. Experiment with different shades and textures of a single color or create subtle patterns using various shades of black, white, or gray. Let simplicity and clean lines speak for themselves.
Textured Tapestries: Explore various tufting techniques to create rugs with different textures and tactile experiences. Combine loop pile, high pile, and low pile tufts to achieve a multi-textured rug. Play with contrasting yarns and tuft heights to add depth and interest to your design.
Personalized Lettering: Incorporate letters, initials, or inspiring words into your tufted rugs. Spell out a meaningful quote, create a rug with a monogram, or add personal touches that convey a story or message. This allows you to make your rug truly unique and reflective of your personality.
Mixing Colors and Patterns: Experiment with color combinations and pattern mixing to create rugs that are vibrant and eye-catching. Combine different hues, play with gradients, or incorporate unexpected color schemes to make a bold statement. Blend stripes with floral designs or introduce geometric patterns into organic shapes.
Seasonal Themes: Create rugs that capture the essence of different seasons. Design rugs with motifs of blooming flowers for spring, shades of green for summer, warm earth tones for autumn, or cool blues for winter. Infuse your rugs with the spirit of each season to bring a touch of nature into your space.
Let these inspiring ideas spark your creativity and serve as a launching pad for your next rug tufting project. Whether you choose to explore nature, abstract art, playful themes, or any other concept, the key is to let your imagination soar and enjoy the process of bringing your vision to life.