
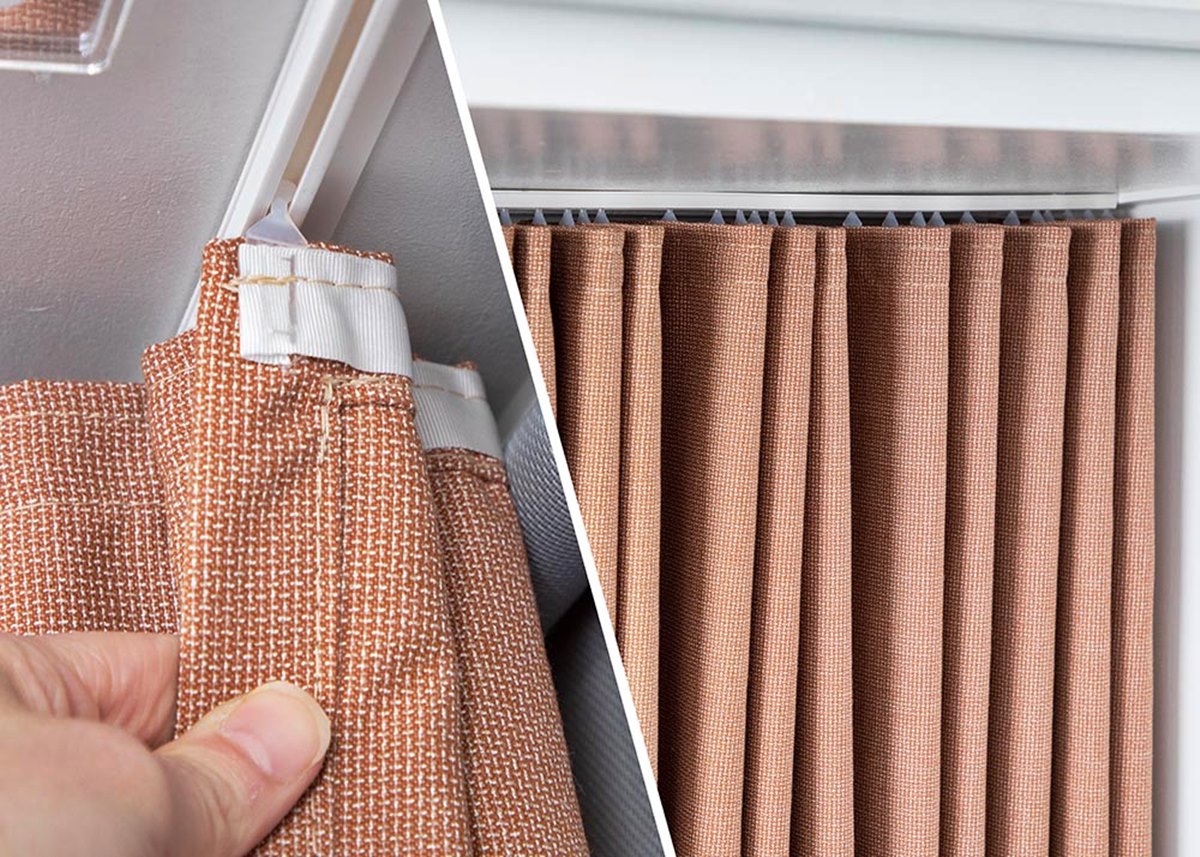
What is Curtain Tape?
Curtain tape is a versatile sewing accessory that is used to create pleats or ruffles in curtains. It is typically made of durable polyester or cotton fabric with evenly spaced rows of small loops or pockets. These loops or pockets make it easy to attach hooks or rings to the curtain tape, allowing for easy hanging of the curtains. Curtain tape not only adds functionality to curtains but also adds a decorative element, transforming a simple curtain into a stylish window treatment.
The purpose of curtain tape is to provide structure and fullness to curtains. By gathering the fabric, it creates neat pleats or ruffles that give curtains a tailored and elegant look. Curtain tape can be used for different types of curtains, such as pencil pleat, pinch pleat, or goblet pleat styles. It offers flexibility in terms of adjusting the fullness of the curtains to achieve the desired visual effect.
Curtain tape comes in various sizes and styles to suit different projects and design preferences. Some curtain tapes have adjustable pockets or loops to accommodate different hook or ring spacing. Others have built-in gathering strings to make it easier to create even and consistent pleats. It is important to choose the right type of curtain tape based on your specific curtain style and the desired level of fullness.
Whether you are making curtains from scratch or upgrading existing ones, curtain tape is an essential component to achieve professional-looking results. It enables you to customize and enhance your curtains, giving them a polished and tailored appearance. By understanding the different types of curtain tapes and their uses, you can confidently embark on your curtain sewing project, knowing that you have the tools to create stunning window treatments.
Different Types of Curtain Tapes
When it comes to choosing curtain tape for your project, it is important to be familiar with the different types available. Each type offers unique features and advantages that can enhance the appearance and functionality of your curtains. Here are some of the most common types of curtain tapes:
- Pencil Pleat Tape: Pencil pleat tape is the most basic and widely used type of curtain tape. It creates neat and evenly spaced pleats that resemble the shape of a row of pencils, hence the name. Pencil pleat tape is versatile and suitable for various curtain styles, making it a popular choice for both casual and formal window treatments.
- Pinch Pleat Tape: Pinch pleat tape is favored for its elegant and tailored appearance. It creates deep and structured pleats that are pinched together at regular intervals. Pinch pleat curtains exude sophistication and are commonly used in formal settings such as dining rooms or master bedrooms.
- Goblet Pleat Tape: Goblet pleat tape is specifically designed to create luxurious and voluminous pleats that resemble wine goblets. It requires more fabric than other types of curtain tapes, making it ideal for creating dramatic window treatments in grand spaces.
- Tab Top Tape: Tab top tape is a versatile option that allows you to easily attach fabric loops to the top of your curtains. This type of curtain tape is suitable for light and airy curtains that are meant to be decorative rather than fully functional.
- Smocking Tape: Smocking tape is a specialty tape that creates a gathered and smocked effect on curtains. It adds a touch of elegance and femininity, perfect for creating a romantic atmosphere in bedrooms or living rooms.
These are just a few examples of the different types of curtain tapes available. It is important to choose the right tape that complements your curtain style and desired aesthetic. Consider the level of fullness you want to achieve, the fabric weight and drape, and the overall look and feel you want for your curtains. By selecting the appropriate curtain tape, you can elevate the visual appeal of your window treatments and create a customized look that suits your personal style.
Choosing the Right Curtain Tape for Your Project
Choosing the right curtain tape is crucial to ensure the success and visual appeal of your sewing project. With various options available, it’s important to consider factors such as curtain style, fabric weight, and desired fullness. Here are some tips to help you choose the right curtain tape for your project:
- Curtain Style: Consider the curtain style you want to achieve. Different types of curtain tape, such as pencil pleat tape, pinch pleat tape, or goblet pleat tape, are specifically designed to create certain pleat patterns. Ensure that the curtain tape you choose is compatible with the desired curtain style.
- Fabric Weight: Take into account the weight and drape of your chosen fabric. Lighter, sheer fabrics may require a different type of curtain tape than heavier fabrics. Ensure that the curtain tape you select can handle the weight of your chosen fabric.
- Desired Fullness: Determine the level of fullness you want for your curtains. Some curtain tapes have adjustable pockets or loops that allow you to vary the amount of gathering in the fabric. Consider the desired visual effect and choose the appropriate curtain tape accordingly.
- Compatibility: Ensure that the curtain tape is compatible with the hooks or rings you plan to use. Check the spacing and size of the loops or pockets on the curtain tape to ensure a proper fit. This will ensure that your curtains hang properly and securely.
- Budget: Consider your budget when choosing curtain tape. While there are various options available, some curtain tapes may be more affordable than others. Determine your budget constraints and select a curtain tape that fits within your budget.
By carefully considering these factors, you can choose the right curtain tape that will help you achieve the desired look and functionality for your curtains. Remember to take measurements and gather all necessary supplies before starting your project to ensure a smooth and successful sewing experience.
Gathering Supplies
Before you start sewing curtain tape onto your fabric, it’s important to gather all the necessary supplies. Having everything on hand will streamline the process and ensure a successful outcome. Here are the essential supplies you’ll need:
- Curtain Tape: Choose the appropriate curtain tape based on your desired curtain style and fullness.
- Fabric: Select the fabric of your choice for your curtains. Ensure that it complements your curtain tape and suits your style and décor.
- Measuring Tape: Use a measuring tape to accurately measure the length and width of your windows and determine the required fabric and curtain tape measurements.
- Fabric Scissors: Have a pair of sharp fabric scissors ready to cut your fabric and curtain tape with precision.
- Sewing Machine: A sewing machine will make the process of sewing the curtain tape onto the fabric much faster and more efficient. Ensure that your sewing machine is in good working condition.
- Thread: Choose a thread color that matches or complements your fabric. Use a high-quality thread suitable for the weight and type of fabric you’re working with.
- Pins or Clips: Use pins or clips to hold the curtain tape in place while sewing it onto the fabric. They will help ensure that the tape is correctly positioned before sewing.
- Iron and Ironing Board: Prepare your iron and ironing board for pressing your fabric and curtain tape. This will help create crisp edges and facilitate sewing.
- Optional Accessories: Depending on your curtain style and design, you might need additional accessories like rings, hooks, or tabs to attach to the curtain tape.
Ensure that all your supplies are clean and in good condition before you begin. Having everything organized and ready will save you time and frustration as you work through your curtain sewing project. Now that you have gathered your supplies, you’re ready to move on to measuring and cutting the curtain tape and fabric.
Measuring and Cutting the Curtain Tape
Accurate measurements and precise cutting are crucial when working with curtain tape to ensure the proper fit and appearance of your curtains. Follow these steps to measure and cut the curtain tape:
- Measure the Window: Use a measuring tape to measure the width and height of your window. It’s important to measure the entire width, including any trim or window frame. Note down these dimensions for reference.
- Determine the Fabric Width: Consider how much fullness you want in your curtains. The general rule of thumb is to have the fabric width at least double the window width for a full and gathered look. However, you can adjust this based on your personal preference and the type of curtain tape you’re using.
- Calculate the Fabric Length: Measure the desired length of your curtains, from the top of the curtain rod to the desired hem length. Add any necessary allowances for hems and headers. Note down this measurement.
- Prepare the Curtain Tape: Lay out the curtain tape on a flat surface. Ensure that it’s straight and ready to be measured and cut. Refer to the manufacturer’s instructions for any specific guidelines on cutting the tape.
- Measure the Curtain Tape: Measure and cut the curtain tape according to the width of your fabric. Ensure that the tape is evenly distributed across the width, leaving space on both sides for side hems. Follow the manufacturer’s recommendations for any adjustments based on the type of curtain tape and desired fullness.
- Cut the Fabric: Using sharp fabric scissors, cut the fabric according to the calculated width and length. Take care to cut straight lines and smooth edges. If needed, use pins or clips to secure the fabric in place while cutting.
- Double Check Measurements: Before sewing, double-check all measurements to ensure accuracy. This will prevent any issues later on and ensure that your curtains fit perfectly on your windows.
Taking the time to measure and cut the curtain tape and fabric accurately will make a significant difference in the final result of your curtains. It’s better to measure twice and cut once, avoiding any unnecessary fabric wastage or uneven pleating. Now that you have measured and cut the curtain tape and fabric, you’re ready to move on to the next step: attaching the curtain tape to the fabric.
Attaching the Curtain Tape to the Fabric
Attaching the curtain tape to the fabric is a crucial step in creating pleats or ruffles and giving your curtains a polished look. Follow these steps to properly attach the curtain tape to the fabric:
- Prepare the Fabric: Lay the fabric out on a flat surface with the right side facing down. Smooth out any wrinkles and ensure that the fabric is free from any dirt or debris.
- Position the Curtain Tape: Place the curtain tape along the top edge of the fabric with the backside of the tape facing up. Align it evenly, ensuring that the loops or pockets are facing towards the fabric.
- Pin or Clip the Curtain Tape: Use pins or clips to hold the curtain tape in place along the entire length of the fabric. Place the pins or clips through the loops or pockets of the tape and into the fabric, securing them together.
- Check for Evenness: Double-check the alignment and evenness of the curtain tape. Make any necessary adjustments to ensure that it is straight and evenly distributed along the fabric.
- Pin the Side Hems: If desired, fold and pin the side hems of the fabric to create a neat finish. Ensure that the curtain tape is still secured in place while pinning the side hems.
- Secure the Curtain Tape: Sew along the top edge of the curtain tape, attaching it to the fabric. Use a straight stitch or a stitch recommended by the manufacturer. Backstitch at the beginning and end to secure the thread.
- Optional: Sew the Side Hems: If you pinned the side hems, sew along the pinned lines to secure them in place. Use a straight stitch or a stitch recommended for the fabric type.
- Remove Pins or Clips: Carefully remove the pins or clips from the fabric and curtain tape once the sewing is completed. Take care not to snag the thread or fabric.
Attaching the curtain tape to the fabric sets the foundation for creating the desired pleats or ruffles in your curtains. Ensure that the tape is securely sewn onto the fabric to withstand the weight of the curtains. Once the curtain tape is attached, you’re ready to move on to the next step: sewing the curtain tape onto the fabric.
Sewing the Curtain Tape onto the Fabric
Sewing the curtain tape onto the fabric is a crucial step in creating beautiful and well-structured pleats or ruffles. Follow these steps to ensure a secure and professional attachment:
- Prepare Your Sewing Machine: Thread your sewing machine with a thread that matches the fabric or curtain tape. Choose a sturdy, straight-stitch setting or a stitch recommended by the manufacturer.
- Position the Fabric and Curtain Tape: Place the fabric with the attached curtain tape under the presser foot of your sewing machine. Ensure that the curtain tape is at the top, facing up, and the fabric is positioned correctly.
- Sew Close to the Edges: Begin sewing along the bottom edge of the curtain tape, as close to the edge as possible. This will secure the curtain tape to the fabric and prevent it from shifting or coming loose.
- Sew Along the Length: Continue sewing along the entire length of the curtain tape. Take care to maintain a straight line and an even seam allowance. Backstitch at the beginning and end to secure the thread.
- Stitch Reinforcement: For extra stability, consider reinforcing the stitches near the ends of the curtain tape. This will ensure that the curtain tape stays securely attached, especially at the points where the curtains will be hung.
- Clean Up Loose Threads: Trim any loose threads or excess fabric as you go. This will keep your work neat and tidy.
Throughout the sewing process, it’s important to maintain a consistent speed and tension on your sewing machine to ensure even stitching. Take your time and pay attention to detail, especially when sewing over thick layers of fabric or curtain tape.
Once you have sewn the curtain tape onto the fabric, you have successfully completed another important step in creating your curtains. The curtain tape should be securely attached, ready for the next step of adding hooks or rings.
Adding Hooks or Rings to the Curtain Tape
Adding hooks or rings to the curtain tape is the final touch that allows you to hang your curtains with ease. Follow these steps to properly attach hooks or rings to the curtain tape:
- Determine the Hook or Ring Placement: Decide on the spacing and placement of the hooks or rings along the curtain tape. The number of hooks or rings will depend on the width of your curtains and personal preference.
- Select the Hooks or Rings: Choose the appropriate hooks or rings based on the type of curtain tape you are using. Make sure they are sturdy and suitable for the weight of your curtains.
- Attach the Hooks or Rings: Slide the hooks or rings through the loops or pockets on the curtain tape. Ensure that they are evenly spaced and securely attached.
- Check for Balance: Hang the curtains on the curtain rod and check for balance and evenness. Make any necessary adjustments to the placement or spacing of the hooks or rings for a visually pleasing appearance.
- Test the Movement: Gently slide the curtains open and closed to ensure that they move smoothly along the curtain rod. Adjust the hooks or rings if necessary to ensure proper functionality.
By properly attaching hooks or rings to the curtain tape, you can easily hang your curtains and enjoy their functionality and aesthetic appeal. Take your time during this step to ensure that the hooks or rings are aligned and securely attached, as this will contribute to a seamless and elegant look.
With the hooks or rings in place, your curtains are ready to be hung and adjusted to fit your windows perfectly. This final step brings your curtain sewing project to completion, allowing you to admire your work and enjoy the beauty of your handmade window treatments.
Hanging and Adjusting the Curtains
After completing the sewing and attaching process, it’s time to hang your curtains and make any necessary adjustments for the perfect fit. Follow these steps to hang and adjust your curtains:
- Prepare the Curtain Rod: Ensure that your curtain rod is securely installed and level across the window. Make any adjustments or repairs if needed.
- Hang the Curtains: Slide the hooks or rings on the curtain tape onto the curtain rod, starting from one end. Ensure that the curtains are evenly distributed along the rod.
- Check for Length: Assess the length of your curtains to make sure they reach the desired point. Adjust the position of the curtain rod if you need to raise or lower the curtains.
- Adjust the Fullness: If the curtains appear too flat or too gathered, make adjustments to the hooks or rings. Slide them closer together or further apart to achieve the desired level of fullness.
- Straighten and Align: Smooth out any wrinkles or unevenness in the fabric. Ensure that the curtains are hanging straight and aligned with the window frame.
- Test the Movement: Gently pull the curtains open and closed to ensure they move smoothly along the curtain rod. Make any additional adjustments if necessary.
Take your time when hanging and adjusting your curtains to ensure they are visually pleasing and functional. Step back and assess their appearance from different angles to ensure they create the desired effect in your space.
With your curtains properly hung and adjusted, you can now enjoy the finished result of your sewing project. They will not only enhance the aesthetics of your room but also provide privacy and control over light and temperature. Enjoy the beauty and functionality of your handmade curtains!
Tips and Tricks for Sewing Curtain Tape
When sewing curtain tape onto fabric, a few tips and tricks can help ensure a smooth and successful sewing process. Here are some valuable tips to keep in mind:
- Use High-Quality Curtain Tape: Invest in high-quality curtain tape that is durable and designed specifically for your curtain style. This will ensure that your curtains hold up well over time.
- Pre-Wash and Iron Fabric: Before sewing, pre-wash and iron your fabric to remove any dirt, debris, or wrinkles. This will ensure accurate measurements and prevent shrinkage after sewing.
- Pin or Clip the Curtain Tape: Use plenty of pins or clips to hold the curtain tape in place while sewing. This will ensure that it stays aligned and secure throughout the sewing process.
- Consider Reinforcement: For heavy or longer curtains, consider reinforcing the curtain tape with additional rows of stitching. This will provide extra support and prevent sagging over time.
- Backstitch for Security: Always backstitch at the beginning and end of your sewing to secure the thread and prevent it from unraveling. This will provide extra strength to your stitches.
- Trim Excess Fabric and Threads: In each step of the sewing process, regularly trim any excess fabric or loose threads to ensure a neat and professional finish.
- Test Techniques on Scrap Fabric: If you’re using a new type of curtain tape or trying out a new sewing technique, it’s a good idea to test it on a scrap piece of fabric first. This allows you to familiarize yourself with the process and make any necessary adjustments.
- Take Measurements Twice: Double-check your measurements before cutting fabric or sewing curtain tape. Accuracy is key to achieving the desired fit and appearance of your curtains.
- Take Breaks and Work at Your Own Pace: Sewing curtain tape onto fabric can be time-consuming. Take breaks when needed and work at a pace that ensures accuracy and concentration. This will result in a more enjoyable sewing experience and better results.
By implementing these tips and tricks, you can enhance your sewing skills and achieve professional-looking curtains. Remember to stay patient, pay attention to detail, and enjoy the process of bringing your curtains to life.
Common Mistakes to Avoid when Sewing Curtain Tape
When sewing curtain tape onto fabric, there are some common mistakes that can occur. Being aware of these mistakes can help you avoid them and ensure a smoother sewing process. Here are some common mistakes to watch out for:
- Inaccurate Measurements: One of the most significant mistakes is taking inaccurate measurements. Double-check your measurements before cutting fabric or attaching the curtain tape to ensure a proper fit.
- Not Using the Right Curtain Tape: Using the wrong type of curtain tape for your desired curtain style can lead to unsatisfactory results. Make sure to choose the appropriate curtain tape that matches your desired pleating style and fabric weight.
- Inadequate Securement: Failing to secure the curtain tape properly to the fabric can result in sagging or uneven pleats. Ensure that you use enough pins or clips and sew the tape securely to the fabric.
- Inconsistent Pleats: Irregular spacing or inconsistent pleating can detract from the overall appearance of your curtains. Take your time to ensure that the pleats are evenly spaced and aligned for a neat and uniform look.
- Neglecting to Trim Excess Fabric: Leaving excess fabric or loose threads can make your curtains look unfinished. Regularly trim any excess fabric or threads throughout the sewing process to achieve a clean and professional result.
- Rushing the Process: Sewing curtain tape requires time and attention to detail. Avoid rushing the process, as it can lead to mistakes and subpar results. Take your time, follow each step carefully, and work at your own pace.
- Forgetting to Backstitch: Failing to backstitch at the beginning and end of your sewing can cause the stitches to unravel over time. Remember to backstitch to ensure the longevity and durability of your curtains.
- Ignoring Ironing and Pressing: Neglecting to iron or press the fabric and curtain tape can result in wrinkles and uneven pleating. Take the time to properly iron and press each component before sewing for a smoother sewing process.
- Overlooking Compatibility: Ensure that the hooks or rings you use are compatible with the loops or pockets on the curtain tape. Using hooks or rings that are too large or small can prevent proper attachment and hinder the functionality of your curtains.
By avoiding these common mistakes, you can achieve professional-looking curtains that are well-fitted, aesthetically pleasing, and functional. Take your time, pay attention to detail, and exercise patience throughout the sewing process to produce high-quality results.
Frequently Asked Questions about Sewing Curtain TapeHere are some commonly asked questions about sewing curtain tape:
- Q: Can I sew curtain tape by hand?
A: While it is possible to sew curtain tape by hand, using a sewing machine will provide more efficiency and durability. The machine’s consistent stitching and stronger thread will ensure a secure attachment of the curtain tape to the fabric. - Q: How do I determine the amount of fabric and curtain tape I need?
A: To determine the amount of fabric, measure the width and length of your window, and add any necessary allowances for hems and headers. For curtain tape, consider the fullness you want to achieve and the spacing between the loops or pockets. Refer to the manufacturer’s instructions for specific guidance on the amount of curtain tape needed for your desired fullness. - Q: Can I reuse curtain tape?
A: In most cases, curtain tape can be reused if it is still in good condition. However, it’s important to ensure that the loops or pockets are not stretched or distorted. Carefully inspect the tape before reuse to ensure it will provide a secure attachment for your curtains. - Q: How do I maintain curtains with curtain tape?
A: Proper maintenance of curtains with curtain tape involves regular dusting or vacuuming to remove dirt and debris. Gentle spot cleaning or professional dry cleaning may be required for stains. Take care when opening and closing the curtains to prevent excessive pulling on the curtain tape. - Q: Can I sew curtain tape onto sheer or lightweight fabrics?
A: Yes, curtain tape can be sewn onto sheer or lightweight fabrics. However, it’s important to choose the appropriate weight of curtain tape that will securely hold the fabric without causing it to sag.
These are just a few frequently asked questions about sewing curtain tape. If you have any specific concerns or queries, it’s always a good idea to consult the manufacturer’s instructions or seek advice from experienced sewers. Happy sewing!