
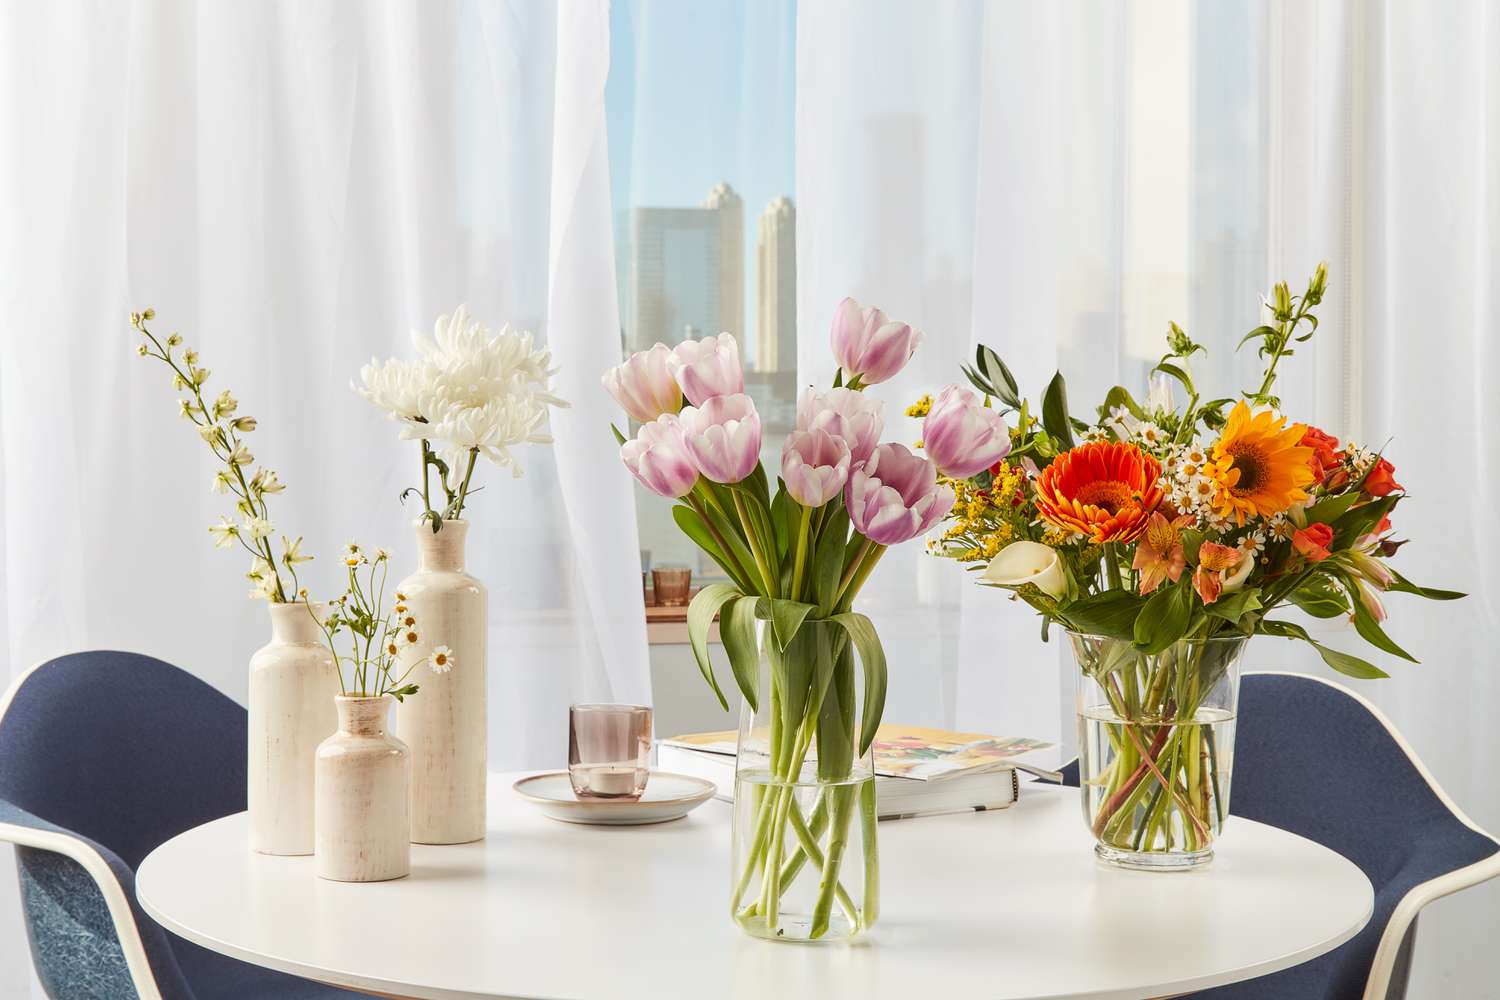
Choosing the Right Vase
When it comes to putting flowers in a tall vase, choosing the right vessel is crucial. The vase not only serves as a container for the flowers but also contributes to the overall aesthetic appeal of the arrangement. Here are a few things to consider when selecting the perfect vase:
- Height: Opt for a tall vase that allows the flowers to stand upright and have enough space to be displayed fully. A vase that is too short might not accommodate the length of the stems properly.
- Proportions: Consider the proportions of the vase in relation to the size and shape of the flowers you intend to use. A wider mouth can provide more room for a larger bouquet, while a narrower opening can help to keep the flowers securely arranged.
- Material: Choose a vase material that complements the style of your flowers and the overall theme of your space. Glass or ceramic vases are common choices, offering a versatile and elegant look.
- Transparency: Decide if you want the vase to be transparent or opaque. Transparent vases allow the stems to be seen, creating a sleek and modern look, while opaque vases can add a touch of mystery and elegance.
- Color: Consider the color scheme you have in mind for your flower arrangement. A clear or neutral-colored vase can create a clean and minimalist look, while a colored vase can add a pop of vibrancy.
- Style: Take into account the overall style and ambiance of the space where the vase will be placed. Choose a vase that complements the existing décor and enhances the visual appeal of the room.
By carefully considering these factors, you can select the perfect vase that will enhance the beauty of your tall flower arrangement. Remember that the vase should not overpower the flowers but rather serve as a harmonious and supportive backdrop. With the right vase, you’ll be well on your way to creating a stunning display of flowers.
Preparing the Vase
Before you start arranging your flowers in a tall vase, it’s important to properly prepare the vessel. Taking a few simple steps will ensure that your flowers stay fresh and last longer. Here’s how to prepare your vase:
- Clean the vase: Start by washing the vase with warm soapy water to remove any dirt or residue. Rinse it thoroughly to ensure there are no soap remains. A clean vase helps prevent bacteria growth and keeps your flowers healthy.
- Trim the stems: Use a pair of sharp, clean scissors or shears to trim the stems of your flower bunch. Cut about an inch off the bottom of each stem at a diagonal angle. This creates a fresh cut, allowing the flowers to better absorb water.
- Remove excess leaves: Remove any leaves that would be submerged in the water to prevent them from rotting. Leaves below the waterline can promote bacterial growth and shorten the vase life of your flowers.
- Fill the vase with water: Fill the vase with fresh, room temperature water. Avoid using extremely cold or hot water, as it can shock the flowers. Fill the vase about two-thirds full to provide enough support and hydration for the flowers.
- Add flower food: If provided with your bouquet or available separately, add flower food to the water in the vase. This special mixture contains nutrients that help prolong the life of the flowers. Follow the instructions on the packet for the correct dosage.
- Change the water regularly: To ensure the longevity of your flowers, change the water every two to three days. Fresh water helps prevent bacterial growth and keeps the flowers hydrated.
- Place the vase in a suitable location: Find a spot away from direct sunlight, drafts, and ripening fruits. Sunlight and drafts can dehydrate the flowers, while fruits release ethylene gas, which can shorten their lifespan.
By properly preparing the vase, you create an optimal environment for your flowers to thrive. This step ensures that your flowers receive the necessary hydration and nutrition, allowing them to stay fresh and beautiful for a longer period. Now that the vase is ready, it’s time to move on to selecting the flowers for your arrangement.
Selecting the Flowers
Choosing the right flowers for your tall vase arrangement is essential to create a visually stunning display. Consider the following factors when selecting flowers:
- Height and shape: Opt for flowers with long stems that will complement the height of your tall vase. Look for flowers with different heights to create depth and visual interest. Also, consider the shape of the flowers and how they will blend together in the arrangement.
- Color scheme: Decide on a color scheme that suits your taste and the overall ambiance of the room. You can choose a monochromatic arrangement with flowers of the same color for a cohesive look, or mix complementary colors for a vibrant and lively display.
- Season and occasion: Consider the season and the occasion for the arrangement. Select flowers that are in season to ensure optimal freshness. For special occasions, you may want to choose flowers with symbolic meaning or sentimental value.
- Variety: Incorporate a variety of flowers to add texture, shape, and interest to the arrangement. Mix larger focal flowers with smaller filler flowers to create a balanced and dynamic display.
- Longevity: Keep in mind the longevity of the flowers you choose. Some flowers, like roses and lilies, have a longer vase life compared to others. This is especially important if you want your arrangement to last for several days.
- Fragrance: Consider the fragrance of the flowers, especially if you intend to place the arrangement in a closed-up space like a bedroom or office. Choose flowers with a pleasant scent or opt for unscented varieties if you or others have sensitivities to strong fragrances.
When selecting the flowers, trust your instincts and choose blooms that genuinely appeal to you. Experiment with different combinations to create a personalized and visually captivating arrangement. Now that you have chosen the perfect flowers, it’s time to prepare them for arranging in the tall vase.
Trimming the Stems
Properly trimming the stems of your flowers is an important step in preparing them for arranging in a tall vase. Trimming the stems correctly helps with water absorption and ensures the longevity of your flower arrangement. Follow these steps to trim the stems effectively:
- Gather your tools: Before you start, gather a sharp pair of scissors or pruning shears, a clean work surface, and a vase filled with fresh water.
- Assess the length: Hold the flower stem next to the vase to estimate the desired height. Remember that the stems should be long enough to be displayed in the tall vase but not so long that they droop or touch the bottom.
- Make a diagonal cut: Using the sharp scissors or shears, make a clean diagonal cut on the stem. This provides a larger surface area for the flower to absorb water, allowing it to stay hydrated for longer.
- Remove lower leaves: Strip off any leaves that would be submerged in the water. These submerged leaves can introduce bacteria into the water and cause the flowers to deteriorate more quickly.
- Check for any damage: Examine the stem for any damaged or rotting sections. If you notice any, trim the stem just above the damaged area to ensure the flowers receive adequate nourishment.
- Repeat for all stems: Trim each flower stem individually, following the same steps. Take your time to ensure each cut is clean and precise.
- Place stems in water promptly: Once you’ve trimmed a flower stem, immediately place it in the vase filled with fresh water. This prevents air from entering the stem and obstructing water uptake.
Trimming the stems of your flowers is a crucial step in the preparation process. By following these steps, you create the optimal conditions for your flowers to absorb water and stay fresh. Now that the stems are properly trimmed, it’s time to move on to creating a base for your tall vase arrangement.
Creating a Base for the Arrangement
Building a solid base is essential for a well-structured and visually appealing flower arrangement in a tall vase. The base provides stability and serves as a foundation for the rest of the flowers. Follow these steps to create a solid base:
- Select sturdy flowers: Choose a few sturdy flowers that will serve as the anchor for the arrangement. These flowers should have strong stems and a larger presence to provide stability.
- Arrange them strategically: Place the sturdy flowers in the vase first, spacing them evenly around the base. Position them slightly lower than the desired height of the final arrangement to allow space for additional flowers.
- Angle the stems: Angle the stems of the sturdy flowers slightly outward, creating a crisscrossing pattern. This adds stability and creates a visually appealing base for the rest of the flowers to nestle into.
- Use flower frog or tape: If needed, you can use a flower frog or floral tape to secure the stems together at the base. This helps to keep the flowers in place and maintain their desired position.
- Add water as needed: While creating the base, periodically check the water level in the vase and top it up if necessary. The base flowers should have enough water to stay hydrated as you continue working on the arrangement.
Creating a solid base sets the foundation for a well-balanced flower arrangement. The sturdy flowers not only provide stability but also add symmetry and structure to the overall design. With the base in place, you’re ready to add the taller and supporting flowers to complete your tall vase arrangement.
Placing the Tallest Flowers
Once you have established a solid base for your tall vase arrangement, it’s time to introduce the tallest flowers. These tall blooms will create height and visual impact in your arrangement. Follow these steps to place the tallest flowers:
- Select your tallest flowers: Choose the tallest flowers in your selection, such as long-stemmed roses or delphiniums. These flowers will draw the eye upwards and create a focal point in the arrangement.
- Determine their placement: Visualize the desired arrangement and decide where you want the tallest flowers to be positioned. Generally, it is best to place them towards the center or back of the vase to create depth and dimension.
- Insert the stems: Insert the stems of the tallest flowers into the base, ensuring they reach the bottom of the vase. This provides stability to the arrangement and prevents them from leaning or toppling over.
- Angle the stems: Angle the tallest flower stems, with the blooms facing slightly outward. This allows the flowers to be visible from all angles and creates an aesthetically pleasing shape.
- Space them evenly: Place the tallest flowers evenly throughout the arrangement, allowing for proper distribution and balance. Avoid clustering them in one area as this can create a crowded and uneven look.
- Step back and assess: Take a step back and evaluate the positioning of the tallest flowers. Make any necessary adjustments to ensure they are evenly spaced and add the desired height and drama to the arrangement.
Placing the tallest flowers in your tall vase arrangement creates a focal point and adds a sense of grandeur to the overall design. By following these steps, you can achieve a visually striking arrangement that captures attention and sets the stage for the supporting flowers to come.
Adding Supporting Flowers
Now that you have placed the tallest flowers in your tall vase arrangement, it’s time to add the supporting flowers. These blooms will fill in the gaps, add volume, and complement the focal flowers. Follow these steps to incorporate the supporting flowers:
- Select your supporting flowers: Choose a variety of medium-sized flowers, such as daisies, carnations, or hydrangeas. These blooms should have shorter stems and a complementary color palette to the tallest flowers.
- Determine their placement: Visualize the arrangement and identify areas where the supporting flowers will enhance the overall design. Consider placing them near the base to create a beautiful transition between the tallest flowers and the filler flowers.
- Trim the stems: Trim the stems of the supporting flowers to the appropriate length, ensuring they are slightly shorter than the tallest flowers. This allows them to fill in the arrangement without overpowering the focal blooms.
- Insert the stems: Insert the supporting flower stems into the vase, carefully weaving them around the base and the tallest flowers. Alternate the placement to create a balanced and harmonious composition.
- Consider flower placement: For a natural look, vary the angles and heights of the supporting flowers. This adds movement and dimension to the arrangement, making it more visually appealing.
- Add pops of color: If your arrangement allows for it, incorporate flowers with contrasting or complementary colors to add vibrant pops within the arrangement. This creates a dynamic and eye-catching display.
- Step back and assess: Take a step back and evaluate the placement of the supporting flowers. Ensure they are evenly distributed, providing balance and enhancing the overall aesthetic of the arrangement.
Adding the supporting flowers brings depth, volume, and cohesion to your tall vase arrangement. By following these steps, you can achieve a well-balanced composition that highlights both the focal and supporting flowers, resulting in a visually captivating display. Now, it’s time to move on to the next step: filling in the arrangement with filler flowers.
Filling in with Filler Flowers
Filler flowers play a crucial role in adding texture, volume, and a sense of completeness to your tall vase arrangement. These delicate blooms fill in the gaps between the taller and supporting flowers, creating a lush and cohesive look. Follow these steps to effectively fill in your arrangement with filler flowers:
- Select your filler flowers: Choose small blooms or foliage that can easily fill empty spaces and add softness to the arrangement. Baby’s breath, statice, or ferns are popular choices for filler flowers.
- Trim the stems: Trim the stems of the filler flowers to the desired length, typically slightly shorter than the supporting flowers. This allows them to nestle in between the other blooms without overpowering the arrangement.
- Determine placement: Assess areas in the arrangement where the filler flowers can be strategically placed. Look for gaps or areas that need additional volume and visual interest.
- Insert the stems: Insert the filler flower stems into the arrangement, weaving them through the taller and supporting flowers. Focus on balancing the distribution of the filler flowers to ensure a harmonious and cohesive look.
- Add variety: Incorporate different varieties of filler flowers to add depth and texture. Combine delicate blooms with foliage or branches to bring a natural and organic feel to the arrangement.
- Consider flower placement: Place the filler flowers at varying heights and angles to create a natural and effortless look. Avoid clustering them in one area, but rather distribute them evenly throughout the arrangement.
- Step back and assess: Take a step back and evaluate the placement of the filler flowers. Make any necessary adjustments to achieve a balanced and visually pleasing arrangement.
Filling in your tall vase arrangement with filler flowers completes the overall look and adds a sense of abundance and fullness. By following these steps, you can achieve a beautifully layered and textured arrangement that captivates the eye. With the filler flowers in place, it’s time to add greenery to enhance the natural appeal of the arrangement.
Adding Greenery
Greenery brings a touch of freshness, texture, and natural beauty to your tall vase arrangement. It complements the flowers and adds an element of foliage that enhances the overall aesthetic. Here are the steps to effectively add greenery to your arrangement:
- Select your greenery: Choose a variety of foliage, such as eucalyptus, ferns, or ivy, to add depth and visual interest. Opt for different textures and shades of green to create contrast and dimension.
- Trim the stems: Trim the stems of the greenery to the desired length, making sure they are slightly shorter than the flowers. This allows the greenery to frame and complement the blooms without overpowering them.
- Consider placement: Plan where you want to add the greenery in your arrangement. It can be used to fill in gaps, create a backdrop for the flowers, or cascade gently over the sides of the vase.
- Insert the stems: Insert the greenery stems into the arrangement, weaving them through the other flowers and foliage. Focus on creating a natural and organic flow, ensuring the greenery is evenly distributed.
- Arrange strategically: Place the greenery strategically to enhance the overall shape and structure of the arrangement. Use larger foliage at the base to create a solid foundation, and layer smaller leaves towards the top for a cascading effect.
- Add variety: Incorporate a mix of different types of greenery to add interest and texture. Combine delicate ferns with broad leaves or wispy branches to create visual contrast and depth.
- Step back and assess: Take a step back and evaluate the placement of the greenery. Make any necessary adjustments to ensure it enhances the arrangement and creates a balanced and visually pleasing display.
Adding greenery is the final touch that brings your tall vase arrangement to life. By following these steps, you can create a well-balanced and visually stunning composition that combines the beauty of both flowers and foliage. With the greenery in place, it’s time to tie the bouquet together for a cohesive and polished look.
Tying the Bouquet Together
Tying the bouquet together is an essential step in creating a cohesive and polished look for your tall vase arrangement. It helps secure the flowers and greenery in place, maintaining their desired positioning and ensuring a neat and professional appearance. Follow these steps to effectively tie your bouquet together:
- Gather your materials: Prepare a floral tape or a natural jute twine to tie the bouquet. These materials provide a secure hold while adding a decorative touch.
- Hold the stems: Gather all the stems of the flowers, greenery, and filler flowers in one hand. Ensure they are held firmly but not too tightly to avoid damaging the delicate blooms.
- Wrap the tape or twine: Starting from the base of the stems, wrap the floral tape or twine around the gathered stems. Work your way up towards the top, ensuring a tight and secure wrap. Leave a small section unwrapped near the top for the vase water to be absorbed.
- Secure the wrap: Once you reach the top, secure the wrap by tying a knot or using a small piece of floral wire. This will hold the bouquet together and prevent it from loosening or unravelling.
- Trim the ends: Trim any excess stems that are sticking out below the tape or twine. Use sharp scissors or shears to create a clean and even cut.
- Add a decorative touch: If desired, you can embellish the tied portion of the bouquet with a ribbon, lace, or a decorative pin. This adds an extra touch of elegance and personalization to the arrangement.
- Step back and assess: Take a step back and evaluate the overall look of the tied bouquet. Make any necessary adjustments to ensure it feels secure, tidy, and visually appealing.
Tying the bouquet together is the final step in creating a well-structured and cohesive tall vase arrangement. It not only ensures the stability and longevity of the flowers but also adds a touch of sophistication to the overall presentation. With the bouquet securely tied, it’s time to carefully place it in the vase and proceed to arrange the flowers evenly.
Placing the Bouquet in the Vase
Placing the bouquet in the vase is the next step in creating your beautiful tall vase arrangement. This step is crucial in achieving a visually appealing display and ensuring the stability of the bouquet. Follow these steps to place the bouquet in the vase:
- Select the appropriate vase: Choose a tall vase that accommodates the height of your bouquet and provides enough space for the flowers to spread out.
- Hold the bouquet: Grasp the tied portion of the bouquet firmly with one hand, ensuring a secure grip on the stems.
- Lower the bouquet into the vase: Gently lower the bouquet into the vase, making sure the stems reach the bottom of the vase. Watch the positioning of the bouquet to ensure it is centered and balanced within the vase.
- Adjust the height: Assess the height of the bouquet in relation to the top of the vase. If necessary, make slight adjustments by pushing the bouquet deeper into the vase or lifting it slightly to achieve the desired height.
- Check the stability: Ensure the bouquet is stable within the vase. If needed, make further adjustments to ensure the bouquet stands upright without leaning or toppling over.
- Arrange the outer layer: Observe the outer layer of flowers and greenery. Gently adjust and spread out any flowers or foliage that may be flattened or pressed against the vase, restoring their natural shape and position.
Placing the bouquet in the vase is a critical step in finalizing your tall vase arrangement. Take your time to ensure the bouquet is centered, balanced, and securely positioned within the vase. With the bouquet in place, it’s time to proceed to arranging the flowers evenly to achieve a visually pleasing and harmonious display.
Arranging the Flowers Evenly
Arranging the flowers evenly is key to achieving a visually pleasing and balanced tall vase arrangement. This step ensures that each flower has its rightful place and space within the bouquet, creating a harmonious and cohesive display. Follow these steps to arrange the flowers evenly:
- Assess the current arrangement: Take a moment to observe the bouquet and identify any areas that may need adjustment. Look for any flowers that are grouped together or unevenly distributed.
- Start from the center outwards: Begin by focusing on the center of the bouquet. Gently separate any flowers that are clumped together, ensuring each bloom has room to stand out.
- Work with symmetry: Create a sense of balance and order by arranging the flowers symmetrically. As you move towards the outer layers of the bouquet, position similar flowers opposite each other for a pleasing and symmetrical arrangement.
- Consider height and size: Arrange the taller flowers towards the center or back of the bouquet, gradually decreasing in height towards the outer edges. This allows each flower to be visible and prevents any particular bloom from overpowering the others.
- Fill in gaps: Identify any empty spaces or gaps within the arrangement. Carefully insert smaller filler flowers or foliage into these areas, ensuring they fit seamlessly and enhance the overall look.
- Avoid overcrowding: Be mindful not to overcrowd the bouquet. Allow each flower to have enough breathing space, ensuring that they can maintain their individual beauty within the arrangement.
- Step back and assess: Regularly step back and assess the overall arrangement. Make any necessary adjustments to achieve an even distribution of flowers and a visually balanced display.
Arranging the flowers evenly requires attention to detail and a mindful approach. By following these steps, you can create a visually pleasing tall vase arrangement where each flower shines and contributes to the overall beauty of the bouquet. With the flowers evenly arranged, it’s time to step back and admire your stunning creation.
Adjusting and Rearranging as Needed
Adjusting and rearranging your tall vase arrangement is an important step in achieving the desired look and ensuring a visually pleasing display. It allows you to fine-tune the arrangement, making any necessary changes or improvements. Follow these steps to effectively adjust and rearrange your tall vase arrangement:
- Take a step back: Step back and observe the overall arrangement from a distance. This allows you to get a better perspective and identify any areas that may need adjustment.
- Assess the balance: Evaluate the balance of the arrangement. Look for any flowers or foliage that may be leaning heavily in one direction or any gaps that need filling.
- Reposition individual flowers: Carefully reposition any individual flowers that may be out of place. Gently adjust their angle or height to achieve a more balanced and visually pleasing composition.
- Consider color distribution: Assess the color distribution within the arrangement. Make adjustments by rearranging flowers to ensure a harmonious blending or a strategic placement of contrasting colors to create visual interest.
- Work on symmetry: Pay attention to symmetry in the arrangement. If needed, move flowers or foliage to create a more balanced and even distribution of elements.
- Fill in gaps: Identify any empty spaces or gaps that need filling. Introduce additional filler flowers or foliage to create a more full and lush arrangement.
- Step back and reassess: Take a break and step back to reassess the arrangement after making adjustments. This allows you to evaluate the overall impact of the changes and make any final tweaks if needed.
Adjusting and rearranging as needed ensures that your tall vase arrangement is visually balanced, pleasing to the eye, and meets your creative vision. Don’t hesitate to make changes until you’re satisfied with the final look. With the arrangement adjusted and rearranged, you can now move on to the final step: adding water and flower food to maintain the freshness and longevity of your flowers.
Adding Water and Flower Food
Adding water and flower food to your tall vase arrangement is vital for maintaining the freshness and longevity of your flowers. Water provides hydration, while flower food contains essential nutrients that nourish the blooms. Follow these steps to effectively add water and flower food to your arrangement:
- Assess the water level: Check the water level in the vase. If needed, carefully pour out any old water and discard it.
- Add fresh water: Fill the vase with fresh, room temperature water. Fill it about two-thirds full, ensuring there’s enough water to keep the stems hydrated.
- Add flower food: If you have flower food provided with your bouquet or have separate flower food packets, follow the instructions for proper dosage. Dissolve the flower food in the water and mix well.
- Stir the water: Use a spoon or your hand to gently stir the water in the vase. This will help distribute the flower food evenly throughout the vase.
- Check stem hydration: Assess the length of the flower stems in the vase. Ensure that the stems are properly submerged in the water to allow for optimal hydration.
- Remove any submerged leaves: Check for any leaves that may be submerged in the water. Remove them to prevent bacterial growth, as submerged leaves can rot and affect the longevity of the flowers.
- Monitor water level: Keep a close eye on the water level in the vase. Check it daily and replenish as needed to ensure the stems remain submerged and the flowers stay hydrated.
- Change the water and replenish the flower food: Every two to three days, change the water in the vase and add fresh flower food. This helps maintain a clean environment for the flowers and replenishes the nutrients they need.
- Avoid direct sunlight and extreme temperatures: Place the vase in a location away from direct sunlight, drafts, or extreme temperatures. These factors can cause the flowers to wilt or deteriorate more quickly.
Adding water and flower food is essential for keeping your tall vase arrangement fresh and vibrant. By following these steps, you ensure that the flowers receive proper hydration and nourishment, extending their lifespan for you to enjoy. With the water and flower food added, your tall vase arrangement is complete, and you can now marvel at its beauty.
Maintaining the Arrangement
Proper maintenance is crucial for ensuring the longevity and continued beauty of your tall vase arrangement. With a little care and attention, you can enjoy your flowers for longer. Follow these tips for maintaining your arrangement:
- Check the water daily: Monitor the water level in the vase and replenish it as needed. Be sure to add fresh water to keep the stems hydrated and prevent the flowers from wilting.
- Remove wilting flowers: As flowers naturally age, some may start to wilt. Remove any wilted blooms from the arrangement to maintain its aesthetic appeal.
- Trim the stems: Every few days, trim a small section off the bottom of the stems at an angle. This creates a fresh surface for water absorption, allowing the flowers to stay hydrated.
- Remove foliage below waterline: Regularly check for any leaves or greenery that may be submerged in the water. Remove them promptly to prevent bacterial growth and maintain the freshness of the arrangement.
- Keep away from ethylene-producing fruits: Ethylene gas, produced by ripening fruits, can cause flowers to age more quickly. Keep your arrangement away from fruits like apples or bananas to prolong its lifespan.
- Avoid extreme temperatures: Place the arrangement in a location away from extreme temperatures and drafts. Exposure to excessive heat or cold can quickly shorten the life of your flowers.
- Dust the leaves and petals: Gently dust the leaves and petals of the flowers to keep them looking clean and vibrant. Use a soft brush or a feather duster to remove any accumulated dust.
- Reimagine the arrangement: As certain flowers wilt or fade, consider removing them or rearranging the remaining blooms to keep the arrangement looking fresh and balanced.
- Enjoy and appreciate: Take a moment each day to appreciate the beauty of your tall vase arrangement. By basking in its beauty, you’ll be reminded of the joy and vitality that fresh flowers bring into your space.
By following these maintenance tips, you can maximize the lifespan of your tall vase arrangement and continue to enjoy its beauty for as long as possible. Remember that each flower has its own lifespan, so it’s normal for some flowers to fade sooner than others. With proper care, your tall vase arrangement will continue to bring beauty and joy to your surroundings.