
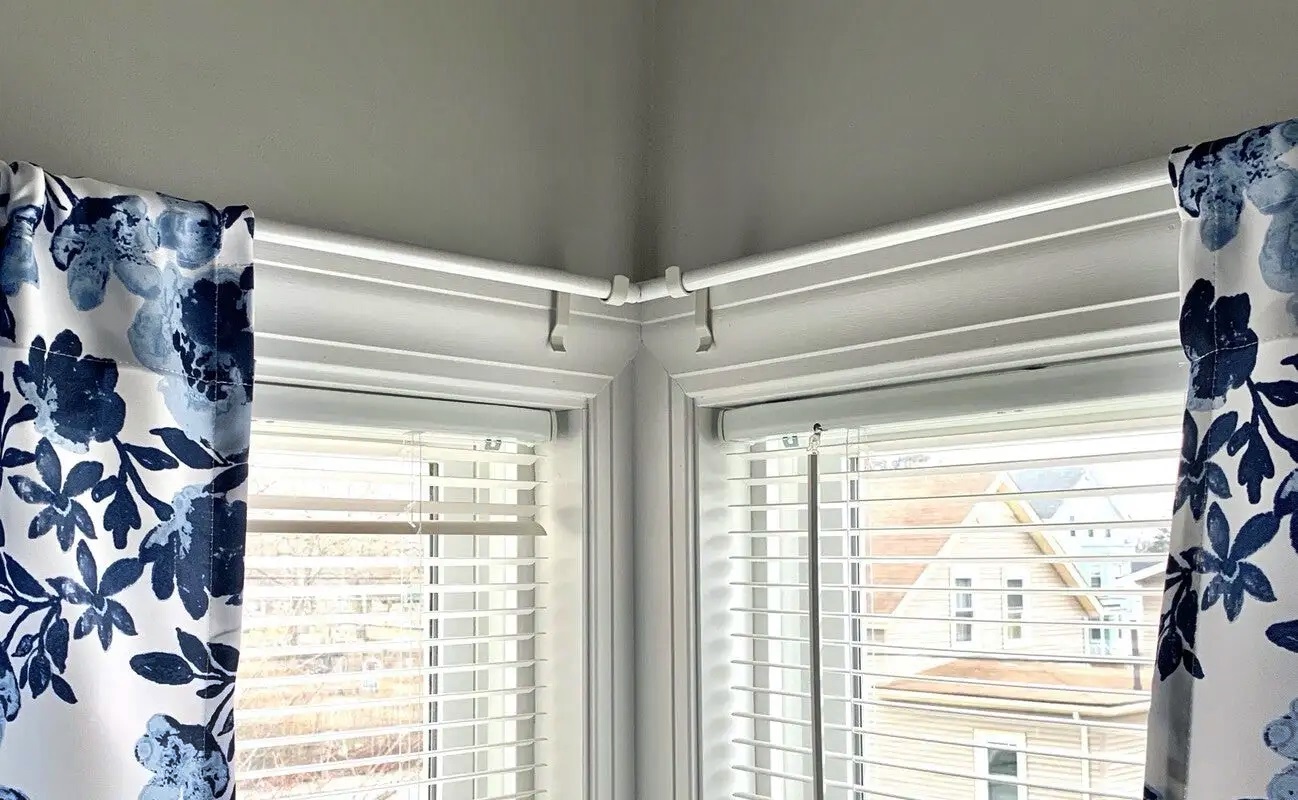
Choosing the Right Corner Curtain Rods
When it comes to installing corner curtain rods, choosing the right hardware is crucial as it determines the overall functionality and aesthetic appeal of your window treatments. Here are a few factors to consider when selecting the perfect corner curtain rods for your space:
1. Material: Curtain rods come in various materials such as metal, wood, or plastic. Consider the overall theme and decor style of your room when selecting the material for your curtain rods. Metal rods offer a sleek and modern look, while wooden rods can add warmth and elegance to your space.
2. Length: Measure the width of your window and add a few inches on both sides to ensure that the curtains fully cover the window when closed. Corner curtain rods typically come in adjustable lengths, allowing you to customize them to fit your specific window dimensions.
3. Design: The design of the curtain rods can greatly impact the overall appearance of your windows. Choose a design that complements your existing decor style, whether it’s contemporary, traditional, or eclectic. Consider decorative finials or end caps to add an extra touch of elegance.
4. Weight Capacity: Take into account the weight of your curtains when selecting the curtain rods. Heavier curtains will require sturdier rods with higher weight capacities to ensure they can be properly supported.
5. Finishes: Curtain rods come in a variety of finishes, such as chrome, bronze, nickel, or painted colors. Consider the existing finishes in your space and select a curtain rod finish that complements the overall color scheme.
6. Compatibility: Ensure that the corner curtain rods you choose are compatible with the type of curtains you plan to hang. Some rods may require curtain rings or clips, while others may have built-in hooks or eyelets to easily attach the curtains.
By carefully considering these factors, you can choose the right corner curtain rods that not only enhance the functionality of your window treatments but also add a stylish touch to your space. Now that you have selected the perfect curtain rods, it’s time to move on to measuring the windows and wall for installation.
Measuring the Windows and Wall
Before installing corner curtain rods, it’s important to accurately measure the windows and wall to ensure a proper fit. Follow these steps to measure your windows and wall:
1. Window Width: Measure the width of the window frame from one side to the other. Be sure to include any trim or molding in your measurements.
2. Curtain Coverage: Decide how much wall space you want your curtains to cover. Typically, curtains should extend beyond the window frame to create a more aesthetically pleasing look. Add this desired coverage to both sides of the window width measurement.
3. Window Height: Measure the height of the window from the top to the bottom. Again, consider any trim or molding and include it in your measurements.
4. Wall Space: Measure the distance from the top of the window frame to the ceiling, and from the sides of the window frame to the adjacent walls. This will help determine the placement of the curtain rods and brackets.
5. Consider the Curtain Length: If you already have curtains or know the desired length, take note of it. This will help when determining the placement of the brackets.
It’s important to remember that measurement precision is key to achieving a professional-looking installation. Use a reliable measuring tape and double-check your measurements to avoid any mistakes.
Once you have precise measurements, you can move on to preparing the corner curtain rods and hardware for installation.
Preparing the Rods and Hardware
Before installing corner curtain rods, it’s important to properly prepare the rods and hardware to ensure a smooth and secure installation. Follow these steps to prepare the rods and hardware:
1. Unpack the Rod and Accessories: Carefully remove the corner curtain rod from its packaging, along with any accessories such as brackets, screws, and installation instructions. Take a moment to familiarize yourself with the components.
2. Check for Damages: Inspect the rod and hardware for any damages or defects. Ensure that the rod is straight and not warped, and that the hardware is in good condition. If you notice any issues, contact the manufacturer for a replacement.
3. Read the Instructions: Take the time to read through the provided installation instructions, as they will provide valuable information on how to properly assemble and install the rods and brackets. Familiarize yourself with any special requirements or tools needed for the installation.
4. Gather the Necessary Tools: Assemble the tools needed for the installation, such as a drill, screws, measuring tape, level, and a pencil. Having all the necessary tools on hand will make the installation process more efficient.
5. Determine the Positioning: Based on the measurements you took earlier, determine the desired positioning of the corner curtain rods on the wall. Use a pencil to mark the spots where the brackets will be attached.
6. Adjust the Rod Length: If the corner curtain rod is adjustable, adjust it to the desired length according to your measurements. Follow the manufacturer’s instructions to properly adjust the rod.
7. Install Finials (if applicable): If your curtain rod has finials or end caps, carefully attach them to each end of the rod. Ensure they are securely fastened.
By properly preparing the rods and hardware for installation, you can ensure a seamless and secure process. Now, it’s time to move on to the next step – attaching the brackets to the wall.
Attaching the Brackets to the Wall
Once you have prepared the corner curtain rods and hardware, the next step is to attach the brackets to the wall. Follow these steps to properly secure the brackets:
1. Locate the Markings: Refer to the markings you made earlier to determine the exact position for each bracket on the wall. Use a measuring tape and level to ensure accurate placement.
2. Mark the Screw Holes: Place each bracket against the wall, aligning it with the markings. Use a pencil or a small nail to mark the screw holes through the bracket’s mounting holes.
3. Pre-drill Pilot Holes: Using an appropriate-sized drill bit for your wall type, pre-drill pilot holes at the marked spots. This will ensure easier installation and prevent the wall from splitting or cracking.
4. Attach the Brackets: Line up the bracket’s mounting holes with the pilot holes and screw them into place. Make sure the brackets are securely attached to the wall.
5. Check for Level: Use a level to ensure that the brackets are straight and level. Adjust them if necessary to maintain a balanced and even installation.
6. Reinforce the Brackets: If the brackets seem wobbly or insecure, reinforce them by adding additional screws or anchors into the wall. This will provide extra stability for the curtain rods.
7. Repeat for Additional Brackets: If your corner curtain rods require multiple brackets, repeat the above steps for each bracket, ensuring they are evenly spaced and aligned.
By following these steps, you can securely attach the brackets to the wall, creating a solid foundation for your corner curtain rods. The next step is to install the center bracket (if necessary) to provide additional support.
Installing the Center Bracket (if necessary)
In some cases, corner curtain rods may require a center bracket for additional support. The center bracket helps prevent sagging and ensures the rod remains straight and secure. Follow these steps to install the center bracket:
1. Determine the Position: Measure the distance between the two end brackets to find the exact center point. Use a measuring tape to ensure accuracy.
2. Mark the Spot: Use a pencil to mark the center point on the wall. This is where the center bracket will be installed.
3. Pre-drill Pilot Holes: Using an appropriate-sized drill bit, pre-drill pilot holes at the marked spot to prepare for the bracket installation.
4. Attach the Bracket: Line up the bracket’s mounting holes with the pilot holes and securely attach the center bracket to the wall using screws.
5. Check for Level: Use a level to ensure that the bracket is straight and level. Make any necessary adjustments to ensure stability.
6. Reinforce, if needed: If the center bracket feels wobbly or unstable, reinforce it by adding additional screws or anchors into the wall. This will provide extra support for the curtain rods.
7. Test the Stability: Give the bracket a gentle tug to ensure it is securely attached to the wall. It should not move or come loose.
If your corner curtain rods do not require a center bracket, you can skip this step. With the brackets and center bracket (if needed) properly installed, you can now move on to attaching the rods to the brackets.
Attaching the Rods to the Brackets
With the brackets securely installed, the next step in installing corner curtain rods is to attach the rods to the brackets. Follow these steps to properly attach the rods:
1. Insert the Rod: Starting with one end of the rod, carefully insert it into the bracket’s opening. Gently slide the rod through the bracket until it reaches the other end.
2. Secure the Rod: Once the rod is positioned within the brackets, use the provided screws or clips to secure it in place. Follow the manufacturer’s instructions on how to properly secure the rod.
3. Check for Level: Use a level to ensure that the rod is straight and level. Adjust the positioning if necessary to achieve a balanced and even appearance.
4. Test the Stability: Give the rod a gentle shake or tug to make sure it is securely attached to the brackets. It should not move or come loose.
5. Repeat for Additional Rods: If your corner curtain rods consist of multiple sections, repeat the above steps to attach each rod to its corresponding set of brackets. Ensure that the rods are aligned properly.
6. Adjust the Length (if needed): If the curtain rods are adjustable, double-check their length and make any necessary adjustments to ensure they fit properly within the brackets. Follow the manufacturer’s instructions for adjusting the rod length.
By carefully attaching the rods to the brackets, you can ensure a secure and stable installation. The next step is to hang the curtains and bring your window treatments to life.
Hanging the Curtains
After successfully attaching the corner curtain rods to the brackets, it’s time to hang the curtains and complete the installation process. Follow these steps to properly hang your curtains:
1. Prepare the Curtains: Remove the curtains from their packaging and give them a gentle shake to remove any wrinkles or creases. If needed, iron or steam the curtains to ensure a smooth and polished appearance.
2. Insert Curtain Hooks or Rings: Depending on the type of curtain rods and curtains you have, insert the curtain hooks or rings onto the rod. Ensure they are evenly spaced and securely attached.
3. Slide the Curtains onto the Rod: Starting from one end, slide the curtains onto the rod, ensuring that the hooks or rings glide smoothly across the rod. Continue sliding until all curtains are in place.
4. Evenly Distribute the Fabric: Once the curtains are on the rod, gently pull and adjust the fabric to ensure it is evenly distributed along the entire length of the rod. This will create a balanced and visually pleasing look.
5. Adjust the Length: If your curtains are too long, use a pair of scissors or hemming tape to adjust the length. Ensure that the curtains skim the floor or meet your desired length for a neat and tailored appearance.
6. Arrange the Pleats (if applicable): If your curtains have pleats, carefully arrange and straighten them, ensuring they lie uniformly for an elegant and polished look.
7. Step Back and Evaluate: Stand back and assess the overall appearance of your newly hung curtains. Make any necessary adjustments to ensure they hang straight and create the desired effect.
8. Optional: Add Tiebacks or Holdbacks: If you wish to add a decorative touch or allow more natural light into the room, consider installing tiebacks or holdbacks to hold the curtains in an open position. These accessories can enhance the overall look and functionality of your window treatments.
With the curtains successfully hung, take a moment to appreciate the transformation they bring to your space. The final step is to make any necessary adjustments to the rods and curtains for a perfect fit.
Adjusting the Rods and Curtains
After hanging your curtains, it’s important to make any necessary adjustments to the rods and curtains to ensure a perfect fit and appearance. Follow these steps to properly adjust your rods and curtains:
1. Straighten the Rods: Stand back and evaluate the alignment of the corner curtain rods. Use a level to ensure they are straight and even. If needed, gently adjust the position of the rods to achieve a balanced and symmetrical look.
2. Check Curtain Length: Assess the length of the curtains once they are hung. Ensure they are the desired length, whether they should be touching the floor or just skim it. Make any necessary adjustments to the length for a neat and tailored appearance.
3. Adjust the Pleats (if applicable): If your curtains have pleats, carefully adjust and arrange them to ensure they fall evenly. Smooth out any unevenness to create a uniform and polished look.
4. Evaluate the Fullness: Take a step back and examine the fullness of the curtains. If you want a more gathered or voluminous look, adjust the curtain hooks or rings to create more pleats and folds. If you prefer a sleeker appearance, reduce the number of hooks or rings for a smoother drape.
5. Recheck Level and Alignment: Double-check the levelness and alignment of the corner curtain rods, as well as the symmetry of the curtains. Ensure that everything is straight and visually balanced.
6. Test the Curtain Movement: Open and close the curtains to ensure they move smoothly along the rods without any obstructions or tangling. Adjust the positioning of the curtains if necessary to ensure easy and uninterrupted movement.
7. Step Back and Assess: Take a final step back and evaluate the overall appearance of the rods and curtains. Make any final adjustments to achieve the desired look and functionality.
By properly adjusting the rods and curtains, you can achieve a flawless and tailored window treatment that enhances the aesthetics of your space. Take the time to ensure everything is perfectly aligned before enjoying the beauty and privacy provided by your corner curtain rods and curtains.