
The Tools You Will Need
Adjusting a metal watch band requires a few specific tools to ensure a successful and accurate adjustment. Before you begin, gather the following items:
- A watch band link remover tool – This tool is essential for safely removing the pins that hold the links together.
- A microfiber cloth – This soft cloth will help protect the watch band from scratches during the adjustment process.
- A small hammer – You will need a small hammer to gently tap the pins out of the metal watch band.
- A pin pusher – This tool is used to reinsert the pins back into the watch band.
- A pair of pliers – Pliers will come in handy for holding the watch band securely during the adjustment.
Having these tools readily available will ensure that you can perform the watch band adjustment properly without causing damage to the band or the watch itself. It’s vital to use the correct tools to ensure a precise and secure adjustment that will not compromise the functionality or appearance of the watch.
Step 1: Determine How Many Links to Remove
The first step in adjusting a metal watch band is to determine how many links need to be removed to achieve the desired fit. This step is crucial to ensure that the watch sits comfortably on your wrist without feeling too tight or too loose.
Start by trying on the watch and clasping it at its current size. Assess how it feels on your wrist. If the band is too loose, you will need to remove one or more links. If it is too tight, you may need to add additional links instead.
Look for the removable links on the side of the watch band. These links are usually held together by small pins, which can be easily removed and reattached using the appropriate tools.
Once you have identified the removable links, it’s time to determine how many of them to remove. It’s essential to make gradual adjustments, removing one or two links at a time, rather than making drastic changes. This approach allows for fine-tuning and ensures a comfortable fit.
When deciding on the number of links to remove, consider the desired snugness of the watch band. Keep in mind that you want the band to stay securely on your wrist without digging into your skin. Additionally, consider the natural movement and expansion of your wrist throughout the day.
It’s important to remember that if you remove too many links, the watch band may become too tight and uncomfortable. Conversely, if you remove too few links, the band may still feel loose and may not sit properly on your wrist.
Take your time during this step to carefully assess the fit of the watch on your wrist. It’s better to make small incremental adjustments rather than rushing through the process. Remember that you can always remove more links if needed, but adding links back may require additional tools or professional assistance.
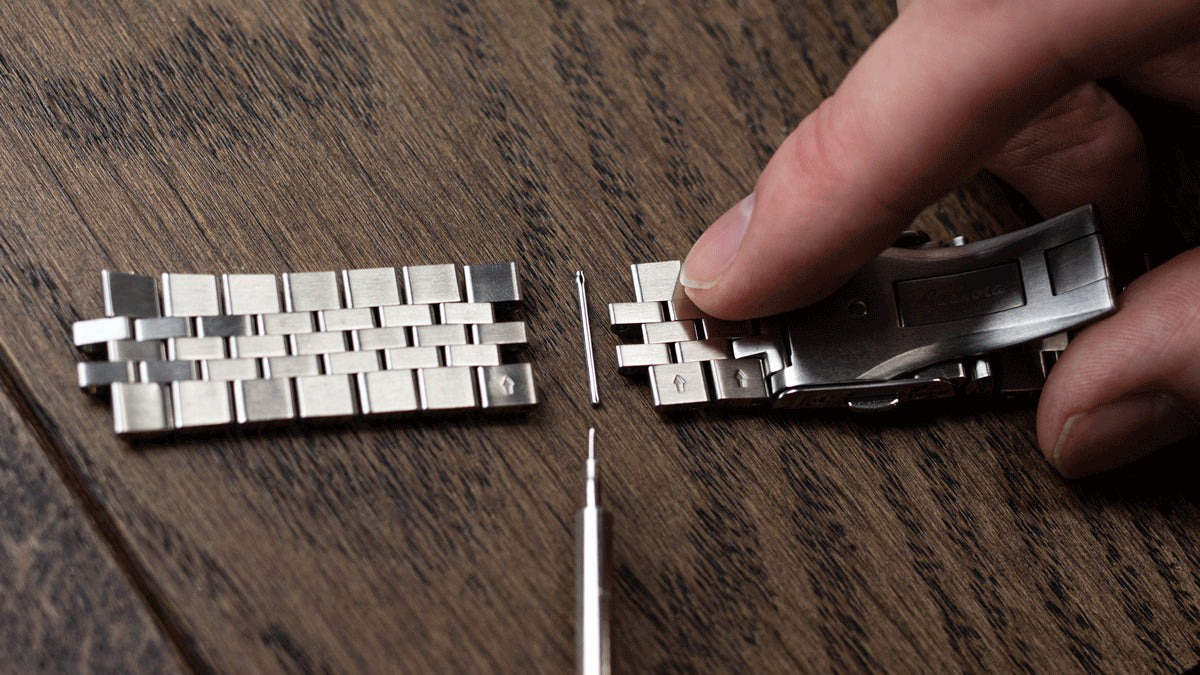
Step 2: Remove the Pins
Once you have determined how many links to remove from the metal watch band, the next step is to remove the pins that hold the links together. This step requires the use of a watch band link remover tool, a small hammer, and a microfiber cloth.
First, lay the watch band on a flat surface and place the microfiber cloth underneath to prevent scratches or damage. Position the watch band link remover tool on the pin of the first removable link. Make sure that the tool is aligned with the pin and apply gentle pressure to push the pin out in the direction indicated by the arrow on the band remover tool.
Using the small hammer, gently tap the end of the pin pusher to push out the pin. Be cautious not to use excessive force as it may damage the watch band or the pin itself. Repeat this process for all the removable links until they are completely detached from the watch band.
Once all the pins are removed, carefully set them aside in a safe place. These pins will be needed later when reattaching the remaining links or adjusting the clasp, depending on the design of your watch band.
It is essential to handle the pins and tools with care during this step to prevent accidental injuries and damages. Pay close attention to the alignment and stability of the pins as you remove them to ensure a smooth and successful adjustment process.
After removing the pins, you should have the desired number of links detached from the watch band. This step sets the foundation for obtaining the perfect fit, and now you can move on to step three, which involves removing the excess links.
Step 3: Remove the Excess Links
With the pins removed, you can now proceed to remove the excess links from the metal watch band. This step will bring you closer to achieving the desired fit for your watch.
Start by identifying the remaining links that you want to remove. It’s important to remember that it’s better to remove fewer links initially and make adjustments as needed rather than removing too many at once. This approach allows for more precise fitting.
Using the watch band link remover tool, place it over the pin of the first link you want to remove. Ensure that the tool is aligned properly, and gently apply pressure to push the pin out, following the indicated direction on the tool. You may need to tap the pin pusher with a small hammer lightly to help dislodge the pin completely.
Once the pin is removed, separate the excess link from the watch band by sliding it out. Set the removed link aside, as you may need it for future adjustments or as a spare in case of any repairs.
Repeat the same process for any additional links you wish to remove. Take your time and be cautious while handling the pins and using the tools to avoid any damage to the watch band.
It’s crucial to check the fit of the watch band after each link removal. Place the watch on your wrist and assess how it feels. Ensure that it is secure but not overly tight or too loose. If necessary, you can repeat the process to remove more links or add some back if the watch feels too tight.
Remember to handle the links and pins with care to avoid misplacing or damaging them. Keeping them organized and in a safe place will make it easier to reassemble the watch band later.
Once you have removed the excess links, you can proceed to the next step, which involves reattaching the pins to secure the remaining links in place.
Step 4: Reattach the Pins
After removing the excess links from your metal watch band, it’s time to reattach the pins to secure the remaining links in place. This step requires the use of a pin pusher and a small hammer.
Start by aligning the holes of the links you want to reconnect. Insert one end of the pin into the hole, making sure it sits flush with the link’s surface. Gently place the watch band on a flat surface, securing it with your hand or a pair of pliers to prevent movement.
Grab the pin pusher and position it over the exposed end of the pin. Apply gentle pressure to straighten and push the pin into the hole. Use the small hammer to softly tap the pin pusher until the pin is fully inserted into both links.
Make sure that the pin is evenly aligned with the link, ensuring that it is securely fastened. Double-check for any misalignment or protruding pins, as they can cause discomfort or potential damage to your wrist or the watch itself.
Repeat the same process for each of the pins that need to be reattached, ensuring that they are properly inserted and secure. Take your time during this step to ensure that all the links are connected smoothly and the watch band is securely held together.
Once all the pins are reattached, give the watch band a gentle tug to check for any loose or unsecured links. If you notice any movement or feel any instability, it could indicate that a pin requires further adjustment.
If needed, use the pin pusher and small hammer to readjust the pins until the watch band feels secure and the links are tightly connected. Pay close attention to the alignment and symmetry of the watch band, as it should sit evenly and comfortably around your wrist.
With the pins successfully reattached, you are one step closer to achieving the desired fit for your metal watch band. The next step involves testing the fit and making any necessary adjustments to the clasp.
Step 5: Test the Fit
With the metal watch band reassembled, it’s time to test the fit on your wrist. This step is crucial to ensure that the adjustment has resulted in the desired comfort and functionality.
Put the watch on your wrist and fasten the clasp. Pay attention to how the watch band feels. It should be snug but not too tight, allowing for a comfortable fit without leaving any marks or causing discomfort.
Check the positioning of the watch on your wrist. It should sit centered and not slide around excessively. If the watch feels too loose, you may need to remove additional links or adjust the clasp further. Conversely, if the watch feels too tight, you may need to add links or loosen the clasp.
Pay attention to the movement of your wrist. The watch band should accommodate your wrist’s natural motion without feeling restrictive. Make sure there is adequate room for your wrist to expand and contract comfortably, especially during activities that may cause sweat or swelling.
Take note of any discomfort or irritation that you may experience. If the watch band is causing any rubbing or pinching, it may be an indication that further adjustments are needed. Ensure that the watch band is not digging into your skin or causing any discomfort that would make wearing the watch unpleasant.
During this step, it’s crucial to carefully evaluate the fit and make any necessary adjustments to achieve the perfect balance. Paying attention to the smallest details will ensure that the watch sits securely and comfortably on your wrist, enhancing both its appearance and functionality.
If you find that additional adjustments are needed, you may need to revisit the previous steps to remove or add links or adjust the clasp accordingly. Remember to make gradual changes and test the fit after each adjustment until you achieve the desired result.
Once you are satisfied with the fit and comfort of the metal watch band, you can move on to the next step, which involves adjusting the clasp to further customize the fit.
Step 6: Adjusting the Clasp
After testing the fit of the metal watch band, you may find that the clasp requires further adjustment to ensure a secure and comfortable fit. The clasp is an essential component that ensures the watch remains securely fastened to your wrist.
Start by examining the clasp mechanism on your watch band. Look for any adjustment holes or mechanisms that can be utilized to customize the fit. Some clasps have multiple holes, allowing you to choose the most suitable size.
For clasps with adjustment holes, carefully open the clasp and select the hole that provides the desired fit. Slide the metal pin into the chosen hole, ensuring that it is secure and securely fastened. You may need to use a pin pusher or a small tool to insert the pin into the hole.
If your clasp does not have adjustment holes, it may feature a sliding mechanism or a fold-over design. Refer to the watch band’s specific instructions or consult the manufacturer’s guidelines to understand how to adjust the clasp correctly.
Once you have made the necessary adjustments to the clasp, close it securely to ensure that it stays in place throughout the day. Give the watch a gentle tug to check the clasp’s stability and make sure it doesn’t loosen or come undone easily.
Take a moment to test the fit and comfort of the watch band again after adjusting the clasp. Ensure that it fits securely on your wrist without any discomfort or excessive movement.
Remember that the adjustment of the clasp is an additional way to fine-tune the fit of the metal watch band. It allows for further customization and ensures that the watch stays securely on your wrist during daily activities.
If you find that further adjustments are needed, you may need to repeat the previous steps or consult a professional watch specialist for assistance. With the clasp properly adjusted, you are now ready to move on to the final step of the process.
Step 7: Final Adjustments
After adjusting the metal watch band and the clasp, it’s time for the final assessment to ensure the perfect fit. This step involves checking all aspects of the watch band and making any additional tweaks if necessary.
Start by examining the watch band on your wrist and evaluating its overall appearance. Ensure that it sits evenly and comfortably, without any twists or turns. If you notice any unevenness or misalignment, you may need to readjust the pins or links accordingly.
Pay attention to the security of the watch band. Give it a gentle tug to ensure that it remains securely fastened while wearing. If you find any instability or loose links, consider removing or adding additional links to improve the fit.
Check for any discomfort or irritation caused by the watch band. Look for any sharp edges, rough surfaces, or areas that may pinch your skin. Smooth out any rough spots or consider adding a protective pad if necessary.
Take a few moments to wear the watch and move your wrist around. Evaluate its comfort during different activities, such as typing, exercising, or everyday tasks. Ensure that the watch band allows for a full range of motion without any restrictions or discomfort.
If you find any issues during this final assessment, make any necessary adjustments. Remove or add links as needed, tighten or loosen the clasp, or take any other measures to achieve the desired fit and comfort.
Keep in mind that the perfect fit may require some trial and error. Take your time and pay close attention to detail to ensure that the watch sits comfortably and securely on your wrist.
Once you are satisfied with the fit and comfort of your metal watch band, you can confidently wear it knowing that it is adjusted to your precise specifications. Properly adjusted watch bands not only enhance the overall appearance of the watch but also ensure a comfortable and enjoyable wearing experience.
By following these step-by-step instructions, you can successfully adjust a metal watch band to achieve the perfect fit and enjoy your timepiece to the fullest.