
Reasons why your Skype camera may not be working
Skype is a popular communication tool used by millions of people worldwide for video conferencing, online meetings, and staying connected with friends and family. However, one frustrating issue that users often encounter is their camera not working during Skype calls. If you’re experiencing this problem, don’t panic. There could be several reasons behind it, and with a little troubleshooting, you can get your camera up and running again. Here are some common reasons why your Skype camera may not be working:
- Camera settings: The first thing you should check is your camera settings within Skype. Ensure that the camera is not disabled or turned off accidentally. To do this, go to the Skype settings and navigate to the “Audio & Video” section. Check if your camera is correctly selected and enabled.
- Outdated camera drivers: Another possible reason for your camera not working is outdated or incompatible drivers. Your camera relies on its drivers to function properly, so it’s essential to keep them up to date. Visit the manufacturer’s website and download the latest drivers for your camera model.
- Default device settings: Sometimes, Skype may be using a different camera or audio device as the default instead of your preferred one. Check your computer’s settings and ensure that your camera is selected as the default recording device. This will ensure that Skype can access and use your camera correctly.
- Camera hardware issues: It’s possible that there may be hardware issues with your camera itself. Check if the camera is physically connected and properly plugged in. Also, inspect the camera for any damage or loose connections. Try connecting the camera to a different USB port or using it on another device to determine if the issue is specific to Skype or the camera itself.
- Software conflicts: Conflicts between your camera and other software on your computer can also cause it to stop working in Skype. Try closing any other applications that might be accessing the camera, such as video recording software, and then restart Skype to see if the camera works.
- Test with other applications: To further troubleshoot the issue, try using your camera with other applications or online services. If the camera works fine outside of Skype, it indicates that the problem lies within the Skype application itself.
- Reinstall Skype: If all else fails, reinstalling Skype can often resolve camera-related issues. Uninstall Skype from your computer and then download the latest version from the official website. After reinstalling, configure the camera settings and test if the issue is resolved.
- Seek professional help: If you have tried all the troubleshooting steps above and your Skype camera still does not work, it may be time to seek professional help. Contact the manufacturer’s support or consult with a technician who can further diagnose and resolve the problem.
Keep in mind that these are just some of the common reasons why your Skype camera may not be working. It’s important to note that specific troubleshooting steps may vary depending on your operating system and camera model. By following these guidelines, you can increase the chances of resolving the issue and enjoy seamless video calls on Skype once again.
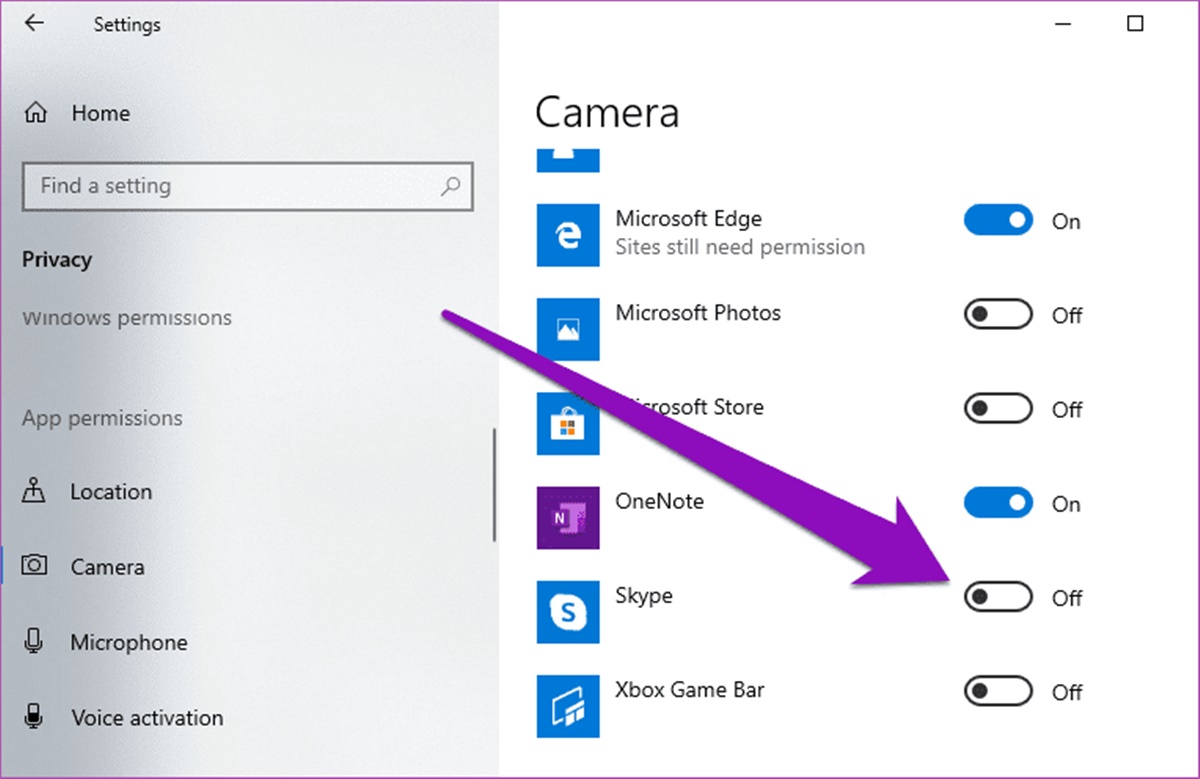
Check your camera settings
If your Skype camera is not working, the first thing you should check is your camera settings within the Skype application. Sometimes, the camera may be disabled or turned off accidentally, causing it to not appear during your video calls. Follow these steps to ensure that your camera settings are correctly configured:
- Launch Skype and sign in to your account.
- Click on your profile picture or the settings gear icon in the top-right corner of the Skype window. This will open the settings menu.
- In the settings menu, navigate to the “Audio & Video” section.
- Under the “Video” tab, make sure that your camera is selected and enabled. If you have multiple cameras connected to your computer, ensure that the correct camera is chosen. You can use the drop-down menu to select the camera you want to use.
- Once you have selected the correct camera, you can adjust the camera settings such as brightness, contrast, and zoom level using the available options.
- You can also test your camera by clicking the “Test Video” button to see a preview of your camera feed. This will help you verify if your camera is working properly within Skype.
- If your camera is disabled, click on the slider next to the camera option to enable it. This will activate your camera for use during Skype calls.
- Once you have made the necessary adjustments, click the “Save” or “Apply” button to save your camera settings.
After following these steps, restart your Skype application and check if your camera is now working. If it still doesn’t work, continue troubleshooting with the other methods mentioned in this article.
It’s important to note that the location and appearance of the camera settings may slightly vary depending on the version of Skype you are using. If you are using the Skype app on a mobile device, the camera settings are usually found in the settings or options menu.
Double-checking and adjusting your camera settings within Skype can often resolve camera-related issues. By ensuring that your camera is enabled and selecting the correct camera device, you increase the chances of having a smooth video calling experience on Skype.
Update your camera drivers
If your Skype camera is not working, it could be due to outdated or incompatible camera drivers. Drivers are essential software components that allow your camera to communicate with your computer’s operating system. Over time, drivers can become outdated, which may result in conflicts or malfunctions. Updating your camera drivers can often resolve issues and ensure compatibility with Skype. Follow these steps to update your camera drivers:
- Identify the manufacturer and model of your camera. This information is usually indicated on the camera itself or in the user manual.
- Visit the official website of the camera manufacturer. Look for a “Support” or “Downloads” section on the website.
- Search for the latest drivers available for your camera model. Make sure to download the drivers that are compatible with your operating system.
- Once you have downloaded the driver installation file, run it and follow the on-screen instructions to install the updated drivers.
- Restart your computer to apply the changes and ensure that the new drivers are properly installed.
After updating your camera drivers, launch Skype and check if your camera is now working. If the issue persists, continue troubleshooting using the other methods mentioned in this article.
It’s worth noting that some operating systems, such as Windows, offer automatic driver updates. In such cases, you can enable automatic updates for your camera drivers to ensure that you always have the latest version installed. To do this on Windows, go to the “Device Manager,” locate your camera under the “Imaging devices” category, right-click on it, select “Update driver,” and choose the “Search automatically for updated driver software” option.
Updating your camera drivers is a crucial step in troubleshooting camera-related issues in Skype. By ensuring that you have the latest drivers installed, you can improve the compatibility, performance, and functionality of your camera, thereby enhancing your Skype video calling experience.
Ensure that your camera is selected as the default device
If your Skype camera is not working, one possible reason could be that another camera or audio device is set as the default device on your computer. When you have multiple cameras or audio devices connected to your system, Skype may mistakenly use the wrong device, causing your camera to not appear during video calls. To resolve this issue, you need to ensure that your camera is selected as the default recording device. Follow these steps to check and set your camera as the default device:
- Right-click on the volume icon in the Windows taskbar and select “Open Sound settings.” Alternatively, you can access the sound settings by going to the Control Panel and selecting “Sound.”
- In the Sound settings window, navigate to the “Input” or “Recording” tab.
- Look for your camera device in the list of available recording devices. It may be listed by the manufacturer’s name or the camera model.
- Right-click on your camera device and select “Set as Default Device.” Alternatively, you can also click on your camera device and then click the “Set Default” button.
- Once you have set your camera as the default device, check if the issue is resolved by launching Skype and making a video call.
If your camera was already set as the default device, you can try disabling all other recording devices temporarily to prevent conflicts. To do this, right-click on the other devices in the list and select “Disable.” Remember to re-enable them later if needed.
It’s important to note that the steps to access the sound settings and set the default device may vary depending on your operating system. If you are using macOS or another operating system, refer to the respective system preferences or settings menu to find and adjust the default audio recording device.
By ensuring that your camera is selected as the default recording device, you can ensure that Skype correctly recognizes and utilizes your camera during video calls. This troubleshooting step is crucial in resolving camera-related issues and ensuring a seamless video calling experience on Skype.
Troubleshoot your camera hardware
If your Skype camera is not working, it’s possible that there may be hardware issues with your camera itself. These issues can range from a loose connection to a malfunctioning camera component. To troubleshoot your camera hardware, follow these steps:
- Check the physical connection: Ensure that your camera is properly connected to your computer. If it’s an external camera, make sure the USB or other connecting cables are securely plugged in. If it’s a built-in camera, check if it’s properly integrated into your device.
- Inspect for physical damage: Examine your camera visually for any signs of physical damage, such as cracks or broken parts. Damaged hardware can prevent the camera from functioning correctly.
- Try a different USB port: If you’re using an external camera, unplug it from the current USB port and try connecting it to a different port. Sometimes, certain ports may have compatibility or power issues.
- Test the camera on another device: If possible, connect your camera to another computer or device to verify if the issue is specific to your Skype application or if it is a problem with the camera itself. If the camera works on a different device, the issue may lie within your computer’s configuration or software settings.
- Restart your computer: Sometimes, a simple system restart can resolve minor hardware issues. Restart your computer and check if the camera starts working again.
- Update your computer’s firmware and drivers: Ensure that your computer’s firmware and drivers are updated to the latest versions. Outdated firmware or drivers can cause compatibility issues with your camera.
If, after performing these steps, your camera still does not work, it’s recommended to contact the camera manufacturer’s support for further assistance. They can provide specific troubleshooting steps or recommend repair options if the camera is still under warranty.
It’s important to note that troubleshooting camera hardware issues can vary depending on the specific camera model and the operating system you are using. Refer to the camera documentation or contact the manufacturer for more detailed instructions.
By troubleshooting your camera hardware, you can determine if the issue lies within the camera itself or other factors. This step is crucial in identifying and resolving hardware-related problems that may be affecting your Skype camera.
Check for software conflicts
If your Skype camera is not working, it’s possible that there may be conflicts between your camera and other software installed on your computer. These conflicts can prevent your camera from functioning properly in Skype. To check for software conflicts and resolve them, follow these steps:
- Close other applications: Close any other applications that might be accessing your camera, such as video recording software, virtual meeting platforms, or webcam utilities. These applications can sometimes interfere with Skype’s access to the camera.
- Disable camera-related extensions: If you have installed browser extensions or plugins that are related to camera functionality, try disabling them temporarily. Some extensions can conflict with Skype and prevent your camera from being recognized.
- Disable antivirus or firewall temporarily: Your antivirus software or firewall settings could potentially block your camera’s access to Skype. Temporarily disabling these security measures can help identify if they are causing conflicts. However, exercise caution and re-enable them once you’ve finished troubleshooting.
- Update conflicting software: If you suspect that certain software applications are causing conflicts, check for updates for those applications. Updates can often resolve compatibility issues and improve the camera’s functionality.
- Perform a clean boot: A clean boot starts your computer with a minimal set of startup programs and services. This can help identify if any background processes or services are conflicting with the camera. Follow the instructions specific to your operating system to perform a clean boot.
- Test the camera in Skype after each step: After performing each step, launch Skype and test your camera to see if it’s working. This will allow you to determine which software or settings were causing the conflict.
If these steps do not resolve the issue, you can try reinstalling Skype as a last resort. Uninstall Skype from your computer, restart it, and then download and install the latest version from the official Skype website.
Remember to re-enable any disabled applications, antivirus software, or firewall settings once you’ve identified and resolved the software conflicts. However, ensure that they are not causing any further camera issues by adjusting their settings or contacting their support if needed.
By checking for software conflicts, you can identify and resolve any application or settings clashes that may be preventing your Skype camera from working properly. This troubleshooting step can help ensure a smooth and uninterrupted video calling experience on Skype.
Test your camera with other applications
If your Skype camera is not working, it’s essential to determine if the issue is specific to the Skype application or if it’s a problem with your camera itself. To do this, you can test your camera with other applications and services to see if it works correctly. Follow these steps to test your camera with other applications:
- Exit the Skype application completely.
- Open a different video calling or video conferencing application on your computer, such as Zoom, Microsoft Teams, or Google Meet.
- Configure the video settings within the application and select your camera as the video input device.
- Initiate a test call or video call with a friend or colleague who is available.
- During the call, check if your camera is working correctly. Make sure the other person can see you and that the video quality is clear.
- If your camera works fine with other applications, it confirms that the problem lies within the Skype application itself.
If your camera doesn’t work with other applications either, it suggests that there may be a hardware issue with your camera or a problem with the camera drivers. In that case, you can refer to the previous sections of this article for troubleshooting steps related to camera drivers and hardware.
If your camera works well with other applications but not with Skype, you can proceed with further troubleshooting steps specific to Skype, such as reinstalling the application or checking for updated versions. It’s important to ensure that you have the latest version of Skype installed, as older versions might have compatibility issues with certain camera models.
By testing your camera with other applications, you can narrow down the source of the problem and determine if it’s a Skype-specific issue or a broader camera-related issue. This step will help guide your troubleshooting efforts and enable you to find an appropriate solution.
Reinstall Skype
If you have tried the previous troubleshooting steps and your Skype camera still isn’t working, you can try reinstalling the Skype application. Reinstalling can help resolve any software-related issues or conflicts that may be affecting the camera functionality. Follow these steps to reinstall Skype:
- Exit Skype and make sure it is not running in the background.
- On Windows:
- Go to the “Control Panel” by searching for it in the Start menu.
- Click on “Uninstall a program” or “Programs and Features.”
- Select Skype from the list of installed programs.
- Click on “Uninstall” or “Remove” to uninstall Skype.
- On Mac:
- Open the Finder and navigate to the “Applications” folder.
- Locate the Skype app and drag it to the Trash.
- After uninstalling Skype, restart your computer.
- Visit the official Skype website and download the latest version of the application.
- Run the Skype installation file that you downloaded.
- Follow the on-screen instructions to install Skype on your computer.
- Once the installation is complete, launch Skype and sign in to your account.
- Configure your camera settings within Skype and check if your camera is now working properly.
Reinstalling Skype will ensure that you have a fresh installation of the application, which can help resolve any software-related issues that may have been causing problems with your camera. Make sure to download and install the latest version of Skype to ensure compatibility with your operating system and camera drivers.
If the issue still persists after reinstalling Skype, you may need to seek professional help or contact Skype support for further assistance. They can provide specific troubleshooting steps or guidance based on your unique situation.
Remember to also check for any available updates for your camera drivers and keep them up to date. Keeping your drivers current can help ensure optimal performance and compatibility with Skype.
By reinstalling Skype, you have the opportunity to start fresh with the application and potentially resolve camera-related issues that were impacting your Skype experience. Give it a try and see if it helps restore the functionality of your camera.
Seek professional help if the issue persists
If you have tried all the troubleshooting steps mentioned earlier and your Skype camera still isn’t working, it may be time to seek professional help. While most camera issues can be resolved through software adjustments or hardware troubleshooting, there are instances where a more specialized approach is necessary. Here are some options to consider if the issue persists:
- Contact camera manufacturer support: Reach out to the support team of your camera manufacturer. They may be able to provide specific guidance and instructions to troubleshoot camera-related issues. They have in-depth knowledge about their product and can offer solutions based on the particular camera model you’re using.
- Consult with a technician: If you’re unsure about how to proceed or if the camera is still under warranty, consulting with a professional technician can be beneficial. They can diagnose the root cause of the problem and provide repair or replacement options if necessary.
- Visit an authorized service center: If your camera is still under warranty or you prefer an expert to handle the repair process, consider visiting an authorized service center. They have the expertise and knowledge to diagnose and fix camera hardware issues effectively.
When seeking professional help, it’s important to provide them with as much information as possible about the issue. Describe the troubleshooting steps you have already tried and any error messages or unusual behavior that you have encountered. This will help them pinpoint the problem more efficiently.
Remember to check if your camera is covered under any warranty before seeking outside assistance. If it is, the manufacturer may provide free repair or replacement services, saving you the cost of repair.
Overall, seeking professional help is a reasonable course of action when you have exhausted all other troubleshooting options. Professionals have the expertise, experience, and tools necessary to diagnose and repair camera issues that may be beyond your scope of knowledge.
By seeking professional help if the issue persists, you increase your chances of resolving the camera problem and enjoying a fully functional Skype experience once again.