
What Is Google PhotoScan?
Google PhotoScan is a mobile scanning app developed by Google that revolutionizes the way we digitize and preserve our physical photos. With PhotoScan, you can easily transform your printed photographs into high-quality digital images without the need for expensive scanning equipment or complicated software.
Unlike traditional scanning apps, which rely on taking a single snapshot of the photo, PhotoScan utilizes advanced technology to capture multiple images of the photo from different angles and automatically stitches them together. This process ensures that the final digital image is free from glare, reflections, and other imperfections that often plague traditional photo scanning methods.
Not only does Google PhotoScan make it incredibly easy to create digital copies of your cherished photos, but it also offers a range of powerful editing and enhancement features that allow you to improve the quality and appearance of your scanned images. With just a few simple taps, you can crop, rotate, adjust colors, and apply filters to make your photos look even better than the original prints.
What sets PhotoScan apart from other scanning apps is its seamless integration with Google Photos. Once you’ve scanned your photos, they are automatically backed up and synchronized with your Google Photos account, ensuring that your memories are safely stored and easily accessible across multiple devices.
Whether you want to preserve old family photos, share memories with friends and loved ones, or simply declutter your physical photo collection, Google PhotoScan is the ultimate solution. This user-friendly app empowers you to digitize your precious memories with utmost ease and convenience, allowing you to relive and share them in the digital world.
How Does Google PhotoScan Work?
Google PhotoScan combines innovative technology with user-friendly design to make the process of scanning your physical photos quick and effortless. Here’s a breakdown of how PhotoScan works:
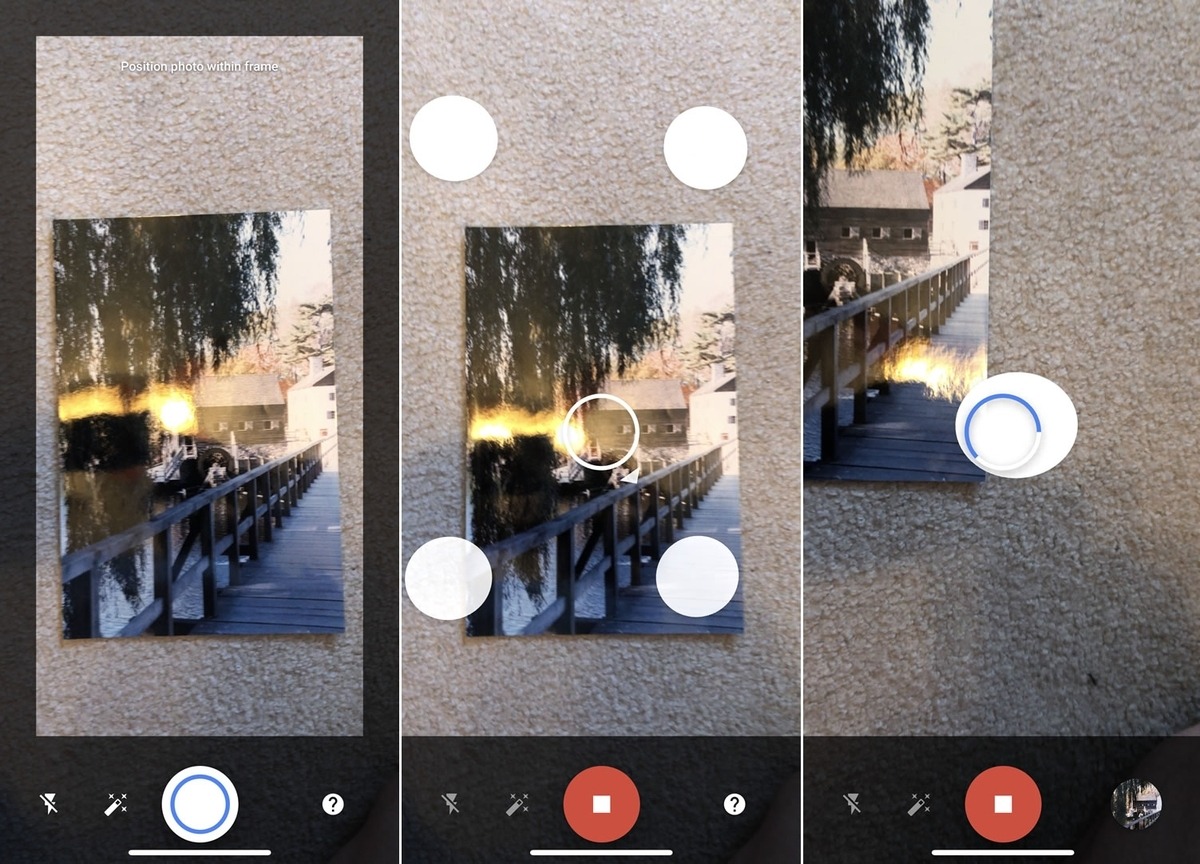
1. Positioning the Photo: Open the PhotoScan app and position your printed photo within the boundaries of the on-screen frame. It’s important to make sure the photo is aligned properly and fits within the frame.
2. Capturing Multiple Images: Once you’ve positioned the photo, PhotoScan prompts you to capture multiple images by moving your phone’s camera over the four white circles displayed on the screen. Each time you position the camera over a circle, PhotoScan takes a snapshot of the photo from a slightly different angle.
3. Image Stitching: PhotoScan then utilizes advanced image-processing algorithms to analyze the multiple images captured and stitch them together into a single, high-quality digital image. This process ensures that the final scan is free from glare, reflections, and other imperfections often caused by uneven lighting.
4. Automatic Cropping: After stitching the images, PhotoScan automatically detects the boundaries of your photo and crops it accordingly. This saves you time and effort in manually adjusting and aligning the scanned image.
5. Editing and Enhancements: Once the scan is complete, you can fine-tune your scanned photo using the built-in editing tools. Crop, rotate, adjust colors, and apply filters to optimize the quality and appearance of the digital image.
6. Saving and Sharing: Finally, you can choose to save the scanned photo to your device or directly upload it to your Google Photos account. Google Photos provides a convenient platform to organize, share, and back up your scanned photos, ensuring they are securely stored and easily accessible across all your devices.
By leveraging cutting-edge image processing technology, Google PhotoScan makes it simple for anyone to convert their physical photos into digital format with exceptional quality and ease.
Understanding PhotoScan’s Image Processing Technology
Google PhotoScan’s image processing technology is at the heart of what makes the app so impressive. By utilizing advanced algorithms and intelligent processing, PhotoScan ensures that your scanned images are of the highest quality. Here’s a closer look at how this technology works:
1. Multiple Image Capture: Unlike traditional scanning apps that capture only one image, PhotoScan takes multiple images of your photo from different angles using your device’s camera. This helps eliminate glare and reflections, ensuring that the final scan is clear and true to the original.
2. Perspective Correction: PhotoScan automatically detects the corners of your photo and corrects any perspective distortions that may occur due to shooting from an angle. This ensures that the scanned image appears as a flat, rectangular photo, just like the original.
3. Glare Removal: Glare is a common problem when scanning glossy photos. PhotoScan’s algorithms intelligently analyze the multiple images captured and identify areas where glare is present. By combining information from different snapshots, it effectively removes the glare to provide a clear and detailed scan.
4. Shadow Reduction: When scanning photos, shadows can sometimes obscure important details or affect the overall quality of the image. PhotoScan’s technology works towards minimizing shadows, resulting in brighter and more balanced scans.
5. Color Adjustment: The app automatically adjusts the colors of the scanned image to match the original photo as closely as possible. This ensures that your digital copy captures the true essence of the original print, preserving the memories in their authentic form.
6. Image Stitching: PhotoScan intelligently analyzes the multiple images captured and stitches them together seamlessly. It aligns the different snapshots, removes any distortions caused by slight camera movements, and creates a cohesive and high-quality digital image.
7. Noise Reduction: The image processing algorithms in PhotoScan also tackle image noise, which can appear as graininess or artifacts. By reducing noise, your scanned photos will have improved clarity and sharpness.
Through these sophisticated image processing techniques, Google PhotoScan ensures that your scanned photos retain their original quality and detail, providing a remarkable level of accuracy and fidelity to the original prints.
Step-by-Step Guide to Using Google PhotoScan
Using Google PhotoScan to digitize your physical photos is a straightforward process that requires just a few simple steps. Here’s a step-by-step guide to help you get started:
Step 1: Install PhotoScan: Download and install the PhotoScan app from the Google Play Store or the Apple App Store. Once installed, open the app to begin.
Step 2: Position the Photo: Place your printed photo on a flat surface with good lighting conditions. Make sure there are no glares or reflections on the photo. Position your phone above the photo and align it within the on-screen frame provided by the app.
Step 3: Capture Images: Follow the on-screen prompts to capture multiple images. Move your phone’s camera over the four white circles displayed on the screen. PhotoScan will automatically capture an image each time you position the camera over a circle. Be sure to capture from different angles to ensure a high-quality scan.
Step 4: Image Stitching: Once you’ve captured the necessary images, PhotoScan will start processing and stitching them together. The app will align the images, remove any distortions, and create a seamless and clear digital scan.
Step 5: Adjust and Enhance: After the scan is complete, you can use the built-in editing tools to crop, rotate, adjust colors, and apply filters to improve the quality and appearance of your scanned photo. Experiment with different options to get the desired look.
Step 6: Save and Share: Once you’re satisfied with the edits and enhancements, save the scanned photo to your device or directly upload it to your Google Photos account. With Google Photos, you can easily organize, share, and access your scanned photos from anywhere, on any device.
Step 7: Repeat for More Photos: If you have multiple photos to scan, simply repeat the process for each photo. PhotoScan makes it easy to digitize your entire photo collection quickly.
With this step-by-step guide, you’ll be able to use Google PhotoScan efficiently and effectively digitize your physical photos with superb quality and convenience.
Tips and Tricks for Getting the Best Scans with PhotoScan
Getting the best scans with Google PhotoScan is all about optimizing your photo capturing process. Here are some useful tips and tricks to help you achieve the highest quality scans:
1. Good Lighting: Ensure that you have ample lighting when capturing your photos. Natural light or a well-lit room can help minimize shadows, glares, and other imperfections on the photo.
2. Stable Surface: Place your photo on a stable and flat surface to minimize camera shake and ensure a focused and clear scan. A tripod or phone stand can be helpful if you’re scanning a large number of photos.
3. Steady Hand: While capturing multiple images, try to keep your hand as steady as possible. This helps in maintaining the consistency of the angles and minimizing any blurriness in the final scan.
4. Angle Variation: Capture the photo from different angles as prompted by the PhotoScan app. This helps the app gather more information about the photo, resulting in better image stitching and reduced distortions.
5. Clean Your Lens: Before scanning, make sure to wipe your phone’s camera lens to remove any dust or smudges that could interfere with the clarity of the photo.
6. Align with White Circles: When capturing images, position your phone’s camera precisely over the four white circles displayed on the screen. This helps PhotoScan accurately align and stitch the images together.
7. Adjust Crop if Needed: After the initial scan, you can manually adjust the crop of the photo with the on-screen controls. This is particularly useful if the automatic cropping didn’t capture the entire photo or if you want to include specific details.
8. Explore Editing Tools: Take advantage of the editing tools available in PhotoScan to enhance the quality and appearance of your scans. Experiment with cropping, rotation, color adjustments, and filters to achieve the desired results.
9. Tag and Organize: Utilize the tagging and organizing features in Google Photos to easily categorize and search for your scanned photos. Add relevant tags or create albums to keep your photo collection organized and easily accessible.
10. Regularly Backup: It’s essential to regularly back up your scanned photos to ensure their safety and accessibility. Enable automatic backup to your Google Photos account or create backups on external storage devices for added protection.
By applying these tips and tricks, you can maximize the quality and efficiency of your scanning experience with Google PhotoScan, preserving your cherished memories with exceptional clarity and ease.
Exploring the Various Editing and Enhancement Features in PhotoScan
Google PhotoScan not only allows you to digitize your physical photos with ease but also provides a range of editing and enhancement features to refine and improve the quality of your scanned images. Here are some of the key features to explore:
1. Crop and Rotate: PhotoScan enables you to crop and rotate your scanned photos to remove any unnecessary edges or adjust the composition. Simply use the intuitive cropping tool to select the desired area and rotate the photo as needed.
2. Color Adjustments: Enhance the colors and tones of your scanned photos with the color adjustment tools in PhotoScan. Adjust brightness, contrast, saturation, and warmth to bring out the best in your images.
3. Filters: Add a creative touch to your scanned photos by applying filters. PhotoScan offers a selection of filters that can enhance the mood or style of your images, such as black and white, vintage, or vibrant filters.
4. Spot Removal: Remove dust, scratches, or other small imperfections from your scanned photos using the spot removal tool. Simply tap on the spots or marks you want to remove, and PhotoScan will automatically blend them into the surrounding area.
5. Auto-Enhance: If you prefer a quick and straightforward enhancement, you can use the auto-enhance feature. With just a tap, PhotoScan analyzes your image and applies automatic adjustments to optimize its overall quality.
6. Manual Adjustments: For more precise editing, PhotoScan provides manual adjustment controls. These allow you to fine-tune aspects like exposure, shadows, highlights, and colors individually, giving you full control over the look of your scanned photos.
7. Sharpen and Blur: PhotoScan offers tools to sharpen or blur specific areas of your scanned photos. This can be useful for enhancing details or creating artistic effects by selectively adjusting the focus.
8. Add Captions and Annotations: Personalize your scanned photos by adding captions, dates, or other annotations. This can be done using text overlays or by utilizing the Google Photos app, which seamlessly integrates with PhotoScan.
9. Comparison View: Use the comparison view feature to compare the edited version of your photo with the original scan. This allows you to see the impact of your edits while still having the option to revert to the original if desired.
10. Undo and Redo: If you’re not satisfied with an edit, don’t worry! PhotoScan provides undo and redo options, allowing you to step back or forward through your editing history and make adjustments as needed.
By exploring and utilizing these editing and enhancement features in Google PhotoScan, you can take your scanned photos to the next level, enhancing their quality, visual appeal, and overall impact.
Integrating Google PhotoScan with Google Photos
A significant advantage of using Google PhotoScan is its seamless integration with Google Photos, a robust platform for storing, organizing, and sharing your digital photos. Here’s an overview of the integration between these two powerful tools:
Automatic Backup: When you use Google PhotoScan to digitize your physical photos, the scanned images are automatically backed up to your Google Photos account. This ensures that your precious memories are safely stored in the cloud, allowing you to access them from any device with an internet connection.
Synced Library: The integration between Google PhotoScan and Google Photos means that all your scanned photos appear in your Google Photos library alongside your other digital images. This unified library makes it easy to browse and manage your collection in one place.
Smart Search: Google Photos utilizes advanced image recognition technology, allowing you to search for specific people, objects, or locations within your scanned photos. This powerful feature lets you find your photos quickly and effortlessly.
Albums and Collections: With Google Photos, you can create albums and collections to organize your scanned photos based on themes, events, or individuals. This helps you keep your memories well-structured and easily accessible when you want to revisit them.
Sharing Made Simple: Google Photos provides various sharing options, allowing you to effortlessly share your scanned photos with family and friends. You can create shared albums, generate links to specific photos, or use the easy sharing options within the Google Photos app.
Collaborative Editing: If you want to collaborate on editing a scanned photo, Google Photos makes it easy. You can invite others to contribute to the shared album or use the built-in commenting feature to discuss and collaborate on the edits in real-time.
Device Syncing: Google Photos syncs your scanned photos across all your devices, ensuring that you can access and view them on your phone, tablet, or computer seamlessly. Any edits or updates made to your scanned photos are instantly reflected across all synced devices.
AI-powered Enhancements: Google Photos employs artificial intelligence (AI) to automatically enhance your scanned photos. This includes improving colors, enhancing details, and even creating collages or animations based on your scans.
Privacy and Security: Google Photos prioritizes the privacy and security of your scanned photos. You have granular control over the sharing settings, and your photos are stored securely in the Google Cloud, protected by Google’s robust security measures.
The integration between Google PhotoScan and Google Photos provides a seamless experience for managing and sharing your scanned photos. By leveraging the power of Google Photos, you can access, organize, and enhance your digital memories effortlessly.
Comparing Google PhotoScan with Other Scanning Apps
While there are several scanning apps available, Google PhotoScan stands out as an excellent option for digitizing your physical photos. Let’s compare PhotoScan with other scanning apps in terms of features, functionality, and overall performance:
Image Quality: One of the key advantages of Google PhotoScan is its ability to capture high-quality scans by eliminating glare and reflections. Many other scanning apps struggle with these issues, resulting in lower-quality scans that may require additional editing.
Multiple Image Capture: PhotoScan’s unique approach of capturing multiple images from different angles ensures better image stitching and reduces distortions. Most other scanning apps rely on a single image capture, which can lead to less accurate and lower-resolution scans.
Editing and Enhancement Features: While many scanning apps offer basic editing tools, Google PhotoScan provides a range of powerful editing and enhancement features. These features allow you to crop, rotate, adjust colors, and apply filters to optimize the quality and appearance of your scanned photos, giving you more control over the final result.
Integration with Google Photos: The seamless integration between Google PhotoScan and Google Photos sets it apart from other scanning apps. With other apps, you may need to transfer scanned photos manually to a separate photo management platform. PhotoScan automatically backs up and synchronizes your scans with Google Photos, ensuring easy access, organization, and sharing of your digital photos.
User Interface and Ease of Use: Google PhotoScan boasts a user-friendly interface that guides you through the scanning process. It provides clear on-screen instructions, making it easy for anyone to digitize their photos. Some other scanning apps may have a steeper learning curve or may lack intuitive features.
Search and Organization: Google Photos, integrated with PhotoScan, utilizes powerful search capabilities based on AI image recognition. This allows you to search for specific people, objects, or locations within your scanned photos. Other scanning apps may lack this advanced search functionality, making it harder to find specific photos in your collection.
Platform Availability: Google PhotoScan is available for both Android and iOS devices, making it accessible to a wide range of users. Some other scanning apps may have limited availability, restricting their usage to specific operating systems.
Price: Google PhotoScan is free to download and use without any limitations. While other scanning apps may offer free versions, some may come with watermarks or limited functionality. Premium versions of other apps may require a one-time purchase or a subscription fee for access to advanced features.
When considering all these factors, Google PhotoScan emerges as a top contender, offering exceptional image quality, extensive editing features, seamless integration with Google Photos, and a user-friendly experience. It provides a comprehensive solution for digitizing and managing your physical photos with remarkable ease and versatility.
Common Issues and Troubleshooting Tips with Google PhotoScan
While Google PhotoScan is a reliable and efficient app for digitizing your physical photos, you may encounter a few common issues during the scanning process. Here are some troubleshooting tips to help you overcome these challenges:
Issue 1: Glare or Reflections: Glare or reflections on glossy prints can interfere with the quality of your scans. To minimize this issue, ensure the lighting is even and avoid positioning the photo under direct light sources. Tilting your phone at different angles while capturing photos can also help reduce glare.
Issue 2: Blurry Images: Blurry images can occur if there is camera shake or if the photo is not held steady during the scanning process. Make sure to hold your phone securely and steady your hand while capturing multiple images. Using a tripod or setting your phone on a stable surface can help eliminate blur.
Issue 3: Inaccurate Auto-Cropping: Sometimes, the automatic cropping feature may not accurately detect the boundaries of your photo. If this occurs, you can manually adjust the crop by tapping on the screen and dragging the edges to encompass the entire photo. Zooming in or out can also help fine-tune the crop.
Issue 4: Poor Image Alignment: If the scanned image appears misaligned or distorted, it could be due to slight movements while capturing the images. Ensure that you hold your phone as steady as possible and avoid any unnecessary movements during the scanning process. If necessary, you can retake the photos to improve alignment.
Issue 5: Incorrect Colors or Exposure: The automatic color adjustment may not always produce desired results. In such cases, utilize the manual editing tools in the app to adjust the colors, exposure, and other settings to your preference. Experiment with different adjustments until you achieve the desired look.
Issue 6: Limited Storage Space: If you encounter storage space limitations while using the app, make sure to regularly back up your photos to Google Photos or transfer them to an external storage device. This will free up storage on your device and allow for seamless scanning without interruptions.
Issue 7: App Crashes or Lagging: If you experience app crashes or lagging, ensure that you have the latest version of Google PhotoScan installed on your device. Additionally, close any unnecessary apps running in the background and free up device memory to improve the app’s performance.
Issue 8: Trouble with Auto-Backup: If the automatic backup of scanned photos to Google Photos is not functioning as expected, check your internet connection and ensure that you are logged in to your Google account. You can also manually upload the scanned photos to Google Photos if automatic backup is not working.
By applying these troubleshooting tips, you can address common issues and optimize your experience with Google PhotoScan, ensuring high-quality scans and a smooth digitization process for your physical photos.
Unlocking the Full Potential of Google PhotoScan: Advanced Techniques
While Google PhotoScan offers a user-friendly experience for digitizing your physical photos, there are advanced techniques you can employ to further enhance your scanning process. Here are some tips to unlock the full potential of Google PhotoScan:
1. External Light Source: For challenging lighting conditions or highly reflective surfaces, you can use an external light source to achieve better results. Positioning a diffused light or using a lightbox can help distribute the light evenly and reduce glare or reflections on the photo.
2. HDR Mode or Manual Exposure: If your device supports it, you can use the HDR (High Dynamic Range) mode or manually adjust the exposure settings to capture a wider range of details in your scans. This can be useful for photos with high contrast or intricate details that require more intricate exposure control.
3. Tripod or Phone Stand: Stability is crucial for obtaining sharp and detailed scans. Using a tripod or a phone stand can eliminate camera shake and ensure consistent image alignment. This is particularly helpful when scanning a large number of photos or working with delicate or valuable prints.
4. Post-Scan Editing Software: After scanning, you can further enhance your photos by using post-scan editing software such as Adobe Photoshop or Lightroom. These tools offer advanced editing capabilities and can help refine details, adjust colors, or apply advanced filters and effects to take your scans to the next level.
5. Batch Scanning: If you have a large collection of photos to scan, you can streamline the process by utilizing batch scanning. This involves setting up a workflow where you efficiently capture multiple photos in a single session, leveraging the automatic capturing feature of PhotoScan. This can save time while ensuring consistent quality across your scans.
6. Archival-Quality Scanning: For particularly important or valuable photos, consider professional archival-quality scanning services. These services utilize high-resolution scanners to capture the finest details, resulting in scans that preserve the integrity and quality of the original prints.
7. Specialized Editing Techniques: Explore advanced editing techniques such as selective adjustments, dodging and burning, or noise reduction to fine-tune your scans in post-processing. These techniques can help optimize the quality, visual appeal, and accuracy of your digitized photos.
8. Metadata Management: Take advantage of metadata management options within Google Photos. This includes adding descriptive keywords, dates, and location information to your scans. This makes it easier to search and organize your digital photo collection based on specific criteria.
9. Restoration and Retouching: If your physical photos have damages or imperfections, you can consider restoring or retouching them digitally using specialized software or professional services. This can help rejuvenate aged photos and restore them to their former glory.
10. Share and Preserve: Once you have digitized your photos, explore various ways to share and preserve them. Create backups on external storage devices, create photo books, or consider printing select photos to display or gift to loved ones, ensuring your memories are preserved for future generations.
By tapping into these advanced techniques, you can fully unlock the potential of Google PhotoScan, taking your scanning experience to new heights and preserving your cherished memories with exceptional quality and creativity.
