
What is a ZXP File?
A ZXP file, short for Adobe Extension Package, is a file format used to package and distribute extensions for Adobe Creative Cloud applications. These extensions are small software add-ons that enhance the functionality and features of Adobe applications such as Photoshop, InDesign, Illustrator, and more.
With a ZXP file, users can easily install and manage extensions to customize and streamline their workflow. These extensions can range from simple tools and scripts to complex functionalities, bringing additional capabilities to the Adobe software.
ZXP files are considered the standard format for Adobe extensions, replacing older formats like MXP and JSX. They are essentially a compressed archive file that contains all the necessary files, metadata, and resources required for the extension to function properly.
One of the advantages of ZXP files is their cross-platform compatibility. They can be used on both Windows and macOS, making them accessible to a wide range of users. Additionally, ZXP files ensure that the extension is properly packaged, making installation and distribution more seamless.
When you download a ZXP file, you essentially have a self-contained package that can be installed directly into Adobe Creative Cloud applications. This makes it easy to add new features or streamline existing workflows without the need for extensive programming knowledge.
Understanding the ZXP File Format
The ZXP file format is a standardized format developed by Adobe specifically for packaging and distributing extensions for their Creative Cloud applications. It provides a structured and organized way to encapsulate all the necessary files and metadata required for an extension to work seamlessly within Adobe software.
A ZXP file is essentially a compressed archive that contains several key components:
- Extension Files: These are the actual files that make up the extension, including scripts, plugins, stylesheets, icons, and other resources necessary for the extension’s functionality.
- Manifest File: This file provides vital information about the extension, such as its name, version, author, compatibility, dependencies, and other metadata that help Adobe Creative Cloud applications understand and manage the extension.
- Signature File: Each ZXP file is digitally signed to ensure its integrity and authenticity. The signature file verifies that the extension has not been tampered with or modified since it was initially created.
The ZXP file format offers several advantages over previous extension formats. One of the main benefits is its ability to handle complex extensions that require multiple files and dependencies. The hierarchical structure of the ZXP file allows for easy organization and bundling of all the necessary components within a single package.
Furthermore, ZXP files enable easy installation and management of extensions directly within Adobe Creative Cloud applications. Users can simply double-click on a ZXP file to install the extension, eliminating the need for manual file placement or complicated installation processes.
Adobe Extension Manager is the traditional tool used to install ZXP files, but in recent years, Adobe Creative Cloud has also integrated the ability to install extensions directly through their desktop app. This seamless integration has made it even more convenient for users to discover, install, and update extensions.
Understanding the ZXP file format is crucial for developers and users alike. Developers must ensure that their extensions are properly packaged as ZXP files, following the required structure and including all the necessary files and metadata. Users, on the other hand, can leverage their understanding of the ZXP format to confidently install and manage extensions within Adobe Creative Cloud applications.
How to Open a ZXP File
Opening a ZXP file is a straightforward process that allows you to install extensions and enhance the functionality of your Adobe Creative Cloud applications. There are a few different methods you can use to open a ZXP file, depending on your preferred workflow.
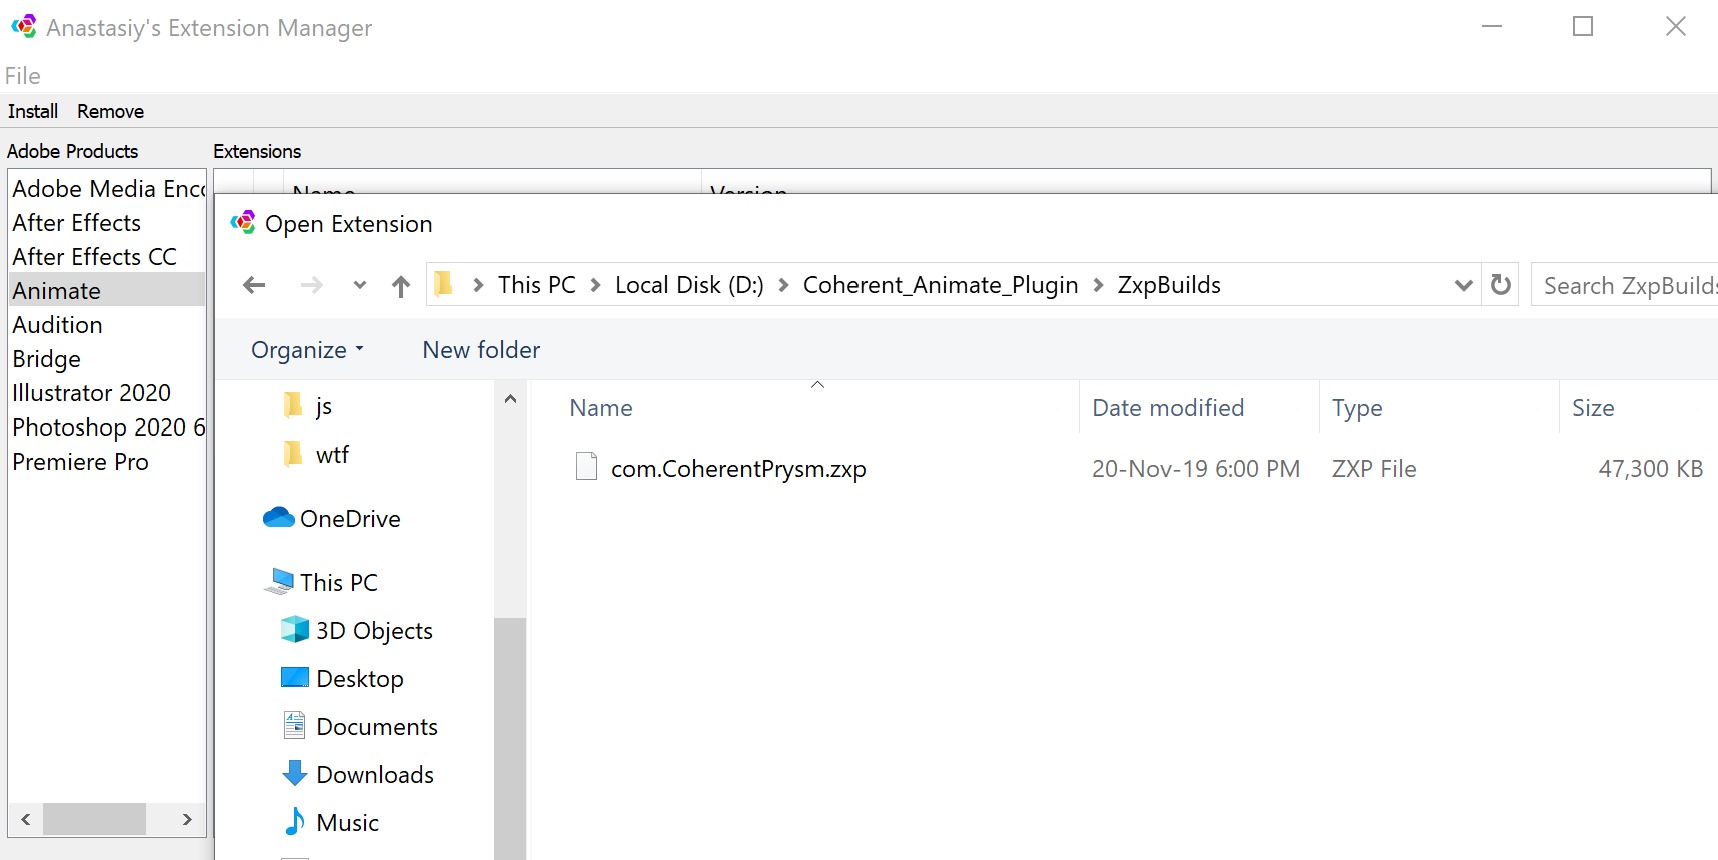
Method 1: Adobe Extension Manager:
If you have Adobe Extension Manager installed on your computer, you can use it to open and install ZXP files. Here’s how:
- Launch Adobe Extension Manager.
- Go to the “File” menu and choose “Install Extension.”
- Navigate to the location where the ZXP file is saved on your computer.
- Select the ZXP file and click “Open.”
- Follow the on-screen instructions to complete the installation process.
Note: Adobe Extension Manager is no longer actively supported by Adobe. For the latest Adobe Creative Cloud applications, it’s recommended to use the alternative methods mentioned below.
Method 2: Adobe Creative Cloud Desktop App:
If you have the Adobe Creative Cloud desktop app installed, you can install extensions directly through it. Here’s how:
- Open the Adobe Creative Cloud desktop app on your computer.
- Navigate to the “Apps” section.
- Scroll down or use the search bar to find the extension you want to install.
- Click on the extension and select “Install.”
- The Creative Cloud app will automatically download and install the extension.
Method 3: Drag and Drop:
Another quick way to open a ZXP file is by using drag and drop. Follow these steps:
- Locate the ZXP file on your computer.
- Drag the ZXP file and drop it onto the Adobe Creative Cloud application window.
- The application will recognize the ZXP file and prompt you to install the extension. Follow the on-screen instructions to complete the installation.
Opening a ZXP file is the first step towards accessing the exciting range of extensions available for Adobe Creative Cloud applications. Whether you use Adobe Extension Manager or the Adobe Creative Cloud desktop app, exploring and installing extensions will allow you to enhance your creative workflow and unlock new possibilities.
Installing a ZXP Extension with Adobe Extension Manager
Adobe Extension Manager is a dedicated application that allows users to install and manage extensions for Adobe Creative Cloud software. With Adobe Extension Manager, you can easily install ZXP files and add new functionality to your Adobe applications. Here’s how to install a ZXP extension using Adobe Extension Manager:
- First, ensure that Adobe Extension Manager is installed on your computer. If not, you can download it from the Adobe website and follow the installation instructions.
- Locate the ZXP file you want to install, either on your computer or a trusted source.
- Open Adobe Extension Manager.
- Go to the “File” menu and select “Install Extension.”
- Navigate to the location where the ZXP file is saved and select it.
- Click “Open” to begin the installation process.
- Adobe Extension Manager will prompt you to review the extension information, such as the name, version, and author. Read through the details and click “Install” to proceed.
- Follow the on-screen instructions provided by Adobe Extension Manager to complete the installation. The process may vary depending on the specific extension you are installing.
- Once the installation is complete, you will receive a notification from Adobe Extension Manager indicating the successful installation of the extension.
After the installation, the ZXP extension should be ready to use in the corresponding Adobe Creative Cloud application. You can access and manage the extension through the application’s menu or dedicated extension panel. Some extensions may require you to launch or restart the application for the changes to take effect.
It’s important to note that Adobe Extension Manager is no longer actively supported by Adobe for newer versions of their Creative Cloud applications. However, it can still be used for older versions or if you have a specific need for it. For the latest versions of Adobe software, it’s recommended to use the alternative methods provided by Adobe, such as installing extensions directly through the Adobe Creative Cloud desktop app.
By installing ZXP extensions with Adobe Extension Manager, you can greatly expand the capabilities of your Adobe Creative Cloud applications, allowing for a more customized and efficient creative workflow. Take advantage of the vast library of extensions available and explore the possibilities they offer to optimize your creative process.
Installing a ZXP Extension with Adobe Creative Cloud
Adobe Creative Cloud provides a convenient and streamlined way to install and manage extensions directly within the Creative Cloud desktop app. With this method, you can easily add new functionalities to your Adobe applications by installing ZXP extensions. Here’s how:
- Ensure that you have the latest version of the Adobe Creative Cloud desktop app installed on your computer. If not, you can download it from the Adobe website and follow the installation instructions.
- Launch the Adobe Creative Cloud desktop app.
- Navigate to the “Apps” section, typically found in the left-hand navigation menu.
- Scroll through the available applications and locate the Adobe application for which you want to install an extension (e.g., Photoshop, Illustrator, InDesign).
- Once you have selected the desired application, click on it to reveal additional options, such as “Browse” or “My Add-ons.”
- Click on the “Browse” or “My Add-ons” option (depending on the version of Creative Cloud) to access the extension marketplace or your previously installed extensions.
- In the extension marketplace, you can search for specific extensions or browse through categories to find the desired one. Alternatively, if you have a ZXP file saved on your computer, you can directly install it by clicking the “Install” button or dragging and dropping the ZXP file into the Creative Cloud app window.
- Follow the prompts to complete the installation process. The Creative Cloud app will handle the installation and ensure that the extension is properly installed and ready for use.
- After successful installation, the extension will be accessible within the corresponding Adobe application. You may need to restart the application to activate the newly installed extension.
Using Adobe Creative Cloud to install ZXP extensions simplifies the installation process and ensures that you have the most up-to-date version of the extensions. It also provides a centralized location for managing and updating your installed extensions, making it easier to stay organized and discover new ones.
Keep in mind that not all extensions may be available in the Creative Cloud app, and some extensions may require a subscription or additional purchase. You can explore the vast library of extensions available through Adobe’s marketplace or third-party websites offering ZXP extensions compatible with Adobe Creative Cloud applications.
By utilizing the power of Adobe Creative Cloud, you can enhance your Adobe software experience by installing ZXP extensions tailored to your specific needs. Whether it’s adding new tools, automating tasks, or expanding creative possibilities, installing ZXP extensions through the Creative Cloud app empowers you to customize and optimize your workflow.
How to Create a ZXP File
Creating a ZXP file allows developers to package their custom extensions for Adobe Creative Cloud applications and distribute them to users. If you have developed an extension and want to share it with others, here’s a step-by-step guide on how to create a ZXP file:
- Prepare your extension files: Gather all the necessary files for your extension, including scripts, stylesheets, icons, and other resources. Ensure that these files are properly organized and meet the requirements of your extension.
- Create a manifest file: The manifest file provides essential information about your extension, such as its name, version, author, compatibility, and dependencies. It also includes details about the extension’s functionality and capabilities. Use an XML or JSON file format to create the manifest and fill in the required fields.
- Digitally sign your extension: It is highly recommended to digitally sign your extension to ensure its integrity and authenticity. You can obtain a digital certificate from a trusted certificate authority (CA) and use it to sign your ZXP file. This step ensures that users can verify the source and integrity of your extension.
- Compress the files: Once you have prepared your extension files and manifest, create a compressed archive file that includes all the necessary components. You can use standard compression software, such as ZIP, to create the archive.
- Rename the file extension: Change the file extension of the compressed archive from “.zip” to “.zxp”. This is necessary to ensure that Adobe Creative Cloud applications recognize it as a valid ZXP file.
- Validate your ZXP file: Before distributing your ZXP file, it’s essential to validate it to ensure that it meets the required specifications. There are various tools available, such as the Adobe Extension Manager or the Extension Validation Toolkit, that can help you validate your ZXP file’s structure, metadata, and overall compatibility.
By following these steps, you can create a ZXP file to package and distribute your custom extension for Adobe Creative Cloud applications. This allows other users to easily install and use your extension to enhance their creative workflow.
Properly creating a ZXP file ensures that your extension is organized, compatible, and can be easily installed by users. It’s important to thoroughly test your extension and make sure it functions as intended before packaging and distributing it.
Remember to provide clear documentation and instructions on how to install and use your extension to make the process seamless for users. By sharing your own ZXP file, you contribute to the vibrant ecosystem of Adobe Creative Cloud extensions, providing valuable tools and utilities for users worldwide.
Converting a ZXP File to Other Formats
While the ZXP file format is specifically designed for packaging and distributing extensions for Adobe Creative Cloud applications, there may be instances where you need to convert a ZXP file to a different format. Converting a ZXP file to other formats can be helpful in situations where you want to extract or modify the contents of the extension. Here are a few methods to convert a ZXP file to other formats:
- Extract with compression software: ZXP files are essentially compressed archive files. You can use standard compression software, such as 7-Zip or WinRAR, to extract the contents of a ZXP file. Simply right-click the ZXP file, choose the extraction software, and select the desired output location. This will extract the files contained within the ZXP file, allowing you to access them in their original format.
- Rename the file extension: If you simply want to change the file extension of a ZXP file without extracting its contents, you can do so by renaming the file. For example, you can change the extension from “.zxp” to “.zip” to treat the ZXP file as a regular ZIP archive. This way, you can access and manipulate the files within the ZXP file using compression software or other file management tools.
- Convert files within the ZXP: If the ZXP file contains specific file types (e.g., images, scripts) that you want to convert to different formats, you can extract those files and use appropriate conversion tools for each file type. For example, you can extract images from a ZXP file and convert them to different formats using image editing software, or convert scripts to different programming languages using text editors or IDEs.
- Develop custom conversion tools: If you have in-depth knowledge of the ZXP file format and the desired target format, you can develop custom conversion tools or scripts to automate the conversion process. This method requires programming expertise and an understanding of both the ZXP file structure and the target format specifications.
Keep in mind that when converting a ZXP file to other formats, it is crucial to respect the intellectual property and licensing agreements associated with the extension. Ensure that you have the necessary permissions or rights to modify or distribute the contents of the extension.
Converting a ZXP file to other formats can be useful in specific scenarios, such as extracting resources for further customization or integrating extension features into other applications. However, it’s important to remember that the ZXP file format is specifically designed for Adobe Creative Cloud extensions, and any modifications or conversions should be done with caution and in compliance with legal and ethical considerations.
Common Issues with ZXP Files and How to Solve Them
ZXP files are generally reliable for installing extensions in Adobe Creative Cloud applications. However, users may occasionally encounter common issues when working with ZXP files. Here are some of the common issues and potential solutions:
- Installation Failure: Sometimes, the installation of a ZXP file may fail. This can occur due to various reasons, such as incompatible software versions or conflicting extensions. To resolve this issue, make sure that your Adobe Creative Cloud application is up-to-date and that your system meets the minimum requirements. Disable any conflicting extensions, restart the application, and try reinstalling the ZXP file.
- Corrupted or Invalid ZXP File: If you encounter an error indicating that the ZXP file is corrupted or invalid, it may be due to a faulty or incomplete download. Try re-downloading the ZXP file from a trusted source. If the issue persists, verify that you are using a compatible version of Adobe Creative Cloud and check for any restrictions or security settings that may be preventing the installation.
- Missing Dependencies: In some cases, an extension packaged in a ZXP file may have dependencies on other software or plugins. If these dependencies are not fulfilled, the extension may not function correctly. Check the extension’s documentation or contact the developer for information on any necessary dependencies and ensure they are installed on your system.
- Conflicts with Antivirus Software: Antivirus or security software may sometimes flag ZXP files as potentially harmful or suspicious due to their compressed archive nature. This can result in the file being blocked or deleted. To resolve this issue, temporarily disable your antivirus software or whitelist the ZXP file before attempting to install it. Exercise caution and ensure that the ZXP file is obtained from a trusted source.
- Compatibility Issues: ZXP files are designed to be compatible with specific versions of Adobe Creative Cloud applications. If you are using an older or newer version of the software, the extension may not work as intended. Check the compatibility information provided by the developer before installing the ZXP file and ensure that you are using a compatible version of the application.
- Permission Issues: If you encounter permissions-related errors during the installation of a ZXP file, make sure you have the necessary administrator privileges on your computer. Right-click the ZXP file and select “Run as administrator” to ensure that the installation process has the required permissions to modify system files and install the extension.
If you continue to experience issues with ZXP files even after following the suggested solutions, it may be helpful to seek assistance from the developer or the Adobe support community. Providing detailed information about the issue, such as error messages and system specifications, can aid in diagnosing and resolving the problem more effectively.
By understanding and addressing common issues with ZXP files, you can ensure a smooth installation process and make full use of the extensions available for Adobe Creative Cloud applications.
The Future of ZXP Files
The ZXP file format has served as the standard for packaging and distributing extensions for Adobe Creative Cloud applications for many years. However, as technology and software evolve, it is natural to wonder about the future of ZXP files and their place in the ever-changing landscape of digital creativity.
Adobe has been transitioning towards a new extension format called CEP (Common Extensibility Platform) HTML panels. CEP HTML panels are built using web technologies such as HTML, CSS, and JavaScript, making them more versatile and cross-platform compatible. This shift towards CEP panels indicates a shift away from the traditional ZXP file format.
While the ZXP file format is still widely used and supported by Adobe Creative Cloud applications, there are several considerations for the future:
- Compatibility and Migration: As Adobe continues to develop and promote CEP HTML panels, it is possible that support for the ZXP file format may decline over time. Developers and users may need to migrate their existing ZXP extensions to the new format to ensure compatibility with future versions of Adobe software.
- Improved Functionality and Flexibility: CEP HTML panels offer improved functionality and flexibility compared to ZXP files. With web technologies at their core, CEP panels can leverage modern web capabilities, integrate with cloud services, and provide a more interactive and engaging user experience.
- Cross-Platform Compatibility: Unlike the ZXP file format, which primarily works on Windows and macOS, CEP HTML panels are designed to be cross-platform compatible, allowing developers to create extensions that work seamlessly on different operating systems.
- Community and Ecosystem: As the transition to CEP HTML panels progresses, an ecosystem of CEP panel developers, resources, and marketplaces is likely to emerge. This ecosystem may provide developers with new opportunities to share and monetize their extensions, and users with a wider range of options for enhancing their Adobe Creative Cloud experience.
It is important for developers and users to stay informed about the latest advancements and changes in extension development for Adobe Creative Cloud applications. Adobe’s official documentation, developer forums, and other community resources can provide valuable insights into the future of extension development and help navigate the transition from ZXP files to CEP HTML panels.
While the future of ZXP files may see them gradually being phased out, their impact and contribution to the Adobe ecosystem cannot be disregarded. ZXP files have played a significant role in expanding the capabilities of Adobe Creative Cloud applications, and many extensions developed in this format will continue to be used and supported for the foreseeable future.
As the creative industry evolves, embracing new technologies and standards, it will be exciting to see how the evolution of extension formats like CEP HTML panels shapes the future of enhancing Adobe Creative Cloud applications.