
What Is a Volume Label?
A volume label, also known as a disk label or drive label, is a unique name assigned to a storage device, such as a hard drive, USB flash drive, or DVD-ROM. It serves as an identifier for the device and helps users distinguish between different drives connected to their computer.
The volume label is a text-based label that can consist of alphanumeric characters, including letters, numbers, and other symbols. It is typically assigned by the user and can be up to 32 characters long. The label is stored in the file system metadata of the drive, allowing the operating system to recognize and display it.
Although the volume label does not impact the functionality or performance of the drive, it plays a vital role in managing and organizing storage devices effectively. It allows users to quickly identify the purpose or content of a particular drive, facilitating easy navigation and data retrieval.
Additionally, when a drive is inserted or connected to a computer, the volume label is displayed in the file explorer or operating system interface, providing users with a visual reference of the drive’s name and purpose. This makes it convenient to locate and access specific drives, especially when multiple devices are connected simultaneously.
Furthermore, the volume label also comes into play when accessing the drive from the command prompt or using scripts and applications that interact with storage devices. By referencing the volume label, users can perform various tasks or operations specific to that drive, such as formatting, partitioning, or assigning drive letters.
In essence, the volume label serves as a user-friendly identifier for storage devices, enabling effective management, quick identification, and easy navigation of drives in the digital world.
Why Are Volume Labels Important?
Volume labels may seem insignificant at first glance, but they serve several essential purposes that make them important for managing and organizing storage devices effectively.
1. Easy Identification: Volume labels provide a quick and effortless way to identify drives. In a situation where multiple drives are connected to a computer, having descriptive labels helps users distinguish between them easily. This is especially helpful when devices are not physically labeled, such as external hard drives or USB flash drives.
2. Convenient Navigation: When browsing through file explorer or the operating system interface, volume labels are displayed alongside drive icons. This allows users to quickly locate and access the desired drive, saving time and effort in finding the right storage device.
3. Organizational Efficiency: By assigning meaningful volume labels to drives, users can better organize their digital storage. For example, labeling a drive as “Work Projects” or “Personal Photos” allows for efficient categorization and seamless retrieval of files, eliminating the need to search through each drive individually.
4. Enhanced Workflow: Volume labels play a significant role in streamlining workflows for both individuals and businesses. When working with multiple projects or clients, labeling drives based on project names or client identifiers allows for easier access to relevant files, increasing productivity and reducing errors in file management.
5. Compatibility and Accessibility: Volume labels are recognized by most operating systems, making them accessible across different platforms. Whether you connect your drive to a Windows PC, Mac, or Linux system, the volume label ensures that the drive is identified correctly and can be accessed without compatibility issues.
6. Scripting and Automation: In scripting and automation processes, volume labels serve as references for performing specific actions on drives. For example, backup scripts can be configured to target drives with specific volume labels, ensuring that the correct drives are selected for regular backup tasks.
7. Error Prevention: Accurately labeling drives can help prevent accidental data loss or errors. When performing operations that involve formatting or partitioning, a clear volume label can help users avoid formatting the wrong drive, thus safeguarding valuable data.
How to Assign a Volume Label to a Drive
Assigning a volume label to a drive is a straightforward process and can be done in various operating systems. Here’s a step-by-step guide on how to assign a volume label:
1. Windows:
- Connect or insert the drive into your computer.
- Open File Explorer by clicking on the folder icon in the taskbar or pressing the Windows key + E.
- Locate the drive in the “This PC” or “Computer” section.
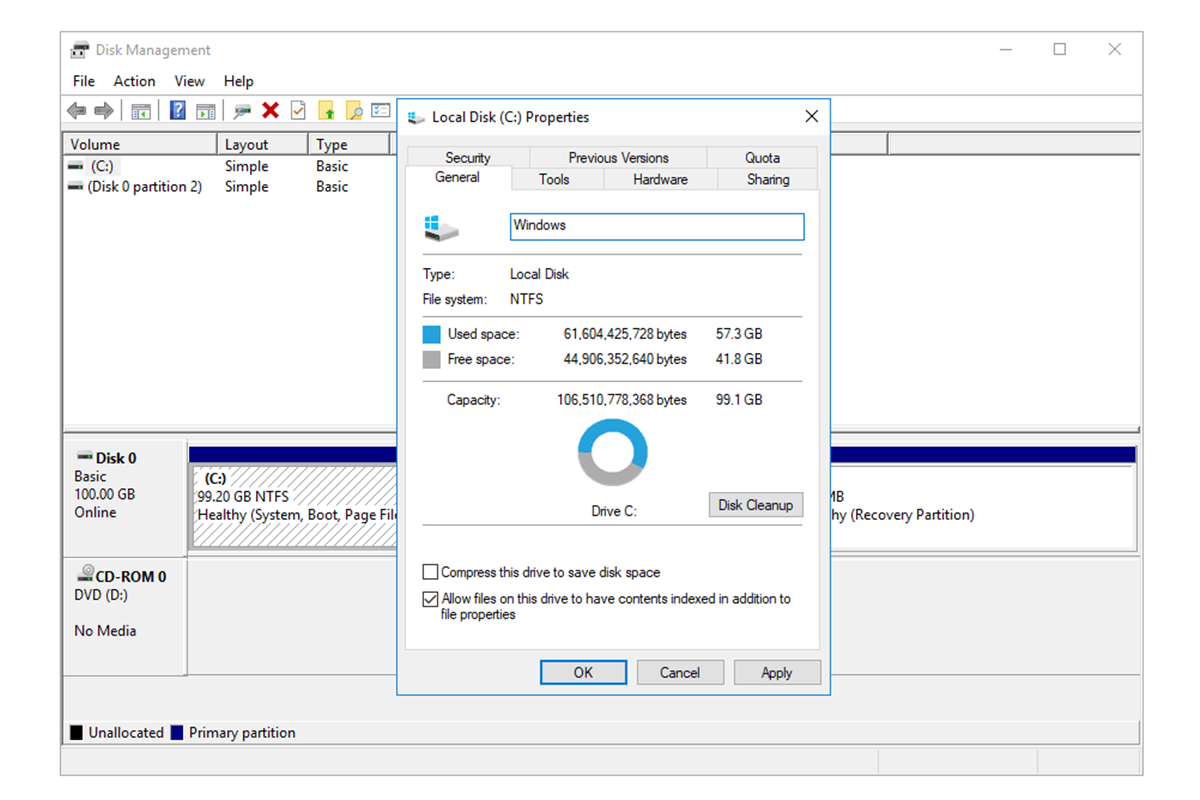
- Right-click on the drive and select “Properties” from the context menu.
- In the Properties window, go to the “General” tab.
- Click on the “Rename” button next to the volume label field.
- Enter the desired volume label and press Enter or click outside the field to save the changes.
2. macOS:
- Connect or insert the drive into your Mac.
- Open Finder by clicking on the smiley face icon in the dock.
- Locate the drive in the sidebar under the “Devices” section.
- Right-click on the drive and select “Get Info” from the context menu.
- In the Info window, click on the drive name or the small pencil icon next to it.
- Type the desired volume label and press Enter.
3. Linux:
- Connect or insert the drive into your Linux machine.
- Open the terminal.
- Type the following command to list the available drives:
lsblk - Identify the drive you want to assign a volume label to based on its size or mount point.
- Unmount the drive using the following command (replace ‘/dev/sdX’ with the appropriate drive identifier):
sudo umount /dev/sdX - Assign a volume label using the following command (replace ‘/dev/sdX’ with the appropriate drive identifier and ‘LABEL_NAME’ with the desired label):
sudo e2label /dev/sdX LABEL_NAME - Remount the drive using the following command (replace ‘/dev/sdX’ with the appropriate drive identifier and ‘/mount/point’ with the desired mount point):
sudo mount /dev/sdX /mount/point
Remember to choose clear and descriptive labels that represent the drive’s content or purpose. This will help you easily recognize and navigate the drive in the future.
How to Change the Volume Label of a Drive
If you need to update or change the volume label of a drive, it can be easily done using the following steps, depending on your operating system:
1. Windows:
- Connect or insert the drive into your computer.
- Open File Explorer by clicking on the folder icon in the taskbar or pressing the Windows key + E.
- Locate the drive whose label you want to change in the “This PC” or “Computer” section.
- Right-click on the drive and select “Properties” from the context menu.
- In the Properties window, go to the “General” tab.
- Click on the “Rename” button next to the volume label field.
- Enter the desired new volume label and press Enter or click outside the field to save the changes.
2. macOS:
- Connect or insert the drive into your Mac.
- Open Finder by clicking on the smiley face icon in the dock.
- Locate the drive in the sidebar under the “Devices” section.
- Right-click on the drive and select “Get Info” from the context menu.
- In the Info window, click on the drive name or the small pencil icon next to it.
- Type the desired new volume label and press Enter.
3. Linux:
- Connect or insert the drive into your Linux machine.
- Open the terminal.
- Type the following command to list the available drives:
lsblk - Identify the drive whose label you want to change based on its size or mount point.
- Unmount the drive using the following command (replace ‘/dev/sdX’ with the appropriate drive identifier):
sudo umount /dev/sdX - Change the volume label using the following command (replace ‘/dev/sdX’ with the appropriate drive identifier and ‘NEW_LABEL’ with the desired label):
sudo e2label /dev/sdX NEW_LABEL - Remount the drive using the following command (replace ‘/dev/sdX’ with the appropriate drive identifier and ‘/mount/point’ with the desired mount point):
sudo mount /dev/sdX /mount/point
By following these simple steps, you can easily update and change the volume label of a drive to reflect its new content or purpose.
Best Practices for Volume Labels
When assigning volume labels to your drives, it’s important to follow some best practices to ensure clarity, consistency, and ease of use. Here are some guidelines to consider:
1. Be Descriptive: Choose volume labels that accurately describe the content or purpose of the drive. This makes it easier to identify the drive at a glance and helps in efficient organization and navigation of your storage devices.
2. Use Clear and Concise Labels: Keep the volume labels short and to the point. Aim for labels that are easily understandable and can convey the purpose or contents of the drive in just a few words.
3. Avoid Special Characters and Spaces: To prevent any compatibility issues with different operating systems or scripts, it’s recommended to avoid using special characters, symbols, spaces, or any non-alphanumeric characters in your volume labels. Stick to letters, numbers, and basic punctuation.
4. Maintain Consistency: Try to establish a consistent naming convention for your volume labels across different drives. This can be particularly useful when working with multiple drives or in an organizational setting, as it helps to maintain a clear and systematic arrangement of your storage devices.
5. Consider Future Scalability: Keep in mind that your storage needs may change over time. When assigning volume labels, think about the potential future expansion or addition of drives. Ensure that the labels you choose can accommodate any future drives in a way that maintains the logical order and organization of your storage system.
6. Review and Update Labels Periodically: It’s a good practice to periodically review and update the volume labels of your drives, especially if the content or purpose of the drive has changed. This ensures that your labels remain accurate and up to date, making it easier to locate and access the desired files or data.
7. Distinguish Between Similar Drives: If you have multiple drives that are similar in appearance, such as external hard drives or USB flash drives, consider using distinct volume labels for each of them. This helps to avoid confusion and ensures that you can easily identify and select the correct drive when needed.
By following these best practices, you can create meaningful and organized volume labels for your drives, making it more efficient and convenient to manage your storage devices and access your data.
How Volume Labels Can Affect Drive Recognition
Volume labels play a crucial role in drive recognition and can impact how a computer identifies and interacts with storage devices. Here’s how volume labels can affect drive recognition:
1. Drive Identification: Volume labels serve as unique identifiers for drives. When a drive is connected to a computer, the operating system reads the volume label and associates it with the corresponding drive. This allows users to easily differentiate between multiple drives connected to their system.
2. Drive Letter Assignment: In some operating systems, like Windows, volume labels are used to assign drive letters to storage devices. When a drive is inserted, the operating system checks the volume label and assigns it a drive letter as part of the recognition process. This ensures consistent access to the drive using the same assigned letter each time it is connected.
3. AutoPlay and AutoRun Actions: The volume label is also utilized by the computer’s AutoPlay and AutoRun features. When a drive is recognized, the operating system can automatically launch certain actions based on the volume label, such as opening a specific application or running a particular script. This allows for an automatic execution of predefined actions upon drive recognition.
4. File Explorer Display: The volume label of a drive is displayed in the file explorer or operating system interface, providing users with a visual reference of the drive’s name and purpose. This helps users quickly locate and access specific drives, especially when multiple devices are connected simultaneously.
5. Scripting and Automation: Volume labels are used as references in scripts and automation processes to interact with specific drives. Scripts or applications can be configured to target drives with specific volume labels, allowing for automated tasks such as backup, synchronization, or data transfer.
6. Network Drive Recognition: When a drive is shared on a network, the volume label is used to identify and map the network drive on other computers. By referring to the volume label, the networked computers can recognize and access the shared drive without confusion or conflicts.
7. Partitioning and Formatting: Volume labels are crucial during the partitioning and formatting process. They help ensure that the correct drive is selected for such operations, preventing accidental data loss or errors. Volume labels provide an additional layer of confirmation to identify the drive before performing critical disk management tasks.
Overall, volume labels significantly influence drive recognition and play a vital role in how computers interact with storage devices. By using clear and descriptive volume labels, users can efficiently manage and organize their drives, ensuring smooth recognition and seamless access to their data.
Troubleshooting Volume Label Issues
While volume labels generally work seamlessly, there can be situations where issues arise. Here are some common volume label issues and troubleshooting steps to resolve them:
1. Unrecognized Volume Label: If a drive’s volume label is not recognized or displayed correctly, try the following steps:
- Ensure that the volume label is formatted correctly and does not contain any special characters or spaces that may cause compatibility issues.
- Disconnect and reconnect the drive to the computer to refresh the recognition process.
- In the case of network drives, check the network connection and permissions to ensure proper access.
- Verify that the drive is compatible with the operating system and the file system being used.
2. Drive Letter Conflict: In situations where multiple drives have the same volume label, conflicts can occur in drive letter assignment. To resolve this issue:
- Disconnect all drives with similar volume labels from the computer.
- Reconnect the drives one by one, ensuring that each drive has a unique volume label.
- Manually assign drive letters to the drives in the Disk Management tool (for Windows) or in the system settings (for other operating systems) if necessary.
3. Inconsistent Drive Recognition: If your computer inconsistently recognizes a drive or fails to display the volume label consistently, try the following steps:
- Check for driver updates for the drive or any required firmware updates.
- Try connecting the drive to a different USB port or using a different cable to rule out any physical connection issues.
- Verify that the drive is not malfunctioning by connecting it to another computer or device.
- Run disk error checking tools or perform a disk scan for any potential errors or corruption on the drive.
4. Changing Volume Label: If you want to change the volume label of a drive but encounter difficulties:
- Ensure you have proper administrator privileges to make changes to the disk.
- Use the correct method specific to your operating system for changing the volume label (refer to the instructions mentioned earlier).
- If encountering errors while changing the volume label, try renaming the drive in safe mode or using command-line tools specific to your operating system.
By following these troubleshooting steps, you can resolve common volume label issues and ensure proper recognition and functioning of your storage drives.
Frequently Asked Questions about Volume Labels
Here are some commonly asked questions about volume labels:
Q1: Can I change the volume label of a drive?
A1: Yes, you can change the volume label of a drive. Most operating systems offer a simple and straightforward way to rename the volume label using the file explorer or disk management tools.
Q2: What happens if I remove the volume label from a drive?
A2: If you remove the volume label from a drive, it reverts to displaying the default label assigned by the operating system. However, keep in mind that removing the label does not affect the data or functionality of the drive.
Q3: Can two drives have the same volume label?
A3: Technically, it is possible to have two drives with the same volume label. However, it can lead to confusion and potential conflicts with drive recognition and drive letter assignments. It is best to use unique volume labels for each drive to avoid any issues.
Q4: Can I have spaces or special characters in a volume label?
A4: While some operating systems allow spaces and certain special characters in volume labels, it is recommended to avoid using them. Stick to alphanumeric characters and basic punctuation to ensure compatibility across different platforms and avoid any potential issues.
Q5: Do volume labels affect the performance or storage capacity of a drive?
A5: No, volume labels have no impact on the performance or storage capacity of a drive. They are simply text-based identifiers used for easier recognition and management of storage devices.
Q6: Can I change the volume label of a network drive?
A6: In most cases, changing the volume label of a network drive is not possible as the label is usually assigned by the hosting server or device. The volume label will depend on the network configuration and settings established by the administrator.
Q7: Can I have multiple volume labels for a single drive?
A7: No, a single drive can have only one volume label. The volume label is associated with the drive itself and serves as its unique identifier.
Q8: Are volume labels case-sensitive?
A8: The case-sensitivity of volume labels depends on the file system used by the drive and the operating system. Some file systems, like NTFS in Windows, are not case-sensitive when it comes to volume labels, while others, like Linux file systems, can be case-sensitive.
Q9: Do I need to assign a volume label to all my drives?
A9: It is not mandatory to assign a volume label to all drives. However, it is recommended to assign labels to your drives for easier identification and organization, especially when working with multiple storage devices.
Q10: Can I change the volume label of a drive on a different operating system?
A10: Yes, you can change the volume label of a drive on a different operating system as long as the file system is compatible and supports volume label modifications. However, the specific steps may vary depending on the operating system.
These frequently asked questions provide further insights into volume labels and how they function. If you have any additional questions or concerns, consult the documentation or support resources for your specific operating system.