
Setting up Voice Recording
Setting up voice recording on your Moto G is a straightforward process that allows you to capture important memos, lectures, or personal notes with ease. Whether you're a student, professional, or someone who simply wants to record their thoughts on the go, the Moto G's voice recording feature can be a valuable tool. Here's a step-by-step guide to help you get started:
-
Locate the Voice Recorder App: The first step in setting up voice recording on your Moto G is to locate the Voice Recorder app. You can typically find this app in the app drawer or on the home screen of your device. If you can't find it, you can use the search feature on your device to quickly locate the app.
-
Check Permissions: Before you start recording, it's essential to ensure that the Voice Recorder app has the necessary permissions to access your device's microphone. To do this, go to your device's settings, find the "Apps" or "Applications" section, locate the Voice Recorder app, and verify that the app has permission to access the microphone.
-
Test the Microphone: To ensure that your voice recordings will be clear and audible, it's a good idea to test the microphone on your Moto G. You can do this by opening the Voice Recorder app, tapping the record button, and speaking into the microphone. If you can hear your voice clearly during playback, then the microphone is functioning properly.
-
Adjust Settings (Optional): Depending on your preferences, you may want to adjust the settings of the Voice Recorder app. This can include selecting the audio quality, choosing a default save location for your recordings, or customizing other recording-related settings. To access these options, look for the settings or gear icon within the Voice Recorder app.
By following these simple steps, you can quickly set up voice recording on your Moto G and begin capturing important audio content. Once the setup process is complete, you'll be ready to access the Voice Recorder app and start recording your voice memos, lectures, or any other audio content that you want to preserve for future reference.
Accessing the Voice Recorder App
Accessing the Voice Recorder app on your Moto G is a simple and intuitive process that allows you to quickly capture audio recordings whenever the need arises. Whether you're attending a lecture, participating in a meeting, or simply want to preserve a spontaneous idea, having easy access to the Voice Recorder app can be incredibly convenient. Here's a detailed guide on how to access the Voice Recorder app on your Moto G:
From the Home Screen
One of the most straightforward ways to access the Voice Recorder app is by locating its icon on the home screen of your Moto G. Typically, app icons are arranged across multiple home screens, and you can swipe left or right to navigate through them. Look for the Voice Recorder app icon, which often resembles a microphone or a simple recording symbol. Once you've located the app, simply tap on the icon to open the Voice Recorder.
Using the App Drawer
If you don't find the Voice Recorder app on your home screen, you can access it through the app drawer. The app drawer is a centralized location that contains all the apps installed on your device. To open the app drawer, look for the icon that resembles a grid of dots or squares, usually located at the bottom of the home screen. Tap on this icon to access the app drawer, and then scroll through the list of apps until you find the Voice Recorder. Once you've located the app, tap on its icon to launch the Voice Recorder.
Using Voice Commands
For added convenience, Moto G devices often support voice commands for launching apps. If you've enabled this feature, you can simply say "Hey Google, open Voice Recorder" or "OK Google, start Voice Recorder" to access the app without manually navigating through the home screen or app drawer. This hands-free approach can be particularly useful when you need to start recording quickly and don't have the luxury of tapping through menus.
Using Quick Access Shortcuts
Some Moto G models offer quick access shortcuts that allow you to launch the Voice Recorder app with a single tap or gesture. These shortcuts may be accessible from the lock screen, the notification panel, or customizable shortcut keys. By taking advantage of these shortcuts, you can bypass the traditional app navigation process and jump straight into the Voice Recorder, saving valuable time when every second counts.
By utilizing these methods, you can effortlessly access the Voice Recorder app on your Moto G, ensuring that you're always prepared to capture important audio content at a moment's notice. Whether it's for work, education, or personal use, having quick and convenient access to the Voice Recorder app can significantly enhance your productivity and ability to preserve valuable audio information.
Recording a Voice Memo
Recording a voice memo on your Moto G is a simple and efficient process that allows you to capture important audio content with ease. Whether you need to record a spontaneous idea, preserve a crucial lecture segment, or create a personal audio diary, the Voice Recorder app on your Moto G provides a convenient platform for capturing and storing voice memos. Here's a detailed guide on how to record a voice memo using your Moto G:
-
Open the Voice Recorder App: To begin recording a voice memo, locate and open the Voice Recorder app on your Moto G. You can access the app from the home screen, the app drawer, or by using voice commands, depending on your preferred method of app navigation.
-
Position the Device: Once the Voice Recorder app is open, ensure that your Moto G is positioned appropriately for recording. Hold the device at a comfortable distance from your mouth to ensure clear and audible audio capture. If using an external microphone, ensure that it is properly connected and positioned for optimal recording.
-
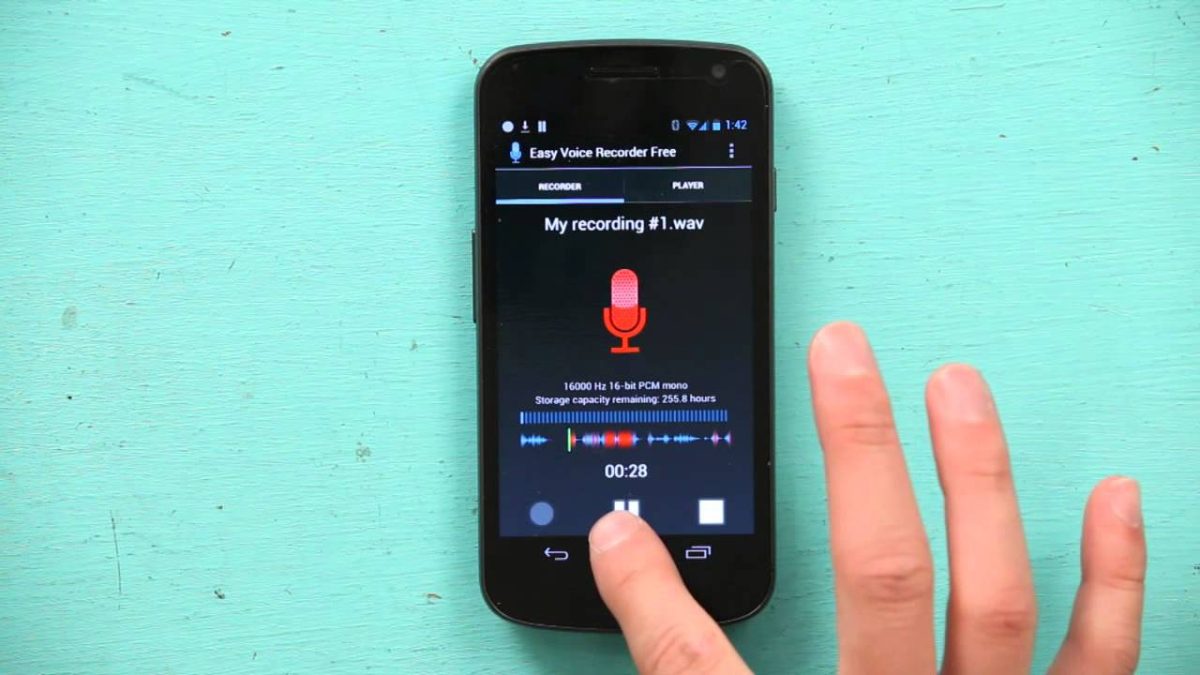
Tap the Record Button: Within the Voice Recorder app, locate the prominent "Record" button, often represented by a circular icon with a microphone symbol. Tap this button to initiate the recording process. Upon tapping the record button, the app will typically display a visual indicator, such as a pulsating icon or a timer, to signify that the recording is in progress.
-
Speak Clearly and Concisely: As the recording begins, speak clearly and concisely to ensure that your voice memo captures the intended content accurately. Whether you're delivering a presentation, sharing personal thoughts, or dictating important notes, maintaining a steady and articulate speaking pace can enhance the overall quality of the voice memo.
-
Pause or Stop Recording: If necessary, the Voice Recorder app often provides options to pause or stop the recording during the process. This can be useful if you need to take a brief break, gather your thoughts, or segment the voice memo into distinct parts. Utilize the pause and stop functions as needed to manage the recording according to your preferences.
-
Review and Save: After completing the voice memo, take a moment to review the recording and ensure that the captured content meets your expectations. Once satisfied, you can save the voice memo within the Voice Recorder app, typically by tapping a "Save" or "Done" button. Additionally, you may have the option to assign a title or description to the recording for easy identification in your audio library.
By following these steps, you can effectively record a voice memo on your Moto G using the Voice Recorder app. Whether for professional, educational, or personal purposes, the ability to capture clear and concise voice memos can significantly enhance your productivity and information retention. With the convenience of the Voice Recorder app at your fingertips, you can seamlessly document important audio content and access it whenever needed.
Managing Voice Recordings
Managing your voice recordings on the Moto G is essential for organizing and accessing your audio content efficiently. Whether you use the Voice Recorder app for work-related interviews, educational lectures, or personal memos, having a structured approach to managing your recordings can streamline your audio experience. Here's a comprehensive guide on how to effectively manage your voice recordings on your Moto G:
Organizing Recordings
Upon creating multiple voice recordings, it's crucial to organize them for easy retrieval. The Voice Recorder app typically offers features to categorize recordings into folders or add labels to distinguish them based on their content or purpose. By creating folders for specific projects, classes, or personal categories, you can maintain a well-structured audio library, making it simpler to locate and manage recordings.
Playback and Editing
The ability to playback and edit recordings directly within the Voice Recorder app is a valuable asset. You can review your recordings to ensure clarity and accuracy, and if necessary, trim or edit sections to remove unwanted content or enhance the overall quality. This feature is particularly useful for refining interview recordings, condensing lengthy lectures, or creating concise audio excerpts for sharing or reference.
Sharing and Backup
The Voice Recorder app often provides options to share your recordings with others via messaging apps, email, or cloud storage platforms. Additionally, it's advisable to regularly back up your voice recordings to prevent data loss. Utilizing cloud storage services or transferring recordings to a computer ensures that your valuable audio content remains secure and accessible, even in the event of device issues.
Deleting Unnecessary Recordings
As your library of voice recordings grows, it's important to periodically review and delete any unnecessary or outdated recordings. Removing redundant content not only conserves storage space but also declutters your audio library, making it easier to locate and manage relevant recordings. Exercise caution when deleting recordings and ensure that you don't inadvertently remove important content.
Customization and Settings
Exploring the customization options and settings within the Voice Recorder app can enhance your recording management experience. You can adjust audio quality settings, choose default save locations, and customize playback preferences to align with your specific requirements. Familiarizing yourself with these features allows you to tailor the app to suit your recording and management preferences.
By implementing these strategies for managing your voice recordings on the Moto G, you can optimize your audio experience and maintain a well-organized library of valuable content. Whether for professional, educational, or personal use, efficient management of voice recordings ensures that you can access and utilize your audio content effectively.