
Set Up Time Machine on Your Mac
Time Machine is a built-in backup feature on macOS that automatically backs up your files to an external storage device. Setting up Time Machine is a straightforward process that ensures your data is secure and easily recoverable in case of accidental deletion, system crashes, or hardware failures. Here’s how to get started:
1. Connect an External Storage Device: Time Machine requires an external hard drive or SSD to store your backups. Connect a compatible storage device to your Mac using a USB, Thunderbolt, or FireWire connection.
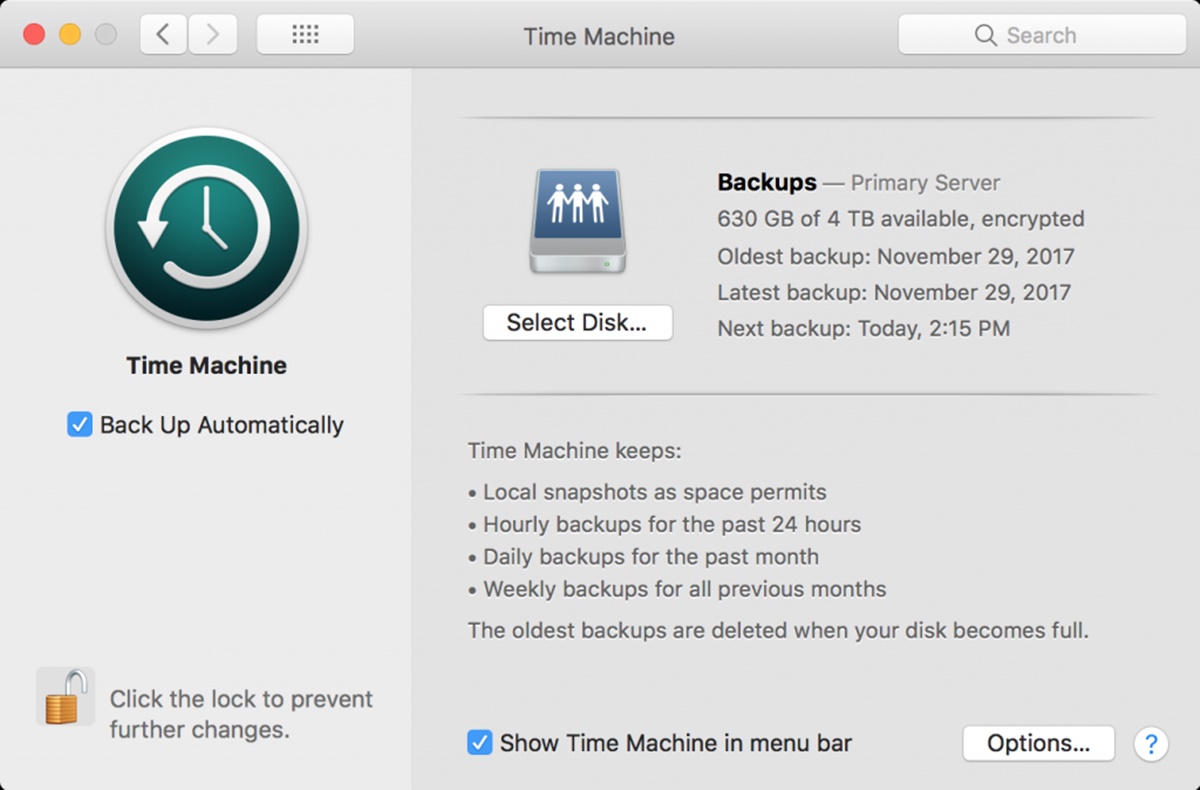
2. Open Time Machine Preferences: Go to the Apple menu and select “System Preferences.” Click on the Time Machine icon to open the Time Machine preferences pane.
3. Select a Backup Disk: In the preferences pane, Time Machine will automatically detect the connected external storage device. Click on the “Select Backup Disk” button to choose the disk you want to use for Time Machine backups.
4. Format the Backup Disk (If Needed): If the connected disk is not already formatted for Time Machine, you will be prompted to erase and format it. Make sure to back up any important data on the disk before formatting.
5. Start Backing Up: Once you’ve selected the backup disk, Time Machine will automatically start the backup process. It will initially perform a full backup of your entire system, and then continue with incremental backups, saving only the changes made to your files.
6. Customize Time Machine Preferences: While Time Machine will work with default settings, you can customize its behavior by clicking on the “Options” button in the Time Machine preferences pane. Here, you can exclude specific folders or files from being backed up, set backup frequency, and more.
With Time Machine set up on your Mac, you can have peace of mind knowing that your files are being regularly backed up. In the event of data loss or system issues, you can easily restore individual files, folders, or even your entire system from a Time Machine backup.
Understand How Time Machine Works
Before diving into using Time Machine on your Mac, it’s important to have a basic understanding of how it works. Time Machine uses a clever combination of features to ensure that your files are backed up and easily retrievable:
1. Automatic Incremental Backups: Time Machine performs automatic incremental backups, which means that after the initial full backup, it only backs up the changes made to your files. This approach conserves storage space while still ensuring that you have a comprehensive backup history.
2. Hourly, Daily, and Weekly Snapshots: Time Machine creates snapshots of your files at different intervals – every hour, every day, and every week. This allows you to go back in time and recover files from specific points in the past, giving you a comprehensive backup history.
3. Time Machine Local Snapshots: If your Time Machine backup disk is not connected to your Mac, Time Machine will create local snapshots directly on your Mac’s internal storage. This provides you with the flexibility to restore files even when your backup disk is not available.
4. Space Management: Time Machine automatically manages the storage space on your backup disk. As the disk fills up, Time Machine will delete older snapshots to make room for new ones. This ensures that you always have enough space for your most recent backups.
5. File Versioning: Time Machine keeps multiple versions of your files, allowing you to restore an earlier version if needed. This can be particularly useful if you accidentally modify or delete a file and want to retrieve a previous version.
Understanding these key aspects of Time Machine will enable you to make the most of this powerful backup tool. By leveraging the automatic incremental backups, snapshots, space management, and file versioning capabilities, Time Machine provides you with a robust and reliable backup solution for your Mac.
Check the Backup Disk Connection
Ensuring that the backup disk is properly connected to your Mac is crucial for Time Machine to work effectively. Here are some steps you can take to check the backup disk connection:
1. Verify Physical Connection: Start by checking the physical connection between your Mac and the backup disk. Make sure that the USB, Thunderbolt, or FireWire cable is securely plugged into both devices. If using a wireless backup disk, ensure that it is within range and connected to your Wi-Fi network.
2. Restart the Backup Disk: If you are experiencing issues with the backup disk connection, try restarting the disk. Disconnect it from your Mac, wait for a few seconds, and then reconnect it. This can sometimes resolve temporary connectivity problems.
3. Test with Different Ports or Cables: If the connection issue persists, try connecting the backup disk to a different USB, Thunderbolt, or FireWire port. This helps identify if the problem is with the port on your Mac or the cable being used. You can also try using a different cable or adapter to rule out any cable-related issues.
4. Check Disk Utility: Open Disk Utility on your Mac, which can be found in the Utilities folder within the Applications folder. From there, locate the backup disk and select it. Click on the “First Aid” tab and run the “Verify Disk” option. This will check for any disk errors or issues that may be affecting the backup disk connection.
5. Reformat the Backup Disk: If Disk Utility detects any errors, you may need to reformat the backup disk. Keep in mind that reformatting erases all data on the disk, so ensure that you have a backup of the backup disk’s content before proceeding. Once reformatted, reconnect the disk to your Mac and set it up again in Time Machine preferences.
By following these steps to check the backup disk connection, you can troubleshoot and resolve any issues that may be hindering Time Machine from properly backing up your files. Maintaining a stable and reliable connection ensures that your backups are up to date and readily accessible when needed.
Verify Backup Disk Access
Having a backup disk connected to your Mac is not enough; you also need to ensure that your system has the necessary access permissions to read and write data to the disk. Here’s how you can verify and troubleshoot backup disk access:
1. Check Disk Permissions: Open Disk Utility on your Mac and select the backup disk. Click on the “First Aid” tab and run the “Repair Disk Permissions” option. This will fix any permission-related issues that may be preventing your Mac from accessing the backup disk.
2. Confirm Ownership and Permissions: Right-click on the backup disk in Finder and select “Get Info.” In the Info window that appears, navigate to the “Sharing & Permissions” section. Ensure that your user account has the necessary read and write permissions for the backup disk. If not, click on the lock icon, enter your administrator password, and make the necessary changes.
3. Reset Home Folder Permissions: If you are using Time Machine to back up your Home folder, you may need to reset the permissions for your Home folder. Go to the “Users & Groups” section in System Preferences and unlock the lock icon. Right-click on your user account and select “Advanced Options.” Click on “Reset Home Folder Permissions and ACLs” to reset the permissions for your Home folder.
4. Disable Third-Party Security Software: Some third-party security software, such as antivirus or firewall applications, may interfere with Time Machine’s access to the backup disk. Temporarily disable these software programs and check if Time Machine can access the backup disk properly. If so, adjust the settings of your security software to allow Time Machine access.
5. Try a Different User Account: Create a new user account on your Mac and set up Time Machine using this account. If Time Machine works seamlessly with the new user account, the issue may be specific to your original user account. In this case, you can transfer your files to the new user account or troubleshoot further to fix the issue in your original account.
By verifying and ensuring proper backup disk access, you can eliminate any obstacles that prevent Time Machine from performing seamless backups. Regularly checking and maintaining the access permissions not only enhances the reliability of your backups but also ensures smooth data restoration when needed.
Check the Backup Disk for Errors
Regularly checking your backup disk for errors is crucial to ensure the integrity and reliability of your Time Machine backups. Here are some steps you can take to check the backup disk for errors:
1. Run First Aid in Disk Utility: Open Disk Utility on your Mac, which can be found in the Utilities folder within the Applications folder. Select the backup disk from the list on the left-hand side and click on the “First Aid” tab. Run the “Verify Disk” option to scan the disk for any errors or issues. If any errors are detected, follow the prompts to repair them.
2. Check for Bad Sectors: Bad sectors on a disk can lead to data corruption and loss. Use a third-party disk utility tool to scan the backup disk for bad sectors. These utilities can identify and mark any bad sectors, allowing the operating system to avoid using them for data storage.
3. Monitor SMART Status: Some external hard drives support Self-Monitoring, Analysis, and Reporting Technology (SMART) to assess disk health. SMART status provides information about various indicators, including disk temperature, spin-up time, and error rates. Use a utility tool or a compatible app to monitor the SMART status of your backup disk and ensure it is in good health.
4. Check for File System Errors: The file system of the backup disk can sometimes become corrupted, leading to errors and issues. On macOS, you can use the built-in Disk Utility to verify and repair file system errors. Select the backup disk and run the “First Aid” option to check for any file system errors and correct them if necessary.
5. Perform Regular Disk Checks: Make it a habit to perform regular disk checks for your backup disk. Schedule these checks at a convenient time when you know Time Machine backups are not running. Regular checks help identify and resolve any potential issues before they impact your backups.
Remember that while these steps can help detect and resolve common disk errors, they may not be able to fix hardware-related problems. If you suspect a hardware issue with your backup disk, it’s advisable to consult with a professional or the manufacturer for further assistance or a potential replacement.
By regularly checking your backup disk for errors, you can maintain the reliability and effectiveness of your Time Machine backups. Detecting and resolving any errors promptly ensures that your backup disk is in optimal condition, allowing you to have peace of mind knowing that your files are securely backed up.
Update Time Machine Software
Keeping your Time Machine software up to date is essential to ensure the smooth and efficient functioning of your backups. Regular updates provide bug fixes, performance improvements, and new features that enhance the overall Time Machine experience. Follow these steps to update your Time Machine software:
1. Check for macOS Updates: Time Machine is an integral part of macOS, so updating your operating system will also update the Time Machine software. Check if there are any available macOS updates by going to the Apple menu and selecting “System Preferences.” Click on “Software Update,” and if an update is available, follow the prompts to download and install it.
2. Check for Time Machine Updates: In addition to macOS updates, Apple occasionally releases specific updates for Time Machine. These updates may address compatibility issues, improve performance, or introduce new features. Check the App Store on your Mac for any updates related to Time Machine. If an update is available, download and install it.
3. Enable Automatic Updates: Ensure that your Mac is set to receive automatic updates for both macOS and Time Machine. To do this, go to the Apple menu, select “System Preferences,” and click on “Software Update.” Check the box for “Automatically keep my Mac up to date.” This will ensure that your Time Machine software stays up to date without manual intervention.
4. Restart After Updates: After installing any updates for macOS or Time Machine, it is recommended to restart your Mac. Restarting helps activate the updated software properly and ensures that any changes or improvements take effect.
5. Verify Time Machine Functionality: After updating Time Machine software, it’s important to verify that your backups are functioning as expected. Open Time Machine preferences and ensure that the backup disk is still recognized and properly connected. Initiate a manual backup to confirm that the software is performing backups without any errors or issues.
Updating your Time Machine software not only ensures the latest features and improvements but also adds an extra layer of security and compatibility. By staying up to date, you can leverage the full potential of Time Machine and have peace of mind knowing that your backups are protected and reliable.
Check Time Machine Preferences
Checking your Time Machine preferences is an important step to ensure that your backups are configured and customized according to your needs. By reviewing and adjusting the preferences, you can optimize Time Machine for efficient and effective backups. Here’s what you should check:
1. Backup Disk Selection: Open Time Machine preferences by clicking on the Time Machine icon in the menu bar and selecting “Open Time Machine Preferences.” Verify that the correct backup disk is selected. If you need to change the backup disk, click on the “Select Backup Disk” button and choose the desired disk.
2. Backup Exclusions: Time Machine allows you to exclude specific files, folders, or even entire disks from being backed up. Review the list of exclusions to ensure that important files are not unintentionally excluded. To modify the exclusions, click on the “Options” button and manage the exclusion list.
3. Backup Frequency: By default, Time Machine performs automatic backups every hour. However, you can adjust the backup frequency to better suit your needs. Click on the “Options” button and select the check box next to “Back up while on battery power.” You can also set a specific backup schedule by using third-party utilities or Terminal commands.
4. Network Backup Settings: If you have a network-attached storage (NAS) device for Time Machine backups, review the network backup settings to ensure that the connection is stable and accessible. Check the permissions, network address, and credentials required to access the NAS device.
5. Encryption and Password Protection: Time Machine offers the option to encrypt your backups for added security. If you haven’t enabled encryption, consider doing so by clicking on the “Encrypt backups” check box in the “Options” section. Set a strong password to protect your encrypted backups.
6. Notification Preferences: Time Machine can display notifications to keep you informed about the status of your backups. Review the notification preferences and customize them according to your preferences. This ensures that you receive timely notifications about successful backups or any issues that may arise.
Regularly checking and adjusting your Time Machine preferences helps optimize your backup settings and ensures that Time Machine is working in accordance with your needs. By reviewing the backup disk selection, exclusion list, backup frequency, network settings, encryption, and notification preferences, you can customize Time Machine to suit your specific requirements and backup strategy.
Delete Old Backups
Over time, Time Machine backups can accumulate, consuming valuable disk space on your backup disk. It’s important to periodically delete old backups to free up space and ensure efficient backups. Here’s how you can delete old backups:
1. Open Time Machine Preferences: Click on the Time Machine icon in the menu bar and select “Open Time Machine Preferences.” This will open the Time Machine preferences pane.
2. Enter Time Machine: In the Time Machine preferences pane, click on the “Enter Time Machine” button. This will launch the Time Machine interface, allowing you to navigate through your backups by date and time.
3. Select Backups to Delete: Once inside Time Machine, navigate to the specific date or backup that you want to delete. You can use the timeline on the right side of the screen or the arrows at the bottom to navigate through different backups. Click on the backup you want to delete.
4. Click on the Gear Icon: In the top-right corner of the Time Machine interface, click on the gear icon. This will open a drop-down menu with various options.
5. Choose “Delete Backup”: From the drop-down menu, select “Delete Backup.” Time Machine will prompt you to confirm the deletion. Click “Delete” to remove the selected backup.
6. Repeat for Additional Backups: If you have multiple backups to delete, repeat steps 3-5 for each backup you wish to remove. Remember to exercise caution when deleting backups, as they cannot be recovered once deleted.
7. Monitor Disk Space: After deleting backups, monitor your backup disk’s available space to ensure that you are freeing up enough storage. Keep in mind that Time Machine will automatically manage the disk space and delete older backups as needed to make room for new ones.
Regularly deleting old backups not only helps free up disk space but also ensures that your backup disk is optimized for future backups. It is recommended to evaluate your backup needs and delete backups that are no longer necessary, such as those that are outdated or no longer relevant to your current data.
Perform a Test Restore
Performing a test restore is a crucial step in ensuring that your Time Machine backups are working correctly and can be relied upon when you actually need them. By simulating a restore process, you can verify the integrity of your backups and ensure that you can successfully recover your data when necessary. Here are the steps to perform a test restore:
1. Open Time Machine: Click on the Time Machine icon in the menu bar and select “Enter Time Machine” to launch the Time Machine interface.
2. Navigate to a File or Folder: Use the timeline on the right side of the Time Machine interface or the arrows at the bottom to navigate to the specific date and time when the file or folder you want to restore was still present.
3. Select a File or Folder: Once you’ve located the desired backup, select the file or folder that you want to restore. You can preview the selected item and verify that it is the correct version that you wish to restore.
4. Click on the Restore Button: In the Time Machine interface, click on the “Restore” button to initiate the restore process. Time Machine will begin restoring the selected file or folder to its original location on your Mac.
5. Verify the Restored Data: After the restore process completes, navigate to the restored file or folder on your Mac and confirm that it has been successfully restored. Ensure that the restored data matches your expectations and is accessible without any issues.
Performing a test restore allows you to not only confirm the integrity of your backups but also familiarize yourself with the restore process. Additionally, it gives you the opportunity to identify any potential issues or inconsistencies with your backups before you encounter a real data loss situation.
Remember to regularly perform test restores to ensure the reliability and effectiveness of your Time Machine backups. By doing so, you can have peace of mind knowing that your data is securely backed up and can be easily restored whenever needed.
Monitor Time Machine for Errors
Monitoring Time Machine for errors is essential to ensure the ongoing reliability and effectiveness of your backups. By regularly checking for errors, you can proactively address any issues and prevent potential data loss. Here are some steps you can take to monitor Time Machine and address errors:
1. Check for Backup Failures: Keep an eye on the Time Machine icon in the menu bar. If you see an exclamation mark or a message indicating a backup failure, it’s a sign that there might be an issue with the backup process. Click on the Time Machine icon to get more details about the error and take appropriate action.
2. Monitor System Logs: macOS keeps logs that contain information about Time Machine operations. You can access these logs in the Console application, located in the Utilities folder within the Applications folder. Look for any error messages or warnings related to Time Machine. If you spot any, research and troubleshoot the specific error to resolve the issue.
3. Review Backup Disk Health: Regularly check the health status of your backup disk using a disk utility tool or compatible app. Look for any disk errors or signs of impending failure. Early detection can allow you to address disk issues before they impact your backups and potentially cause data loss.
4. Set Up Notifications: Time Machine can send notifications to keep you informed about the status of your backups. Go to Time Machine preferences and check the notification settings. Ensure that notifications are enabled and customize them according to your preferences. This way, you will receive timely alerts about backup errors or warnings.
5. Monitor Backup Speed: Take note of the speed at which Time Machine performs backups. If you notice a significant decrease in backup speed over time or unusually slow backups, it may indicate underlying issues with your backup disk or system. Investigate and address any factors that may be contributing to the slowdown.
6. Regularly Test Restores: As mentioned earlier, performing regular test restores is an excellent way to ensure the integrity of your backups. By testing the restore process, you can verify that your backups are functioning properly and that you can successfully recover your data when needed.
By actively monitoring Time Machine for errors, you can identify and address issues before they escalate into significant problems. Regularly checking for backup failures, reviewing system logs, monitoring disk health, setting up notifications, watching backup speed, and performing test restores are all crucial aspects of maintaining the reliability of your Time Machine backups.