
Benefits of Using Access Input Forms
Access input forms are a powerful tool that offer a multitude of benefits for efficiently entering and modifying data in an Access database. Let’s explore some of the key advantages of using Access input forms.
Simplicity and User-Friendliness: Access input forms provide a user-friendly interface that simplifies the data entry process. Instead of directly working with tables and fields, users can interact with well-designed forms that present the necessary fields in a logical and organized manner. This makes it easier for both novice and experienced users to enter and modify data accurately and efficiently.
Error Reduction: Access input forms allow for the implementation of data validation rules, ensuring that the entered data meets the required criteria. Through the use of built-in validation features such as data type checks, range restrictions, and required field validations, the possibility of errors or inconsistencies in the database is significantly reduced. This saves time and effort in the long run by preventing the need for manual error detection and correction.
Data Integrity: With Access input forms, you can define relationships between tables and enforce referential integrity rules. This means that when data is entered or modified through a form, the relationships between related tables are maintained and validated. This ensures that the database remains consistent and accurate, preventing data corruption or loss.
Improved Efficiency: Access input forms offer various features that enhance data entry efficiency. Through the use of default values, auto-populated fields, and drop-down lists, users can quickly and accurately enter data with minimal effort. Additionally, the ability to create input forms with customized layouts and navigational elements allows for a streamlined data entry process, reducing the time required to enter and modify data.
Enhanced Data Analysis: By utilizing Access input forms, users can easily retrieve and analyze data without the need for complex queries or direct table access. Forms can be designed to include search options, filters, and sorting capabilities, enabling users to extract specific subsets of data and perform in-depth analysis. This empowers users to make data-driven decisions and gain valuable insights.
Data Security: Access input forms provide a layer of security by allowing the restriction of data entry and modification privileges. By assigning specific user roles and permissions, you can control who can access and manipulate data in the database. This ensures that sensitive information remains protected and reduces the risk of unauthorized changes or data breaches.
Overall, utilizing Access input forms offers a range of benefits that streamline data entry, improve accuracy, enhance efficiency, and provide additional layers of security. By taking advantage of these features, you can optimize your data management processes and maintain a robust and reliable Access database.
Creating an Access Input Form
Creating an Access input form is a straightforward process that allows you to design a user-friendly interface for entering and modifying data in your Access database. Let’s walk through the steps to create an Access input form.
Step 1: Open the Access Database: Launch Microsoft Access and open the database in which you want to create the input form.
Step 2: Access the Form Design View: In the Navigation Pane, locate the table or query for which you want to create the input form. Right-click on the table or query and select “Form Design” from the context menu.
Step 3: Design the Layout: In the Form Design View, you can design the layout of your input form. Utilize tools such as the Form Layout Tools and the Arrange group to add and arrange form elements, such as text boxes, labels, and buttons.
Step 4: Adding Fields: To add fields to the input form, select the desired field from the Field List pane, commonly located on the right-hand side of the Form Design View. Click and drag the field onto the form to add it.
Step 5: Adding Labels: To provide clear instructions or descriptions for each field, add labels to your input form. Labels help users understand the purpose of each field and how to correctly enter data.
Step 6: Adding Controls: Customize the appearance and functionality of the input form by adding controls. Controls allow users to interact with and enter data into the fields. Examples of controls include text boxes, drop-down lists, checkboxes, and command buttons.
Step 7: Customize the Appearance: Use formatting options such as font styles, colors, and borders to customize the appearance of your input form. Ensuring a visually appealing and cohesive design can enhance the user experience.
Step 8: Save and Test the Input Form: Once you’ve finished designing the input form, save it and switch to Form View to test its functionality. Enter sample data into the fields and verify that the form behaves as expected.
Step 9: Fine-tune the Input Form: Iterate and refine the input form as needed. Adjust the layout, modify field properties, or add additional functionalities like data validation and navigation buttons to improve the user experience.
By following these steps, you can create a customized Access input form tailored to your specific data entry requirements. Access input forms provide a user-friendly interface for entering and modifying data, simplifying the data management process and improving overall efficiency.
Designing the Layout of an Access Input Form
Designing the layout of an Access input form is crucial to ensure a visually appealing and user-friendly interface for entering and modifying data in your Access database. Let’s explore some key considerations and best practices for designing the layout of an Access input form.
1. Organize and Group Fields: Arrange related fields together to create a logical flow for data entry. Grouping fields that are conceptually connected or share a common category can make it easier for users to understand and navigate the form.
2. Prioritize Essential Information: Place the most important fields prominently on the form. Fields that are frequently used or required for data entry should be easily accessible and positioned at the top or left-hand side of the form, while less critical fields can be placed below or to the right.
3. Use Labels and Instructions: Clearly label each field to provide context and guidance for data entry. Use clear and concise labels that accurately describe the purpose of each field. Additionally, consider adding instructions or tooltips to further assist users in entering data correctly.
4. Consider Field Types and Sizes: Tailor the size and type of fields based on the nature of the data being entered. For example, use a text box for short text inputs and a larger text box or a combo box for longer text or selection-based inputs. Align the width of fields to accommodate the expected data length and prevent unnecessary scrolling.
5. Utilize Grids and Alignment: Use a grid layout to align fields, labels, and controls consistently. This creates a neat and organized appearance that enhances readability. Align elements vertically and horizontally to maintain a clean and professional design.
6. Maintain Adequate Spacing: Leave enough space between fields, labels, and controls to prevent overcrowding. Adequate spacing helps prevent visual clutter and makes it easier for users to focus on individual fields. Use margins and padding to ensure proper spacing throughout the form.
7. Incorporate Visual Cues: Use visual cues such as color, font styling, and icons to highlight important fields or indicate required fields. Employing consistent visual cues throughout the form can enhance usability and assist users in understanding form interactions.
8. Test and Refine: After designing the initial layout, test the input form with sample data to evaluate its usability and effectiveness. Collect feedback from users and make necessary adjustments to improve the form’s flow, clarity, and efficiency.
By considering these design principles, you can create an Access input form with a well-organized and visually pleasing layout. A well-designed layout not only enhances the user experience but also improves data entry accuracy and efficiency in your Access database.
Adding Fields to an Access Input Form
Adding fields to an Access input form is an essential step in creating a user-friendly interface for entering and modifying data in your Access database. Let’s explore the process of adding fields to an Access input form.
1. Open the Form in Design View: Open the Access input form in Design View by selecting the form from the Navigation Pane and clicking on the “Design View” button.
2. Access the Field List: In the Design View, locate the “Field List” pane. This pane displays all the fields available from the underlying table or query connected to the form. If the Field List pane is not visible, you can enable it by going to the “Design” tab and clicking on “Add Existing Fields” in the “Controls” group.
3. Select Fields: From the Field List pane, select the fields you want to add to the form. You can single-click to select one field at a time or use Ctrl+click or Shift+click to select multiple fields. Alternatively, you can drag and drop fields directly from the Field List pane onto the form.
4. Position and Arrange Fields: Once you have selected the desired fields, position them on the form by clicking and dragging them into the desired location. Use alignment tools to ensure proper spacing and alignment between fields. You can also resize fields by dragging their edges to accommodate the desired input length.
5. Adjust Field Properties: After adding fields to the form, you can adjust their properties to customize their behavior. Right-click on a field and select “Properties” to access the field’s properties window. From here, you can define properties such as the field’s default value, data type, formatting, validation rules, and more.
6. Label the Fields: To provide clear instructions or descriptions for each field, add labels. Labels help users understand the purpose of each field and how to correctly enter data. To add a label, select the “Label” control from the “Controls” group in the “Design” tab and position it next to the associated field.
7. Test the Form: Switch to the Form View to test the form’s functionality. Enter sample data into the fields and verify that the form behaves as expected. Make any necessary adjustments to the field layout or properties based on the testing results.
By following these steps, you can add fields to an Access input form and customize their properties to create a tailored data entry experience. Remember to consider usability and data integrity when selecting and positioning fields, ensuring a seamless and efficient data entry process in your Access database.
Adding Labels to an Access Input Form
Labels play a vital role in providing clear instructions and improving the user experience when entering and modifying data in an Access input form. In this section, we will explore the process of adding labels to an Access input form and their importance in guiding users.
1. Open the Form in Design View: To add labels to your Access input form, open the form in Design View by selecting it from the Navigation Pane and clicking on the “Design View” button.
2. Access the Label Control: In the Design View, locate the “Controls” group in the “Design” tab. Select the “Label” control to activate it for adding labels to the form.
3. Position the Label: Click on the desired location on the form where you want to add the label. The label control will appear at that position, and you can adjust its size and position as needed.
4. Customize the Label: With the label control selected, you can customize the appearance and properties of the label. Access the “Property Sheet” by right-clicking on the label and selecting “Properties.” From here, you can modify properties such as the caption, font, color, alignment, and more.
5. Associate the Label with a Field: To ensure that the label corresponds to the correct field, select the label control and find the “Control Source” property in the “Property Sheet.” In the “Control Source” property, enter the name of the field that the label describes.
6. Format the Label: Use formatting options such as bold, italic, font size, and color to make the label stand out and catch the user’s attention. Consistent formatting throughout the form can enhance its visual appeal and make it easier to read and understand.
7. Test the Form: Switch to the Form View to test the form’s functionality. Enter sample data and verify that the labels provide clear instructions for each field. Make any necessary adjustments to the label’s position or appearance based on the testing results.
Adding labels to an Access input form is crucial for improving the user experience by providing clear instructions and descriptive text for each field. Labels serve as a visual cue for users, guiding them in accurately entering data and understanding the purpose of each field. By following the steps outlined above, you can effectively add and customize labels to create a user-friendly Access input form.
Adding Controls to an Access Input Form
Controls are essential elements in an Access input form that allow users to interact with and enter data. Adding controls to an Access input form enhances its functionality and usability. In this section, we will discuss the process of adding controls to an Access input form and explore their significance in improving data entry.
1. Open the Form in Design View: To add controls to your Access input form, open the form in Design View by selecting it from the Navigation Pane and clicking on the “Design View” button.
2. Access the Control Toolbox: In the Design View, locate the “Controls” group in the “Design” tab. Click on the “Toolbox” button to access the Control Toolbox, which contains various controls you can add to the form.
3. Select a Control: From the Control Toolbox, select the desired control you want to add to your form. Examples of commonly used controls include text boxes, combo boxes, checkboxes, radio buttons, and command buttons.
4. Position the Control: Click on the desired location on the form where you want to add the control. The control will appear at that position, and you can adjust its size and position as needed.
5. Customize the Control’s Properties: With the control selected, you can customize its properties to tailor its behavior and appearance. Right-click on the control and select “Properties” to access its properties window. Properties may include captions, default values, control source, formatting, validation rules, and more.
6. Link the Control to the Field: To associate the control with a specific field in your database, find the “Control Source” property in the control’s properties window. Enter the name of the field that you want the control to store or display data from.
7. Configure Control Events: Controls can have event triggers that perform certain actions based on user interactions. For example, you can specify an event for a button click or a selection change in a combo box. Access the control’s events properties to define the desired event and associated action.
8. Test the Form: Switch to the Form View to test the form’s functionality. Interact with the controls and verify that they behave as expected, allowing users to enter and modify data accurately and efficiently. Make any necessary adjustments to the control’s properties or position based on the testing results.
Adding controls to an Access input form is pivotal in providing users with the necessary tools to interact with and manipulate the data. By following the steps outlined above, you can add and customize controls to create a functional and user-friendly Access input form, empowering users to efficiently enter and modify data in your database.
Customizing the Appearance of an Access Input Form
Customizing the appearance of an Access input form is a crucial step in creating a visually appealing and user-friendly interface for entering and modifying data in your database. In this section, we will explore various ways to customize the appearance of an Access input form.
1. Form Layout: Choose a layout that best suits your needs, whether it’s a single-column form or a multi-column form. Consider the amount of data and the screen resolution of your users when deciding on the form layout. You can modify the layout by adjusting the size and positioning of fields, labels, and other controls.
2. Color Scheme: Select an appropriate color scheme that matches your application’s branding or enhances readability. Consistency in color choices across the form creates a cohesive and professional look. Apply colors to background, text, and control elements, but ensure readability and accessibility of the content.
3. Font Styles and Sizes: Choose font styles and sizes that are easy to read and visually pleasing. Consider the overall design aesthetics and ensure that the font style and size work well with the amount of text displayed in each field or control. Consistency in font choices throughout the form aids in creating a cohesive visual experience.
4. Alignment: Maintain proper alignment of fields, labels, and controls to present a polished and organized appearance. Alignment creates visual harmony and simplifies the user’s understanding of the form’s structure. Utilize alignment tools to ensure that elements are aligned vertically and horizontally.
5. Borders and Grids: Use borders and grids to demarcate different sections or groupings within the form. Borders can help visually separate fields and controls, improving usability and readability. Gridlines can aid in aligning elements accurately and maintaining consistency in design.
6. Padding and Margins: Adjust the spacing around fields, labels, and controls to provide a clean and uncluttered look. Proper padding and margins can prevent elements from appearing cramped and improve the user experience by enhancing readability and ease of interaction.
7. Images and Icons: Incorporate images or icons to visually enhance the form and provide intuitive visual cues. Use images or icons in buttons, header sections, or to represent specific information. Ensure that the images or icons are relevant and support understanding and interaction with the form.
8. Apply Themes: Utilize pre-defined themes or create custom themes to maintain consistency across multiple forms in your application. Themes modify the appearance of various form elements, including colors, fonts, and effects, and provide a polished and professional look to your Access input form.
9. Test and Refine: Regularly switch to the Form View to test the form’s appearance and user experience. Make adjustments as needed based on user feedback and usability testing to ensure that the customized appearance aligns with user expectations and enhances the overall form experience.
By following these guidelines, you can customize the appearance of your Access input form to create a visually appealing and user-friendly interface for data entry. A well-designed form not only enhances the overall user experience but also reflects the branding and professionalism of your application.
Validating Data in an Access Input Form
Validating data in an Access input form is crucial to ensure that the entered data meets the required criteria and maintains the integrity of the database. In this section, we will explore the importance of data validation and various techniques to validate data in an Access input form.
1. Data Type Validation: Access provides built-in data types, such as text, number, date/time, and yes/no. Setting the appropriate data type for each field in the form ensures that the entered data matches the expected format. For example, a date field should only accept valid dates, and a number field should only accept numeric values.
2. Range Validation: You can set validation rules to ensure that the entered data falls within a specific range. For instance, you can define a minimum and maximum value for a numeric field, or specify a start and end date for a date field. This helps prevent data entry errors and ensures data accuracy.
3. Required Field Validation: Designate certain fields as required in the form to ensure that essential information is not missed during data entry. Access allows you to set the “Required” property for a field, which will prompt the user to enter data before proceeding. This avoids incomplete or missing data in the database.
4. Format Validation: Use format validation to enforce specific formatting rules for fields such as phone numbers, email addresses, or postal codes. Access provides validation rules and custom input masks that can be applied to fields, ensuring that the entered data adheres to the specified format.
5. Unique Value Validation: In scenarios where fields need to contain unique values, such as employee ID or customer number, you can set the “Unique” property for the field. This prevents the entry of duplicate values in the database and ensures data integrity.
6. Custom Validation: Access allows you to create custom validation rules through expressions or macros. These rules can be used to perform more complex data validation, such as checking relationships between fields, cross-field validation, or validations based on external data sources.
7. Display Validation Messages: When a validation rule is violated, Access can display user-friendly error messages to prompt users to correct the data. These messages should provide clear instructions on the issue and how to resolve it, improving the user experience and guiding users to enter valid data.
8. Test and Refine: After implementing data validation in the Access input form, thoroughly test the form to ensure that the validation rules work as intended. Input various test scenarios and verify that the validation messages are displayed correctly and that invalid data is not accepted.
By validating data in an Access input form, you can ensure the accuracy, consistency, and integrity of the data stored in your database. Implementing appropriate validation rules and providing clear error messages guide users in entering valid data and minimize errors or inconsistencies in the database.
Adding Navigation Buttons to an Access Input Form
Adding navigation buttons to an Access input form provides users with a convenient way to navigate through records and enhances the user experience. In this section, we will explore how to add navigation buttons to an Access input form and their benefits.
1. Open the Form in Design View: To add navigation buttons to your Access input form, open the form in Design View by selecting it from the Navigation Pane and clicking on the “Design View” button.
2. Access the Control Toolbox: In the Design View, locate the “Controls” group in the “Design” tab. Click on the “Toolbox” button to access the Control Toolbox, which contains various controls you can add to the form.
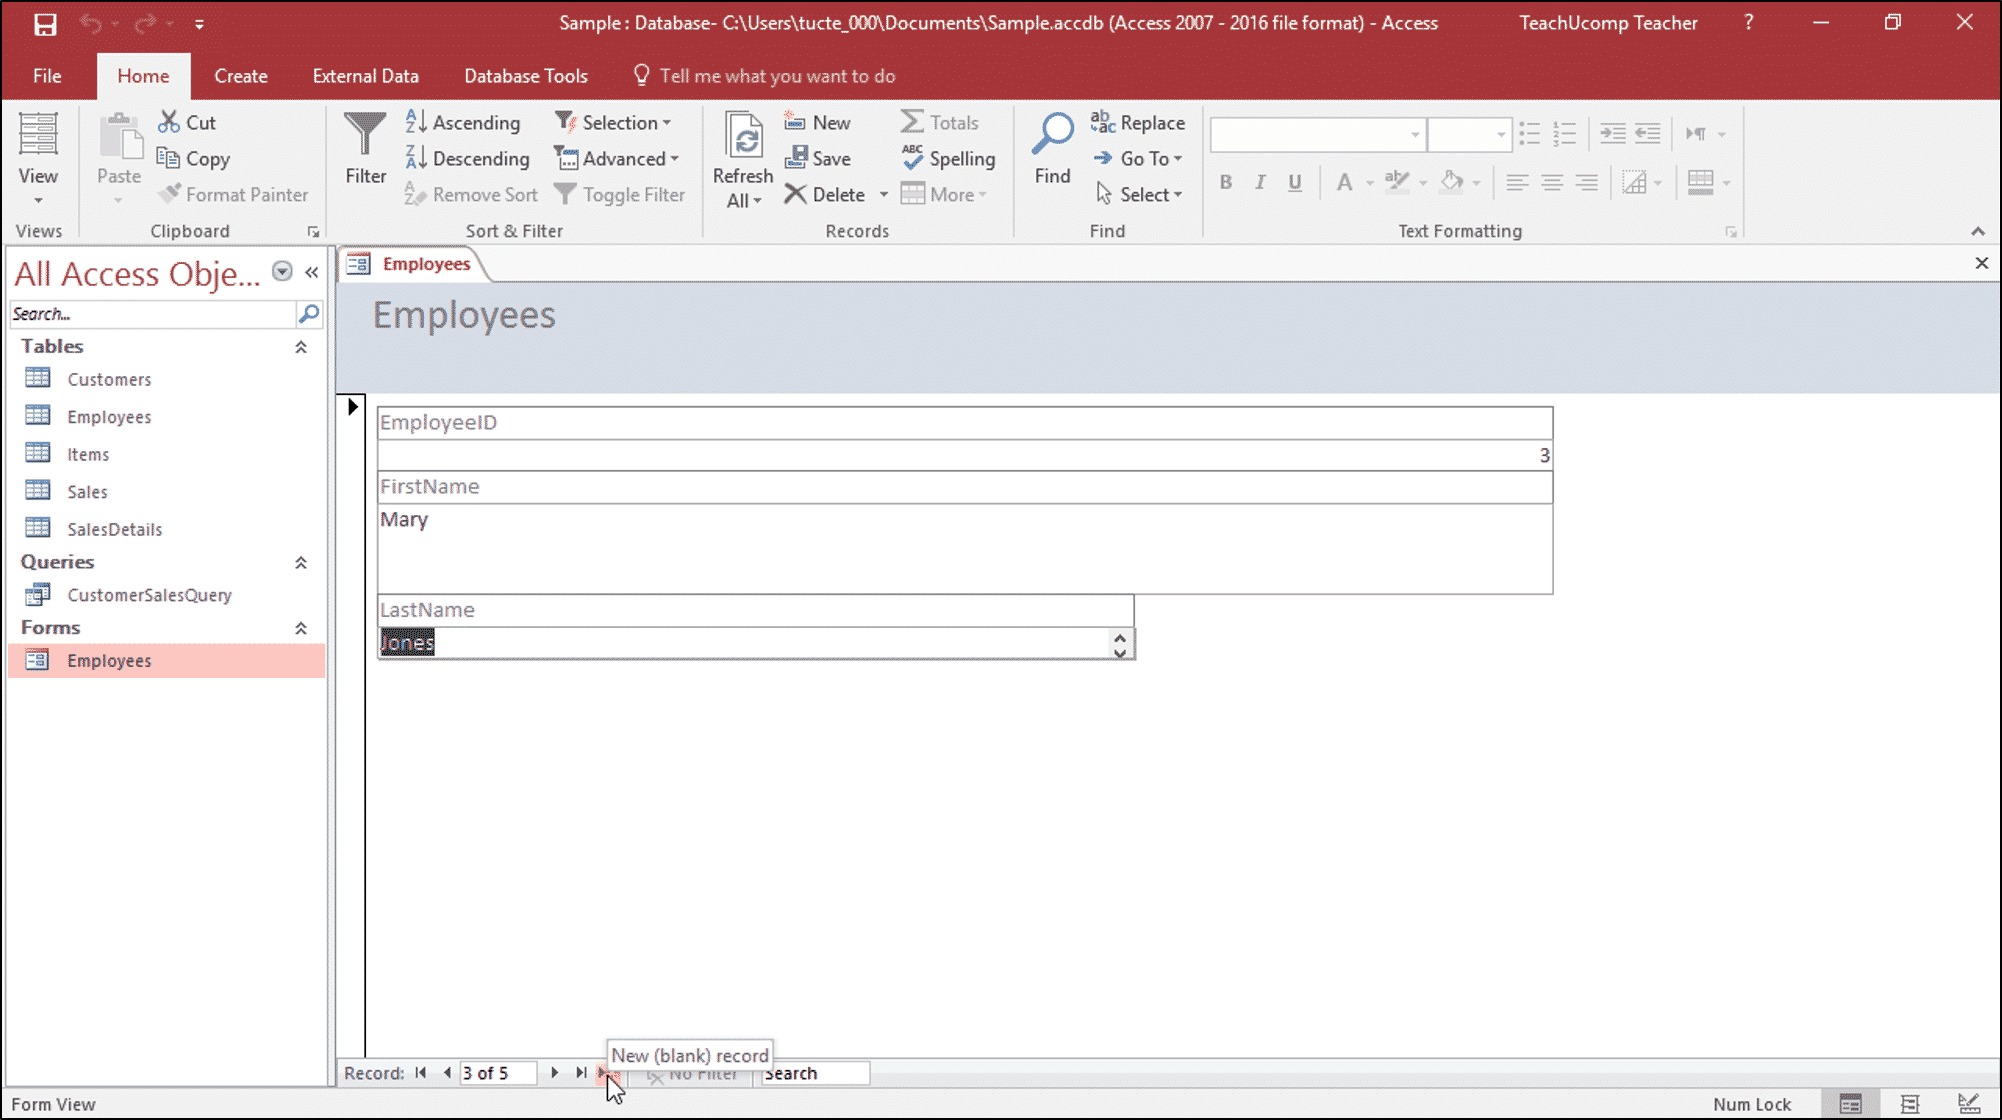
3. Select the Navigation Control: From the Control Toolbox, choose the appropriate navigation control for your needs. Common navigation controls include buttons for moving to the first record, previous record, next record, and last record. You can also include additional buttons for new record creation, saving changes, or deleting records.
4. Position the Navigation Buttons: Click on the desired location on the form where you want to add the navigation buttons. Typically, these buttons are placed in the header or footer section of the form for easy access. Arrange the buttons in a logical order that follows the typical navigation flow.
5. Customize the Button Properties: With the navigation buttons selected, you can customize their appearance and behavior by adjusting properties such as captions, fonts, colors, and sizes. Access the “Property Sheet” by right-clicking on a button and selecting “Properties.”
6. Assign Macro or VBA Code: To define the functionality of each navigation button, you need to assign macros or VBA code. Right-click on a button, select “Build Event,” and choose either “Macro Builder” or “Code Builder.” In the builder window, create the desired actions for each button, such as moving to the previous or next record.
7. Test the Form: Switch to the Form View to test the form’s functionality. Interact with the navigation buttons and verify that they navigate through the records as expected. Make any necessary adjustments to the button properties or assigned macros based on the testing results.
8. Add Visual Cues: Consider adding visual cues such as tooltips or icons to enhance the usability of the navigation buttons. Tooltips can provide additional information or hints about the functionality of each button, while icons can intuitively indicate their purpose.
By adding navigation buttons to an Access input form, you make it easier for users to navigate through records, saving them time and effort. This improves the efficiency and user experience when working with large datasets. Additionally, incorporating visual cues aids in the discoverability and usability of these navigation buttons.
Modifying Data in an Access Input Form
An Access input form not only allows users to enter new data but also provides the capability to modify existing data within the database. In this section, we will explore how to modify data in an Access input form and the steps involved in the process.
1. Open the Form in Form View: To begin modifying data, open the Access input form in Form View. Select the form from the Navigation Pane, and click on the “Form View” button to switch to the Form View mode.
2. Navigate to the Record to Modify: Use the navigation buttons or search functionality within the form to locate the specific record that you want to modify. Move to the desired record by clicking the appropriate navigation buttons or using the lookup or search features.
3. Edit Data in the Form: Once you have navigated to the record to modify, directly edit the data within the form. Click on the field you want to modify and make the necessary changes. You can use the keyboard or mouse to update the values in the fields.
4. Save the Changes: After modifying the data, save the changes to update the corresponding record in the database. In most Access input forms, clicking the save button or navigating to a different record triggers the automatic saving of changes. Alternatively, you can use the Ctrl+S keyboard shortcut to save the changes.
5. Undo Changes: If you realize that the modifications made are incorrect or need to be reverted, you can use the Undo feature. The Undo command, typically accessed through the Ctrl+Z keyboard shortcut or the Undo button, will revert the last change made to the data.
6. Validate the Data: As modifications are made, ensure that the changed data adheres to any validation rules established in the form. Validate the modified data against any specified criteria or constraints to ensure its accuracy and integrity within the database.
7. Test and Review the Modifications: After saving the modifications, test and review the updated record to verify that the changes have been applied correctly. Navigate through the records and review the modified data to ensure it is accurate and consistent with the intended changes.
8. Document the Modifications: It is important to keep track of the modifications made to the data within an Access input form. Documenting the changes, including the date, time, and the user who performed the modifications, can be useful for audit purposes or troubleshooting data inconsistencies.
By following these steps, you can effectively modify data within an Access input form. This allows for easy updating and editing of records, providing users with a seamless and efficient data modification experience.
Searching and Filtering Data in an Access Input Form
In an Access input form, searching and filtering functionality allows users to locate specific records or narrow down the dataset based on specific criteria. This capability enhances usability and productivity when working with large amounts of data. In this section, we will explore how to search and filter data in an Access input form and the benefits it provides.
1. Search Functionality: Access input forms often include a search feature that allows users to find specific records based on search keywords or criteria. The search functionality can be implemented using a text box where users can enter search terms, and the form filters the records to display only those that match the search criteria.
2. Filtering Options: Access input forms provide options to filter data based on specific criteria, allowing users to narrow down the dataset and focus on relevant records. Filtering can be performed on single or multiple fields, and conditions can be applied to specify the exact values or ranges to be included in the filtered results.
3. Search and Filter Controls: Including search and filter controls in the form interface makes it easily accessible to users. These controls can take the form of buttons, dropdown lists, or checkboxes, depending on the design and functionality requirements. Users can interact with these controls to initiate searches or apply filters to the data.
4. Designing User-Friendly Search Fields: When designing search fields, consider using clear labels and placeholders to guide users in providing appropriate search terms. Utilize input masks or validation rules to enforce the correct format or type of search input. Consider providing search suggestions or auto-complete functionality to assist users in finding relevant records.
5. Advanced Search Options: Advanced search options allow users to specify complex search criteria by combining multiple fields or using logical operators. This allows for more flexible and precise searches, empowering users to retrieve specific subsets of data based on their requirements.
6. Instant Search Results: Implementing instant search results or live filtering allows users to see the updated results as they type the search terms or apply filters. This enhances the user experience by providing immediate feedback and reducing the wait time for obtaining the desired information.
7. Clearing Filters: Provide an option for users to easily clear the applied filters or search terms, returning to the full dataset view. This helps users reset the form and start a new search or filter operation without having to navigate to a new record or close and reopen the form.
8. Test and Refine: Thoroughly test the search and filtering functionality in the form. Verify that the searches produce accurate results and that the filters effectively narrow down the dataset as intended. Make any necessary refinements to improve the accuracy and efficiency of the search and filtering features.
By incorporating search and filtering functionality into an Access input form, users can quickly locate specific records or narrow down the dataset based on their criteria. This improves productivity and usability by reducing the time and effort required to find and analyze the desired information.
Printing and Exporting Data from an Access Input Form
Printing and exporting data from an Access input form is a valuable feature that allows users to generate physical copies or digital versions of the form data. In this section, we will explore how to print and export data from an Access input form and the benefits it offers.
1. Printing the Form: To print the form, open the Access input form in Form View and click on the “Print” button or go to the “File” tab and select the “Print” option. This allows users to generate a physical copy of the form, which can be useful for documentation, record keeping, or sharing information offline.
2. Print Options: Access provides various printing options to cater to individual needs. Users can choose to print the current record, selected records, or all records in the form. Additionally, they can customize the page orientation, paper size, margins, and other printing settings as per their requirements.
3. Exporting the Form Data: Access allows users to export the data from an input form to different file formats such as Excel, CSV, PDF, or Word. This provides flexibility in sharing or further analyzing the data outside of Access. Users can choose the desired export format and specify the file path and name for the exported file.
4. Export Options: Access provides various export options to customize the exported data. Users can choose to export all records or a selected subset of records. Additionally, they can select specific fields to export or apply filters to export only the subset of data that meets specific criteria.
5. Formatting Considerations: When printing or exporting data, it is essential to consider formatting. Access allows for the customization of the appearance and layout of the printed or exported data, including font styles, colors, column widths, and more. User-friendly formatting ensures that the information is presented in a clear and organized manner.
6. Print Preview: Access provides a print preview feature that allows users to see how the form will appear when printed. This enables users to review the layout and formatting, make any necessary adjustments, and eliminate any potential printing errors before actually printing the form.
7. Exporting Reports: In addition to printing and exporting the form data directly, Access allows users to create customized reports to present the data in a more organized and professional manner. Reports offer extensive formatting and grouping options, making them ideal for creating professional-looking documents with data from the input form.
8. Test and Refine: Before printing or exporting the form data, thoroughly test the printing and export features to ensure that the generated output matches the intended format and includes the desired data. Make any necessary refinements and adjustments to improve the accuracy and effectiveness of the print and export functionality.
By enabling users to print and export data from an Access input form, Access provides the flexibility to share, present, and analyze form data in various formats. This enhances data accessibility and usability, allowing users to work with the form data both digitally and in a physical format as needed.