
Tools and Materials Needed
Before embarking on the process of removing wires from a connector, it’s essential to gather the necessary tools and materials to ensure a smooth and efficient procedure. Here’s a comprehensive list of items you’ll need:
- Wire removal tool: This specialized tool is crucial for safely extracting wires from connectors without causing damage.
- Small flathead screwdriver: Useful for releasing the retaining clips on certain types of connectors.
- Needle nose pliers: These are handy for manipulating wire terminals and providing a firm grip during the removal process.
- Clean cloth or compressed air: These are essential for cleaning the connector and wire terminals, ensuring a secure connection upon reassembly.
- Electrical contact cleaner: A specialized cleaner designed to remove dirt, debris, and oxidation from connectors, promoting optimal conductivity.
- Connector identification chart or guide: Particularly useful for identifying the specific type of connector and understanding its unique removal process.
- Workspace illumination: Adequate lighting is crucial for inspecting and working on the connector effectively.
- Safety gloves and goggles: To protect your hands and eyes from any potential hazards during the removal and cleaning process.
By ensuring you have these tools and materials at your disposal, you’ll be well-prepared to tackle the task of removing wires from a connector with confidence and precision.
Identify the Connector Type
Before delving into the process of removing wires from a connector, it’s crucial to accurately identify the specific type of connector you’re dealing with. Connectors come in various designs, each with its unique method of securing and releasing wires. Here’s a step-by-step guide to help you identify the connector type:
- Visual Inspection: Begin by visually examining the connector. Take note of its shape, size, and any distinguishing features or markings. Some connectors may have labels or embossed codes that indicate the manufacturer or part number, providing valuable information for identification.
- Consult Documentation: If available, refer to any equipment or vehicle documentation that details the wiring and connector types used. Schematics, service manuals, or wiring diagrams can be invaluable resources for identifying connectors and understanding their configurations.
- Online Resources: Utilize online databases, forums, or manufacturer websites that offer connector identification tools or resources. Many automotive and electronic component manufacturers provide detailed information about their connectors, aiding in accurate identification.
- Connector Identification Guides: Some specialized tools and guides are designed to assist in identifying connectors. These resources often feature visual references, dimensions, and key identifying factors to determine the specific connector type.
By meticulously examining the connector, consulting available documentation, leveraging online resources, and utilizing specialized identification guides, you can confidently determine the precise type of connector you’re working with. This critical initial step sets the foundation for successfully removing wires without causing damage to the connector or terminals.
Remove the Connector Retaining Clip
Once you’ve identified the type of connector, the next step is to remove the retaining clip, if present. The retaining clip secures the connector in place and prevents accidental disconnection. Here’s a detailed guide on how to remove the connector retaining clip:
- Locate the Retaining Clip: Inspect the connector to identify the location of the retaining clip. It may be situated on the side, top, or bottom of the connector housing, depending on the design.
- Use the Appropriate Tool: Select the suitable tool for releasing the retaining clip. In some cases, a small flathead screwdriver or a specialized release tool designed for the specific connector type may be required.
- Apply Gentle Pressure: With the tool in hand, carefully apply gentle pressure to the retaining clip, following the designated release direction. Some clips may require pushing, pulling, or sliding motions to disengage.
- Observe for Movement: As you exert pressure on the retaining clip, observe the connector for any signs of movement or loosening. A successful release will allow the connector to be separated from its mating half.
- Exercise Caution: While releasing the retaining clip, exercise caution to avoid excessive force that could damage the clip or the connector housing. Patience and precision are key to executing this step effectively.
By methodically locating the retaining clip, using the appropriate tool, applying gentle pressure, observing for movement, and exercising caution throughout the process, you can successfully remove the connector retaining clip, paving the way for the subsequent steps in the wire removal process.
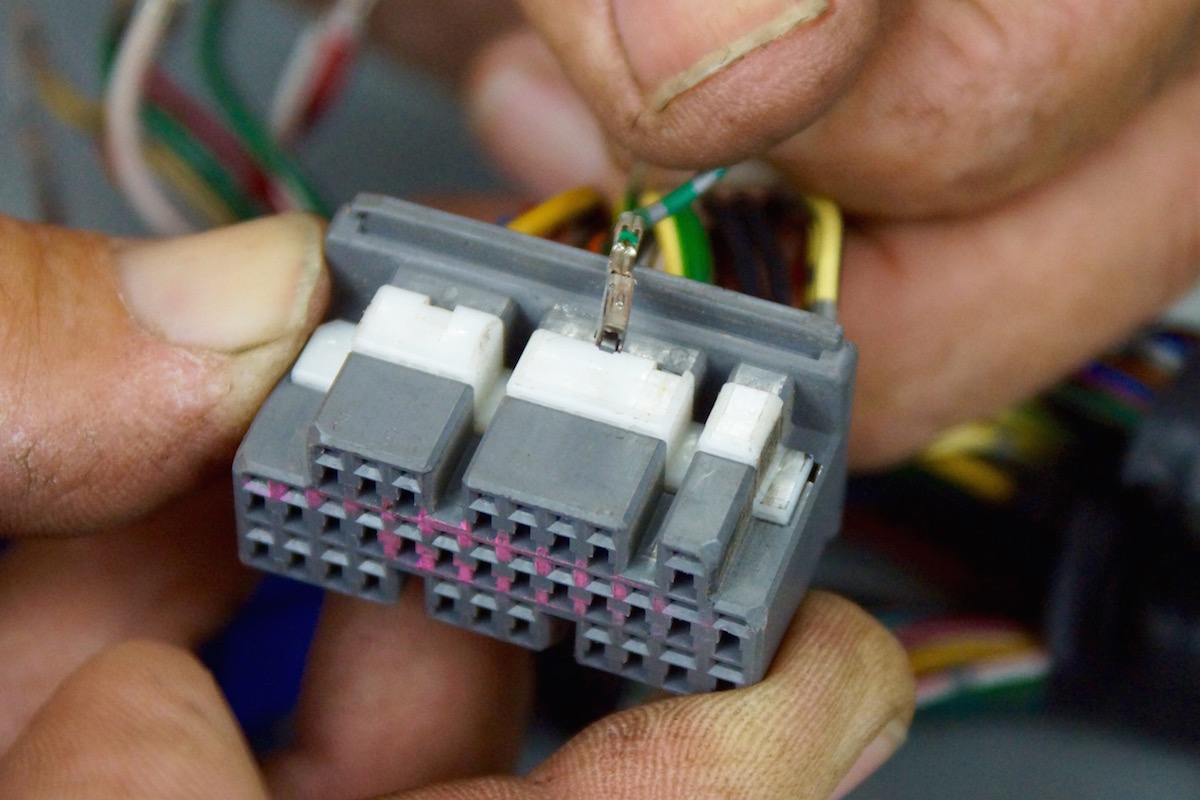
Release the Wire Terminal
After removing the connector retaining clip, the next crucial step in the process of removing wires from a connector is releasing the wire terminal. Wire terminals are securely housed within the connector and must be carefully disengaged to avoid damaging the terminal or the wire. Here’s a detailed guide on how to release the wire terminal:
- Identify the Terminal Retention Mechanism: Examine the connector to identify the specific type of terminal retention mechanism employed. Common mechanisms include locking tabs, latches, or secondary locking devices.
- Refer to Manufacturer Documentation: If available, refer to the manufacturer’s documentation or connector specifications to understand the terminal release method recommended for the particular connector type.
- Utilize the Appropriate Tool: Select the suitable tool for releasing the wire terminal based on the identified retention mechanism. Specialized terminal release tools or precision screwdrivers may be required for this step.
- Engage the Release Mechanism: With the chosen tool, carefully engage the terminal release mechanism as per the manufacturer’s guidelines. This may involve pressing a tab, lifting a latch, or manipulating the secondary locking feature.
- Apply Even Pressure: As you engage the release mechanism, apply even pressure to ensure a smooth disengagement of the wire terminal. Avoid sudden or excessive force that could cause damage to the terminal or connector.
- Verify Terminal Release: Once the release mechanism is engaged, verify that the wire terminal is free to move within the connector housing. Gently tug on the wire to confirm that the terminal is no longer securely locked in place.
By meticulously identifying the terminal retention mechanism, referring to manufacturer documentation, utilizing the appropriate tool, engaging the release mechanism, applying even pressure, and verifying the terminal release, you can successfully release the wire terminal from the connector without compromising its integrity.
Remove the Wire from the Connector
With the wire terminal successfully released, the next step in the process of removing wires from a connector involves extracting the wire from its housing. It’s essential to perform this step with precision to avoid damaging the wire or the terminal. Here’s a detailed guide on how to remove the wire from the connector:
- Inspect the Wire Path: Carefully examine the pathway of the wire within the connector housing. Take note of any obstructions or retention features that may impede the smooth removal of the wire.
- Ensure Adequate Clearance: Confirm that there is sufficient clearance and space to maneuver the wire out of the connector without encountering resistance or causing strain on the terminal.
- Apply Gentle Traction: Grasp the wire close to the terminal with a firm yet gentle grip. Slowly and steadily apply traction to the wire, guiding it along the designated pathway within the connector.
- Observe for Snags or Resistance: As you pull the wire, pay close attention to any signs of snags, resistance, or binding within the connector. If you encounter any impediments, pause and reassess the wire’s path before proceeding.
- Utilize Lubrication if Necessary: In cases where the wire removal process encounters excessive resistance, applying a small amount of electrical contact lubricant or dielectric grease can facilitate smoother extraction without causing damage.
- Ensure Terminal Integrity: Throughout the wire removal process, ensure that the terminal remains securely attached to the wire and that no undue stress is exerted on the terminal’s crimped connection.
By methodically inspecting the wire path, ensuring adequate clearance, applying gentle traction, observing for snags or resistance, utilizing lubrication if necessary, and ensuring the integrity of the terminal, you can safely and effectively remove the wire from the connector without compromising its functionality or the terminal’s structural integrity.
Inspect and Clean the Connector
Following the removal of the wire from the connector, it’s crucial to meticulously inspect and clean the connector to ensure optimal performance and future reusability. This step involves assessing the connector for any signs of damage, corrosion, or debris accumulation, and then performing a thorough cleaning process. Here’s a comprehensive guide on how to inspect and clean the connector:
- Visual Inspection: Carefully examine the interior of the connector housing for any visible damage, such as bent terminals, corrosion, or foreign particles that may impede proper functionality.
- Check Terminal Alignment: Ensure that the terminals within the connector are correctly aligned and not bent or misshapen, as this can affect the integrity of future connections.
- Inspect for Corrosion: Look for any signs of corrosion or oxidation on the terminals and within the connector housing. Corrosion can hinder electrical conductivity and must be addressed during the cleaning process.
- Remove Debris: Use compressed air or a clean, dry cloth to gently remove any loose debris, dirt, or foreign particles from the interior of the connector. Exercise caution to avoid pushing debris further into the connector.
- Utilize Electrical Contact Cleaner: Apply a specialized electrical contact cleaner to the terminals and the interior of the connector housing. This cleaner effectively dissolves and removes oxidation, dirt, and other contaminants without leaving residue.
- Gently Agitate and Dry: After applying the contact cleaner, gently agitate the connector to ensure thorough cleaning. Allow the connector to air dry completely before proceeding with reassembly.
By diligently performing a visual inspection, checking terminal alignment, inspecting for corrosion, removing debris, utilizing electrical contact cleaner, and ensuring thorough drying, you can effectively inspect and clean the connector, restoring it to optimal condition for future use.
Reassemble the Connector
After completing the inspection and cleaning process, reassembling the connector is the final step in the wire removal and maintenance procedure. Proper reassembly is essential to ensure secure connections and reliable performance. Here’s a detailed guide on how to reassemble the connector:
- Verify Terminal Orientation: Before reinserting the wire, ensure that the terminal is oriented correctly to align with the connector’s terminal cavity. Proper alignment prevents damage to the terminal and facilitates a smooth reinsertion process.
- Insert the Wire: Carefully guide the wire back into the connector, following the original pathway and taking care to avoid bending or stressing the wire during insertion.
- Engage the Terminal: Once the wire is inserted, engage the terminal by applying gentle pressure to ensure it is securely seated within the connector housing. Listen for a distinct click or feel for a positive connection to confirm proper engagement.
- Reinstall the Retaining Clip: If the connector features a retaining clip, reposition and secure it back into place, ensuring that it fully locks the connector to prevent unintended disconnection.
- Perform a Functionality Test: After reassembly, perform a functionality test by gently tugging on the wire to ensure it is securely held in place. Additionally, verify that the connector is firmly seated and latched to its mating half.
- Apply Dielectric Grease (Optional): For added protection against moisture and corrosion, a thin layer of dielectric grease can be applied to the terminal and connector mating surfaces before final reassembly.
By meticulously verifying terminal orientation, inserting the wire carefully, engaging the terminal securely, reinstalling the retaining clip, performing a functionality test, and optionally applying dielectric grease, you can successfully reassemble the connector, ensuring a reliable and durable connection for the wire.