
Choosing the Right Tools
Before diving into the disassembly process, it's crucial to gather the necessary tools to ensure a smooth and efficient experience. Here's a list of essential tools you'll need:
1. Precision Screwdriver Set
A precision screwdriver set is indispensable for removing the tiny screws that hold the headset together. Look for a set that includes various Phillips and flathead screwdriver sizes to accommodate the different screw types commonly found in electronic devices.
2. Plastic Opening Tools
To prevent damage to the delicate plastic components of the headset, plastic opening tools are essential. These tools help pry open the casing without leaving scratches or marks, ensuring that the headset maintains its aesthetic appeal even after disassembly.
3. Tweezers
Tweezers come in handy for handling small components and wires with precision. When disconnecting wires or removing intricate parts, tweezers provide the dexterity needed to navigate the internal components without causing any accidental damage.
4. Anti-Static Wrist Strap
When working with electronic devices, it's crucial to prevent static electricity from damaging sensitive components. An anti-static wrist strap helps dissipate any static charge from your body, safeguarding the headset from potential harm during the disassembly process.
5. Workspace Mat
Lay down a workspace mat to provide a soft and clean surface for disassembling the headset. This helps prevent any small screws or components from rolling away and getting lost, ensuring that you can easily keep track of all the parts during the disassembly process.
6. Small Containers
Using small containers or compartments to organize the screws and components as you disassemble the headset is essential for keeping everything in order. Labeling the containers can further streamline the reassembly process, ensuring that you can easily identify which screws and components belong to each specific part of the headset.
By assembling these tools, you'll be well-equipped to embark on the disassembly journey and gain a deeper understanding of the internal workings of your Turtle Beach headset. With the right tools at your disposal, you can confidently proceed to the next steps of this rewarding process.
Removing the Ear Cushions
As you begin the disassembly process of your Turtle Beach headset, the first step is to carefully remove the ear cushions. This step sets the stage for accessing the internal components of the headset. Follow these steps to successfully remove the ear cushions:
1. Gently Pry the Ear Cushions
Using your plastic opening tools, carefully insert the edge between the ear cushion and the outer casing of the ear cup. Apply gentle pressure to pry the cushion away from the casing, ensuring that you do not use excessive force to avoid damaging the cushion or the headset.
2. Work Around the Cushion
Once you have successfully loosened a section of the ear cushion, continue to work your way around the perimeter, gradually detaching the cushion from the ear cup. Take your time and exercise patience to avoid any tearing or deformation of the cushion material.
3. Remove the Cushion
After working around the entire circumference of the ear cushion, carefully lift it away from the ear cup, taking note of any clips or attachment points that may require gentle manipulation to release the cushion completely. Ensure that you set the cushions aside in a safe place to prevent any damage during the remainder of the disassembly process.
By delicately removing the ear cushions, you have successfully completed the initial step in disassembling your Turtle Beach headset. This paves the way for accessing the internal components and gaining a comprehensive understanding of the headset’s intricate design and construction.
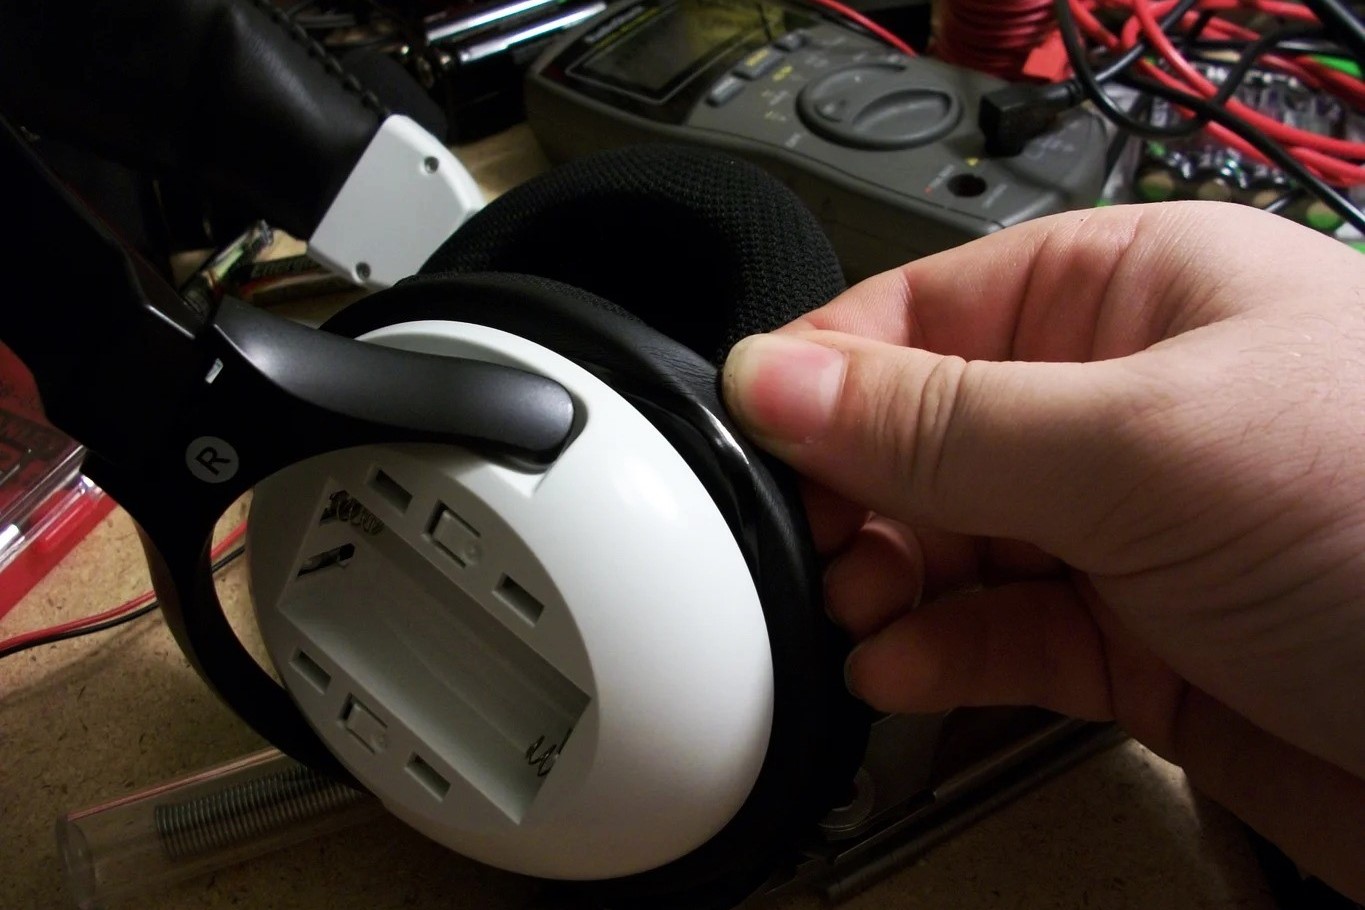
Unscrewing the Speaker Plates
After removing the ear cushions, the next step in disassembling your Turtle Beach headset involves unscrewing the speaker plates. This process grants access to the speaker drivers and other internal components. Here’s a detailed guide on how to accomplish this step:
1. Identify the Screws
Inspect the outer perimeter of the speaker plates to locate the screws holding them in place. Depending on the model of your Turtle Beach headset, there may be multiple screws securing each speaker plate to the ear cups. Use a precision screwdriver from your set that fits the screw heads snugly to ensure proper removal without causing damage.
2. Loosen the Screws
Using the appropriate screwdriver, gently loosen and remove the screws from each speaker plate. Keep the screws organized in a small container to prevent misplacement and facilitate easy retrieval during the reassembly phase. Exercise caution to avoid stripping the screw heads, as this could complicate the reassembly process.
3. Carefully Remove the Speaker Plates
Once all the screws have been removed, carefully lift the speaker plates away from the ear cups. Take note of any clips or additional fasteners that may require disengagement before the plates can be fully detached. Handle the plates with care to prevent any damage to the speaker drivers or the wiring connected to them.
4. Set Aside the Speaker Plates
Place the speaker plates in a secure location, ensuring that they are protected from any potential damage during the remainder of the disassembly process. This step sets the stage for accessing the internal components of the headset, allowing for a closer examination of the speaker drivers and their placement within the ear cups.
By successfully unscrewing and removing the speaker plates, you have advanced further into the disassembly process, gaining a deeper insight into the intricate construction of your Turtle Beach headset.
Disconnecting the Wires
As you progress with disassembling your Turtle Beach headset, the next crucial step involves disconnecting the wires that interconnect the various components. This process is essential for gaining access to the internal circuitry and individual elements of the headset. Here’s a detailed guide on how to disconnect the wires:
1. Identify the Wire Connections
Survey the internal components of the headset to locate the wire connections. These connections may include those between the speakers and the main circuit board, as well as the wiring for the microphone and any additional features specific to your headset model. Take note of the placement and orientation of the wires to ensure accurate reconnection during the assembly phase.
2. Carefully Unplug the Connectors
Using your fingers or tweezers for precision, gently unplug the wire connectors from their respective ports. Exercise caution to avoid applying excessive force or pulling on the wires directly, as this could lead to damage or dislodging of the connectors. Take your time to ensure that each connector is detached smoothly and without any strain on the wires.
3. Inspect for Securing Mechanisms
Some wire connectors may feature securing mechanisms such as clips or tabs that need to be disengaged before the connectors can be unplugged. Carefully inspect each connector for any such mechanisms and release them as needed to facilitate the disconnection process. Adhering to this step ensures that the wires can be safely unplugged without causing any damage to the connectors or the internal components.
4. Organize and Secure the Wires
Once the wires are disconnected, take care to organize and secure them to prevent tangling or accidental damage. Using small containers or cable ties can help keep the wires neatly arranged and easily identifiable for reconnection during the assembly phase. Properly securing the wires at this stage streamlines the reassembly process and minimizes the risk of errors during reconstruction.
By meticulously disconnecting the wires, you have successfully cleared the pathway for a detailed examination of the internal components of your Turtle Beach headset, setting the stage for a comprehensive disassembly process.
Removing the Headband and Inner Frame
As you delve deeper into the disassembly of your Turtle Beach headset, the next critical step involves removing the headband and inner frame. This process allows for a closer inspection of the structural components and paves the way for accessing the internal circuitry and drivers. Here’s a detailed guide on how to accomplish this step:
1. Locate the Attachment Points
Examine the points where the headband and inner frame connect to the ear cups and the main structure of the headset. Depending on the model of your Turtle Beach headset, there may be screws, clips, or other fastening mechanisms securing these components in place. Identify and take note of these attachment points before proceeding with the removal process.
2. Unscrew or Disengage Fasteners
Using the appropriate tools from your precision screwdriver set, carefully unscrew any fasteners that secure the headband and inner frame to the main structure of the headset. Exercise caution to avoid stripping the screw heads and ensure that the screws are kept organized for easy retrieval during the reassembly phase. If the components are held in place by clips or other fasteners, gently disengage them to facilitate removal.
3. Lift Away the Headband and Inner Frame
Once the fasteners or attachment points have been addressed, carefully lift the headband and inner frame away from the main structure of the headset. Pay attention to any additional wires or cables that may be routed through the headband or inner frame, ensuring that they are safely disconnected to prevent any strain or damage during the removal process.
4. Secure the Components
After removal, set the headband and inner frame aside in a secure location, safeguarding them from any potential damage. This step opens up a clear view of the internal layout of the headset, allowing for a comprehensive examination of the structural elements and providing insights into the design and assembly of the Turtle Beach headset.
By successfully removing the headband and inner frame, you have advanced further into the disassembly process, gaining a deeper understanding of the intricate construction and layout of your Turtle Beach headset.
Detaching the Microphone
As you continue the disassembly of your Turtle Beach headset, the next significant step involves detaching the microphone. This process allows for a closer examination of the microphone’s components and the associated wiring, providing insights into its functionality and integration within the headset. Here’s a detailed guide on how to accomplish this step:
1. Identify the Microphone Connection
Locate the point where the microphone is connected to the headset. Depending on the model of your Turtle Beach headset, the microphone may be detachable or integrated into the headset’s design. Identify the specific connection point, which may involve a plug, connector, or wiring that links the microphone to the main circuitry.
2. Gently Unplug or Disconnect the Microphone
If the microphone is detachable, carefully unplug it from its port or connector. Exercise caution to avoid applying excessive force or causing any strain on the connection points. If the microphone is integrated, locate the point where the internal wiring connects to the main circuit board and proceed with the disconnection process, ensuring that the wiring is handled delicately to prevent any damage.
3. Inspect the Microphone Components
After detaching the microphone, take the opportunity to inspect its components, including the microphone capsule, wiring, and any associated mechanisms. This close examination provides valuable insights into the construction and design of the microphone, enhancing your understanding of its role within the headset and the technology behind its functionality.
4. Secure the Detached Microphone
Once the microphone is detached and inspected, ensure that it is secured in a safe location to prevent any damage during the remainder of the disassembly process. Proper handling and storage of the microphone components contribute to a seamless reassembly phase and maintain the integrity of the headset’s components for future use.
By successfully detaching the microphone, you have gained a deeper understanding of this integral component of your Turtle Beach headset, setting the stage for a comprehensive exploration of its internal workings and design.
Reassembling the Headset
After successfully disassembling your Turtle Beach headset and gaining valuable insights into its internal components and construction, the reassembly process is a critical step to restore the headset to its fully functional state. Follow these steps to methodically reassemble the headset:
1. Organize the Components
Before commencing the reassembly, ensure that all the disassembled components, including screws, wires, and small parts, are organized and easily accessible. Use small containers or compartments to categorize the components based on their respective sections of the headset, facilitating a systematic reassembly process.
2. Follow a Reverse Sequence
Refer to any documentation or notes you may have taken during the disassembly process to guide the reassembly. Work in a reverse sequence, starting with the last components removed and progressing towards the initial components, ensuring that each step is executed with precision and attention to detail.
3. Secure Fasteners and Connectors
As you reattach the various components, such as the headband, inner frame, speaker plates, and ear cushions, ensure that all fasteners, screws, and connectors are securely fastened. Exercise caution to avoid overtightening screws and pay attention to the alignment of components to maintain the headset’s structural integrity.
4. Route and Connect Wires
Carefully route and reconnect the wires, ensuring that each connector is securely plugged in its respective port. Take note of the orientation and placement of the wires to avoid any entanglement or strain that could affect the headset’s functionality. Adhering to the original wire routing and connections is crucial for the proper functioning of the headset.
5. Test Functionality
Once the reassembly is complete, perform a thorough functionality test to ensure that all components are properly reconnected and that the headset operates as intended. Test the audio output, microphone functionality, and any additional features to verify that the reassembly has been executed accurately.
By meticulously reassembling your Turtle Beach headset, you have not only restored it to its original state but also honed your understanding of its internal architecture and assembly. This hands-on experience provides valuable insights into the intricate design and functionality of the headset, enriching your overall knowledge of electronic devices.