
Understanding the Connector and Pin Types
Connectors are essential components in various electronic devices and systems, serving as the interface that facilitates the transfer of signals and power between different parts. These connectors often contain multiple pins, each responsible for carrying specific signals or power to ensure proper functionality. Understanding the types of connectors and pins is crucial before attempting to remove them.
Connector Types
Connectors come in diverse forms, ranging from simple two-pin connectors to complex multi-pin connectors used in industries such as aerospace and automotive. They can be categorized based on their form factor, such as circular, rectangular, or D-shaped connectors, and the number of pins they contain. Additionally, connectors can be classified according to their specific applications, such as power connectors, data connectors, and audio connectors.
Pin Types
Pins within connectors serve various purposes, including transmitting power, data, and signals. They can differ in size, shape, and configuration, depending on the connector's function and design. Common pin types include male and female pins, straight and right-angled pins, crimp pins, and solder pins. Understanding the specific type of pin within a connector is crucial for successful removal without causing damage.
Importance of Identification
Before embarking on the pin removal process, it is vital to identify the specific connector and pin types involved. This identification ensures the use of the appropriate tools and techniques, minimizing the risk of damage to the connector or surrounding components. Furthermore, understanding the pin types enables the removal process to be executed with precision, reducing the likelihood of errors and complications.
Understanding the connector and pin types is the foundational step in successfully removing pins from a connector. By familiarizing oneself with the diverse connector and pin configurations, individuals can proceed with confidence and accuracy in the subsequent stages of pin removal.
Gathering the Necessary Tools and Materials
Before initiating the pin removal process, it is essential to gather the appropriate tools and materials to ensure a smooth and successful procedure. The following items are crucial for effectively removing pins from a connector:
Pin Extraction Tool
A pin extraction tool is specifically designed for safely removing pins from connectors without causing damage. These tools come in various sizes and configurations to accommodate different types of connectors and pins. It is imperative to select a pin extraction tool that matches the specific connector and pin types being worked on, ensuring precise and efficient pin removal.
Small Flathead Screwdriver
In the absence of a pin extraction tool, a small flathead screwdriver can serve as an alternative for removing pins from certain types of connectors. Care must be taken to use the screwdriver gently and precisely to avoid damaging the connector or adjacent pins during the removal process.
Precision Needle-Nose Pliers
Precision needle-nose pliers are valuable for extracting pins from connectors, particularly in situations where a pin extraction tool or screwdriver may not be suitable. These pliers enable a controlled grip and delicate handling, minimizing the risk of slippage and damage to the connector.
Additional Materials
Other materials that may be necessary include a magnifying glass or a well-lit magnifying lamp to aid in the visual inspection of the connector and pins. Additionally, a clean workspace with ample lighting is essential for performing the pin removal process with accuracy and precision.
Gathering the necessary tools and materials is a critical preparatory step before embarking on the pin removal process. By ensuring the availability of the appropriate tools and a conducive working environment, individuals can proceed with confidence and efficiency in the subsequent stages of pin removal.
Identifying the Pins to be Removed
Prior to removing pins from a connector, it is essential to accurately identify the specific pins that require extraction. This process involves careful examination and assessment to determine the targeted pins for removal.
Visual Inspection
Begin by visually inspecting the connector and its pins to identify any damaged or malfunctioning pins that may need to be replaced or removed. Look for pins that exhibit signs of physical damage, corrosion, or improper alignment, as these may indicate the need for extraction.
Consulting Schematics or Documentation
If available, refer to any schematics, technical documentation, or pinout diagrams associated with the connector. These resources can provide valuable insights into the function and configuration of each pin, aiding in the identification of the pins requiring removal. Additionally, documentation may highlight specific pins designated for certain functions, further guiding the identification process.
Testing for Faulty Pins
Utilize appropriate testing equipment, such as a multimeter, to conduct continuity tests or voltage measurements on the pins. This can help pinpoint pins that are not functioning as intended or are causing electrical issues within the system. Faulty pins identified through testing may need to be removed and replaced to restore proper functionality to the connector.
Marking the Targeted Pins
Once the pins requiring removal have been identified, consider marking them using a non-permanent method, such as colored tape or a small adhesive label. This visual indication helps ensure that the correct pins are targeted during the removal process, minimizing the risk of inadvertently extracting the wrong pins.
Accurately identifying the pins to be removed is a crucial preliminary step in the pin removal process. By carefully assessing the condition of the pins, consulting relevant documentation, conducting tests, and marking the targeted pins, individuals can proceed with confidence and precision in the subsequent stages of pin extraction.
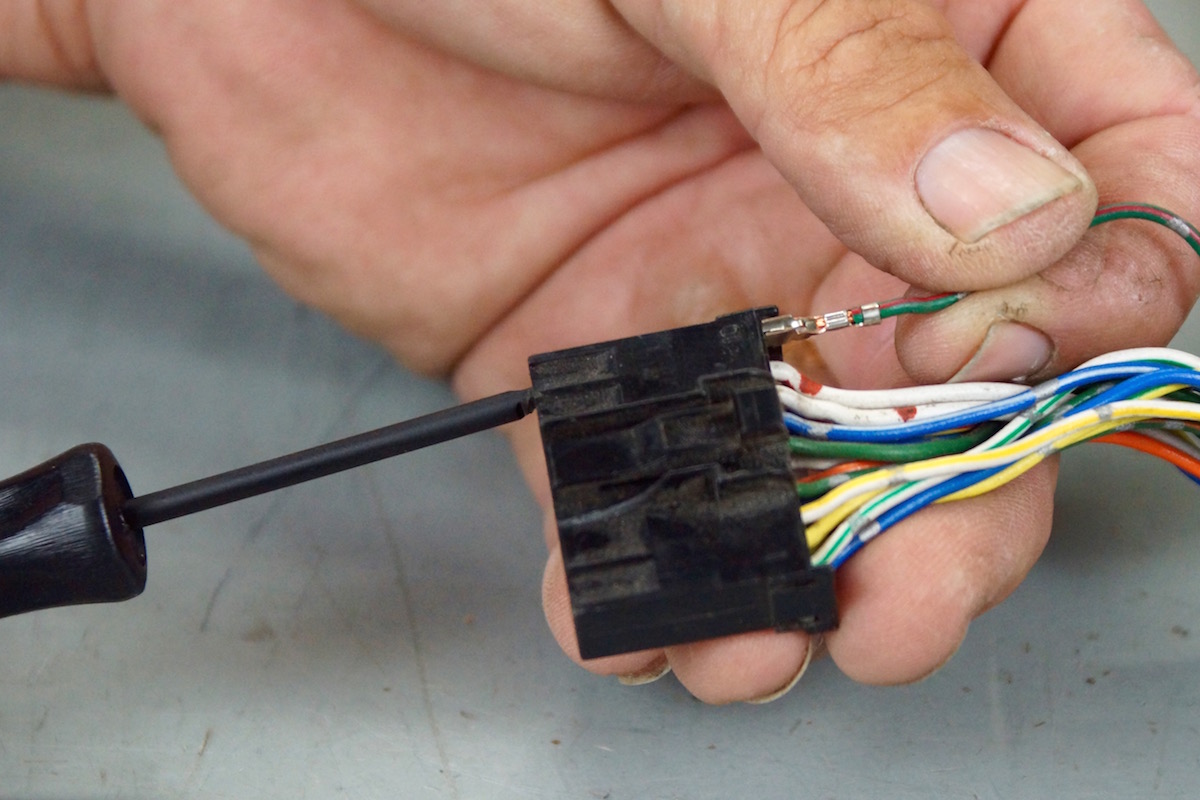
Removing the Pins Using a Pin Extraction Tool
A pin extraction tool is specifically designed to facilitate the safe and efficient removal of pins from connectors. When utilizing a pin extraction tool, the following step-by-step procedure can be employed to extract the targeted pins:
Step 1: Selecting the Appropriate Tool
Choose a pin extraction tool that matches the size and configuration of the pins to be removed. Different types of connectors and pins may require specific extraction tools, so ensure that the selected tool is compatible with the connector in question.
Step 2: Positioning the Tool
Insert the pin extraction tool into the connector, aligning it with the targeted pin. The tool should securely grasp the pin without exerting excessive force that could damage the surrounding pins or connector housing.
Step 3: Applying Pressure
Gently apply pressure to the extraction tool, ensuring that it securely engages with the pin. The tool is designed to release the retention mechanism of the pin, allowing for its safe removal without causing damage to the connector or adjacent components.
Step 4: Extracting the Pin
Once the retention mechanism is disengaged, carefully pull the pin extraction tool, along with the targeted pin, out of the connector. Exercise caution to maintain a steady and controlled motion, preventing any undue stress on the surrounding pins or the connector housing.
Step 5: Inspecting the Connector
After the pin has been extracted, visually inspect the connector to ensure that no damage has occurred during the removal process. Verify that the surrounding pins remain intact and undisturbed, and that the connector housing has not been compromised in any way.
Utilizing a pin extraction tool provides a methodical and reliable approach to removing pins from connectors. By carefully following the steps outlined above, individuals can safely and effectively extract targeted pins without compromising the integrity of the connector or its associated components.
Removing the Pins Using a Small Flathead Screwdriver
When a pin extraction tool is not available, a small flathead screwdriver can serve as an alternative for removing pins from certain types of connectors. The following step-by-step procedure outlines the process of using a small flathead screwdriver to extract targeted pins:
Step 1: Assessing Suitability
Ensure that the connector and pins are conducive to removal using a small flathead screwdriver. The design of the connector and the accessibility of the pins will determine the viability of this method. Exercise caution to avoid damaging the connector or adjacent pins during the removal process.
Step 2: Positioning the Screwdriver
Gently insert the tip of the small flathead screwdriver alongside the targeted pin, taking care not to exert excessive force. Position the screwdriver in such a way that it can engage with the retention mechanism of the pin without causing damage to the surrounding components.
Step 3: Applying Controlled Force
With precision and control, apply gentle force to the screwdriver to disengage the retention mechanism of the targeted pin. It is essential to exert pressure in a manner that allows for the safe release of the pin without causing unintended damage to the connector or adjacent pins.
Step 4: Extracting the Pin
Once the retention mechanism is disengaged, carefully maneuver the screwdriver to extract the targeted pin from the connector. Exercise caution to maintain a steady and controlled motion, ensuring that the pin is removed without causing any disturbance to the surrounding pins or the connector housing.
Step 5: Visual Inspection
After the pin has been extracted, visually inspect the connector to ensure that no damage has occurred during the removal process. Verify that the surrounding pins remain intact and undisturbed, and that the connector housing has not been compromised in any way.
When a pin extraction tool is unavailable, the use of a small flathead screwdriver provides an alternative method for removing pins from connectors. By following the outlined steps with precision and care, individuals can effectively extract targeted pins without compromising the integrity of the connector or its associated components.
Removing the Pins Using Precision Needle-Nose Pliers
Precision needle-nose pliers are valuable tools for extracting pins from connectors, particularly in situations where a pin extraction tool or screwdriver may not be suitable. The following step-by-step procedure outlines the process of using precision needle-nose pliers to remove targeted pins:
Step 1: Assessing Suitability
Evaluate the accessibility of the targeted pins within the connector to determine the feasibility of using precision needle-nose pliers for extraction. Ensure that the pliers can be maneuvered with precision and that the connector and surrounding components will not be compromised during the removal process.
Step 2: Grasping the Pin
Gently position the jaws of the precision needle-nose pliers around the targeted pin, ensuring a secure and controlled grip. It is crucial to grasp the pin without exerting excessive force that could lead to damage or misalignment of the connector and surrounding pins.
Step 3: Applying Even Pressure
With steady and even pressure, carefully pull the targeted pin using the precision needle-nose pliers. Exercise caution to maintain control and prevent any lateral movement that may affect the integrity of the surrounding pins or the connector housing.
Step 4: Verifying Successful Extraction
Once the pin has been extracted, visually inspect the connector to ensure that the removal process has not caused any damage. Verify that the surrounding pins remain undisturbed, and that the connector housing has not been compromised in any way.
Step 5: Releasing the Pin
If the connector features retention clips or mechanisms designed to secure the pins, ensure that these are properly disengaged to facilitate the smooth extraction of the pin. Carefully release any retention features before attempting to remove the pin with the precision needle-nose pliers.
Utilizing precision needle-nose pliers provides a methodical approach to removing pins from connectors, particularly in scenarios where other tools may not be suitable. By following the outlined steps with precision and care, individuals can effectively extract targeted pins without compromising the integrity of the connector or its associated components.
Reassembling the Connector After Pin Removal
Once the targeted pins have been successfully removed from the connector, the reassembly process is essential to ensure the integrity and functionality of the connector. The following steps outline the procedure for reassembling the connector after pin removal:
Step 1: Inspecting the Connector
Visually inspect the connector and its surrounding area to ensure that no damage has occurred during the pin removal process. Verify that the remaining pins are securely in place, and that the connector housing is free from any debris or damage that could impede reassembly.
Step 2: Preparing the Replacement Pins
If the removed pins are to be replaced with new ones, ensure that the replacement pins are compatible with the connector and that they are in optimal condition. Verify that the dimensions, configurations, and electrical specifications of the replacement pins align with the requirements of the connector.
Step 3: Aligning the Replacement Pins
Carefully align the replacement pins with their respective positions within the connector. Ensure that the orientation and polarity of the replacement pins match the original configuration to maintain the proper functionality of the connector within the system.
Step 4: Securing the Replacement Pins
Gently insert the replacement pins into their designated positions within the connector, taking care to avoid applying excessive force that could lead to damage or misalignment. Ensure that the pins are securely seated and make proper contact within the connector housing.
Step 5: Verifying Connectivity
Once the replacement pins are in place, conduct a thorough inspection to verify that they are making proper contact and establishing the necessary connectivity within the connector. Utilize appropriate testing equipment, such as a multimeter, to confirm the continuity and functionality of the reassembled connector.
Reassembling the connector after pin removal is a critical step in restoring the functionality and reliability of the connector within the electronic system. By following the outlined steps with precision and care, individuals can ensure that the reassembled connector operates seamlessly and reliably, maintaining the integrity of the overall system.