
What is Spelling and Grammar Quick Check in Microsoft Word?
The Spelling and Grammar Quick Check feature in Microsoft Word is a powerful tool that helps users identify and correct spelling and grammar mistakes in their documents. It is an essential feature for anyone who wants to ensure the accuracy and professionalism of their written work. Whether you are writing an essay, a report, or even just a simple email, this feature can save you from embarrassing typos and grammatical errors.
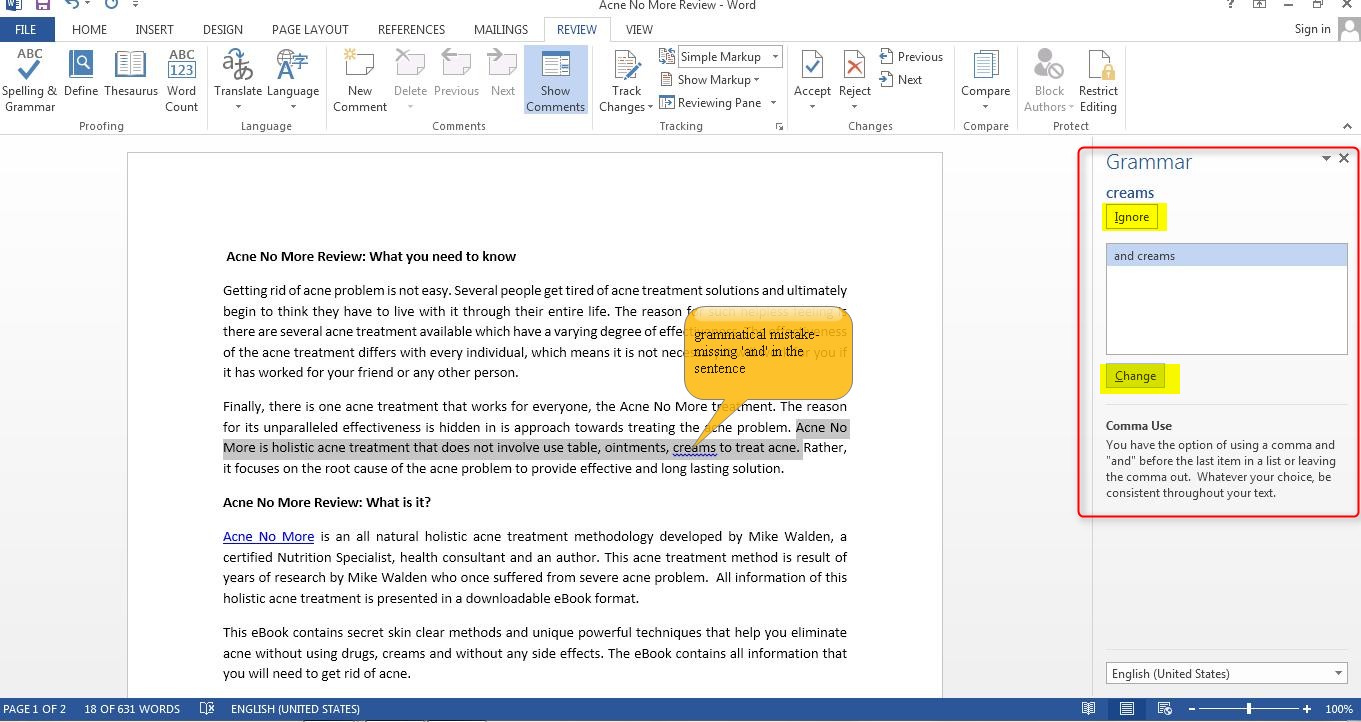
When you run the Spelling and Grammar Quick Check, Microsoft Word scans your document for any words that are not recognized in its built-in dictionary. It also flags potential grammar issues such as sentence fragments, subject-verb disagreements, and improper use of punctuation. The feature highlights these errors and offers suggested corrections, allowing you to quickly make the necessary changes.
Not only does the Spelling and Grammar Quick Check help with basic spelling and grammar, but it can also catch more advanced errors, such as incorrect word usage or improper capitalization. It provides you with a comprehensive review of your document’s language and makes it easy to polish your writing.
This feature is particularly helpful for non-native English speakers who may struggle with grammar rules or misspellings. It serves as a reliable proofreading tool, ensuring that your writing remains accurate and professional. Even for native English speakers, the Spelling and Grammar Quick Check can be valuable in catching unintentional mistakes or overlooked errors.
With its user-friendly interface and comprehensive error detection capabilities, the Spelling and Grammar Quick Check is an indispensable tool in Microsoft Word. By utilizing this feature, you can save time and effort in manually reviewing your document for errors, allowing you to focus more on the content and message you want to convey.
How to use Spelling and Grammar Quick Check
Using the Spelling and Grammar Quick Check in Microsoft Word is a simple and straightforward process. Whether you are a beginner or an experienced user, these steps will guide you through effectively utilizing this powerful proofreading tool:
- Open your document in Microsoft Word.
- Click on the “Review” tab in the toolbar at the top of the screen.
- Select the “Spelling and Grammar” option from the available tools.
- Microsoft Word will begin scanning your document for spelling and grammar errors.
- If an error is detected, it will be highlighted and underlined in the text.
- To review and correct the error, right-click on the highlighted word or phrase.
- A context menu will appear, offering suggested corrections for the error.
- Choose the correct option from the menu, or manually correct the error if necessary.
- Continue reviewing and correcting any additional errors in your document.
- Once you have addressed all the errors, Microsoft Word will display a dialog box indicating that the check is complete.
It’s important to note that while the Spelling and Grammar Quick Check is a helpful tool, it may not catch every error or provide perfect suggestions. Therefore, it’s always a good idea to review the suggestions with a critical eye and make any necessary adjustments to ensure the accuracy and clarity of your writing.
By following these steps and utilizing the Spelling and Grammar Quick Check feature in Microsoft Word, you can significantly improve the quality of your documents, save time on proofreading, and enhance the overall professionalism of your written work.
Understanding the Spelling and Grammar Errors
When using the Spelling and Grammar Quick Check in Microsoft Word, it’s essential to understand the types of errors that can be identified and how to interpret them. This understanding will enable you to effectively correct the errors and improve the quality of your written content.
The most common spelling errors that the tool detects are misspellings or words that are not recognized by Microsoft Word’s built-in dictionary. These errors are typically highlighted with a red squiggly line underneath the word. It’s important to carefully review suggestions for corrections and choose the option that accurately reflects your intended word.
Grammar errors, on the other hand, can be more complex. Microsoft Word can detect various grammar issues, including subject-verb agreement, verb tenses, sentence fragments, run-on sentences, and punctuation errors. Grammar errors are typically indicated with a green squiggly line underneath the section of text in question.
Understanding the specific grammar errors can be beneficial when manually correcting the mistakes. By familiarizing yourself with basic grammar rules, such as noun-verb agreement or proper use of punctuation marks, you can make more informed decisions when choosing the correct option or modifying the text yourself.
Additionally, it’s important to note that not all highlighted words or phrases are necessarily incorrect. The tool may flag certain proper nouns, technical terms, or specialized vocabulary that are not recognized in its default dictionary. In such cases, you can choose to ignore the error or add the word to your custom dictionary for future reference.
By understanding the different types of errors and how to interpret them, you can effectively use the Spelling and Grammar Quick Check to refine and improve the accuracy of your writing. It’s a valuable tool that helps to ensure your document is error-free, professional, and polished.
Ignoring Errors or Adding Them to the Custom Dictionary
While the Spelling and Grammar Quick Check in Microsoft Word is generally accurate, there may be instances where it incorrectly identifies certain words or phrases as errors. In such cases, it’s important to know how to handle these false positives by either ignoring the errors or adding them to the custom dictionary.
If you come across an error that you believe is not incorrect or simply a matter of personal preference, you can choose to ignore it. To do this, right-click on the underlined word or phrase and select “Ignore Once” from the context menu. Microsoft Word will skip that particular error and move on to the next one without suggesting any changes.
However, if you encounter a word that is consistently flagged as an error, but you know it is correct, you can add it to the custom dictionary. Right-click on the underlined word or phrase and choose either “Add to Dictionary” or “Add to Custom Dictionary” from the context menu, depending on the version of Microsoft Word you are using.
By adding the word to the custom dictionary, you inform Microsoft Word that it is a valid word and should not be flagged as an error in future documents. This can be especially useful for specialized vocabulary, industry-specific terms, or unique names that are not recognized by the default dictionary.
Keep in mind that adding words to the custom dictionary should be done sparingly and with caution. Make sure the words you add are truly correct and not simply typos or misspellings. Being selective with the words you add will help maintain the accuracy and reliability of the Spelling and Grammar Quick Check feature.
By utilizing the option to ignore or add words to the custom dictionary, you can fine-tune the performance of the Spelling and Grammar Quick Check in Microsoft Word and ensure that it accurately reflects your writing style and terminology choices.
AutoCorrect Feature in Microsoft Word
The AutoCorrect feature in Microsoft Word is a powerful tool designed to automatically correct common spelling errors and typos as you type. It offers a convenient way to improve your writing accuracy and productivity by quickly fixing common errors without the need for manual intervention.
With AutoCorrect enabled, Microsoft Word will automatically detect and correct common spelling mistakes in real-time. For example, if you accidentally type “teh” instead of “the,” AutoCorrect will automatically change it to the correct spelling as you continue typing. This feature can save you time and effort by preventing the need to go back and manually correct each individual mistake.
In addition to common spelling errors, AutoCorrect can also fix common typos and incorrect capitalization. For instance, if you frequently mistype “hte” instead of “the,” AutoCorrect can be set to automatically correct the error every time it occurs.
Moreover, the AutoCorrect feature in Microsoft Word allows you to create your own custom corrections. If you find yourself commonly misspelling specific words or phrases, you can add them to the AutoCorrect settings to ensure their automatic correction. Similarly, if you frequently mistype your own name or company name, you can add those corrections as well.
AutoCorrect can be particularly useful when typing long documents or emails, as it reduces the need for extensive proofreading and manual editing. By automatically correcting mistakes as you type, you can maintain the flow of your writing and focus on the content rather than getting distracted by errors.
It’s important to note that while AutoCorrect is a helpful feature, it is not foolproof. It may occasionally make incorrect corrections or misinterpret certain words or phrases. Therefore, it’s essential to keep an eye on the corrections it suggests and manually review them to ensure they are accurate.
Overall, the AutoCorrect feature in Microsoft Word is a valuable tool for improving spelling accuracy and reducing common typographical errors. By using this feature, you can enhance the quality of your writing and present professional and error-free documents.
Correcting Grammar Errors with Spelling and Grammar Quick Check
The Spelling and Grammar Quick Check feature in Microsoft Word not only helps identify spelling mistakes but also assists in correcting grammar errors. It provides suggestions and guidance to improve the grammatical accuracy of your writing. Here’s how you can effectively correct grammar errors using this feature:
1. Run the Spelling and Grammar Quick Check by clicking on the “Review” tab in the toolbar and selecting “Spelling and Grammar.”
2. As the tool identifies grammar errors, they will be highlighted with green squiggly lines. Right-clicking on the underlined section will display suggestions for correction in the context menu.
3. Carefully review the suggested changes and choose the option that best fits the intended meaning of your sentence. Alternatively, modify the text manually if you have a better understanding of the grammar rules or if the suggested correction does not accurately reflect your desired meaning.
4. Repeat this process for each grammar error identified in your document. Take the time to understand the rules behind the errors to avoid making the same mistakes in future writing.
5. Use the feedback provided by Microsoft Word to enhance your grammatical knowledge and improve your overall writing skills.
Though the Spelling and Grammar Quick Check offers helpful suggestions, it’s important to note that it may not catch all grammar errors, and its suggestions may not always be perfect. Therefore, it’s crucial to apply critical thinking and rely on your own understanding of grammar rules to ensure accuracy. Consider consulting style guides or grammar resources for additional clarification.
Furthermore, be aware that grammar rules can sometimes be subjective or flexible, depending on the context or style. Remember to adapt the suggestions to suit your specific needs and writing style.
By utilizing the Spelling and Grammar Quick Check feature in Microsoft Word to correct grammar errors, you can significantly improve the clarity and professionalism of your writing. It serves as a valuable tool in developing your grammar skills and ensuring your work is of the highest linguistic quality.
Using the Thesaurus Feature in Microsoft Word
The Thesaurus feature in Microsoft Word is a helpful tool that allows you to find synonyms, antonyms, and alternate word choices to enhance your writing. It serves as a valuable resource for improving vocabulary, avoiding repetition, and making your documents more engaging. Here’s how you can effectively use the Thesaurus feature:
1. Select the word you want to find synonyms for in your document. This could be a word you feel is overused, lacks precision, or simply needs variety.
2. Right-click on the selected word to open the context menu. Choose the “Synonyms” option from the list.
3. Microsoft Word will display a list of suggested synonyms for the selected word. Skim through the list to find words that fit the context and convey your intended meaning.
4. Click on the desired synonym to replace the original word in your document. The Thesaurus feature can be used multiple times for the same word to explore different options.
5. If you find the suggested synonyms inadequate, choose the “Thesaurus” option at the bottom of the context menu. It will open the full Thesaurus pane on the right side of your screen, providing a more comprehensive range of synonyms and related words.
6. Use the search bar within the Thesaurus pane to further refine your search. You can explore synonyms, antonyms, definitions, and related terms to find the perfect word.
7. To insert the selected synonym into your document, simply click on it, and it will replace the original word.
8. Continue using the Thesaurus feature as needed to enrich your writing with varied and precise language.
Using the Thesaurus feature can help you avoid repetitive language and add depth to your writing. It allows you to choose words that convey your intended meaning more accurately or add a touch of sophistication to your work.
However, it’s important to use the Thesaurus judiciously. Make sure to consider the context, tone, and audience when selecting synonyms. Be mindful of subtle differences in meaning and choose words that align with the overall style and purpose of your writing.
By utilizing the Thesaurus feature in Microsoft Word, you can enhance your vocabulary, improve your writing style, and make your documents more engaging and dynamic.
Adjusting the Settings for Spelling and Grammar Quick Check
The Spelling and Grammar Quick Check in Microsoft Word offers customizable settings that allow you to tailor its behavior and improve its effectiveness in detecting errors. By adjusting these settings, you can personalize the proofreading experience to better suit your writing style and preferences. Here’s how you can make adjustments to the Spelling and Grammar Quick Check settings:
1. Open Microsoft Word and click on the “File” tab in the toolbar at the top of the screen.
2. Select “Options” from the drop-down menu. This will open the Word Options window.
3. In the Word Options window, click on the “Proofing” tab from the left sidebar.
4. Under the “When correcting spelling and grammar in Word” section, you will find various options to customize the behavior of the Spelling and Grammar Quick Check.
5. To enable or disable specific proofing options, such as grammar checking or style checking, check or uncheck the corresponding boxes.
6. If you want to review the spelling and grammar suggestions before making any changes, select the “Show spelling and grammar suggestions” checkbox.
7. To set Word to automatically correct certain typing errors as you type, click on the “AutoCorrect Options” button. This will open a dialog box where you can add and customize auto-corrections.
8. In the AutoCorrect dialog box, you can add your own custom corrections, modify existing corrections, or turn off specific AutoCorrect features entirely. This allows you to have greater control over the automatic correction behavior.
9. Make any desired adjustments to the settings based on your preferences.
10. Once you have finished customizing the settings, click “OK” to save your changes and close the Word Options window.
By adjusting the settings for the Spelling and Grammar Quick Check, you can enhance its efficiency and tailor it to your specific needs. Personalizing the proofreading experience ensures that you receive the specific feedback and corrections that are most relevant to your writing style and requirements.
Take the time to explore and experiment with these settings to find the configuration that works best for you. By fine-tuning the Spelling and Grammar Quick Check settings, you can optimize its performance and improve the overall quality of your documents.
Troubleshooting Common Issues with Spelling and Grammar Quick Check
The Spelling and Grammar Quick Check in Microsoft Word is generally a reliable tool for identifying and correcting errors in your documents. However, there may be instances when you encounter issues or errors with this feature. Here are some common problems that users may face and tips for troubleshooting them:
1. False positives: Sometimes, the Spelling and Grammar Quick Check may incorrectly flag a word or phrase as an error. If you believe the highlighted text is correct, you can choose to ignore the error. Alternatively, you can add the word to the custom dictionary to prevent it from being flagged in future documents.
2. Missed errors: While the Spelling and Grammar Quick Check is designed to be thorough, it may occasionally miss certain errors. To address this, double-check your document manually or consider using additional proofreading tools or services to ensure comprehensive error detection.
3. Grammar suggestions: The grammar suggestions provided by the tool may not always align with your intended meaning or writing style. If you find that the suggested corrections alter the essence of your sentence, it’s important to trust your own judgment and make the necessary revisions based on your understanding of grammar rules.
4. Limited language support: The Spelling and Grammar Quick Check primarily focuses on the English language. If you are working with documents in other languages, the tool may not have the same level of accuracy or functionality. In such cases, consider using language-specific proofreading tools or consulting native speakers for assistance.
5. Outdated dictionary: Occasionally, the Spelling and Grammar Quick Check may not recognize newer words or terminologies. To address this, ensure that you have the latest updates installed for Microsoft Word. Additionally, consider using online resources or specialized dictionaries to confirm the accuracy of newer or technical terms.
6. Inconsistent stylistic suggestions: The Spelling and Grammar Quick Check may provide stylistic suggestions that conflict with your preferred writing style or industry conventions. In such cases, it’s important to strike a balance between adhering to proper grammar and maintaining your unique voice. You can consider adjusting the settings to turn off specific style suggestions or consult style guides for further guidance.
Remember, the Spelling and Grammar Quick Check is a helpful tool, but it is not infallible. It’s always important to use your own judgment and expertise as a writer to ensure the accuracy and clarity of your documents. By being aware of these common issues and troubleshooting them effectively, you can make the most of the Spelling and Grammar Quick Check feature in Microsoft Word.
Tips for Efficient Use of Spelling and Grammar Quick Check
The Spelling and Grammar Quick Check in Microsoft Word is a powerful tool for detecting errors and improving the quality of your written work. To make the most of this feature and streamline your proofreading process, here are some tips for efficient use:
1. Save it for the end: While it’s tempting to run the Spelling and Grammar Quick Check after every paragraph or sentence, it’s more efficient to complete a full draft of your document first. Running the check at the end allows you to focus on the content flow without constant interruptions.
2. Read out loud: Before running the Spelling and Grammar Quick Check, read your document out loud. This can help identify errors or awkward phrasing that may not be caught by the tool. It also allows you to assess the overall coherence and readability of your writing.
3. Set up default language: Ensure that the default language in Microsoft Word matches the language you are writing in. This will enhance the accuracy of the Spelling and Grammar Quick Check, improving detection and suggestion of errors specific to your chosen language.
4. Customize auto-corrections: Take advantage of the AutoCorrect feature in Microsoft Word. Customize it by adding your own frequently used terms, acronyms, or industry-specific jargon. This will save you time by automatically correcting common errors you tend to make.
5. Use grammar rules as a guide: When reviewing grammar suggestions made by the Spelling and Grammar Quick Check, consult reliable grammar guides or reputable online resources to confirm the rules. This will help you make informed decisions when accepting or rejecting suggested changes and ensure that your writing adheres to proper grammar conventions.
6. Edit beyond the suggestions: Remember that the Spelling and Grammar Quick Check is not infallible. It may not catch every error or offer the most suitable suggestions. Take the time to manually review your document beyond the highlighted suggestions, paying attention to syntax, clarity, and overall coherence.
7. Learn from mistakes: Pay attention to mistakes that are consistently flagged by the Spelling and Grammar Quick Check. Take note of these patterns and learn from them to improve your writing skills. Addressing repeated errors will help you become more aware of your weaknesses and refine your writing style.
8. Proofread multiple times: Proofreading should never be limited to a single pass. After you have made corrections using the Spelling and Grammar Quick Check, go through your document again. This will help you catch any remaining errors or inconsistencies that may have been overlooked initially.
By following these tips, you can use the Spelling and Grammar Quick Check in Microsoft Word efficiently and effectively. It will assist you in producing error-free and polished documents, saving you time and improving the overall quality of your written work.