
Precautions before removing the battery
Before embarking on the process of removing the battery from your Sony Xperia, it's crucial to observe certain precautions to ensure the safety of both the device and yourself. The battery of a smartphone is a delicate component, and mishandling it can lead to potential hazards. Therefore, it's essential to adhere to the following precautions before initiating the battery removal process:
-
Power Off the Device: Always power off your Sony Xperia before attempting to remove the battery. This simple yet critical step prevents the risk of electrical shock or damage to the device.
-
Work in a Clean Environment: Find a well-lit and clean workspace to carry out the battery removal process. Working in a clutter-free environment minimizes the chances of misplacing small components or causing accidental damage to the device.
-
Use the Right Tools: Ensure that you have the necessary tools at your disposal, such as a set of precision screwdrivers and plastic pry tools. Using the correct tools not only simplifies the process but also reduces the likelihood of causing unintended harm to the device.
-
Handle the Battery with Care: The lithium-ion battery in your Sony Xperia should be handled with extreme care. Avoid bending, puncturing, or exposing the battery to high temperatures, as these actions can lead to leakage, overheating, or even a fire hazard.
-
Refer to the User Manual: It's always advisable to consult the user manual or seek online guides specific to your Sony Xperia model before proceeding with battery removal. Different Xperia models may have varying internal layouts, and understanding the specifics for your device can prevent errors during the removal process.
By adhering to these precautions, you can approach the battery removal process with confidence, knowing that you've taken the necessary steps to ensure the safety of both yourself and your Sony Xperia. These precautions not only minimize potential risks but also contribute to a smoother and more efficient battery removal experience.
Tools required for battery removal
When it comes to removing the battery from your Sony Xperia, having the right tools at your disposal is essential for a smooth and efficient process. The following tools are recommended for safely and effectively removing the battery from your device:
-
Precision Screwdrivers: A set of precision screwdrivers with various heads is indispensable for accessing the internal components of your Sony Xperia. These screwdrivers enable you to remove the screws securing the back cover and other components, allowing for safe and precise disassembly.
-
Plastic Pry Tools: Plastic pry tools are gentle yet effective instruments for carefully prying open the back cover of your Sony Xperia. Unlike metal tools, plastic prying tools minimize the risk of scratching or damaging the device's exterior, ensuring that the removal process is carried out without causing cosmetic harm.
-
Anti-Static Wrist Strap (Optional): While not mandatory, an anti-static wrist strap can be beneficial for dissipating any static electricity from your body, thus reducing the risk of electrostatic discharge (ESD) that could potentially damage sensitive electronic components during the battery removal process.
-
Tweezers: A pair of fine-tipped tweezers can be invaluable for handling small screws, connectors, or other intricate components during the battery removal process. Tweezers allow for precise maneuvering and placement of small parts, minimizing the risk of misplacement or accidental damage.
-
Heat Gun or Hair Dryer (Optional): In some cases, a heat gun or hair dryer can be used to gently warm the adhesive securing the battery to the device, making it easier to detach the battery without causing damage. However, it's crucial to exercise caution and apply heat sparingly to avoid overheating the device.
By ensuring that you have these essential tools at your disposal, you can confidently proceed with the battery removal process, knowing that you are equipped to handle the task with precision and care. These tools not only facilitate the safe removal of the battery but also contribute to a seamless and successful disassembly of your Sony Xperia.
Step 1: Power off the Sony Xperia
Before initiating the process of removing the battery from your Sony Xperia, it is crucial to power off the device to ensure the safety of both the user and the smartphone itself. Powering off the device is a fundamental step that mitigates the risk of electrical shock and prevents potential damage to the internal components during the battery removal process.
To power off your Sony Xperia, begin by pressing and holding the power button located on the side or top of the device, depending on the specific model. After holding the power button for a few seconds, a menu will appear on the screen, prompting you to power off the device. Once this menu is displayed, simply tap the "Power Off" or "Shut Down" option to initiate the device shutdown process.
Alternatively, if your Sony Xperia is unresponsive or the touchscreen is not functional, you can force a shutdown by pressing and holding the power button for an extended period, typically around 10-15 seconds. This action will force the device to power off, allowing you to proceed with the battery removal process safely.
It's important to ensure that the device is completely powered off before proceeding to remove the battery. This step is essential to prevent any electrical current from flowing through the device, reducing the risk of accidental damage or injury during the subsequent steps of the battery removal process.
By diligently following this initial step and ensuring that your Sony Xperia is powered off, you set the stage for a safe and methodical battery removal process. This simple yet critical action lays the foundation for a smooth and secure disassembly of your device, ultimately contributing to a successful battery removal experience.
Step 2: Remove the back cover of the Sony Xperia
Removing the back cover of your Sony Xperia is a pivotal step in gaining access to the internal components, including the battery. This process requires precision and care to ensure that the back cover is detached without causing any damage to the device's exterior.
-
Locate the Notch or Slot: Begin by examining the edges of your Sony Xperia to identify the presence of a small notch or slot along the perimeter of the device. This notch or slot is designed to facilitate the removal of the back cover and may be located at the top, bottom, or sides of the device, depending on the specific Xperia model.
-
Use a Plastic Pry Tool: Once the notch or slot is located, carefully insert a plastic pry tool into the identified opening. Plastic pry tools are preferred for this task as they minimize the risk of scratching or denting the device's exterior, ensuring that the back cover is removed without cosmetic damage.
-
Apply Gentle Pressure: With the plastic pry tool inserted into the notch or slot, apply gentle and even pressure to begin loosening the back cover from the main body of the Sony Xperia. It's important to exercise caution and avoid applying excessive force, as this can lead to unintended damage to the device.
-
Work Around the Edges: Gradually work your way around the edges of the device, gently prying the back cover away from the main body. Take your time during this process to ensure that the back cover detaches smoothly without any resistance. If you encounter significant resistance at any point, reassess the positioning of the plastic pry tool and adjust the angle to continue the removal process smoothly.
-
Lift Off the Back Cover: Once the back cover has been sufficiently loosened from the main body, carefully lift it away from the device, taking note of any attached cables or connectors. Some Xperia models may have adhesive securing the back cover, requiring additional care when detaching it to avoid damage.
By following these steps with precision and attention to detail, you can successfully remove the back cover of your Sony Xperia, gaining access to the internal components, including the battery. This careful process sets the stage for the subsequent steps involved in safely disconnecting and removing the battery from your device.
Step 3: Locate the battery and its connectors
With the back cover successfully removed, the next crucial step in the battery removal process is to locate the battery and its corresponding connectors within the internal framework of your Sony Xperia. The positioning of the battery and its connectors may vary slightly depending on the specific Xperia model; however, they are typically situated near the center or bottom section of the device's interior.
Upon gaining visual access to the internal components, including the battery, it's important to exercise caution and attentiveness to identify the battery and its associated connectors accurately. The battery in most Sony Xperia models is a rectangular or square-shaped component, often secured in place by adhesive or fasteners to ensure stability within the device.
In addition to identifying the physical location of the battery, it's essential to locate the connectors that link the battery to the device's circuitry. These connectors are typically small, rectangular components attached to the battery's terminals, facilitating the transfer of power between the battery and the smartphone. Carefully tracing the wiring from the battery leads to these connectors, allowing for a clear understanding of their positioning and attachment points.
As you locate the battery and its connectors, take note of any surrounding components or cables that may be in close proximity. It's important to avoid unintentional interference with other internal elements to prevent damage or disruption to the device's functionality.
During this step, it's beneficial to refer to any available diagrams or online resources specific to your Sony Xperia model, as these visual aids can provide additional guidance in identifying the battery and its connectors within the device's internal layout. By leveraging these resources, you can enhance your understanding of the internal structure of your Xperia, ultimately facilitating a more informed and precise battery removal process.
By meticulously locating the battery and its connectors, you lay the groundwork for the subsequent steps involved in disconnecting and safely removing the battery from your Sony Xperia. This careful and methodical approach ensures that you are well-prepared to proceed with the battery removal process, ultimately contributing to a successful and efficient disassembly of your device.
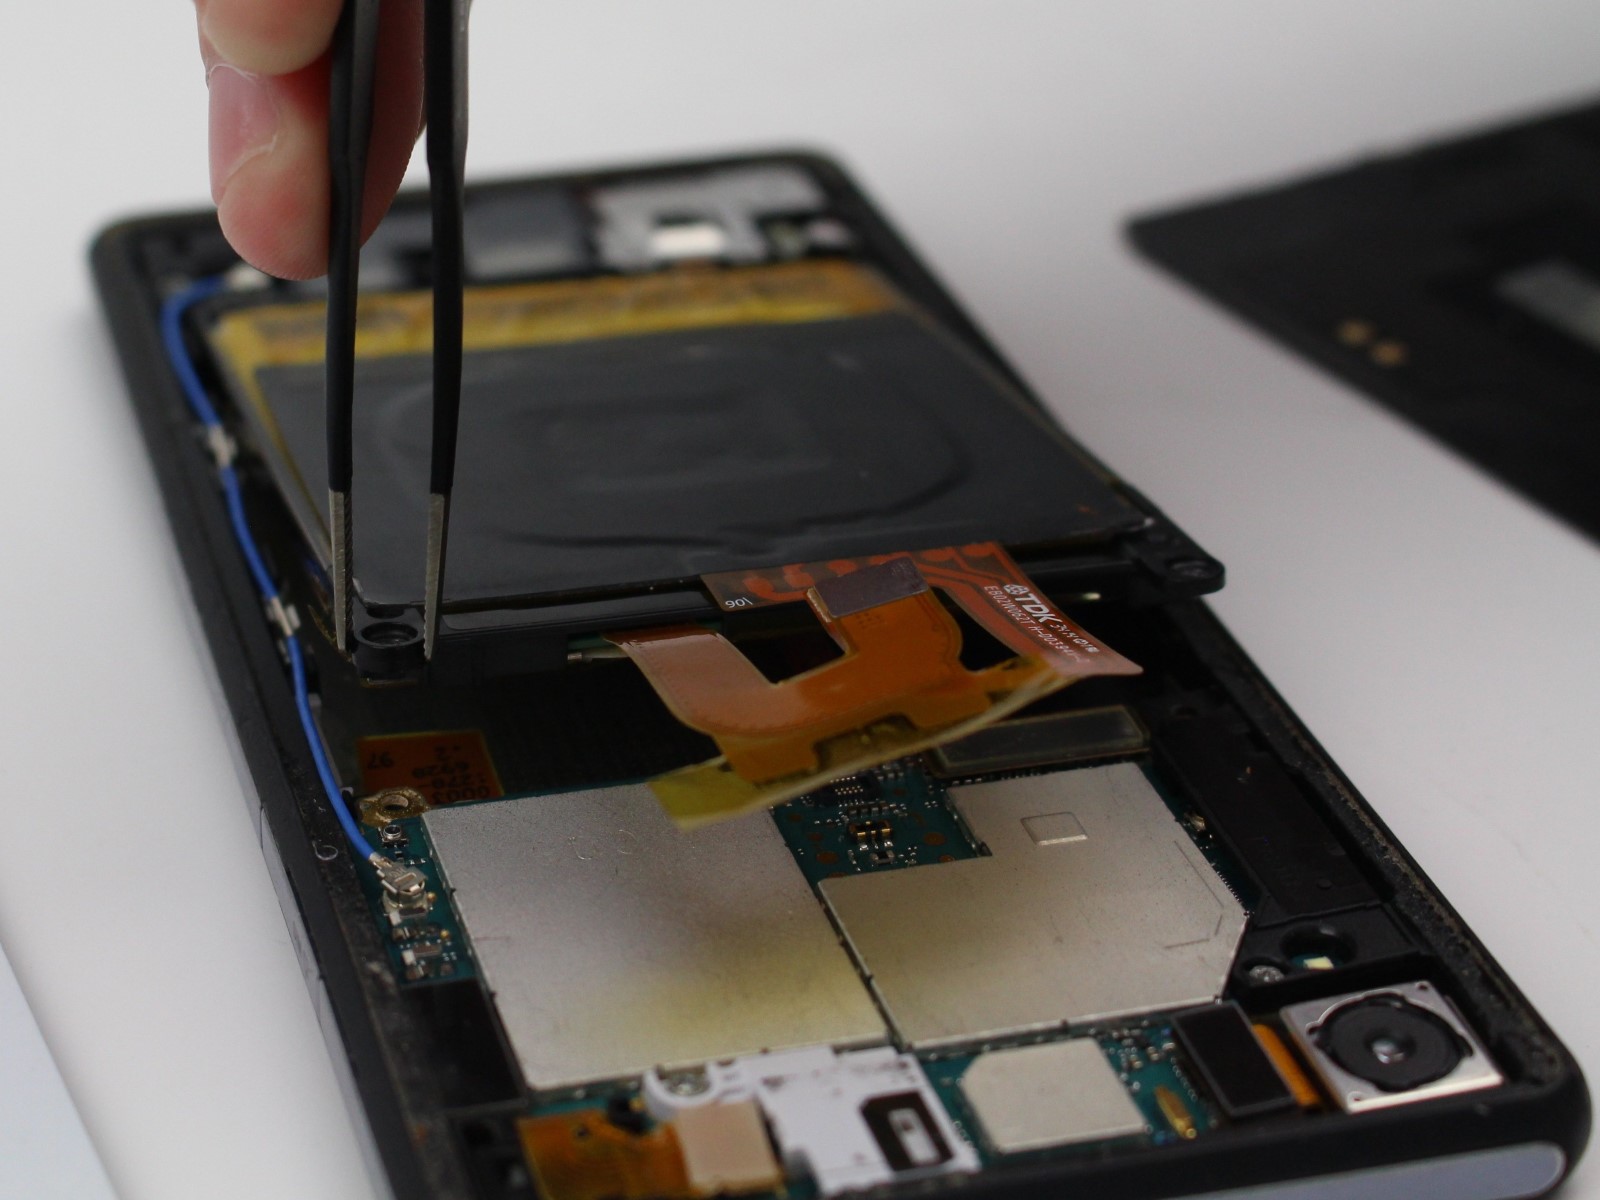
Step 4: Disconnect the battery connectors
Once the battery and its connectors have been located within the internal framework of your Sony Xperia, the next critical step in the battery removal process is to disconnect the battery connectors. This step is pivotal in ensuring the safe disconnection of the battery from the device's circuitry, preparing it for removal without causing any electrical mishaps or damage.
To begin the process of disconnecting the battery connectors, it's essential to exercise precision and attentiveness. The connectors are typically small, rectangular components attached to the battery's terminals, facilitating the transfer of power between the battery and the smartphone. These connectors may be secured in place with adhesive or small retaining clips to maintain a stable connection.
Using a pair of fine-tipped tweezers or plastic pry tools, carefully maneuver the tools to gently disconnect the connectors from the corresponding terminals on the battery. It's crucial to apply even pressure and avoid excessive force to prevent damage to the connectors or the surrounding circuitry.
As you disconnect the battery connectors, pay close attention to the orientation and positioning of each connector to ensure that they can be reattached correctly during the reassembly process. Taking note of any color-coding or labeling on the connectors can aid in identifying their proper alignment for future reference.
In some Sony Xperia models, the connectors may feature a locking mechanism or latch that needs to be carefully released before the connectors can be detached. Exercise caution and patience when dealing with these locking mechanisms to prevent any accidental breakage or damage.
Once the connectors have been successfully disconnected from the battery, take a moment to inspect the surrounding area for any additional cables or components that may be linked to the battery. Ensuring that all associated connections are carefully detached sets the stage for the final step of removing the battery from your Sony Xperia.
By meticulously following this step and delicately disconnecting the battery connectors, you pave the way for a seamless and secure battery removal process. This careful approach minimizes the risk of damage to the device's internal components and ensures that the battery can be safely removed without any adverse effects on the smartphone's functionality.
Step 5: Carefully remove the battery from the Sony Xperia
With the battery connectors successfully disconnected and all associated components accounted for, the final step in the battery removal process involves the careful extraction of the battery from your Sony Xperia. This critical phase demands precision, patience, and attentiveness to ensure that the battery is removed without causing any damage to the device's internal components or the battery itself.
Begin by identifying any adhesive or fasteners securing the battery in place within the device. In many Sony Xperia models, the battery is affixed to the internal framework using adhesive strips or small fastening clips to maintain stability. Carefully examine the edges and corners of the battery to locate any adhesive or fasteners that may be present.
Using a plastic pry tool or a gentle, non-metallic instrument, carefully work around the edges of the battery to gradually loosen it from its secured position. Exercise caution to avoid bending or puncturing the battery during this process, as lithium-ion batteries are sensitive to physical damage and mishandling.
As the battery becomes increasingly detached from the internal framework, continue to apply gentle and even pressure to ensure a smooth and controlled removal. Take note of any resistance or adhesion points, adjusting your approach to carefully navigate these areas without causing damage to the battery or the surrounding components.
Once the battery has been loosened and is no longer affixed to the device, carefully lift it away from the internal framework, ensuring that no cables or connectors are inadvertently pulled or strained during the extraction process. It's essential to maintain a steady and deliberate approach to prevent any sudden movements that could lead to damage or dislodging of other internal components.
Upon successful removal of the battery, place it on a flat, stable surface away from any potential sources of heat or electrical interference. This ensures the safety of the battery and minimizes the risk of accidental damage or exposure to adverse conditions.
By meticulously following these steps and exercising care throughout the battery removal process, you can safely extract the battery from your Sony Xperia, setting the stage for any necessary replacement or maintenance. This methodical and cautious approach ensures that the device's internal components remain intact, and the battery is handled with the utmost care and precision.
This careful approach not only contributes to a successful battery removal experience but also sets the foundation for any subsequent steps involved in replacing the battery or performing maintenance on your Sony Xperia.