
Why is Search History Important?
Search history plays a vital role in our digital lives, providing a record of the websites we visit and the queries we enter into search engines. It may seem mundane, but search history can offer several benefits and conveniences. Here are a few reasons why search history is important:
- Efficient Information Retrieval: The search history keeps track of your past searches, allowing you to quickly access previously visited websites or repeat specific queries. It saves precious time and effort by eliminating the need to remember or recreate search terms.
- Personalized Search Results: Search engines utilize your search history to offer personalized search results based on your interests and preferences. This customization enhances the relevance and accuracy of the information presented to you, making it easier to find what you’re looking for.
- Record of Research: Keeping a record of your search history can be invaluable for researchers, students, or individuals working on projects. The search history serves as a digital breadcrumb trail, documenting the sources and references used during the research process.
- Account Activity Monitoring and Security: By examining your search history, you can track the websites you have visited and identify any suspicious or unauthorized activity that may have occurred. Regularly reviewing your search history can help maintain the security and privacy of your online accounts.
- Content Recall: Search history acts as a memory bank, allowing you to revisit articles, blog posts, or any other content that you may have stumbled upon and found interesting in the past. It serves as a convenient way to revisit valuable information or sources that you may have forgotten about.
While search history can be highly beneficial, it is important to note that it also poses potential privacy concerns. Search engines and other online platforms have access to your search history data, which can be used for targeted advertising or tracking your online behavior. Therefore, it is essential to understand how to view and manage your search history, which we will discuss in the following sections.
How to View Your Search History
Viewing your search history can provide valuable insights into your online activities and help you track down previously visited websites or search queries. While the exact steps may vary depending on your browser and search engine preferences, here are some general guidelines to help you view your search history:
How to View Search History on Google
If you use Google as your primary search engine, follow these steps to view your search history:
- Open your web browser and go to the Google homepage.
- Click on the “Sign In” button at the top right corner of the page and enter your Google account credentials.
- Once signed in, click on the grid icon (also known as the “Apps” icon) located at the top right corner, then select “Search History.”
- You will be redirected to the “My Activity” page, where you can browse through your search history by date, search terms, or website visits.
How to View Search History on Safari
If you are using Safari as your web browser, here’s how you can view your search history:
- Launch Safari on your device.
- Click on the “History” tab in the top menu bar.
- A dropdown menu will appear, displaying your recent search history. You can click on any of the listed websites to revisit them.
- If you want to view your complete search history, click on “Show All History.” This will open a new window with a detailed record of your browsing activities.
How to View Search History on Firefox
To view your search history in Firefox, follow these steps:
- Open Firefox browser on your device.
- Click on the hamburger menu icon (three horizontal lines) located at the top right corner.
- From the dropdown menu, select “Library” and then click on “History.”
- A new window will appear, showing your browsing history. You can use the search bar or scroll through the list to find specific entries.
How to View Search History on Microsoft Edge
If you are using Microsoft Edge as your browser, here’s how you can view your search history:
- Launch Microsoft Edge on your device.
- Click on the “Hub” icon (three horizontal lines) located at the top right corner.
- From the menu, click on the “History” icon, which looks like a clock.
- A new sidebar will appear on the right side of the browser, displaying your browsing history. You can click on any entry to revisit the respective website.
How to View Search History on Opera
If you use the Opera browser, follow these steps to view your search history:
- Open Opera browser on your device.
- Click on the Opera icon (red “O” logo) located at the top left corner of the browser window.
- From the dropdown menu, select “History” and then click on “Show All History.”
- You will be taken to a new tab, displaying your complete browsing history. You can search for specific entries using the search bar or browse through the list manually.
These are some general steps to view your search history on popular browsers. However, it’s important to note that variations may exist depending on the browser versions and settings. Now that you know how to view your search history, let’s move on to the next section to learn how to delete it if needed.
How to View Search History on Google
If you frequently use Google as your preferred search engine, you might be interested in viewing your search history. Google provides a simple way to access and explore your search history. Here’s how you can view your search history on Google:
- Sign in to your Google Account: Open your web browser and go to the Google homepage. Click on the “Sign In” button at the top right corner of the page. Enter your Google account credentials to log in.
- Access your Search History: Once you’re signed in, locate the grid icon (often referred to as the “Apps” icon), located at the top right corner of the page. Click on it to open a dropdown menu.
- Select “Search History”: In the dropdown menu, you will find various Google services and apps. Look for the “Search History” option and click on it.
- Explore your Search History: You will now be redirected to the “My Activity” page, which displays your search history. Here, you can browse through your search activity based on different criteria like dates, search terms, or website visits.
On the “My Activity” page, you can scroll through your search history to find specific searches or use the search bar on top to narrow down your results. Each entry will show the date and time of the search, along with a brief description.
You also have the option to filter your search history by different Google services, such as Google Search, Google Maps, YouTube, etc. You can use the filters on the left side of the page to focus on a particular service or expand your search across all services.
It’s important to note that your search history might not be available or complete if you recently cleared your browsing history or if you were searching in incognito mode. Additionally, if you have disabled the search history feature in your Google account settings, no search history will be recorded.
By viewing your search history on Google, you can gain insights into your past online activities and retrieve previously visited websites or search queries. It provides a convenient way to rediscover valuable information and revisit websites that you might have forgotten about.
Now that you know how to access your search history on Google, you can explore your past searches and make better use of this valuable feature.
How to View Search History on Safari
If you use Safari as your browser on Mac or iOS devices, you may want to view your search history for various reasons. Safari provides a straightforward way to access and explore your search history. Here’s how you can view your search history on Safari:
- Launch Safari: Open the Safari browser on your Mac or iOS device.
- Access the History Menu: In the top menu bar of Safari, click on the “History” tab. This will reveal a dropdown menu.
- View Recent Search History: In the dropdown menu, you will see a list of your recent search history. Simply click on any of the listed websites to revisit them.
- Show All History: If you want to access your complete search history, click on “Show All History” at the bottom of the dropdown menu. This will open a new window displaying an organized list of your browsing activities.
Within the History window, you can navigate through your search history by scrolling or using the search bar located in the top right corner of the window. You can enter keywords or website addresses to quickly find specific entries.
By default, Safari sorts your search history by date and time, making it easier to track your past searches. Each entry displays the website name, date and time of the visit, and the page title or search query.
It’s important to note that your search history might not be available or complete if you recently cleared your browsing history or if you were browsing in private mode (also known as “Private Browsing” or “Incognito mode”). Additionally, if you have disabled the search history feature in your Safari settings, no search history will be recorded.
By viewing your search history on Safari, you can review your past online activities and rediscover valuable information or previously visited websites. Whether you’re looking for a specific webpage you visited or trying to recall a search query, Safari’s search history feature can be helpful.
Now that you know how to access your search history on Safari, you can explore your past searches and make better use of this valuable feature.
How to View Search History on Firefox
If you use Firefox as your browser, you can easily access and explore your search history. Firefox provides a user-friendly way to view your search history. Here’s how you can do it:
- Open Firefox: Launch the Firefox browser on your device.
- Access the History Menu: In the top menu bar of Firefox, click on the “History” tab. This will open a dropdown menu.
- View Recent Search History: In the dropdown menu, you will see a list of your most recent search history. Click on any of the listed websites to revisit them.
- Show Full History: If you want to access your complete search history, click on “Show All History” at the bottom of the dropdown menu. This will open a new window displaying your browsing history organized by date and time.
Within the History window, you can scroll through your search history to find specific entries. Firefox displays each entry with the website name, date and time of the visit, and the page title or search query.
You can also use the search bar located at the top right corner of the History window to search for specific terms or website addresses. Typing keywords will filter the search history, making it easier to find the desired information.
It’s worth noting that if you have recently cleared your browsing history or enabled private browsing mode (also known as “Private Window” or “Incognito mode”), your search history may be unavailable or incomplete. Additionally, if you have disabled the search history feature in your Firefox settings, no search history will be recorded.
Viewing your search history on Firefox allows you to track your online activities and revisit previously visited websites or search queries. Whether you’re trying to recall a specific webpage or researching past interests, Firefox’s search history feature can prove to be valuable.
Now that you know how to access your search history on Firefox, you can delve into your past searches and benefit from this useful feature.
How to View Search History on Microsoft Edge
If you use Microsoft Edge as your browser, you can easily access and explore your search history. Microsoft Edge offers a straightforward way to view your search history. Here’s how you can do it:
- Launch Microsoft Edge: Open the Microsoft Edge browser on your device.
- Access the History Sidebar: In the top right corner of the browser, click on the “Hub” icon. It resembles three horizontal lines.
- Open the History Tab: From the menu that appears, click on the “History” icon, which looks like a clock. This will open the History sidebar.
- Explore Your Search History: In the History sidebar, you will see a list of your browsing history. Scroll through the list or use the search bar at the top to find specific entries.
Within the History sidebar, Microsoft Edge displays your search history in chronological order, making it easy to track your past searches. Each entry includes the website name, date and time of the visit, and a brief description of the page or search query.
You can also use the search bar at the top of the History sidebar to search for specific keywords or website addresses. Typing in the search bar will filter your search history, helping you find the information you’re looking for more efficiently.
It’s important to note that if you recently cleared your browsing history or used the InPrivate browsing mode (also known as “InPrivate Window” or “Incognito mode”), your search history may be unavailable or incomplete. Additionally, if you have disabled the search history feature in your Microsoft Edge settings, no search history will be recorded.
By viewing your search history on Microsoft Edge, you can review your past online activities and revisit previously visited websites or search queries. Whether you’re trying to recall a specific webpage or retrieve important information, Microsoft Edge’s search history feature can be beneficial.
Now that you know how to access your search history on Microsoft Edge, you can explore your past searches and take full advantage of this useful feature.
How to View Search History on Opera
If you use Opera as your browser, you can easily access and explore your search history. Opera provides a simple way to view your search history. Here’s how you can do it:
- Open Opera: Launch the Opera browser on your device.
- Access the History Menu: In the top left corner of the browser, click on the Opera icon, which resembles a red ‘O’ logo.
- Open the History Window: From the dropdown menu that appears, select “History” and then click on “Show All History.” This will open a new tab displaying your browsing history.
- Explore Your Search History: In the History tab, you will see a list of your browsing history in chronological order. You can scroll through the list to find specific entries or use the search bar located at the top to search for keywords or website addresses.
Opera displays your search history with the website name, date and time of the visit, and a brief description of the page or search query. The chronological order makes it easy to track your past searches and revisit previously visited websites.
Using the search bar at the top of the History tab, you can type keywords or website addresses to filter your search history and quickly find the information you’re looking for.
It’s important to note that if you recently cleared your browsing history or used the private browsing mode (also known as “Private Window” or “Incognito mode”), your search history may be unavailable or incomplete. Additionally, if you have disabled the search history feature in your Opera settings, no search history will be recorded.
By viewing your search history on Opera, you can review your past online activities and revisit previously visited websites or search queries. Whether you’re trying to recall a specific webpage or retrieve important information, Opera’s search history feature can prove to be valuable.
Now that you know how to access your search history on Opera, you can explore your past searches and make better use of this helpful feature.
How to Delete Your Search History
Deleting your search history can help protect your privacy and remove any traces of your online activities. Whether you want to clear your search history due to security reasons or simply maintain a clean browsing record, here’s how you can delete your search history on popular browsers:
How to Delete Search History on Google
If you want to delete your search history on Google, follow these steps:
- Sign in to your Google Account.
- Go to the Google homepage and click on the grid icon (Apps) located at the top right corner.
- Select “Search History” from the dropdown menu.
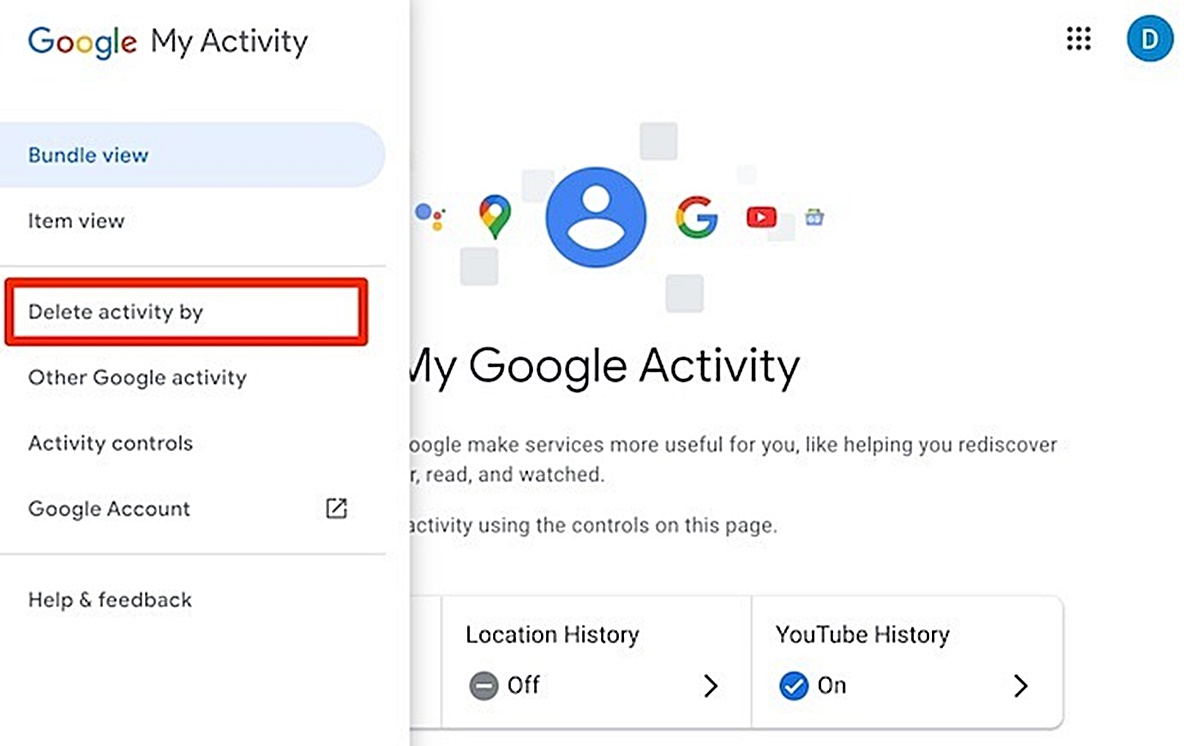
- On the “My Activity” page, click on the three-dot menu icon (More Options) next to the search entry you want to delete, and select “Delete” to remove individual searches. Alternatively, you can click on “Delete activity by” on the left sidebar to delete the search history for specific dates.
- To clear your entire search history, click on “Delete activity by” on the left sidebar, select “All time” as the date range, and click on “Delete” to remove all search history entries.
How to Delete Search History on Safari
To delete your search history on Safari, you can follow these steps:
- Open Safari browser on your device.
- Click on the “History” tab in the top menu bar.
- In the dropdown menu, select “Clear History…”
- Choose the time range for which you want to delete your search history, or select the option “all history” to remove all search history entries.
- Click on “Clear History” to delete the selected search history.
How to Delete Search History on Firefox
To delete your search history on Firefox, follow these steps:
- Open Firefox browser on your device.
- Click on the hamburger menu icon (three horizontal lines) at the top right corner of the browser.
- Select “History” from the dropdown menu.
- Click on “Clear Recent History…”
- In the window that appears, select the time range for which you want to delete your search history, or choose “Everything” to clear all search history entries.
- Click on “Clear Now” to delete the selected search history.
How to Delete Search History on Microsoft Edge
If you want to delete your search history on Microsoft Edge, follow these steps:
- Launch Microsoft Edge on your device.
- Click on the “Hub” icon (three horizontal lines) at the top right corner of the browser.
- Click on the “History” icon, which looks like a clock.
- In the right sidebar, click on the “Clear history” button.
- Select the types of browsing data you want to delete, including your search history.
- Click on the “Clear” button to delete the selected search history.
How to Delete Search History on Opera
To delete your search history on Opera, follow these steps:
- Open Opera browser on your device.
- Click on the Opera icon (red “O” logo) at the top left corner of the browser window.
- From the dropdown menu, select “History” and then click on “Clear browsing data…”
- In the window that appears, select the time range for which you want to delete your search history, or choose “the beginning of time” to remove all search history entries.
- Make sure the box next to “Browsing history” is checked.
- Click on the “Clear browsing data” button to delete the selected search history.
By following these steps, you can delete your search history on popular browsers, helping you maintain privacy and a clutter-free browsing experience. Regularly clearing your search history can also free up storage space on your device.
Keep in mind that clearing your search history will remove the information permanently, and you won’t be able to recover it. Therefore, make sure you only delete the search history that you no longer need and always consider the potential implications before proceeding.
How to Delete Search History on Google
If you want to delete your search history on Google, you have the option to remove individual searches or clear your entire search history. Here’s how you can do it:
- Sign in to your Google Account: Open your web browser and go to the Google homepage. Click on the “Sign In” button at the top right corner of the page. Enter your Google account credentials to log in.
- Access your Search History: Once signed in, locate the grid icon (sometimes referred to as the “Apps” icon) located at the top right corner of the page. Click on it to open a dropdown menu.
- Select “Search History”: From the dropdown menu, find the “Search History” option and click on it. You will be redirected to the “My Activity” page, which displays your search history.
- Delete Individual Searches: On the “My Activity” page, you will see a list of your search history entries. To delete an individual search, click on the three-dot menu icon (More Options) next to the search entry, and select “Delete” from the dropdown menu.
- Clear Entire Search History: If you want to remove your entire search history, click on “Delete activity by” from the left sidebar. Choose “All time” as the date range, and then click on the “Delete” button. This will delete all search history entries.
It’s important to note that deleting your search history on Google will remove the information permanently, and you won’t be able to recover it. If you have enabled Google Account sync, deleting your search history on one device will also remove it from other devices connected to your Google Account.
Keep in mind that clearing your search history on Google does not necessarily mean that all traces of your online activities are completely erased. Google and other online platforms may still retain some data for various purposes, including but not limited to security, performance, and user experience improvement.
By deleting your search history on Google, you can maintain your privacy and remove any potentially sensitive or unwanted information from your account. Regularly clearing your search history can also free up storage space and help organize your browsing experience.
Now that you know how to delete your search history on Google, you can control your browsing data and ensure a cleaner online track record.
How to Delete Search History on Safari
If you use Safari as your browser on Mac or iOS devices, deleting your search history can help maintain your privacy and remove any traces of your online activities. Here’s how you can delete your search history on Safari:
- Launch Safari: Open the Safari browser on your Mac or iOS device.
- Access the History Menu: In the top menu bar of Safari, click on the “History” tab. This will reveal a dropdown menu.
- Clear Recent History: In the dropdown menu, select “Clear History…” This will open a dialog box.
- Select Time Range: In the dialog box, you can choose the time range for which you want to delete your search history. You can select the option “all history” to remove all search history entries or choose a specific time frame.
- Delete Search History: After selecting the desired time range, click on the “Clear History” button to delete your search history. Safari will remove the selected history items from your browser.
It’s important to note that clearing your search history in Safari will remove the information permanently, and you won’t be able to recover it. Additionally, clearing your search history may also delete other browsing data, such as cookies and website preferences, depending on the options you choose.
By regularly deleting your search history on Safari, you can maintain your privacy and remove any potentially sensitive or unwanted information from your browsing records. This can help protect your online activities and ensure a cleaner browsing experience.
Keep in mind that clearing your search history on Safari does not necessarily mean that all traces of your online activities are completely erased. Websites and other online platforms may still retain some data for various purposes, including but not limited to caching, performance optimization, and user analytics.
Now that you know how to delete your search history on Safari, you can take control of your browsing data and ensure a more private and organized online experience.
How to Delete Search History on Firefox
If you use Firefox as your browser, you can easily delete your search history to maintain your privacy and remove any traces of your online activities. Here’s how you can do it:
- Open Firefox: Launch the Firefox browser on your device.
- Access the History Menu: In the top menu bar of Firefox, click on the hamburger menu icon (three horizontal lines). This will open a dropdown menu.
- Select “History”: In the dropdown menu, click on the “History” option. This will open a new tab displaying your browsing history.
- Clear Recent History: In the new tab, click on the “Clear Recent History…” option. This will open a dialog box.
- Choose Time Range and Data to Clear: In the dialog box, you can select the time range for which you want to delete your search history. You can also choose the types of data you want to clear, such as browsing history, cookies, cache, and more.
- Delete Search History: After selecting the desired time range and data to clear, click on the “Clear Now” button. Firefox will delete the selected history items and other data from your browser.
It’s important to note that clearing your search history in Firefox will remove the information permanently, and you won’t be able to recover it. Additionally, clearing your search history may also delete other browsing data depending on the options you choose.
By regularly deleting your search history on Firefox, you can maintain your privacy and remove any potentially sensitive or unwanted information from your browsing records. This can help protect your online activities and ensure a cleaner browsing experience.
Keep in mind that clearing your search history on Firefox does not necessarily mean that all traces of your online activities are completely erased. Websites and other online platforms may still retain some data for various purposes, including but not limited to caching, performance optimization, and user analytics.
Now that you know how to delete your search history on Firefox, you can take control of your browsing data and ensure a more private and organized online experience.
How to Delete Search History on Microsoft Edge
If you use Microsoft Edge as your browser, you can easily delete your search history to maintain your privacy and remove any traces of your online activities. Here’s how you can do it:
- Launch Microsoft Edge: Open the Microsoft Edge browser on your device.
- Access the History Hub: In the top right corner of the browser, click on the “Hub” icon. It resembles three horizontal lines.
- Open the History Tab: From the menu that appears, click on the “History” icon, which looks like a clock. This will open the History sidebar.
- Clear Browsing Data: In the History sidebar, click on the “Clear history” button located at the top. This will open the Clear browsing data window.
- Select Time Range and Data to Clear: In the Clear browsing data window, you can select the time range for which you want to delete your search history. You can also choose the types of data you want to clear, such as browsing history, cookies, cache, and more.
- Delete Search History: After selecting the desired time range and data to clear, click on the “Clear” button. Microsoft Edge will delete the selected search history entries and other data from your browser.
It’s important to note that clearing your search history in Microsoft Edge will remove the information permanently, and you won’t be able to recover it. Additionally, clearing your search history may also delete other browsing data depending on the options you choose.
By regularly deleting your search history on Microsoft Edge, you can maintain your privacy and remove any potentially sensitive or unwanted information from your browsing records. This can help protect your online activities and ensure a cleaner browsing experience.
Keep in mind that clearing your search history on Microsoft Edge does not necessarily mean that all traces of your online activities are completely erased. Websites and other online platforms may still retain some data for various purposes, including but not limited to caching, performance optimization, and user analytics.
Now that you know how to delete your search history on Microsoft Edge, you can take control of your browsing data and ensure a more private and organized online experience.
How to Delete Search History on Opera
If you use Opera as your browser, you can easily delete your search history to maintain your privacy and remove any traces of your online activities. Here’s how you can do it:
- Open Opera: Launch the Opera browser on your device.
- Access the History Menu: Click on the Opera icon (red “O” logo) located at the top left corner of the browser window. This will open a dropdown menu.
- Open the Clear Browsing Data Window: From the dropdown menu, hover over the “History” option, and then click on “Show All History”. Alternatively, you can use the shortcut “Ctrl+Shift+Del” (Windows) or “Command+Shift+Del” (Mac) to directly open the Clear Browsing Data window.
- Select Time Range and Data to Clear: In the Clear Browsing Data window, you can select the time range for which you want to delete your search history. You can also choose the types of data you want to clear, such as browsing history, cookies, cache, and more.
- Delete Search History: After selecting the desired time range and data to clear, click on the “Clear browsing data” button. Opera will delete the selected search history entries and other data from your browser.
It’s important to note that clearing your search history in Opera will remove the information permanently, and you won’t be able to recover it. Additionally, clearing your search history may also delete other browsing data depending on the options you choose.
By regularly deleting your search history on Opera, you can maintain your privacy and remove any potentially sensitive or unwanted information from your browsing records. This can help protect your online activities and ensure a cleaner browsing experience.
Keep in mind that clearing your search history on Opera does not necessarily mean that all traces of your online activities are completely erased. Websites and other online platforms may still retain some data for various purposes, including but not limited to caching, performance optimization, and user analytics.
Now that you know how to delete your search history on Opera, you can take control of your browsing data and ensure a more private and organized online experience.
Tips to Protect Your Search History
Protecting your search history is essential for maintaining your privacy and keeping your online activities secure. Here are some tips to help you safeguard your search history:
1. Use Private Browsing Mode:
Most modern browsers offer a private browsing mode, such as Incognito mode in Chrome or Private Window mode in Firefox. When you browse in these modes, your search history, cookies, and temporary files are not saved, helping to keep your online activities private.
2. Clear Your Search History Regularly:
Take the time to regularly clear your search history on your browser or search engine to remove any traces of your online activities. Refer to the instructions provided earlier to learn how to delete your search history on specific browsers.
3. Adjust Privacy Settings:
Review and customize the privacy settings of your browser and search engine. Consider disabling features that track your search history or limit data collection to minimize the amount of information stored about your online activities.
4. Use a Virtual Private Network (VPN):
A VPN encrypts your internet connection, making it difficult for others to monitor or track your online activities, including your search history. It adds an extra layer of security and privacy, especially when accessing the internet on public Wi-Fi networks.
5. Opt for Private Search Engines:
Consider using private search engines, such as DuckDuckGo or Startpage, which prioritize user privacy and do not track or store your search history. These search engines provide search results without collecting personal information.
6. Keep Your Browser Updated:
Regularly update your browser to ensure you have the latest security patches and bug fixes. Updated browsers often include enhanced privacy features that can protect your search history and keep your browsing experience secure.
7. Be Mindful of Extensions and Plugins:
Be cautious when installing browser extensions or plugins from unknown sources. Some extensions may have access to your search history or collect your browsing data. Only install trusted extensions and consider reviewing their permissions regularly.
8. Secure Your Devices:
Protect your devices with strong passwords or passcodes. Enable biometric features, such as fingerprint or face recognition, if available. Additionally, consider using device encryption to safeguard your search history and other sensitive information.
9. Educate Yourself About Online Privacy:
Stay informed about online privacy practices, data protection, and potential risks. Understand the privacy policies of the browsers, search engines, and websites you use, and make informed decisions about sharing your personal information.
By following these tips, you can take proactive steps to protect your search history and maintain your privacy online. Remember, safeguarding your search history not only protects your personal information but also ensures a safer and more secure digital experience.