
Checking for Software Updates
One of the first steps to take when addressing grainy camera quality on an iPhone 11 is to ensure that the device's software is up to date. Software updates often include bug fixes and improvements to the camera's performance, which can significantly impact image quality.
To check for software updates on your iPhone 11, follow these simple steps:
-
Open Settings: Tap on the "Settings" app on your iPhone's home screen.
-
Select General: Scroll down and tap on "General" to access the general settings.
-
Tap Software Update: Within the General settings, tap on "Software Update." Your iPhone will then check for available updates.
-
Download and Install: If an update is available, tap "Download and Install" to initiate the update process. Ensure that your iPhone is connected to a stable Wi-Fi network and has sufficient battery life to complete the update.
-
Follow On-Screen Instructions: Once the update is downloaded, follow the on-screen instructions to install it on your device.
By keeping your iPhone 11's software up to date, you can take advantage of the latest improvements and optimizations for the camera, potentially resolving any issues related to grainy image quality.
It's important to note that software updates not only address camera performance but also enhance the overall functionality and security of your device. Therefore, regularly checking for and installing software updates is a crucial aspect of maintaining your iPhone 11.
In the event that updating the software does not resolve the grainy camera quality, it may be necessary to explore additional troubleshooting steps to pinpoint and address the underlying cause of the issue.
Adjusting Camera Settings
Fine-tuning the camera settings on your iPhone 11 can significantly impact the quality of your photos and videos. By adjusting specific parameters, you can optimize the camera's performance and potentially mitigate issues related to grainy image quality.
1. HDR (High Dynamic Range)
The HDR feature on the iPhone 11 is designed to capture a wider range of light and detail in both bright and dark areas of a scene. By default, the HDR setting is set to "Auto," allowing the camera to determine when to use this feature. However, manually toggling the HDR setting can sometimes improve image clarity, especially in challenging lighting conditions. To adjust HDR settings:
- Open the Camera app.
- Tap the "HDR" icon at the top of the screen.
- Choose "On" to enable HDR for every photo, or "Off" to disable it entirely.
Experimenting with different HDR settings can help you capture more balanced and detailed images, potentially reducing graininess in certain scenarios.
2. Exposure and Focus
The iPhone 11 allows users to manually adjust exposure and focus for greater control over the composition of their shots. By tapping on the screen while in the Camera app, you can set the focus and exposure point, and then adjust the exposure slider to achieve the desired brightness. This level of manual control can help ensure that your photos are properly exposed, potentially reducing the likelihood of grainy or overexposed images.
3. Noise Reduction
The iPhone 11's camera settings include a noise reduction feature that aims to minimize digital noise in photos, particularly in low-light conditions. While this feature is automatically applied by the camera, accessing third-party camera apps with advanced noise reduction settings can provide additional control over this aspect of image processing.
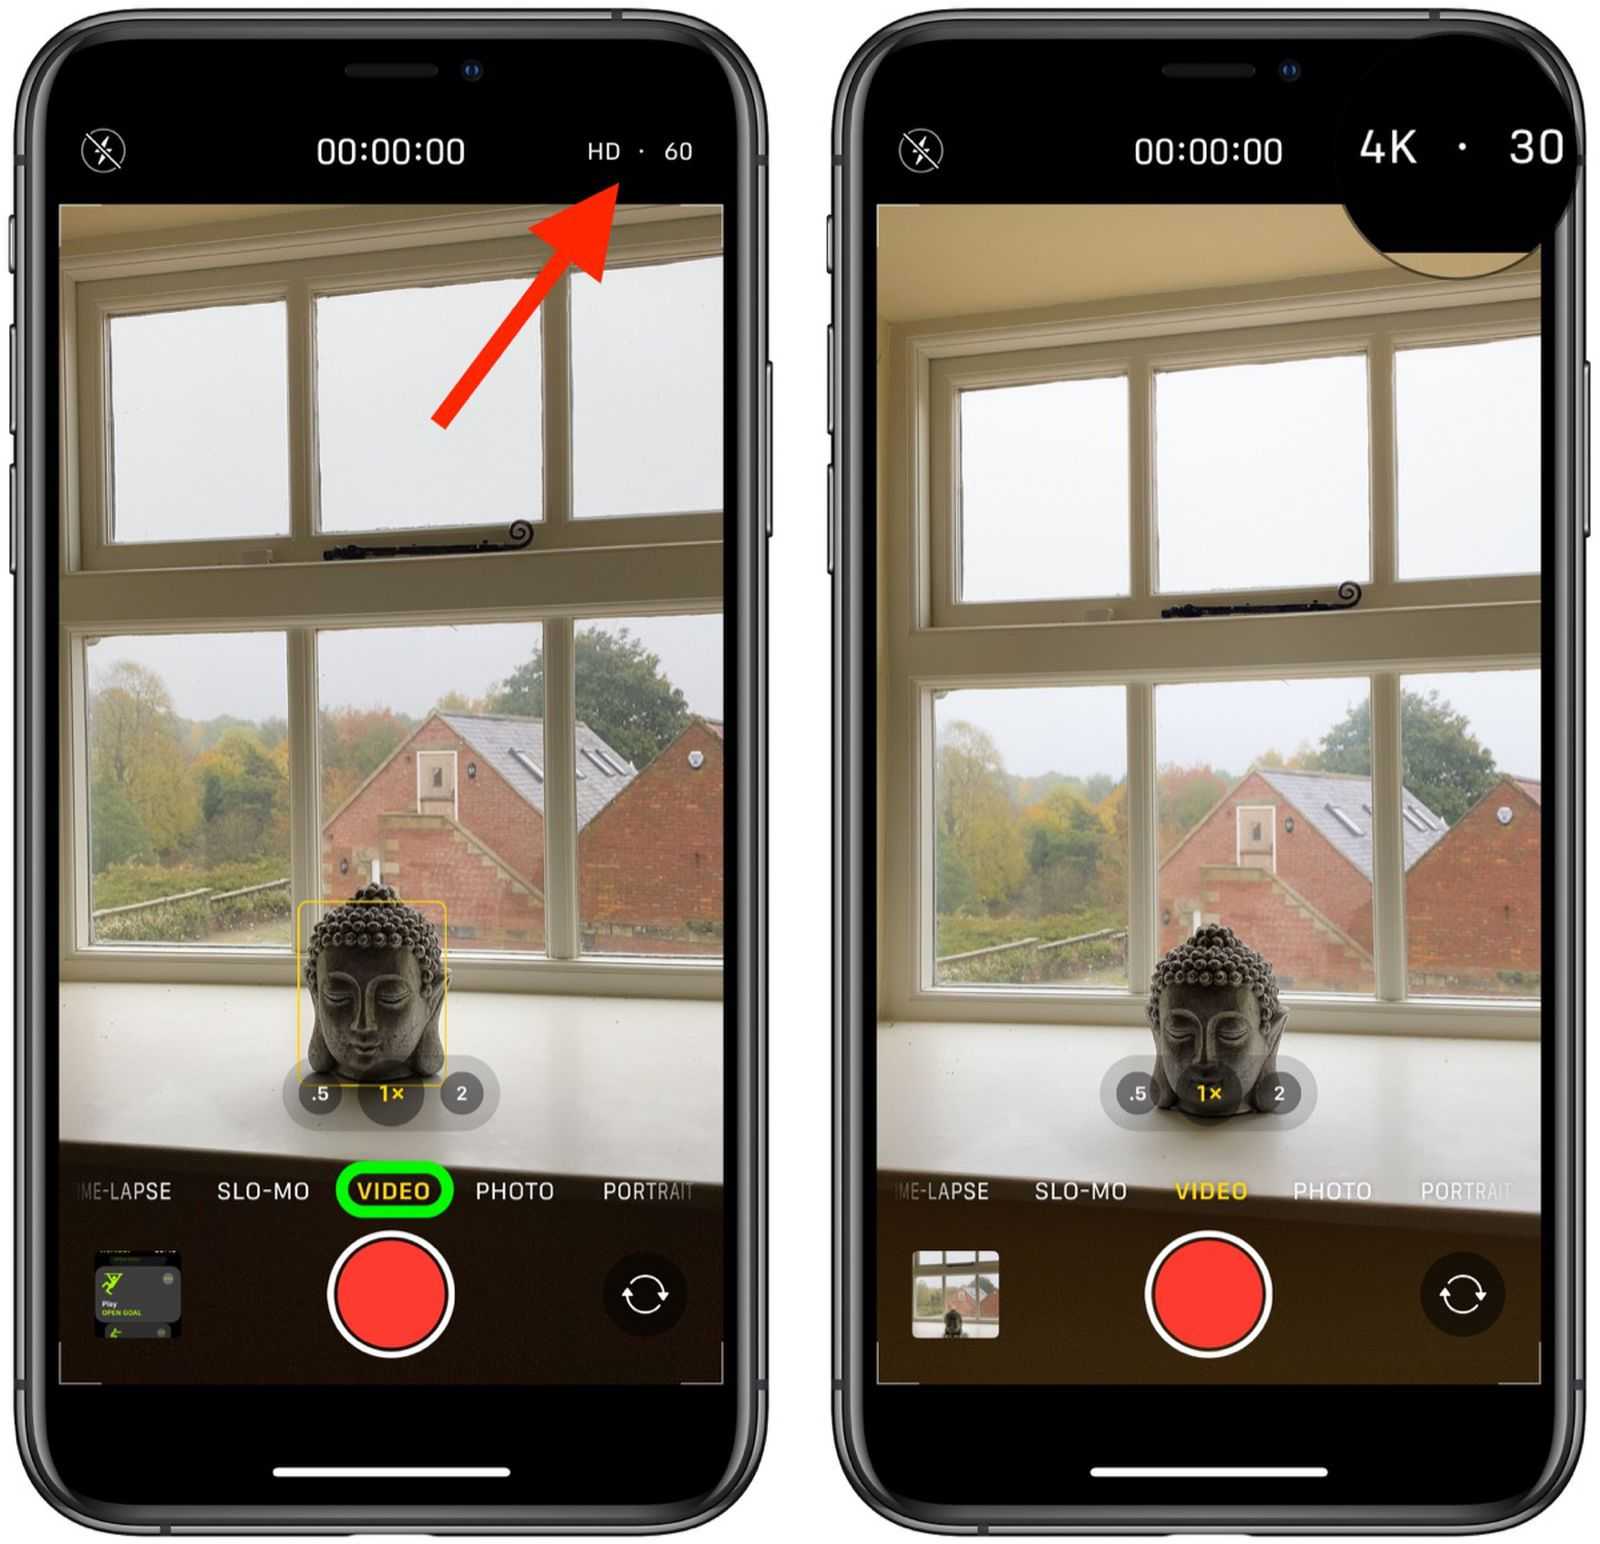
4. Resolution and Format
Adjusting the resolution and format settings can also impact image quality. The iPhone 11 offers various resolution and format options, including High Efficiency (HEIF) and Most Compatible for photo capture, as well as 4K and 1080p for video recording. Experimenting with different combinations of resolution and format settings can help identify the optimal configuration for capturing clear and detailed images.
By exploring and adjusting these camera settings, you can potentially address grainy image quality on your iPhone 11 and enhance the overall performance of the device's camera. It's important to experiment with different settings in various shooting conditions to determine the most effective configuration for your specific photography needs.
Cleaning the Camera Lens
Proper maintenance of the camera lens is essential for ensuring optimal image quality on the iPhone 11. Over time, the lens can accumulate dust, fingerprints, and smudges, which can significantly impact the clarity and sharpness of photos and videos. By regularly cleaning the camera lens, users can mitigate the risk of grainy or distorted images and maintain the overall performance of the device's camera.
To clean the camera lens of your iPhone 11, follow these simple steps:
-
Gather Cleaning Materials: Before proceeding, gather the necessary cleaning materials, including a microfiber cloth and lens cleaning solution. It's important to use a clean, soft cloth to avoid scratching the lens surface.
-
Power Off the Device: To prevent accidental activation of the camera or damage to the lens during the cleaning process, it's advisable to power off the iPhone 11 before proceeding.
-
Remove the Case: If your iPhone 11 is equipped with a protective case, remove it to access the camera lens without obstruction.
-
Inspect the Lens: Carefully examine the camera lens for any visible smudges, fingerprints, or debris. This inspection will help identify areas that require cleaning.
-
Apply Lens Cleaning Solution: Apply a small amount of lens cleaning solution to the microfiber cloth. Avoid applying the solution directly to the lens to prevent excess liquid from seeping into the device.
-
Gently Wipe the Lens: Using the dampened microfiber cloth, gently wipe the camera lens in a circular motion. Ensure that the entire lens surface is cleaned thoroughly, paying particular attention to areas with visible smudges or debris.
-
Dry the Lens: After cleaning the lens with the damp cloth, use a dry section of the microfiber cloth to gently dry the lens surface. This step helps remove any remaining moisture or cleaning solution.
-
Inspect the Lens Again: Once the lens is cleaned and dried, inspect it again to ensure that all smudges and debris have been effectively removed.
By incorporating regular lens cleaning into your iPhone 11 maintenance routine, you can optimize the camera's performance and minimize the risk of grainy or distorted images. Additionally, maintaining a clean camera lens can contribute to the overall longevity and functionality of the device, ensuring that you consistently capture high-quality photos and videos.
Remember to exercise caution and gentleness when cleaning the camera lens to avoid causing damage. With proper care and maintenance, you can maximize the potential of your iPhone 11's camera and enjoy consistently clear and vibrant images.
Restarting the iPhone
Restarting the iPhone is a fundamental troubleshooting step that can effectively address a wide range of issues, including those related to the camera's performance and image quality. By restarting the device, you initiate a fresh boot cycle, which can resolve temporary software glitches, clear system caches, and recalibrate various components, potentially leading to improved camera functionality and clearer image capture.
To restart your iPhone 11, follow these straightforward steps:
-
Press and Hold the Side Button: Locate the side button on your iPhone 11, which is used to power the device on and off. Press and hold this button until the "slide to power off" slider appears on the screen.
-
Slide to Power Off: Once the "slide to power off" slider is displayed, use your finger to swipe the slider from left to right. This action initiates the shutdown process for your iPhone 11.
-
Wait for Shutdown: Allow the device to power off completely. You may notice the screen going dark, indicating that the iPhone has successfully shut down.
-
Press and Hold the Side Button Again: After the device has powered off, press and hold the side button once more. Continue holding the button until the Apple logo appears on the screen, indicating that the iPhone is restarting.
-
Release the Side Button: Once the Apple logo is displayed, release the side button and allow the device to complete the restart process.
By performing a restart, you give your iPhone 11 the opportunity to reset various system processes and clear any temporary inconsistencies that may be affecting the camera's performance. This simple yet effective troubleshooting step can often resolve issues related to grainy image quality, camera freezing, or other unexpected behaviors.
It's important to note that restarting the iPhone 11 is a non-invasive procedure that does not affect your personal data or settings. Instead, it focuses on refreshing the device's software and hardware components, potentially leading to improved overall performance.
In the event that grainy camera quality persists after restarting the iPhone, it may be necessary to explore additional troubleshooting steps, such as resetting camera settings or contacting Apple Support for further assistance. However, for many users, a simple restart can be the key to restoring the camera's clarity and ensuring a seamless photography experience on the iPhone 11.
Resetting Camera Settings
Resetting the camera settings on your iPhone 11 can serve as a valuable troubleshooting step when addressing issues related to grainy image quality and overall camera performance. This process essentially restores the camera settings to their default configurations, effectively clearing any potential inconsistencies or irregularities that may be impacting the camera's functionality.
To reset the camera settings on your iPhone 11, follow these steps:
-
Open the Settings App: Navigate to the home screen of your iPhone 11 and locate the "Settings" app. Tap to open the settings menu.
-
Scroll to Camera: Within the Settings menu, scroll down and select "Camera" to access the camera-specific settings.
-
Tap "Preserve Settings": Under the Camera settings, tap on "Preserve Settings" to ensure that specific settings, such as camera mode or filter, are preserved even after the reset. This step is optional and can be adjusted based on personal preferences.
-
Scroll to the Bottom and Tap "Reset": At the bottom of the Camera settings menu, you will find the "Reset" option. Tap on this to proceed with resetting the camera settings.
-
Confirm the Reset: A confirmation prompt will appear, asking if you want to reset all settings to their defaults. Tap "Reset All Settings" to initiate the process.
It's important to note that resetting the camera settings does not delete any photos or videos stored on your device. Instead, it focuses on reverting the camera's configuration to its original state, potentially resolving issues related to grainy image quality, exposure inconsistencies, or other camera-related challenges.
By resetting the camera settings, you provide the device with a fresh starting point, allowing it to recalibrate and reconfigure its camera parameters. This can be particularly beneficial if certain settings have become inadvertently misconfigured, leading to suboptimal image quality.
After resetting the camera settings, it's advisable to test the camera in various shooting conditions to assess whether the grainy image quality issue has been resolved. Additionally, users may need to readjust specific settings based on their preferences and shooting requirements.
In the event that resetting the camera settings does not alleviate the grainy image quality problem, further troubleshooting steps, such as contacting Apple Support or exploring hardware-related considerations, may be necessary to pinpoint and address the underlying issue.
Overall, resetting the camera settings on the iPhone 11 can be a valuable and non-destructive troubleshooting approach, offering the potential to restore the camera's performance and image quality to their optimal states.
Contacting Apple Support
If the aforementioned troubleshooting steps fail to resolve the grainy camera quality issue on your iPhone 11, reaching out to Apple Support can provide valuable assistance and guidance. Apple offers a comprehensive support system that caters to various technical concerns, including those related to the performance of iPhone cameras.
Direct Support Channels
1. Apple Support Website
The Apple Support website serves as a centralized platform for accessing a wealth of resources, including troubleshooting guides, support articles, and community forums. Users can explore specific topics related to camera issues, participate in discussions, and gain insights from Apple experts and fellow iPhone users.
2. Apple Support App
The Apple Support app offers a convenient way to seek assistance directly from your iPhone. Through the app, users can initiate support chats, schedule appointments at Apple Stores or authorized service providers, and receive personalized recommendations based on their device and issue.
3. Apple Authorized Service Provider
Visiting an Apple Authorized Service Provider allows for in-person assessment and support for hardware-related concerns. These providers are equipped to diagnose and address a wide range of technical issues, offering expert guidance and potential solutions for camera-related challenges.
Remote Support Options
1. Phone Support
Apple's phone support service enables users to connect with knowledgeable advisors who can provide personalized assistance for iPhone-related issues. By engaging in a phone conversation, users can receive step-by-step guidance and troubleshooting recommendations tailored to their specific concerns.
2. Online Chat Support
The online chat support feature on the Apple Support website facilitates real-time communication with Apple's support team. This interactive platform allows users to describe their camera issues and receive immediate feedback, potentially leading to effective solutions or further diagnostic steps.
Apple Store Genius Bar
Visiting an Apple Store and consulting with a Genius at the Genius Bar presents an opportunity to receive hands-on support and guidance. Geniuses are trained to diagnose and address various technical issues, including those related to iPhone cameras, offering personalized recommendations and potential resolutions.
Technical Diagnostics and Service Options
In cases where the grainy camera quality issue persists despite initial troubleshooting efforts, Apple Support can initiate diagnostic tests to identify potential hardware or software anomalies. Depending on the findings, service options such as repair or replacement may be recommended to address underlying issues and restore the camera's optimal performance.
By leveraging the diverse support channels and resources offered by Apple, users can access tailored guidance and potential solutions for persistent camera quality concerns. Whether seeking remote assistance, in-person support, or diagnostic services, Apple Support aims to empower users with the tools and expertise needed to address technical challenges and optimize the performance of their iPhone cameras.