
Understanding the Northern Lights
The Northern Lights, also known as Aurora Borealis, are one of the most mesmerizing natural phenomena that grace the night skies in the polar regions. This breathtaking display of colorful lights is caused by the interaction between charged particles from the sun and the Earth's magnetic field. When these charged particles collide with the Earth's atmosphere, they emit light, creating the stunning auroral displays that captivate observers.
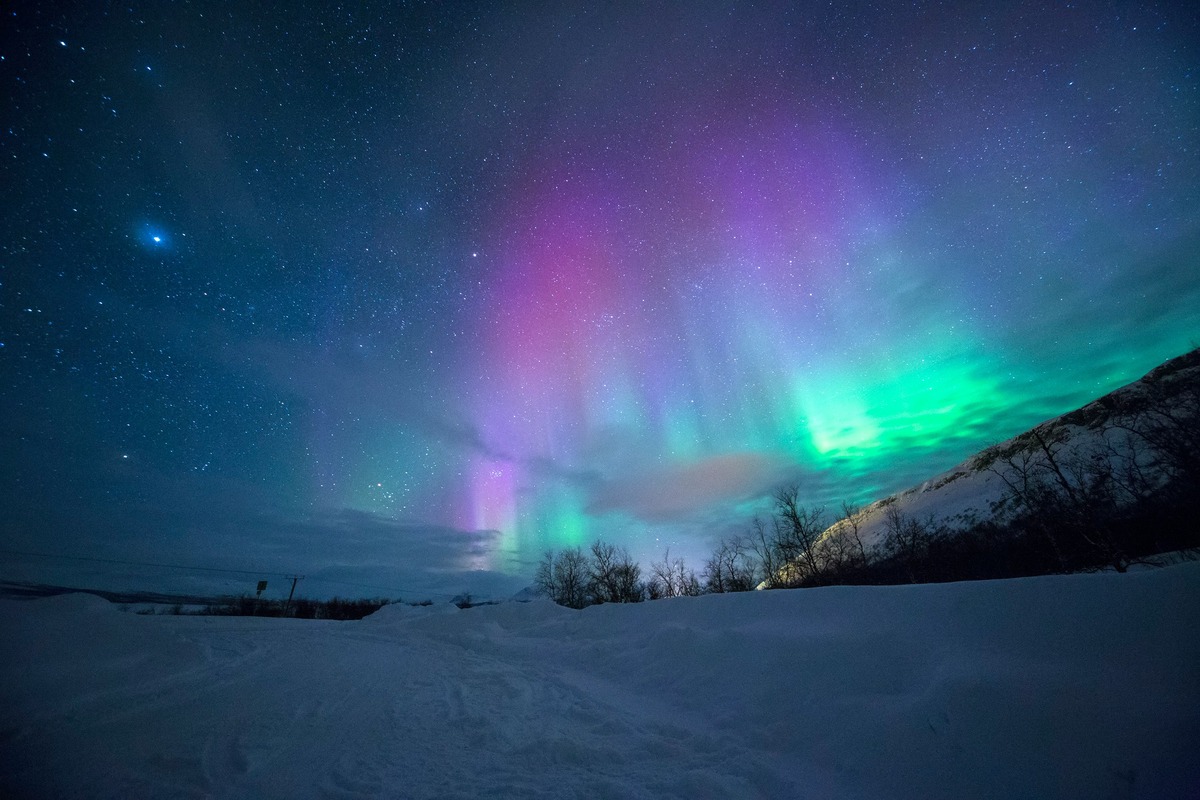
The colors of the Northern Lights are a result of the type of gas particles colliding with the charged particles. Oxygen molecules produce green and red auroras, while nitrogen molecules create purple, blue, and pink hues. The intensity and color variations of the auroras are influenced by the altitude at which the collisions occur and the type of particles involved.
To witness the Northern Lights, one must venture to high-latitude regions, such as Scandinavia, Iceland, Canada, and Alaska, where the auroras are most commonly visible. The best time to observe the Northern Lights is during the winter months when the nights are long and the skies are dark. Additionally, the auroras are more likely to appear during periods of high solar activity, such as during the solar maximum of the 11-year solar cycle.
Understanding the science and characteristics of the Northern Lights is crucial for capturing their beauty through photography. By comprehending the factors that contribute to the appearance of the auroras, photographers can strategically plan their shoots and optimize their camera settings to immortalize this celestial spectacle.
In the next sections, we will delve into the intricacies of photographing the Northern Lights with an iPhone 11, from selecting the right location and time to mastering the camera settings and post-processing techniques. With a solid understanding of the Northern Lights and the right tools at hand, you can embark on a captivating journey to capture the magic of the auroras with your iPhone 11.
Choosing the Right Location and Time
Capturing the mesmerizing Northern Lights with your iPhone 11 begins with selecting the perfect location and timing. The Northern Lights are predominantly visible in high-latitude regions, making destinations such as Iceland, Norway, Sweden, Canada, and Alaska prime locations for aurora photography. These areas offer dark, unpolluted skies, providing an ideal backdrop for the celestial spectacle.
When choosing a location, consider factors such as light pollution and weather conditions. Opt for remote areas away from urban centers to minimize light pollution, which can diminish the visibility and vibrancy of the auroras. Additionally, check the weather forecast to ensure clear skies, as cloud cover can obstruct the view of the Northern Lights.
The timing of your aurora photography expedition is equally crucial. Plan your trip during the winter months, particularly from September to March, when the nights are long and darkness prevails. This period offers extended opportunities to witness and photograph the Northern Lights against the backdrop of the night sky. Furthermore, aim to coincide your visit with periods of high solar activity, as this increases the likelihood of vibrant auroral displays.
To optimize your chances of capturing the Northern Lights, consider consulting aurora forecast websites and apps, which provide real-time information on aurora visibility and solar activity. These resources offer valuable insights into the expected aurora intensity and the best times to venture out for photography.
By carefully selecting the right location and timing for your Northern Lights photography excursion, you can position yourself for an awe-inspiring encounter with this celestial phenomenon. With the stage set for the auroras to dance across the night sky, the next step is to prepare your iPhone 11 for capturing these breathtaking moments.
Setting Up Your iPhone 11 for Northern Lights Photography
Preparing your iPhone 11 for Northern Lights photography involves optimizing its settings and features to ensure that you can effectively capture the mesmerizing auroras. While professional cameras are commonly associated with astrophotography, the advanced capabilities of the iPhone 11 make it a formidable tool for capturing the Northern Lights. Here's how to set up your iPhone 11 for this captivating endeavor:
1. Enable Night Mode:
The Night Mode feature on the iPhone 11 is designed to enhance low-light photography, making it particularly useful for capturing the Northern Lights. When shooting in dimly lit environments, the Night Mode automatically activates, allowing the camera to capture stunning details and vibrant colors even in the darkness. To enable Night Mode, simply tap on the Night Mode icon that appears when the camera detects low-light conditions.
2. Use a Tripod or Stabilization:
Stability is crucial for capturing clear and sharp images of the Northern Lights. To minimize camera shake and blurriness, use a tripod or a stable surface to mount your iPhone 11. Alternatively, consider using accessories such as a smartphone tripod mount or a grip stabilizer to ensure steady and shake-free shots.
3. Adjust Focus and Exposure:
Manually adjusting the focus and exposure settings can significantly improve the quality of your Northern Lights photos. When using the iPhone 11's camera app, tap and hold on the screen to lock the focus on a specific area of the sky where the auroras are most prominent. Additionally, you can adjust the exposure slider to control the brightness of the image, allowing you to capture the delicate nuances of the auroras without overexposure.
4. Disable Flash and HDR:
When photographing the Northern Lights, it's essential to disable the flash and HDR (High Dynamic Range) features on your iPhone 11. The flash can disrupt the natural ambient light of the auroras, while HDR may not be suitable for capturing the dynamic and rapidly changing light patterns of the Northern Lights. By turning off these features, you can ensure that your iPhone 11 is optimized for capturing the raw beauty of the auroras.
5. Clean the Lens:
Before embarking on your Northern Lights photography expedition, ensure that the lens of your iPhone 11 is clean and free from smudges or debris. A clean lens is essential for capturing crisp and clear images, especially in low-light conditions where any obstructions can impact the overall image quality.
By implementing these adjustments and preparations, you can effectively set up your iPhone 11 for Northern Lights photography. With your device primed to capture the celestial spectacle, the next step is to fine-tune the camera settings for optimal results.
Adjusting Camera Settings for Aurora Photography
Capturing the ethereal beauty of the Northern Lights with your iPhone 11 requires meticulous attention to camera settings to ensure that the vibrant colors and intricate details of the auroras are faithfully preserved in your photographs. By adjusting the camera settings with precision, you can elevate your aurora photography to new heights, transforming fleeting moments of celestial splendor into timeless visual masterpieces.
1. Exposure and Shutter Speed:
Achieving the perfect exposure is paramount in Northern Lights photography. With the iPhone 11, you can manually adjust the exposure to control the amount of light entering the camera sensor. When photographing the auroras, experiment with different exposure settings to find the optimal balance between capturing the vivid colors of the Northern Lights and maintaining the natural darkness of the night sky. Additionally, adjusting the shutter speed is crucial for capturing the dynamic movement of the auroras. A longer shutter speed allows for the graceful motion of the lights to be captured, creating mesmerizing streaks and patterns across the sky.
2. ISO Sensitivity:
The ISO sensitivity of the camera determines its ability to capture light in low-light conditions. When photographing the Northern Lights, consider adjusting the ISO settings on your iPhone 11 to enhance the camera's sensitivity to the faint light emitted by the auroras. However, it's important to strike a balance, as excessively high ISO settings can introduce digital noise and graininess to the images. Experiment with different ISO levels to find the optimal sensitivity that preserves the clarity and vibrancy of the auroras while minimizing noise.
3. White Balance:
The color temperature of the light emitted by the Northern Lights can vary, ranging from cool blues and purples to warm greens and reds. Adjusting the white balance settings on your iPhone 11 allows you to accurately capture the diverse color palette of the auroras. By fine-tuning the white balance, you can ensure that the hues of the Northern Lights are faithfully reproduced in your photographs, conveying the true essence of this celestial spectacle.
4. Focus and Composition:
When photographing the Northern Lights, it's essential to maintain a sharp and clear focus on the celestial display. Use the iPhone 11's manual focus capabilities to ensure that the intricate details and patterns of the auroras are captured with precision. Additionally, consider the composition of your shots, framing the Northern Lights against the backdrop of the night sky or incorporating natural elements such as trees or mountains to add depth and context to your photographs.
By meticulously adjusting the camera settings of your iPhone 11, you can unleash its full potential as a powerful tool for capturing the enchanting allure of the Northern Lights. With these settings optimized, you are poised to embark on a captivating journey to immortalize the celestial dance of the auroras with your iPhone 11.
Capturing the Northern Lights with iPhone 11
Capturing the mesmerizing Northern Lights with your iPhone 11 is a thrilling endeavor that allows you to immortalize the celestial spectacle with remarkable clarity and vibrancy. Armed with a solid understanding of the Northern Lights and meticulously optimized camera settings, you are now poised to embark on an enchanting journey to capture the auroras in all their splendor.
As you venture into the dark, pristine landscapes where the Northern Lights grace the night skies, prepare to be immersed in a realm of otherworldly beauty. With your iPhone 11 in hand and the stage set for the auroras to make their appearance, the art of capturing the Northern Lights unfolds as a delicate dance between technology and nature.
Position yourself in a strategic vantage point, ensuring an unobstructed view of the night sky where the auroras are expected to manifest. As the first wisps of colorful light begin to emerge, unleash the full potential of your iPhone 11's camera, poised to seize the fleeting moments of celestial grandeur.
Engage the meticulously adjusted camera settings to orchestrate the perfect exposure, allowing the vibrant hues of the Northern Lights to unfold in all their glory. Experiment with varying shutter speeds to capture the graceful movement of the auroras, transforming their ephemeral dance into timeless visual poetry.
Harness the enhanced sensitivity of the iPhone 11's camera to encapsulate the ethereal glow of the auroras, preserving their intricate details and luminous beauty with unparalleled clarity. As the Northern Lights weave their enchanting tapestry across the night sky, seize the opportunity to frame the celestial display against the backdrop of the natural landscape, adding depth and context to your photographs.
With each click of the shutter, you encapsulate the essence of the Northern Lights, freezing moments of celestial splendor into captivating images that transcend the boundaries of time and space. The iPhone 11 becomes a conduit for your artistic vision, transforming the intangible magic of the auroras into tangible visual narratives that evoke wonder and awe.
As the auroras gracefully fade into the night, you are left with a collection of photographs that encapsulate the essence of this celestial spectacle. Each image tells a story of the Northern Lights, capturing their ephemeral beauty and timeless allure with the precision and artistry of the iPhone 11's camera.
In the realm of Northern Lights photography, the iPhone 11 emerges as a formidable ally, empowering you to encapsulate the celestial dance of the auroras with unparalleled clarity and artistry. With each photograph, you preserve the magic of the Northern Lights, inviting others to embark on a visual journey through the celestial wonders that grace the polar skies.
In the next section, we will explore the art of editing and enhancing Northern Lights photos, elevating your captures to new heights of visual splendor.
Editing and Enhancing Northern Lights Photos
Editing and enhancing Northern Lights photos is a crucial step in the process of immortalizing the ethereal beauty of the auroras captured with your iPhone 11. Through skillful post-processing techniques, you can elevate your Northern Lights photographs to new heights, accentuating their mesmerizing allure and preserving the true essence of this celestial spectacle.
1. Embracing the Magic of Lightroom:
Adobe Lightroom stands as a powerful ally in the realm of Northern Lights photography post-processing. Leveraging its comprehensive suite of editing tools, you can fine-tune the exposure, contrast, and color balance of your Northern Lights photos with precision. By delicately adjusting these parameters, you can accentuate the vibrant hues of the auroras while preserving the natural ambiance of the night sky.
2. Enhancing Color and Contrast:
The Northern Lights exhibit a captivating array of colors, ranging from subtle pastels to intense, luminous hues. In post-processing, you can enhance the color vibrancy and contrast of the auroras, ensuring that their radiant beauty is faithfully conveyed in your photographs. By carefully adjusting the saturation and vibrance levels, you can breathe life into the delicate dance of light that graces the night sky.
3. Fine-Tuning Clarity and Sharpness:
To capture the intricate details and delicate textures of the Northern Lights, it is essential to fine-tune the clarity and sharpness of your photographs. Through selective adjustments, you can accentuate the graceful patterns and luminous wisps of the auroras, ensuring that every nuance is preserved with remarkable clarity and precision.
4. Embracing the Art of Composition:
In addition to technical adjustments, post-processing offers the opportunity to refine the composition and framing of your Northern Lights photographs. By cropping and aligning the images with artistic intent, you can create visually compelling narratives that draw the viewer into the enchanting world of the auroras, evoking a sense of wonder and awe.
5. Preserving the Authenticity of the Auroras:
While post-processing allows for creative enhancements, it is essential to preserve the authenticity and natural essence of the Northern Lights. Avoid excessive manipulation that distorts the true character of the auroras, striving to capture and convey their ephemeral beauty with honesty and reverence.
By embracing the art of post-processing, you can breathe new life into your Northern Lights photographs, transforming them into captivating visual narratives that encapsulate the timeless allure of the auroras. With skillful editing and enhancements, you preserve the magic of the Northern Lights, inviting others to embark on a visual journey through the celestial wonders that grace the polar skies.