
Understanding the Aurora Borealis
The Aurora Borealis, also known as the Northern Lights, is a breathtaking natural phenomenon that graces the night skies in high-latitude regions. This mesmerizing display of colorful lights is caused by the interaction between charged particles from the sun and the Earth's magnetic field. Understanding the science behind this celestial spectacle can deepen our appreciation for its beauty.
At the heart of the Aurora Borealis lies a complex interplay of solar activity and the Earth's magnetic field. When the sun releases a surge of charged particles, known as solar wind, into space, some of these particles are drawn towards the Earth by its magnetic field. As these charged particles collide with the gases in the Earth's atmosphere, such as oxygen and nitrogen, they emit photons of light, creating the stunning auroral displays that captivate observers below.
The colors of the Northern Lights are determined by the type of gas particles involved in the collision. Oxygen molecules typically produce green and red hues, while nitrogen molecules contribute to the display with shades of blue, purple, and pink. The altitude at which these collisions occur also influences the colors and shapes of the auroras, resulting in a dynamic and ever-changing visual symphony across the night sky.
The occurrence of the Aurora Borealis is closely linked to solar activity, particularly during periods of heightened solar flares and sunspot cycles. As the sun approaches the peak of its 11-year solar cycle, the frequency and intensity of the Northern Lights tend to increase, offering prime opportunities for photographers and enthusiasts to witness and capture this celestial spectacle.
Appreciating the Aurora Borealis goes beyond its visual allure; it also serves as a reminder of the intricate connections between the sun, the Earth, and the cosmos. By delving into the science behind this natural wonder, we gain a deeper understanding of the forces at play in our solar system and the awe-inspiring displays they produce in the night sky.
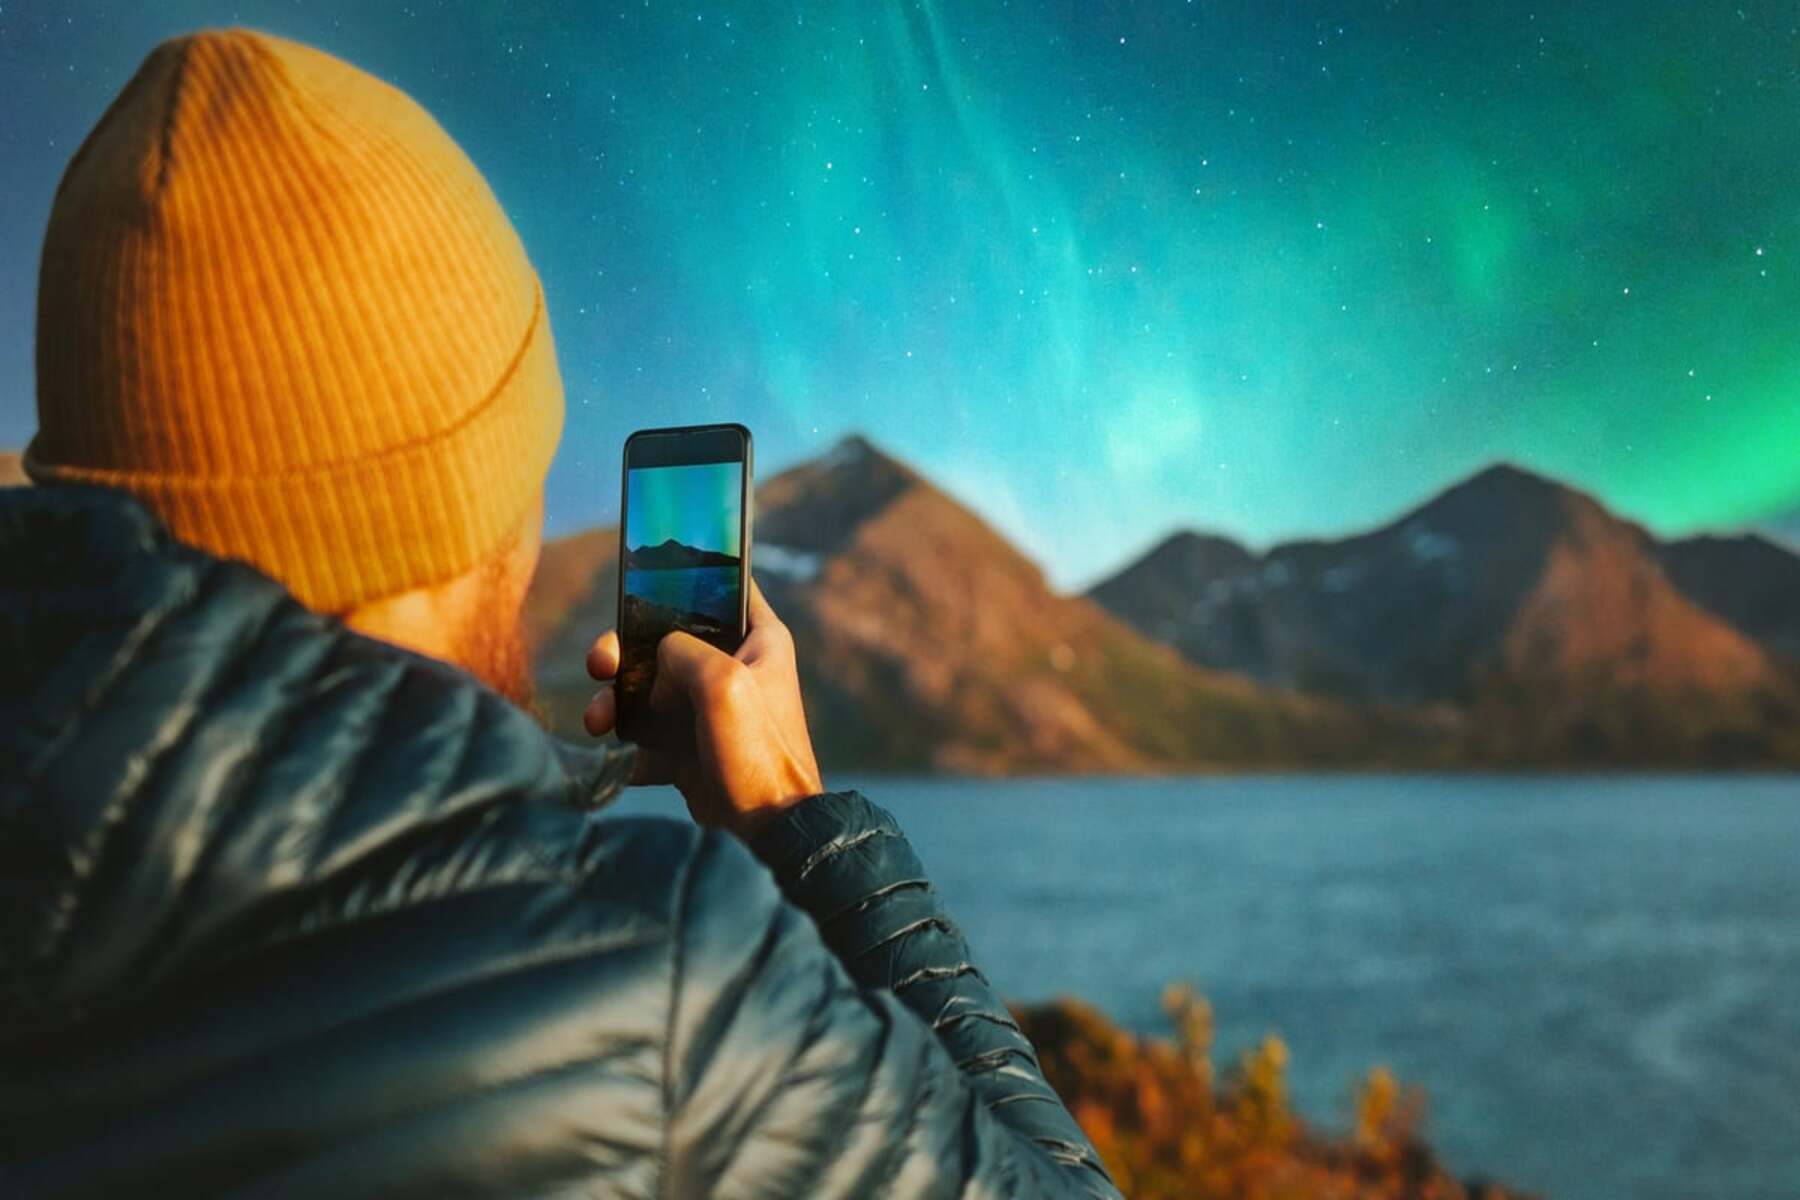
Tips for Photographing the Northern Lights
Capturing the ethereal beauty of the Northern Lights through photography is a thrilling and rewarding endeavor. To immortalize this celestial spectacle with your iPhone 12, consider the following tips to enhance your chances of capturing stunning aurora images:
-
Plan Ahead: Research the best times and locations for viewing the Northern Lights. Consult aurora forecast websites and apps to identify nights with high auroral activity. Additionally, scout for dark, open areas away from light pollution to maximize visibility and photo quality.
-
Use a Sturdy Tripod: Stability is crucial for capturing sharp, clear images of the Northern Lights. Invest in a reliable tripod to minimize camera shake during long exposures. This will help maintain the integrity of the intricate light patterns and prevent blurriness in your photos.
-
Master Manual Settings: Familiarize yourself with the manual camera settings on your iPhone 12, such as adjusting exposure, ISO, and shutter speed. Experiment with different combinations to find the optimal settings for capturing the vibrant colors and delicate movements of the auroras.
-
Long Exposure Techniques: Utilize the long exposure capabilities of your iPhone 12 to capture the mesmerizing dance of the Northern Lights. By prolonging the exposure time, you can accentuate the vivid colors and intricate patterns, resulting in captivating and dynamic photographs.
-
Frame the Scene: Incorporate compelling foreground elements, such as trees, mountains, or bodies of water, to add depth and context to your Northern Lights compositions. This juxtaposition can elevate the visual impact of your photos and create a sense of scale and wonder.
-
Minimize Light Pollution: Avoid using artificial light sources, such as flash or ambient light from nearby structures, as they can detract from the natural radiance of the auroras. Embrace the darkness and allow the Northern Lights to be the focal point of your compositions.
-
Stay Patient and Observant: The Northern Lights are a natural phenomenon, and their appearance can be unpredictable. Exercise patience and remain vigilant during your photography sessions, as the auroras may intensify or change shape and color throughout the night.
-
Experiment with Perspectives: Explore different angles and compositions to capture the Northern Lights from unique vantage points. Whether it's a wide panoramic view or a close-up of intricate details, varying perspectives can yield diverse and captivating images.
By implementing these tips and techniques, you can elevate your Northern Lights photography with the iPhone 12, immortalizing the awe-inspiring beauty of the auroras in stunning visual narratives.
Preparing Your iPhone 12 for Aurora Photography
Before embarking on a captivating journey to capture the mesmerizing Northern Lights with your iPhone 12, it's essential to prepare your device for the unique challenges and opportunities presented by aurora photography. By optimizing your iPhone 12 for this celestial endeavor, you can maximize its potential to immortalize the enchanting dance of colors in the night sky.
Clean the Lens
Start by ensuring that the lens of your iPhone 12 is pristine and free from any smudges, dust, or debris. A clean lens is crucial for capturing sharp and clear images, especially in low-light conditions. Use a microfiber cloth or lens cleaning tool to gently remove any impurities that could compromise the quality of your aurora photographs.
Update Camera Software
Keeping your iPhone 12's camera software up to date is vital for optimizing its performance and leveraging any enhancements or features that may improve low-light photography. Check for and install any available updates to ensure that your device is equipped with the latest camera capabilities for capturing the Northern Lights with precision and clarity.
Charge Your Device
Aurora photography often involves extended periods of shooting in cold environments, where battery life can be significantly impacted. To avoid missing out on capturing the perfect aurora moment, fully charge your iPhone 12 before venturing out. Consider bringing a portable power bank to ensure uninterrupted shooting sessions amidst the captivating auroral displays.
Enable Gridlines and HDR
Activate the gridlines feature on your iPhone 12's camera app to assist in composing well-balanced and visually engaging aurora shots. Additionally, consider enabling the High Dynamic Range (HDR) mode to capture a wider range of light and detail in your Northern Lights photographs, especially when dealing with varying levels of brightness and contrast in the night sky.
Adjust Camera Settings
Familiarize yourself with the manual camera settings of the iPhone 12, including adjusting exposure, ISO, and shutter speed. Experiment with different combinations to find the optimal settings for capturing the vibrant colors and delicate movements of the auroras. Consider utilizing the Night mode feature for enhanced low-light performance and extended exposure times.
By meticulously preparing your iPhone 12 for aurora photography, you can harness the full potential of your device to immortalize the enchanting spectacle of the Northern Lights. With a clean lens, updated software, fully charged battery, optimized camera settings, and essential features enabled, your iPhone 12 is poised to capture the celestial dance of colors with unparalleled clarity and artistry.
Choosing the Right Location for Northern Lights Photography
Selecting the ideal location for Northern Lights photography is a pivotal decision that significantly influences the quality and visual impact of your aurora images. The following considerations can guide you in choosing the perfect setting to capture the mesmerizing dance of the auroras with your iPhone 12.
Dark Sky Areas
Opt for locations with minimal light pollution to ensure optimal visibility and clarity of the Northern Lights. Seek out dark sky areas, such as remote wilderness locations, national parks, or coastal regions, where ambient light from urban centers and artificial sources is minimal. By immersing yourself in pristine dark skies, you can amplify the brilliance of the auroras and capture their radiant beauty with enhanced precision.
Aurora Forecast
Consult reliable aurora forecast resources and apps to identify regions with favorable auroral activity during your planned photography sessions. These tools provide real-time data on geomagnetic conditions, solar wind activity, and aurora visibility forecasts, empowering you to pinpoint locations where the Northern Lights are most likely to manifest in all their splendor.
Scenic Backdrops
Seek out locations with captivating natural features that can complement the ethereal allure of the Northern Lights in your compositions. Consider incorporating elements such as snow-covered landscapes, reflective bodies of water, rugged mountains, or silhouetted trees to add depth and context to your aurora photographs. These scenic backdrops can elevate the visual narrative of your images and create a sense of wonder and scale.
Accessibility and Safety
Prioritize locations that are easily accessible and safe for nighttime photography excursions. Ensure that the chosen site allows for unobstructed views of the northern horizon, where the Northern Lights typically manifest. Additionally, consider factors such as weather conditions, terrain stability, and proximity to emergency services to ensure a secure and enjoyable photography experience amidst the captivating auroras.
Local Knowledge
Leverage local knowledge and insights from experienced photographers, tour guides, or community members familiar with the region's aurora viewing opportunities. Their expertise can provide valuable recommendations on prime locations, optimal vantage points, and potential logistical considerations, enhancing your chances of capturing remarkable Northern Lights imagery.
By carefully considering these factors and conducting thorough research, you can strategically choose the right location for Northern Lights photography, setting the stage for capturing the celestial symphony of colors with your iPhone 12. Embrace the natural beauty of dark sky areas, leverage aurora forecast tools, seek scenic backdrops, prioritize accessibility and safety, and tap into local knowledge to maximize the potential of your aurora photography endeavors.
Setting Up Your iPhone 12 for Capturing the Aurora
Preparing your iPhone 12 for capturing the mesmerizing dance of the Northern Lights involves a strategic approach to optimize its camera capabilities for low-light, high-contrast scenarios. By implementing the following steps, you can ensure that your device is primed to immortalize the enchanting auroras with unparalleled clarity and artistry.
Clean the Lens
Commence the preparation process by meticulously cleaning the lens of your iPhone 12. Any smudges, dust, or debris on the lens can compromise the sharpness and clarity of your aurora photographs, especially in low-light conditions. Utilize a microfiber cloth or specialized lens cleaning tool to gently remove any impurities, ensuring that the lens is pristine and ready to capture the intricate details of the Northern Lights.
Update Camera Software
Keeping your iPhone 12's camera software up to date is essential for leveraging any enhancements or features that may improve its performance in challenging lighting environments. Check for and install any available updates to ensure that your device is equipped with the latest camera capabilities, including low-light optimization and advanced imaging algorithms tailored for capturing the vivid hues and delicate movements of the auroras.
Charge Your Device
Aurora photography often entails extended shooting sessions in cold environments, where battery life can be significantly impacted. To mitigate the risk of missing out on capturing the perfect aurora moment, ensure that your iPhone 12 is fully charged before embarking on your photography expedition. Consider bringing a portable power bank to sustain uninterrupted shooting amidst the captivating auroral displays.
Enable Gridlines and HDR
Activate the gridlines feature within your iPhone 12's camera app to assist in composing well-balanced and visually engaging aurora shots. The gridlines can aid in aligning the elements within your frame, enhancing the overall composition of your Northern Lights photographs. Additionally, consider enabling the High Dynamic Range (HDR) mode to capture a wider range of light and detail, especially when dealing with varying levels of brightness and contrast in the night sky.
Adjust Camera Settings
Familiarize yourself with the manual camera settings of the iPhone 12, including exposure, ISO, and shutter speed adjustments. Experiment with different combinations to find the optimal settings for capturing the vibrant colors and delicate movements of the auroras. Consider utilizing the Night mode feature for enhanced low-light performance and extended exposure times, allowing you to capture the celestial dance of colors with remarkable clarity and depth.
By meticulously executing these preparatory steps, you can equip your iPhone 12 with the essential tools and capabilities to capture the enchanting spectacle of the Northern Lights with precision and artistry. With a clean lens, updated software, fully charged battery, optimized camera settings, and essential features enabled, your iPhone 12 is poised to immortalize the celestial dance of colors in the night sky, preserving the awe-inspiring beauty of the auroras for generations to come.
Editing and Enhancing Northern Lights Photos on iPhone 12
Once you have captured the mesmerizing dance of the Northern Lights with your iPhone 12, the journey continues with the post-processing phase, where you can elevate your aurora photographs to new heights through editing and enhancement techniques. Leveraging the powerful capabilities of the iPhone 12's built-in editing tools and third-party applications, you can refine and accentuate the ethereal beauty of the auroras, transforming your raw captures into stunning visual masterpieces.
Embracing Natural Colors
When editing Northern Lights photos, it's essential to preserve the natural colors and tones that define the captivating allure of the auroras. Avoid excessive saturation or color manipulation, and instead, focus on enhancing the inherent vibrancy and richness of the auroral hues. Utilize the color adjustment tools within your editing app to fine-tune the balance of tones, ensuring that the greens, reds, blues, and purples of the Northern Lights are faithfully represented with authenticity and depth.
Enhancing Contrast and Detail
The intricate patterns and delicate movements of the Northern Lights can be accentuated through strategic contrast adjustments and detail enhancement. Experiment with the contrast and clarity settings to bring out the intricate textures and dynamic interplay of light within the auroras. By delicately refining the contrast and enhancing the fine details, you can amplify the visual impact of your aurora photographs, drawing the viewer into the enchanting dance of colors across the night sky.
Fine-Tuning Exposure and Composition
Refining the exposure and composition of your Northern Lights photos can further elevate their visual narrative and emotional resonance. Adjust the exposure levels to optimize the balance of light and shadow, ensuring that the subtle nuances and luminous trails of the auroras are showcased with precision. Additionally, consider fine-tuning the composition to emphasize the captivating interplay between the Northern Lights and the surrounding landscape, creating a harmonious visual symphony that evokes a sense of wonder and awe.
Embracing Minimalist Editing
While it's tempting to apply a myriad of editing effects and filters, embracing a minimalist approach can often yield the most compelling results when enhancing Northern Lights photos. Strive to maintain the authenticity and purity of the auroras, allowing their natural radiance to shine through without being overshadowed by excessive editing. Focus on subtle refinements that accentuate the inherent beauty of the Northern Lights, preserving the integrity of the celestial spectacle while infusing your images with a touch of artistic finesse.
Harnessing Specialized Editing Apps
In addition to the native editing tools on the iPhone 12, consider exploring specialized third-party editing applications tailored for astrophotography and low-light imaging. These apps often offer advanced features such as noise reduction, selective color adjustments, and specialized presets designed specifically for enhancing aurora photographs. By harnessing the capabilities of these dedicated editing apps, you can unlock a new realm of creative possibilities and precision in refining your Northern Lights imagery.
By embracing a thoughtful and nuanced approach to editing and enhancing Northern Lights photos on the iPhone 12, you can transform your raw captures into evocative visual narratives that encapsulate the otherworldly beauty of the auroras. Through meticulous color adjustments, contrast enhancements, exposure refinements, and the judicious use of specialized editing tools, you can immortalize the celestial dance of colors with unparalleled clarity and artistry, preserving the awe-inspiring allure of the Northern Lights in captivating visual compositions.