
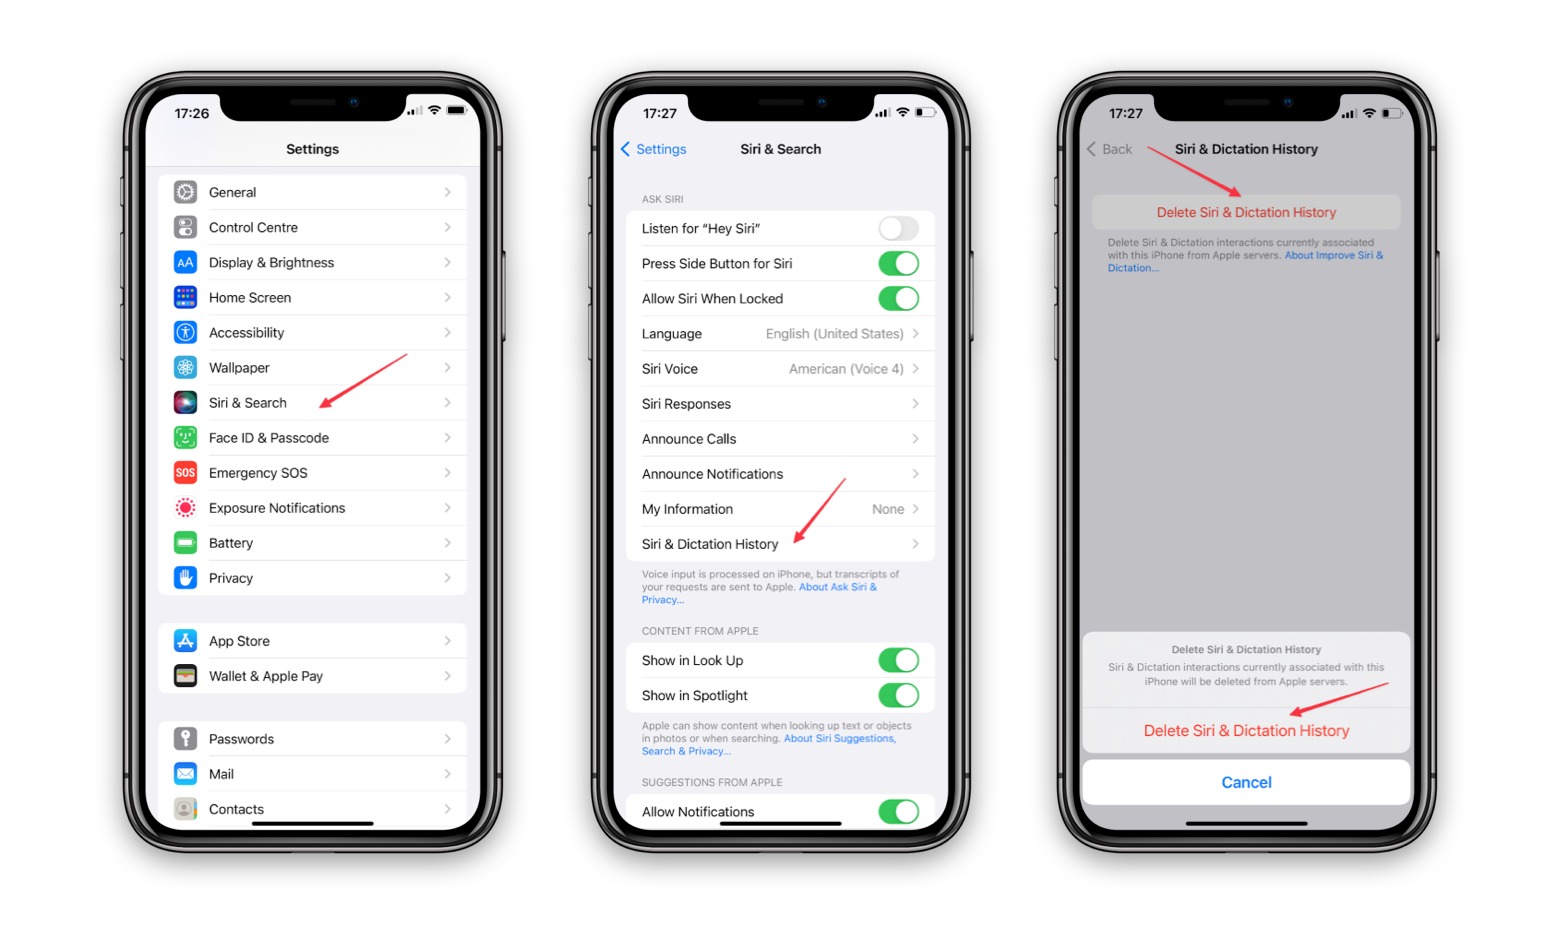
Why Clear Your History on iPhone 11
Clearing your history on iPhone 11 can be a crucial step in maintaining your privacy and security. Whether you're concerned about your browsing habits being tracked, want to free up storage space, or simply wish to keep your personal data confidential, regularly clearing your history can offer several benefits. Here's why it's important to clear your history on iPhone 11:
1. Privacy Protection
By clearing your browsing history, cookies, and site data, you can prevent websites from tracking your online activities. This helps safeguard your privacy and prevents targeted advertising based on your browsing habits. Additionally, clearing your call history and messages can prevent unauthorized access to your personal communications.
2. Enhanced Security
Regularly clearing your history can help protect your iPhone 11 from potential security threats. By removing stored passwords, autofill data, and other sensitive information, you reduce the risk of unauthorized access to your accounts and personal data.
3. Free Up Storage Space
Clearing your history, cache, and temporary files can free up valuable storage space on your iPhone 11. This can improve the device's performance and ensure that you have ample space for new apps, photos, and videos.
4. Prevent Unintended Data Sharing
When you clear your history, you reduce the chances of inadvertently sharing sensitive information with others who may have access to your device. This can be particularly important if you share your iPhone 11 with family members or colleagues.
5. Maintain a Clean Digital Footprint
Clearing your history helps you maintain a clean digital footprint, reducing the risk of unauthorized access to your personal information. Whether it's your browsing history, call logs, or messages, regularly clearing your history can contribute to a more secure and private digital presence.
By understanding the importance of clearing your history on iPhone 11, you can take proactive steps to protect your privacy, enhance security, and maintain control over your personal data. Now, let's explore the steps to clear different types of history on your iPhone 11 to ensure that your privacy and security remain intact.
Steps to Clear Safari Browsing History
Clearing your Safari browsing history on iPhone 11 is a straightforward process that can help protect your privacy and ensure that your browsing habits remain confidential. Follow these simple steps to clear your Safari browsing history:
-
Open the Settings App: Begin by tapping the "Settings" app on your iPhone 11's home screen. The Settings app is represented by a gear icon and is typically located on the first page of your home screen.
-
Scroll Down and Tap Safari: Once you have opened the Settings app, scroll down until you find the "Safari" option. Tap on "Safari" to access the browser's settings and preferences.
-
Select "Clear History and Website Data": Within the Safari settings, scroll down to find the "Clear History and Website Data" option. Tap on this option to proceed with clearing your browsing history.
-
Confirm Your Decision: A confirmation prompt will appear, asking if you want to clear your history and website data. Select "Clear History and Data" to confirm your decision. This action will remove your browsing history, cookies, and other site data from the Safari browser on your iPhone 11.
By following these steps, you can effectively clear your Safari browsing history on iPhone 11, ensuring that your online activities remain private and secure. It's important to note that clearing your browsing history may also log you out of websites and remove any saved autofill information, so be prepared to re-enter your credentials when revisiting websites.
In addition to clearing your browsing history, you can also take advantage of Safari's private browsing mode, which allows you to browse the web without saving your history or storing data about your online activities. To activate private browsing, simply open Safari, tap the tab icon in the lower-right corner, and select "Private" to start a new private browsing session.
By regularly clearing your Safari browsing history and utilizing private browsing when necessary, you can maintain greater control over your online privacy and ensure that your browsing habits remain confidential. This simple yet effective practice can contribute to a more secure and private browsing experience on your iPhone 11.
Clearing Call History on iPhone 11
Clearing your call history on iPhone 11 is an essential step in maintaining your privacy and ensuring that your personal communications remain confidential. Whether you want to remove specific call records, erase all call logs, or prevent unauthorized access to your calling history, clearing your call history can offer several benefits. Here's how you can clear your call history on iPhone 11:
-
Open the Phone App: Begin by locating and tapping the "Phone" app on your iPhone 11's home screen. The Phone app icon typically resembles a green telephone receiver and is commonly found on the first page of the home screen.
-
Navigate to the Recents Tab: Once you have opened the Phone app, navigate to the "Recents" tab located at the bottom of the screen. This tab displays a list of your recent incoming, outgoing, and missed calls.
-
Select "Edit": In the top-right corner of the screen, tap the "Edit" option. This will allow you to select and delete individual call records from your call history.
-
Delete Specific Call Records: After tapping "Edit," you can now select the specific call records that you want to delete. A red minus (-) icon will appear next to each call record, allowing you to delete individual entries by tapping on the icon and confirming the deletion.
-
Clear Entire Call History: If you prefer to clear your entire call history, tap the "Clear" option located in the top-left corner of the screen. A prompt will appear, asking if you want to clear all call logs. Select "Clear All Recents" to confirm your decision and remove all call records from your history.
By following these steps, you can effectively clear your call history on iPhone 11, ensuring that your recent calls remain private and secure. It's important to note that clearing your call history cannot be undone, so be sure to review the call records before proceeding with the deletion.
Regularly clearing your call history can help protect your privacy, prevent unauthorized access to your recent calls, and ensure that your personal communications remain confidential. By taking proactive steps to manage your call history, you can maintain greater control over your privacy and security on your iPhone 11.
Deleting Messages and Conversations
Deleting messages and conversations on your iPhone 11 is an important aspect of managing your privacy and maintaining control over your personal communications. Whether you want to clear individual messages, remove entire conversations, or free up storage space, deleting messages and conversations can offer several benefits.
Here's how you can delete messages and conversations on your iPhone 11:
-
Open the Messages App: Begin by locating and tapping the "Messages" app on your iPhone 11's home screen. The Messages app icon typically resembles a speech bubble and is commonly found on the first page of the home screen.
-
Select the Conversation: Once you have opened the Messages app, navigate to the conversation that contains the messages you want to delete. Tap on the conversation to open it and view the message history.
-
Delete Individual Messages: Within the conversation, press and hold the specific message that you want to delete. A menu will appear with various options, including "Copy" and "More…". Tap on "More…" to reveal additional actions.
-
Delete Multiple Messages: If you want to delete multiple messages within the conversation, tap on "More…" and select the specific messages by tapping on the circles next to each message. Once you have selected the messages, tap the trash can icon in the bottom-left corner to delete them.
-
Clearing Entire Conversations: If you prefer to delete an entire conversation, return to the main Messages screen and swipe from right to left on the conversation you want to remove. A "Delete" option will appear. Tap on "Delete" to confirm the deletion of the entire conversation.
By following these steps, you can effectively delete individual messages and entire conversations on your iPhone 11, ensuring that your personal communications remain private and secure. It's important to note that once messages or conversations are deleted, they cannot be recovered, so be sure to review the content before proceeding with the deletion.
Regularly deleting messages and conversations can help protect your privacy, free up storage space, and ensure that your personal communications remain confidential. By taking proactive steps to manage your message history, you can maintain greater control over your privacy and security on your iPhone 11.
Managing Location History and App Data
Managing location history and app data on your iPhone 11 is essential for safeguarding your privacy and controlling the information shared with apps and services. By actively managing location settings and app data, you can ensure that your personal whereabouts and sensitive information remain secure. Here's how you can effectively manage location history and app data on your iPhone 11:
Location Services Settings
- Access Location Services: Open the "Settings" app on your iPhone 11 and navigate to "Privacy" to access the "Location Services" settings.
- Review App Permissions: Within "Location Services," you can view a list of apps that have requested access to your location. Review each app's permission settings and consider whether they genuinely require access to your location.
- Manage Location Access: For apps that do not require constant access to your location, you can choose to set their permissions to "While Using the App" or "Never" to limit their access to your location data.
Clearing Location History
- Open Maps App: Launch the "Maps" app on your iPhone 11 and tap on the "i" icon in the top-right corner to access your settings.
- Select "Privacy & Terms": Within the Maps settings, select "Privacy & Terms" and then tap on "Location & Privacy" to manage your location history.
- Clear Location History: You can choose to clear your entire location history by tapping on "Clear Location History" and confirming your decision. This action removes all stored location data from the Maps app.
Managing App Data
- Review App Permissions: Navigate to the "Settings" app and select "Privacy" to review the permissions granted to various apps, including access to your contacts, photos, microphone, and camera.
- Revoke Unnecessary Permissions: For apps that do not require access to sensitive data, consider revoking their permissions to enhance your privacy and security.
- Delete Unnecessary Apps: Regularly review and delete apps that you no longer use to minimize the amount of data stored on your device and reduce potential privacy risks.
By actively managing location history and app data on your iPhone 11, you can maintain greater control over your privacy and security. Regularly reviewing app permissions, clearing location history, and minimizing unnecessary data storage can contribute to a more secure and private digital experience. Taking proactive steps to manage your location and app data empowers you to protect your personal information and maintain control over the data shared with apps and services.