
Downloading OS X Mavericks
To perform a clean install of OS X Mavericks on your startup drive, the first step is to download the operating system installer. Follow the steps below to get started:
- Open the App Store on your Mac by clicking on the Apple menu in the top-left corner of the screen and selecting “App Store”.
- In the App Store, search for “OS X Mavericks”.
- Click on the “Download” button next to OS X Mavericks to begin the download.
- Wait for the download to complete. The download time may vary depending on your internet connection speed.
Once the download is complete, you will find the OS X Mavericks installer in your Applications folder. The installer will be named “Install OS X Mavericks”. It is crucial to have the installer on your Mac before proceeding with the clean install.
Note: If you have previously downloaded OS X Mavericks and need to re-download it, you can do so by navigating to the “Purchases” tab in the App Store and locating OS X Mavericks in the list of available downloads.
Downloading OS X Mavericks is the first step in preparing for a clean install. With the installer downloaded onto your Mac, you are now ready to proceed to the next section, “Preparing for the Clean Install”.
Preparing for the Clean Install
Before performing a clean install of OS X Mavericks on your startup drive, there are a few important preparations you need to make. Follow the steps below to ensure a smooth installation process:
- Back Up your data: It’s crucial to back up all important files and data on your Mac before proceeding with a clean install. This will ensure that you have a copy of your data in case anything goes wrong during the installation process. You can use Time Machine or any other backup method of your choice to create a backup.
- Verify System Requirements: Ensure that your Mac meets the minimum system requirements for OS X Mavericks. Check Apple’s official website or the Mavericks documentation for the specific requirements.
- Check for Software Compatibility: Make sure that any third-party software or applications you rely on are compatible with OS X Mavericks. Visit the developers’ websites or reach out to their support teams to confirm compatibility and download any necessary updates.
- Make a List of Essential Apps: Take note of the essential applications and utilities you use on a daily basis. This will help you quickly reinstall them after the clean install of Mavericks.
- Keep License Keys and Installation Media Handy: If you have purchased software that requires license keys or physical installation media, ensure that you have them readily available for reinstallation after the clean install.
By following these preparations, you can minimize the risk of data loss and ensure a smooth transition to OS X Mavericks. With your data backed up and your essential apps and licenses organized, you are now ready to move on to the next step, “Creating a Bootable Installer Drive”.
Creating a Bootable Installer Drive
In order to perform a clean install of OS X Mavericks, you will need to create a bootable installer drive. This will allow you to boot your Mac from the installer and install Mavericks on your startup drive. Follow the steps below to create a bootable installer drive:
- Connect a USB flash drive to your Mac. Make sure the flash drive has at least 8GB of storage space available.
- Open the Terminal application on your Mac. You can find it in the Utilities folder within the Applications folder.
- Type the following command into the Terminal window:
sudo /Applications/Install\ OS\ X\ Mavericks.app/Contents/Resources/createinstallmedia --volume /Volumes/MyVolume --applicationpath /Applications/Install\ OS\ X\ Mavericks.app– Replace “MyVolume” with the name of your USB flash drive or external drive. - Press Enter and enter your administrator password when prompted. Note that your password will not be visible as you type it.
- The Terminal will now format the USB drive and copy the OS X Mavericks installation files onto it. This process may take some time, so be patient.
- Once the process is complete, you will have a bootable installer drive for OS X Mavericks.
Note: Creating a bootable installer drive will erase all data on the USB flash drive. Make sure you have a backup of any important files before proceeding.
With your bootable installer drive ready, you can now proceed to the next step, “Booting from the Installer Drive”, to begin the clean install of OS X Mavericks on your startup drive.
Booting from the Installer Drive
Once you have created a bootable installer drive for OS X Mavericks, the next step in performing a clean install is to boot your Mac from the installer drive. Follow the steps below to boot your Mac from the installer drive:
- Restart your Mac.
- While your Mac is restarting, hold down the Option (⌥) key on your keyboard.
- After a moment, you will see the Startup Manager screen, which displays all available startup drives.
- Use the arrow keys on your keyboard to select the bootable installer drive (usually labeled “OS X Install”).
- Press the Return (↩) key or click on the right-facing arrow button to start booting from the installer drive.
- Your Mac will now boot from the installer drive, and you will see the OS X Mavericks installer window.
Note: If your Mac doesn’t display the Startup Manager screen, try restarting and holding down the Option (⌥) key again. If you still can’t access the Startup Manager, you may need to check your Mac’s documentation or contact Apple support for specific instructions on how to boot from an external drive.
Booting from the installer drive is a crucial step in the clean installation process, as it allows you to access the OS X Mavericks installer and proceed with the installation on your startup drive. With your Mac booted from the installer drive, you are now ready for the next step, “Erasing the Startup Drive”.
Erasing the Startup Drive
Before installing OS X Mavericks on your Mac’s startup drive, it is important to erase the drive to ensure a clean installation. Follow the steps below to erase your startup drive:
- From the OS X Mavericks installer window, select “Disk Utility” from the Utilities menu.
- In the Disk Utility window, you will see a list of available drives and volumes. Select your startup drive from the list.
- Click on the “Erase” tab at the top of the Disk Utility window.
- Choose a name for your startup drive and enter it in the “Name” field.
- Select the appropriate format option. For most Macs, the recommended format is “Mac OS Extended (Journaled)”.
- Ensure that the scheme is set to “GUID Partition Map”.
- Double-check that you have selected the correct drive and format options, as erasing the drive will permanently delete all data stored on it.
- Click on the “Erase” button to begin the erasing process.
- Wait for the erasing process to complete. The time it takes will depend on the size and speed of your startup drive.
Note: Erasing your startup drive will permanently delete all data stored on it. Make sure you have a backup of any important files before proceeding.
With your startup drive erased, it is now ready to be used for the clean installation of OS X Mavericks. You can move on to the next step, “Installing OS X Mavericks on the Startup Drive”, to continue with the installation process.
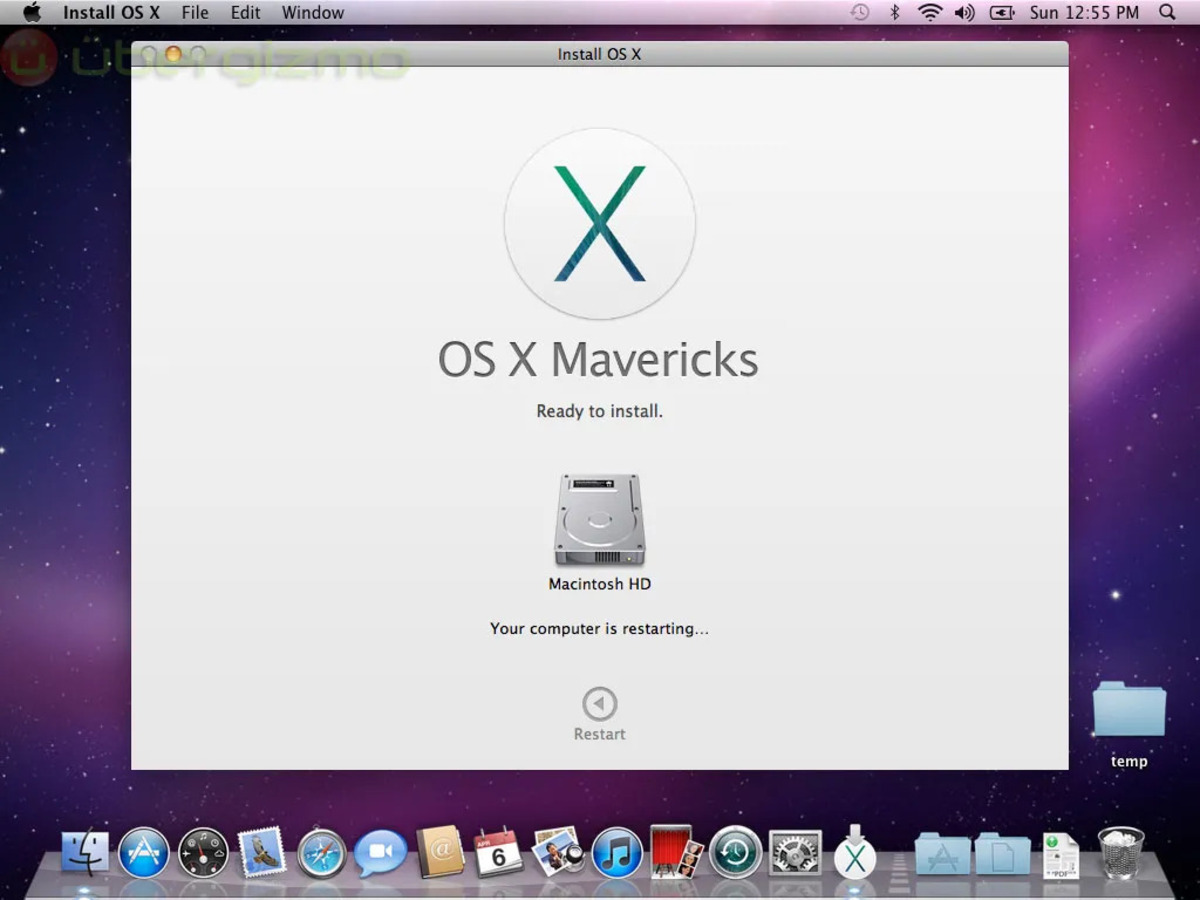
Installing OS X Mavericks on the Startup Drive
After erasing your Mac’s startup drive, you are now ready to install OS X Mavericks on it. Follow the steps below to complete the installation process:
- From the OS X Mavericks installer window, click on the “Continue” button to begin the installation process.
- Read and agree to the license agreement presented on the screen.
- Select your erased startup drive as the destination for the OS X Mavericks installation.
- Click on the “Install” button to start the installation process.
- Wait for the installation to complete. This may take some time, so be patient.
- Once the installation is finished, your Mac will restart.
- After restarting, the OS X Mavericks setup assistant will guide you through the initial setup process. Follow the on-screen instructions to set up your Mac.
- During the setup process, you will have the option to transfer data from a Time Machine backup or another Mac. Choose the appropriate option based on your needs.
- Follow all the prompts and provide any necessary information to complete the setup process.
Once you have completed the setup process, your Mac will be running OS X Mavericks. Take some time to familiarize yourself with the new features and enhancements of Mavericks.
Congratulations! You have successfully performed a clean install of OS X Mavericks on your startup drive. From here, you can proceed to the next section, “Setting up OS X Mavericks”, to customize your preferences and personalize your Mac experience.
Setting up OS X Mavericks
After completing the installation of OS X Mavericks on your Mac’s startup drive, it’s time to set up and customize the operating system to your preferences. Follow the steps below to get started:
- On your Mac, go through the initial setup process, including selecting your region, connecting to a Wi-Fi network, and signing in with your Apple ID.
- Set up iCloud: If you have an iCloud account, you can choose to sign in and enable iCloud services such as iCloud Drive, iCloud Photos, and iCloud Keychain. This will allow you to sync your data and access it across multiple devices.
- Customize System Preferences: Click on the Apple menu in the top-left corner of the screen and select “System Preferences”. Explore the different preference panes and customize settings such as display, sound, notifications, privacy, and security to suit your preferences.
- Install Essential Apps: Use the list you created during the preparation phase to reinstall essential applications and utilities. You can download them from the Mac App Store or install them using their respective installation media or package files. Make sure to check for updates for these apps to ensure compatibility with OS X Mavericks.
- Restore Data from Backup: If you have previously backed up your data using Time Machine or another backup method, you can now restore your files and settings. Open Migration Assistant, which can be found in the Utilities folder within the Applications folder, and follow the on-screen instructions to restore your data.
- Configure Security and Privacy: Visit the Security & Privacy pane in System Preferences to set up features such as FileVault encryption, Firewall protection, and App Store download settings.
- Personalize your Desktop: Change your desktop wallpaper, screensaver, and desktop icons by accessing the Desktop & Screensaver preference pane in System Preferences. Add your favorite widgets to the Dashboard for quick access.
- Set Up Email and Internet Accounts: Configure your email accounts and other internet accounts such as social media and cloud storage services in the Internet Accounts preference pane.
- System Updates: Make sure to check for and install any available system updates for OS X Mavericks. This will ensure that you have the latest security patches and bug fixes.
By following these steps, you can tailor OS X Mavericks to your preferences and make the most out of its features. Take your time to explore the system and adjust settings as needed. Enjoy the improved performance and new functionalities offered by OS X Mavericks!
Restoring your Files and Settings
After setting up OS X Mavericks and customizing your preferences, it’s time to restore your files and settings from your backup. Follow the steps below to restore your data:
- If you used Time Machine for your backup, connect your Time Machine backup drive to your Mac.
- Open Migration Assistant. You can find it in the Utilities folder within the Applications folder.
- Click on the “Continue” button to proceed with the restoration process.
- Choose the option to transfer data from a Mac, Time Machine backup, or startup disk and click on the “Continue” button.
- Select your backup source, such as your Time Machine backup drive, and click on the “Continue” button.
- Choose the specific files, folders, or settings you want to restore. You can select individual items or select the option to transfer all data.
- Click on the “Continue” button to start the restoration process.
- Wait for the restoration to complete. The time it takes will depend on the size of your backup and the speed of your Mac.
- After the restoration is finished, you may need to restart your Mac.
Note: If you backed up your data using a different method or service, such as a cloud storage provider or external hard drive, follow their specific instructions to restore your files and settings.
Once your data has been restored, you can start using your Mac with all your files, applications, and settings intact. Take some time to ensure that everything was transferred correctly and test out your important applications to make sure they are working as expected.
Congratulations! You have successfully restored your files and settings after performing a clean install of OS X Mavericks. Now you can continue using your Mac with the added benefits of the new operating system.
Final Steps and Troubleshooting
After performing a clean install of OS X Mavericks and restoring your files and settings, there are a few final steps to complete the process. Additionally, if you encounter any issues or need to troubleshoot, the following steps may help:
- Restart your Mac: After completing the installation and restoration process, it’s always a good idea to restart your Mac. This can help ensure that all changes and updates are applied correctly.
- Update Applications: Check for any updates to your applications in the Mac App Store or by visiting the developers’ websites. Keeping your applications up to date can help improve compatibility and performance with OS X Mavericks.
- Verify System Stability: Monitor your Mac’s performance and stability after the clean installation. If you notice any unusual behavior or encounter frequent crashes, consider troubleshooting options such as resetting PRAM/NVRAM, repairing disk permissions, or conducting a hardware diagnostics test. Apple Support is a valuable resource for troubleshooting guidance.
- Set Up Time Machine: If you haven’t already done so, set up Time Machine for regular automated backups. This will ensure that your data is protected in the event of any future issues or data loss.
- Optimize Storage: Take advantage of OS X Mavericks’ storage management features, such as optimizing storage and enabling iCloud Drive, to efficiently manage your disk space and keep your files organized.
- Explore New Features: Familiarize yourself with the new features and improvements in OS X Mavericks. Take the time to discover and utilize the enhancements that can enhance your productivity and overall user experience.
Troubleshooting: If you encounter any issues during or after the clean install process, such as installation failures, compatibility problems, or application errors, consider reaching out to Apple Support or consulting online communities for assistance. Troubleshooting steps could involve resetting SMC, safe booting, or reinstalling specific problematic applications.
By completing these final steps and troubleshooting any issues, you can ensure that your Mac is running smoothly with OS X Mavericks. Enjoy the enhanced performance, new features, and improved stability that Mavericks brings to your Mac!