
Understanding Gmail’s Message Size Limit
Gmail is one of the most popular email services, allowing users to send and receive messages, as well as attachments. However, it’s important to understand the message size limit set by Gmail to ensure smooth and efficient communication.
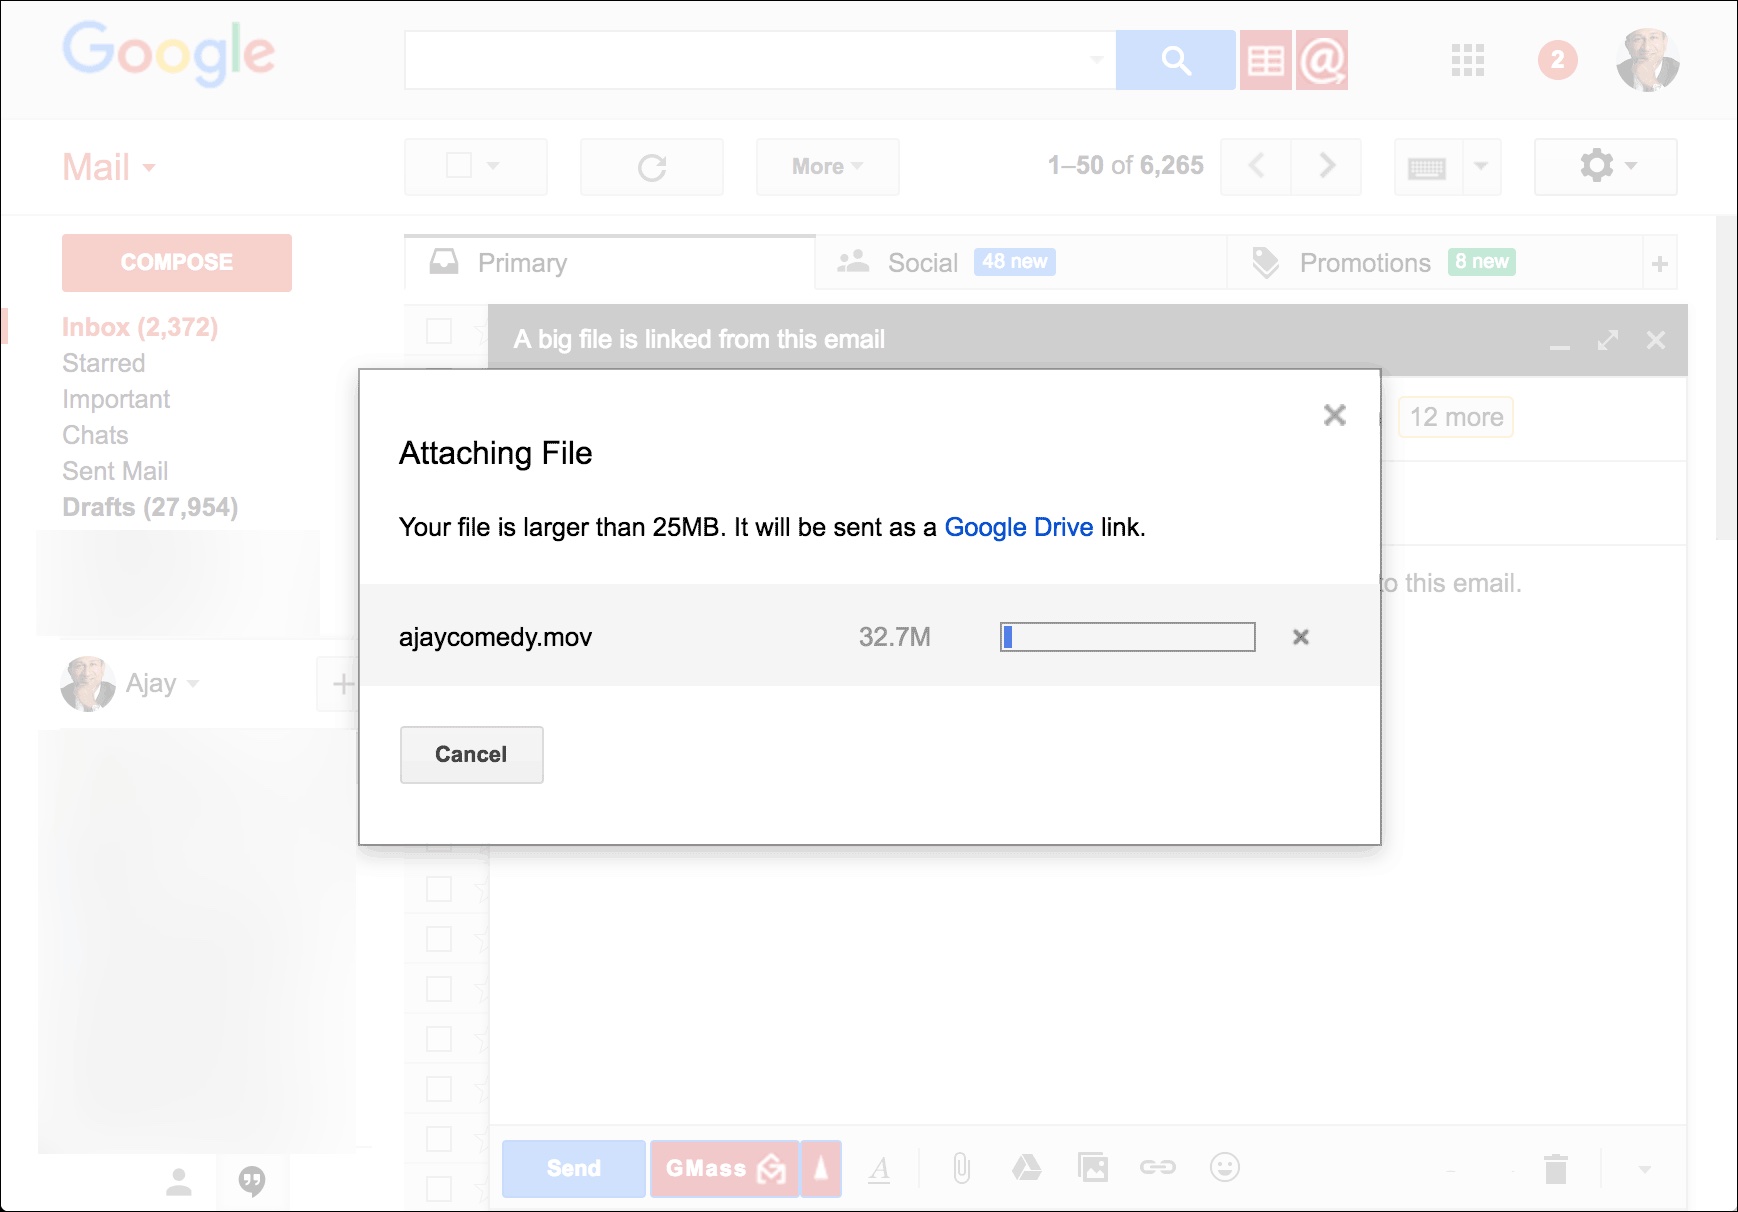
Gmail imposes a maximum size limit on both the message itself and any attachments that are included. This limit is in place to ensure that emails can be delivered quickly and efficiently, without causing any disruptions. While the exact limit may vary, the standard message size limit for Gmail is 25 megabytes (MB).
This means that the total size of the email, including both the text of the message and any attachments, cannot exceed 25 MB. It’s worth noting that encoding and formatting can increase the size of the message, so it’s essential to keep this in mind when composing emails.
When it comes to attachments, Gmail allows users to send files with a maximum size of 25 MB. However, if you need to send larger files, there are alternative methods available such as Google Drive or other file-sharing services. We will explore these options in more detail later in this article.
It’s important to be mindful of the message size limit to ensure that your emails are delivered successfully. If you exceed the maximum size limit, Gmail will usually prompt you with an error message stating that the message or attachment is too large. In such cases, you will need to take appropriate actions to reduce the size or find alternative methods to send the email.
Understanding Gmail’s message size limit is crucial for effective communication. By being aware of the limitations, you can ensure that your emails are delivered hassle-free and avoid running into issues with oversized attachments or messages. In the following sections, we will explore various methods to check attachment sizes, compress files, send large files using Google Drive, and manage Gmail attachments to optimize your email experience.
What is the Maximum Size Limit for Gmail Attachments?
Gmail allows users to include attachments in their emails, making it convenient to share files with colleagues, friends, and family. However, there is a maximum size limit for attachments in Gmail that users need to be aware of.
The maximum size limit for attachments in Gmail is 25 megabytes (MB). This means that any individual attachment uploaded to an email cannot exceed this size. If you attempt to attach a file larger than 25 MB, you will receive an error message stating that the attachment is too large.
It’s worth noting that the 25 MB limit applies to the attachment alone and may not include the additional size of the email message itself. Various factors, such as formatting, encoding, and embedded images, can contribute to the overall size of the email. These factors should be taken into consideration to ensure that the email as a whole does not exceed the message size limit.
If you need to send larger files that exceed the attachment size limit, Gmail offers alternative methods to help you overcome this obstacle. One such method is using Google Drive, which allows you to upload files to the cloud and share them as a link instead of attaching the actual file to the email. This enables you to share files of sizes up to 15 GB per individual file.
By utilizing Google Drive, you can easily share large documents, videos, or other files without worrying about exceeding the attachment size limit. Additionally, using Google Drive offers the advantage of saving storage space in your Gmail account.
It’s important to be aware of the maximum size limit for attachments in Gmail to ensure that you can efficiently share files with others. By understanding this limitation, you can explore alternative methods like Google Drive to accommodate larger files while still benefiting from the convenience and functionality of Gmail.
How to Check the Size of an Attachment in Gmail
When sending emails with attachments in Gmail, it’s essential to be aware of the file sizes to ensure they comply with the size limits. Fortunately, Gmail provides a convenient way to check the size of an attachment before sending the email.
To check the size of an attachment in Gmail, follow these simple steps:
- Compose a new email or open a draft that contains the attachment.
- Hover your mouse cursor over the attachment icon below the email subject line. A tooltip will appear, displaying the size of the attachment.
By hovering over the attachment icon, you can quickly determine the size of the file you are about to send. This allows you to assess whether the attachment complies with the file size limit of 25 MB.
If the attachment exceeds the size limit, you will need to take appropriate actions to reduce the file size or explore alternative methods like using Google Drive to share larger files. We will discuss these methods in more detail later in this article.
Checking the size of an attachment in Gmail is a simple yet essential step to ensure that your emails are sent successfully without any issues. By verifying the size before sending, you can avoid encountering errors or having your email delivery delayed due to oversized attachments.
Now that you know how to check the size of an attachment in Gmail, you can confidently send emails with the appropriate file sizes and make your communication more efficient and effective.
How to Compress Large Attachments in Gmail
When dealing with large attachments in Gmail, it’s essential to optimize their size to ensure smooth transmission and avoid exceeding the attachment size limit. One effective method to achieve this is by compressing the attachments before sending them. Compressing files reduces their size without compromising the content. Here’s how you can compress large attachments in Gmail:
- Locate the file or files you wish to compress on your computer.
- Right-click on the file, hover over the “Send to” option, and select “Compressed (zipped) folder” from the drop-down menu. This will create a compressed version of the file or files in a new zip folder.
- Rename the zip folder to a descriptive name to indicate the content it contains.
- In Gmail, compose a new email or reply to an existing thread.
- Click on the “Attach files” icon located below the email subject line.
- Navigate to the location on your computer where the compressed zip folder is saved.
- Select the zip folder and click “Open” to attach it to your email.
By compressing the attachment into a zip folder, you can significantly reduce its size. This allows you to fit larger files within the 25 MB attachment size limit set by Gmail.
It’s important to note that certain file types, such as already compressed files (such as JPEG or MP4), may not see a significant reduction in size when zipped. However, files like documents, presentations, or spreadsheets are usually highly compressible.
By following these steps to compress large attachments in Gmail, you can effectively manage file sizes and ensure smooth email delivery without exceeding size limits. Compressing attachments not only helps you stay within the boundaries of Gmail’s attachment size limit but also saves space for both the sender and the recipient.
Now that you know how to compress large attachments in Gmail, you can optimize your file sizes and make your email communication more efficient and convenient.
How to Send Large Files Using Google Drive
Gmail has a maximum attachment size limit of 25 megabytes (MB), which can be restrictive when it comes to sending large files. However, Google Drive offers a solution by allowing you to upload and share files up to 15 gigabytes (GB) in size. Here’s how you can send large files using Google Drive:
- Open your Gmail account and compose a new email.
- In the email composition window, click on the “Google Drive” icon located at the bottom of the email body.
- A “Insert files using Drive” window will appear. Here, you can choose to upload files from your computer or select files already stored in your Google Drive.
- Select the desired file(s) you want to attach from your computer or Google Drive.
- Click on the “Insert” button to add the selected file(s) as a Drive link in your email.
- Compose your email and add any necessary text or additional attachments.
- Click “Send” to deliver your email with the Drive link.
When the recipient opens the email, they will see a link to download the file(s) from Google Drive. This ensures that large files can be easily shared, even if they exceed Gmail’s attachment size limit.
Additionally, sharing files via Google Drive offers a few advantages. Firstly, it saves storage space in the recipient’s inbox since the file is not directly attached to the email. Secondly, it allows for collaboration, as recipients can be granted permission to edit or comment on the shared file. Lastly, files shared via Google Drive can be easily accessed from any device with an internet connection, providing convenience and flexibility.
Sending large files using Google Drive is a convenient and efficient method to overcome the limitations of Gmail’s attachment size limit. By utilizing the capabilities of Google Drive, you can easily share files of up to 15 GB in size, ensuring seamless communication and collaboration.
Now that you know how to send large files using Google Drive, you can make use of this feature to effortlessly share files without worrying about attachment size constraints.
Alternative Methods to Send Large Files through Gmail
While Gmail has a maximum attachment size limit of 25 megabytes (MB), there are alternative methods available to send large files conveniently and without hassle. Let’s explore some of these alternatives:
1. Using File Compression: One straightforward method is to compress large files using software like WinZip or 7-Zip. Compressing files reduces their size, making it easier to fit within Gmail’s attachment size limit. Simply compress the files, attach the compressed file to your email, and send it as you normally would.
2. Cloud Storage Services: Another popular option is to utilize cloud storage services such as Dropbox, OneDrive, or Box. Upload the large file to your preferred cloud storage platform, then generate a shareable link. Copy the link and include it in your email. Recipients can simply click on the link to access and download the file.
3. Transfer Services: Several online transfer services specialize in sending large files. Services like WeTransfer and SendSpace allow you to upload your file and provide a download link that you can include in your email. These services are designed to handle large file transfers with ease.
4. FTP (File Transfer Protocol): If you have access to an FTP server, you can upload your large file to the server and provide the recipient with the FTP details (hostname, username, and password). They can then use an FTP client to download the file from the server.
5. Peer-to-Peer Sharing: Peer-to-peer (P2P) sharing platforms like BitTorrent or eMule allow for efficient file sharing. However, it’s important to use these platforms responsibly and ensure that you have the necessary permissions to share the files.
By exploring these alternative methods, you can send large files through Gmail by utilizing file compression, cloud storage services, transfer services, FTP, or peer-to-peer sharing platforms. These options ensure that you can conveniently share files that exceed Gmail’s attachment size limit, expanding your possibilities for efficient communication.
It’s important to consider the specific requirements of your recipients and choose the most appropriate method for sharing large files. Each alternative method offers unique features and benefits, so you can select the one that best suits your needs and preferences.
How to Receive Large Attachments in Gmail
Receiving large attachments in Gmail is a common occurrence, but sometimes, the process can present challenges. Thankfully, Gmail provides a seamless way to handle large attachments and ensure their successful delivery to your inbox. Here’s how you can receive large attachments in Gmail:
- Open your Gmail account and navigate to your inbox.
- When someone sends you an email with a large attachment, you will see a paperclip icon indicating the presence of an attachment.
- Click on the email to open it, and you will see the attachment below the sender’s information.
- For files smaller than 25 megabytes (MB), you can simply click on the attachment to download it to your device.
- For larger files, Gmail provides a “View” or “Download” option, depending on the file type and size. Click the appropriate action to access the attachment.
- For files shared via Google Drive, you will see a “View” or “Save to Drive” option. Click on these options to either preview the file or save it directly to your Google Drive account.
By following these steps, you can receive large attachments in Gmail without any issues. Gmail’s user-friendly interface makes it straightforward to access and manage files sent to you, regardless of their size.
It’s worth noting that if you receive an email with a large attachment that exceeds Gmail’s size limits, you may encounter some restrictions. In such cases, the sender may opt to use alternative methods, such as Google Drive or file compression, to share the file with you.
Remember to regularly check your email and manage your attachments to ensure that your inbox remains organized and efficient. If needed, consider utilizing Gmail’s search and filtering capabilities to locate specific emails or attachments.
Receiving large attachments in Gmail is a simple process that allows you to access and manage files sent to you with ease. By understanding how Gmail handles large attachments, you can ensure a smooth and efficient experience when receiving files from others.
How to Increase Gmail Attachment Size Limit with Google Workspace
If you frequently need to send or receive large attachments and find Gmail’s 25 megabyte (MB) attachment size limit restrictive, you can increase this limit by using Google Workspace. Google Workspace offers enhanced features and higher attachment size limits for businesses and organizations. Here’s how you can increase Gmail’s attachment size limit with Google Workspace:
- Sign in to your Google Workspace admin console using your administrator credentials.
- Navigate to the “Apps” section and select “Google Workspace” or “G Suite,” depending on your organization’s edition.
- Click on “Settings” and then select “Gmail” from the list of available apps.
- In the Gmail settings, locate and click on “User settings.”
- Scroll down to the “Attachments” section and look for the option to adjust the maximum attachment size.
- Enter the desired attachment size limit in megabytes (MB).
- Click “Save” to apply the changes.
By following these steps and adjusting the attachment size limit in the Google Workspace admin console, you can increase the maximum attachment size for all users within your organization.
It’s important to be aware that increasing the attachment size limit may have implications on storage space and network bandwidth. Consider the storage capacity and network capabilities of your organization when adjusting the attachment size limit to avoid any potential issues.
Increasing the attachment size limit with Google Workspace enables your organization to send and receive larger files, allowing for more efficient collaboration and communication. However, remember that the recipient’s email service may still have a maximum attachment size limit, so it’s essential to consider both ends of the email transaction.
If you’re not using Google Workspace or are an individual user, you can also explore alternative methods like using cloud storage platforms or file compression techniques to overcome Gmail’s attachment size limit.
By utilizing the capabilities of Google Workspace, you can customize Gmail’s attachment size limit to meet the specific needs of your organization, facilitating the efficient exchange of large files and enhancing productivity.
Understanding Gmail’s Message Size Limit for Forwarding Emails
Gmail’s message size limit is not only applicable to composing and receiving emails but also applies to forwarding messages. It’s important to be aware of this limitation when forwarding emails with attachments, as it can affect the successful delivery of the forwarded message.
Gmail imposes a maximum message size limit of 25 megabytes (MB), which includes both the message content and any attachments. When forwarding an email, Gmail considers the combined size of the original message and its attachments to determine if it exceeds the message size limit.
If the forwarded email, including its attachments, exceeds the 25 MB size limit, Gmail will display an error message stating that the message or attachment is too large to send. In such cases, you will need to take further actions to reduce the size of the message or find alternative methods to share the content.
To avoid encountering message size limit issues when forwarding emails with attachments, there are a few options you can consider:
- Delete unnecessary attachments: Before forwarding an email, review and remove any non-essential attachments that may contribute to the overall size of the message.
- Use alternative file-sharing methods: If the attachments exceed Gmail’s size limit, utilize file-sharing services like Google Drive, Dropbox, or OneDrive. Upload the files to the respective service and share the download link within the forwarded email.
- Compress attachments: Compressing large file attachments into compressed (zipped) folders can reduce their size, making it possible to forward the email without exceeding the size limit. Simply compress the attachments before forwarding the email.
By understanding Gmail’s message size limit for forwarding emails and implementing these strategies, you can ensure successful delivery of forwarded messages without running into size-related issues.
It’s important to note that when forwarding emails, the size limitation can also depend on the recipient’s email service. Different email providers may have their own size limits for incoming messages, so it’s crucial to consider both ends of the email transaction to ensure compatibility.
By being mindful of Gmail’s message size limit for forwarding emails and taking the necessary steps to manage the size of the forwarded message, you can enhance your email communication and avoid potential complications or delivery failures.
How to Reduce the Size of a Gmail Message
Reducing the size of a Gmail message can be crucial when dealing with large attachments or when the message is close to the maximum size limit. By minimizing the size of the email, you can ensure smooth delivery and avoid any potential issues. Here are some methods to reduce the size of a Gmail message:
- Remove unnecessary content: Review the email and eliminate any unnecessary text or attachments. Consider if all attachments are essential to the communication, and remove any that are not crucial.
- Consider alternative file formats: Some file formats, such as JPEG or MP4, are already compressed and might not provide significant size reduction when compressed further. Consider converting larger files into more compact formats without compromising quality, if applicable.
- Compress file attachments: Compressing attachments is an effective way to reduce the overall size of the email. Use file compression tools like WinZip or 7-Zip to create a compressed version of the attachment before attaching it to the email.
- Resize images: If your email includes images, resize them to a smaller resolution. Large images can significantly contribute to the overall size of the email. Image editing software or online tools can help you resize images without compromising quality.
- Use cloud storage links: Instead of attaching large files directly to the email, consider uploading the files to a cloud storage platform like Google Drive or Dropbox. Generate a shareable link and include it in the email instead. This reduces the size of the email and allows the recipient to download the file when needed.
By implementing these techniques, you can effectively reduce the size of a Gmail message and optimize its delivery. It’s important to note that certain file types, such as already compressed files or media files, may not see significant size reduction by employing these methods.
Remember to strike a balance between reducing the size of the email and ensuring that the content remains clear and understandable. Always consider the recipient’s needs and preferences when making decisions about what to include or exclude from the email.
Reducing the size of a Gmail message is beneficial for both the sender and the recipient. It allows for smoother email transmission, improved inbox organization, and better overall email management.
By employing these strategies, you can efficiently reduce the size of your Gmail messages, ensuring optimal delivery and enhancing your email communication experience.
How to Delete Large Attachments in Gmail to Free up Storage Space
Gmail offers a generous amount of storage space; however, if you find yourself running low on available storage or simply want to free up some space, deleting large attachments in Gmail can be an effective solution. Removing these attachments will not only help reclaim storage space but also promote better email organization. Here’s how you can delete large attachments in Gmail:
- Open your Gmail account and navigate to your inbox or the specific label where the email with the large attachment is located.
- Use Gmail’s search filters to locate emails with large attachments. For example, you can use the search bar with search criteria like “larger:10MB” to find emails with attachments larger than 10 megabytes (MB).
- Select the emails that you want to delete by checking the checkboxes next to them. If you want to delete all emails with large attachments in a label, click the checkbox at the top to select all emails on that page.
- Once you’ve selected the desired emails, click on the trash bin icon (Delete) to remove them from your inbox and move them to the Trash folder.
- Finally, to permanently delete the emails and free up storage space, navigate to the Trash folder, select the emails, and click on the “Delete forever” button or the Trash bin icon (Empty Trash).
By deleting large attachments, you can regain valuable storage space in your Gmail account. However, keep in mind that permanently deleting emails removes them from all folders, including the Trash folder, and they cannot be recovered.
Remember to use caution when deleting emails. Consider archiving important emails or backing up attachments before deleting them to ensure you have a copy of any critical information you may need in the future.
Regularly deleting large attachments in Gmail will not only free up storage space but also help maintain good email hygiene and optimize your Gmail experience. It’s a proactive step towards better managing your inbox and ensuring efficient email storage.
By following these steps to delete large attachments in Gmail, you can effectively reclaim storage space, organize your mailbox, and continue utilizing Gmail’s features to their fullest extent.
Tips for Managing Gmail Attachments and Message Sizes
Efficiently managing Gmail attachments and message sizes can help streamline your email communication and optimize your storage space. Here are some valuable tips to consider:
- Regularly clean out your inbox: Take the time to review and delete unnecessary emails with large attachments. Clearing out your inbox not only frees up storage space but also improves email organization.
- Use cloud storage services: When sending or receiving large files, consider utilizing cloud storage platforms like Google Drive or Dropbox. Upload the files to the cloud and share the download link instead of attaching them directly to the email.
- Compress attachments: Compressing large file attachments into zip folders can significantly reduce their size. This allows you to send attachments within Gmail’s size limits and avoid unnecessary storage use.
- Optimize image sizes: Resize images before attaching them to emails. Large images can contribute to increased message sizes. Use image editing tools to reduce their resolution or compress them without sacrificing quality.
- Utilize file-sharing links: Instead of sending attachments, upload files to file-sharing services like Google Drive, OneDrive, or Dropbox. Generate shareable links and include them in your emails, making it easy for recipients to access and download the files.
- Sort and organize attachments: Create folders or labels within Gmail to categorize and store important attachments. This allows for faster retrieval and better management of files.
- Regularly empty the Trash folder: Deleted emails and attachments still occupy space in Gmail’s Trash folder. Remember to empty the Trash periodically to permanently clear out deleted items and reclaim storage space.
- Consider archiving: Instead of deleting emails, consider archiving them. Archiving allows you to store emails out of your inbox while maintaining access to them when needed. This can be particularly useful for emails with important attachments or information.
By implementing these tips, you can effectively manage Gmail attachments and message sizes, ensuring efficient email communication and optimized storage space usage.
It’s essential to strike a balance between retaining important attachments and pruning unnecessary ones regularly. Regularly assessing your email storage usage and implementing these best practices will help you maintain a streamlined and organized Gmail experience.
Remember, efficient management of Gmail attachments and message sizes not only improves your email management but also enhances your overall productivity and collaboration with others.