
Exporting Emails from Mozilla Thunderbird
Mozilla Thunderbird is a popular email client that offers a variety of features and customization options for managing your emails. If you’re planning to switch to Gmail and want to transfer your emails from Thunderbird, you’ll need to export them first. Fortunately, Thunderbird provides a simple method to export your emails in a standard format that can be easily imported into Gmail. Here’s how you can do it:
- Open Mozilla Thunderbird on your computer.
- Select the email account that contains the emails you want to export.
- Click on “Local Folders” in the left-hand sidebar. This is where Thunderbird stores emails for local accounts.
- Choose the specific folder containing the emails you want to export.
- Once the folder is selected, go to the “File” menu at the top and click on “Save As”.
- Choose a destination on your computer where you want to save the exported emails. Make sure to select a folder that is easy to locate later.
- Choose a name for the exported file, preferably something descriptive that helps you identify the contents of the file.
- Select the file format as “EML” from the dropdown menu. This format is widely supported and can be easily imported into Gmail.
- Click on “Save” to start the export process. Thunderbird will create individual EML files for each email in the selected folder.
- Once the export is complete, you can navigate to the destination folder on your computer to find the exported EML files.
By following these steps, you can successfully export your emails from Mozilla Thunderbird. The EML files that are generated contain all the necessary email data, including the sender, recipient, subject, and body of the message. Now that you have exported your emails, you are ready to set up Gmail for importing them. In the next section, we will cover the steps needed to prepare your Gmail account for importing the Thunderbird emails.
Setting Up Gmail for Import
Before you can import your exported emails from Mozilla Thunderbird into Gmail, you need to make sure that your Gmail account is properly set up. Here are the steps to get your Gmail account ready for importing:
- First, log in to your Gmail account using your credentials. If you don’t have an account yet, you can easily create one by visiting the Gmail website.
- Once logged in, go to the gear icon in the top-right corner of the inbox and click on “Settings” from the dropdown menu.
- In the Settings page, navigate to the “Accounts and Import” tab.
- Scroll down to the “Import mail and contacts” section and click on “Import mail and contacts” button.
- A new window will appear where you will be prompted to enter the email address you want to import from. Enter your Thunderbird email address and click on “Next”.
- In the next step, you will need to enter the password for your Thunderbird email account and click on “Next”. Make sure to provide the correct password to establish the connection between Thunderbird and Gmail.
- In the following screen, you can choose the specific Thunderbird folders you want to import. You can either select all folders or choose specific ones based on your preference. Once you’ve made your selection, click on “Import”.
- The import process will begin, and Gmail will start fetching your emails from Thunderbird. The time it takes to import the emails will depend on the number of emails and their size.
- Once the import process is complete, Gmail will display a notification confirming the successful import. You can now access your Thunderbird emails in Gmail by navigating to the corresponding folders or searching for specific emails.
With your Gmail account properly set up for importing, you’re now ready to proceed with the actual import process. In the next section, we will cover two different methods that you can use to import your Thunderbird emails into Gmail. Choose the method that suits your preference and follow the step-by-step instructions to successfully import your emails.
Importing Emails into Gmail Using Google Mail Loader
If you have exported your emails from Mozilla Thunderbird and want to import them into Gmail, one convenient method is by using the Google Mail Loader tool. This tool allows you to upload your exported emails into Gmail in a few simple steps. Here’s how you can import your Thunderbird emails into Gmail using Google Mail Loader:
- Open your web browser and go to the Google Mail Loader website.
- Click on the “Choose File” button and navigate to the folder on your computer where you saved the exported EML files from Thunderbird.
- Select all the EML files that you want to import, and then click on the “Open” button.
- Once the files are selected, click on the “Upload” button to start the import process.
- Google Mail Loader will begin uploading the EML files to your Gmail account. The time it takes to upload the files depends on the number and size of the emails.
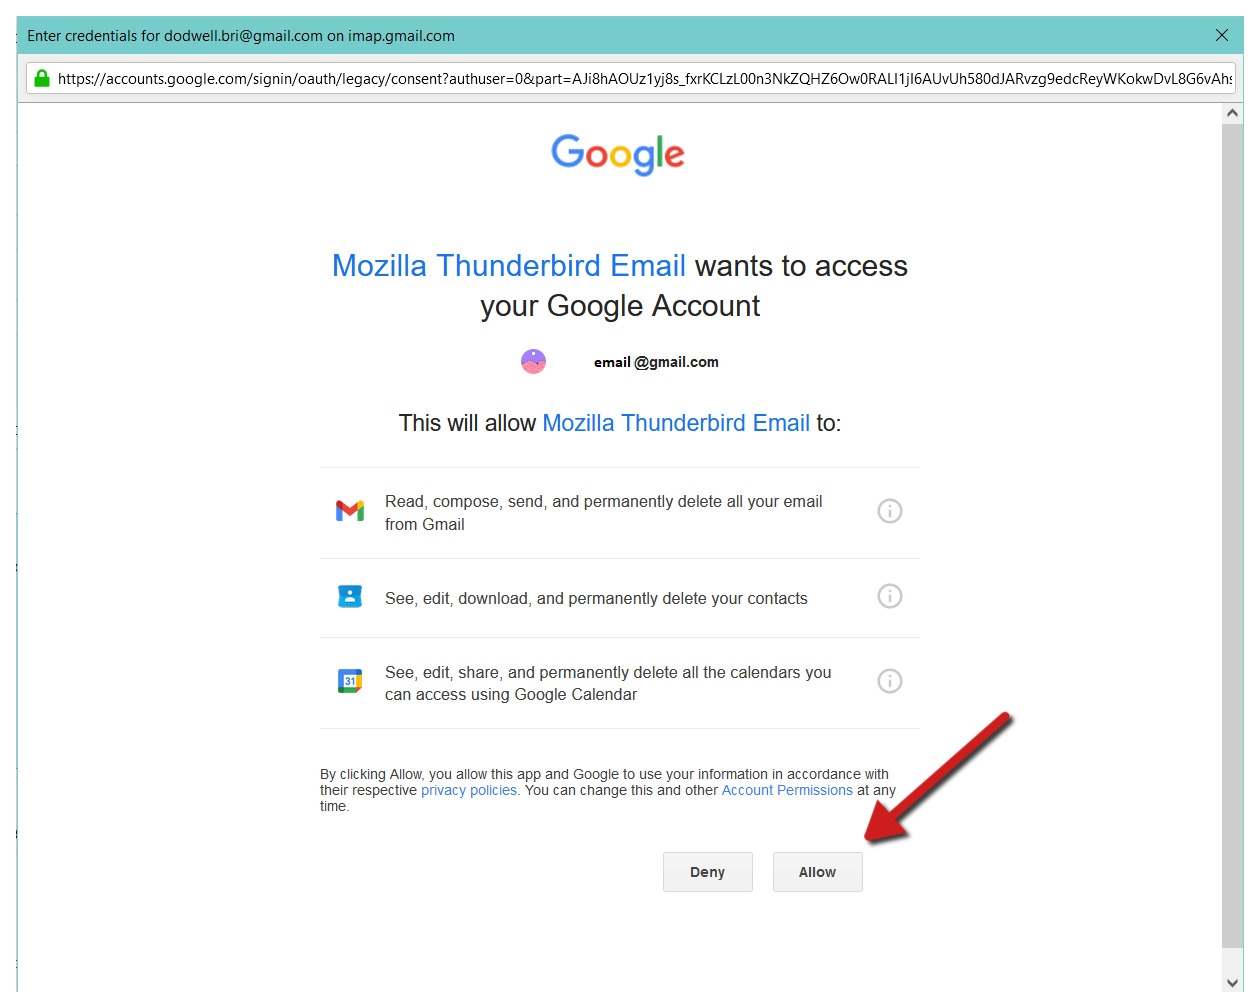
- During the upload process, you may be asked to grant the necessary permissions for Google Mail Loader to access your Gmail account. Follow the on-screen instructions to provide the required permissions.
- Once the upload is complete, Google Mail Loader will display a confirmation message. You can then close the tool.
- Go back to your Gmail account and navigate to the relevant folders to find your imported Thunderbird emails. You can also use the search bar to look for specific emails or keywords.
Using Google Mail Loader is a straightforward and efficient way to import your Thunderbird emails into Gmail. This method retains the original formatting and metadata of the emails, ensuring a seamless transition from Thunderbird to Gmail. Now that you know how to use Google Mail Loader, let’s explore an alternative method for importing Thunderbird emails into Gmail in the next section.
Importing Emails into Gmail Using an Email Client
If you prefer to import your exported emails from Mozilla Thunderbird into Gmail using an email client, you can achieve this by configuring Thunderbird as an IMAP client for Gmail. This method allows you to directly synchronize your Thunderbird emails with your Gmail account. Follow the steps below to import your Thunderbird emails into Gmail using an email client:
- Open Mozilla Thunderbird on your computer.
- If you haven’t added your Gmail account to Thunderbird, click on “File” in the top menu, select “New”, and then choose “Existing Mail Account”. Enter your Gmail credentials and follow the setup instructions to add your Gmail account to Thunderbird as an IMAP account.
- Once your Gmail account is successfully added, Thunderbird will start synchronizing with your Gmail account and downloading the email folders.
- Next, go to the folder where you exported your Thunderbird emails as EML files. Drag and drop the EML files into the corresponding Gmail folders in Thunderbird.
- Thunderbird will automatically upload the EML files to your Gmail account. The synchronization process may take some time depending on the size and number of emails.
- Once the synchronization is complete, you can open your Gmail account in a web browser and navigate to the corresponding folders to access your imported Thunderbird emails.
Using an email client like Thunderbird to import your Thunderbird emails into Gmail offers a seamless integration between the two platforms. By configuring Thunderbird as an IMAP client, you can easily transfer your emails from Thunderbird to Gmail without the need for any external tools or services. This method ensures that all your email folders and their contents are accurately imported into Gmail.
Choose the method that suits your preference and follow the step-by-step instructions to successfully import your Thunderbird emails into Gmail. Remember to double-check your imported emails in Gmail to ensure the transfer was successful. In case you encounter any issues during the import process, refer to the troubleshooting section in the next part for possible solutions.
Troubleshooting Common Issues
While importing emails from Mozilla Thunderbird into Gmail, you may encounter some common issues. Here are a few troubleshooting tips to help you resolve them:
- File Compatibility: Ensure that the exported EML files from Thunderbird are in the correct format and compatible with Gmail. Double-check the file format and make sure you selected “EML” during the export process.
- Internet Connection: A stable internet connection is necessary for the import process to work smoothly. Ensure that your internet connection is reliable and check for any connectivity issues.
- Permission Settings: If you are using Google Mail Loader or configuring Thunderbird as an IMAP client, make sure you have granted the necessary permissions and access to your Gmail account. Verify that you have correctly authorized the tools or email client to perform the import process.
- Email Size Limit: Gmail has a limit on the size of emails that can be imported or uploaded. If any of your exported emails from Thunderbird exceed this limit, you may need to split them into smaller parts or compress them before importing.
- Folders and Subfolders: Ensure that you correctly map and import Thunderbird folders and subfolders into the corresponding folders in Gmail. Take note of any folder structure modifications to avoid potential confusion during the import process.
- Sync Errors: If you are synchronizing Thunderbird with Gmail using an email client, it’s possible to encounter sync errors. In Thunderbird, restart the synchronization process or check the account settings to resolve any synchronization errors.
- Unsupported Features: Keep in mind that some Thunderbird-specific features or customizations may not be supported or translated exactly in Gmail. Certain email formatting, filters, or add-ons may behave differently or require adjustment after the import.
If you encounter any other issues during the import process, double-check the steps and settings you followed. You can also refer to the official documentation or support forums for Mozilla Thunderbird and Gmail for further assistance. By troubleshooting these common issues, you can ensure a successful and smooth import of your Thunderbird emails into Gmail.
Final Thoughts and Recommendations
Importing emails from Mozilla Thunderbird into Gmail can be a straightforward process if you follow the right steps and troubleshoot any issues that may arise. By migrating your emails to Gmail, you can take advantage of its powerful features, robust search capabilities, and seamless integration with other Google services. As you conclude the email migration process, here are some final thoughts and recommendations:
Backup Your Emails: Before proceeding with any email import process, it is always a good practice to create a backup of your Thunderbird emails. This ensures that you have a copy of your emails in case any unexpected issues arise during the import process.
Verify Imported Emails: Once you have completed the import process, it is crucial to verify that all your Thunderbird emails have been successfully imported into Gmail. Check the folders, search for specific emails, and ensure that the email content, attachments, and metadata are intact.
Organize and Clean up: Take the opportunity to organize and clean up your emails in Gmail after the import. Create labels, set up filters, and delete any redundant or outdated emails to keep your inbox clutter-free. This will help you stay organized and make it easier to manage your emails in the future.
Adjust Settings and Filters: Remember to review and adjust any settings or filters in Gmail to match your preferences. Thunderbird may have different default settings or filters compared to Gmail, so take the time to customize these settings accordingly for optimal email management.
Transition Period: Keep in mind that transitioning from Thunderbird to Gmail may require some adjustment period. Familiarize yourself with Gmail’s interface, features, and shortcuts to maximize its productivity potential. Explore the various options available and customize your Gmail experience to your liking.
Stay Organized: As you continue using Gmail, make a habit of regularly archiving or deleting old emails to avoid clutter in your inbox. Use labels, folders, and search filters effectively to quickly find and manage your emails.
By following these recommendations, you can ensure a successful transition from Mozilla Thunderbird to Gmail. Enjoy the benefits of Gmail’s powerful email management features and experience seamless integration with other Google services. With your emails securely migrated, you can now fully embrace the productivity and convenience of Gmail.