
How to Zip Files on a Chromebook
Chromebooks are known for their simplicity and ease of use, but when it comes to zipping files, you might wonder how to do it on this unique operating system. Fortunately, zipping files on a Chromebook is a straightforward process. Whether you want to compress multiple files into one convenient package or save storage space, here’s how you can zip files on a Chromebook.
To begin, open the Files app on your Chromebook. You can find it in the launcher or by clicking on the app shelf at the bottom of the screen. Once the Files app is open, navigate to the folder containing the files you want to zip.
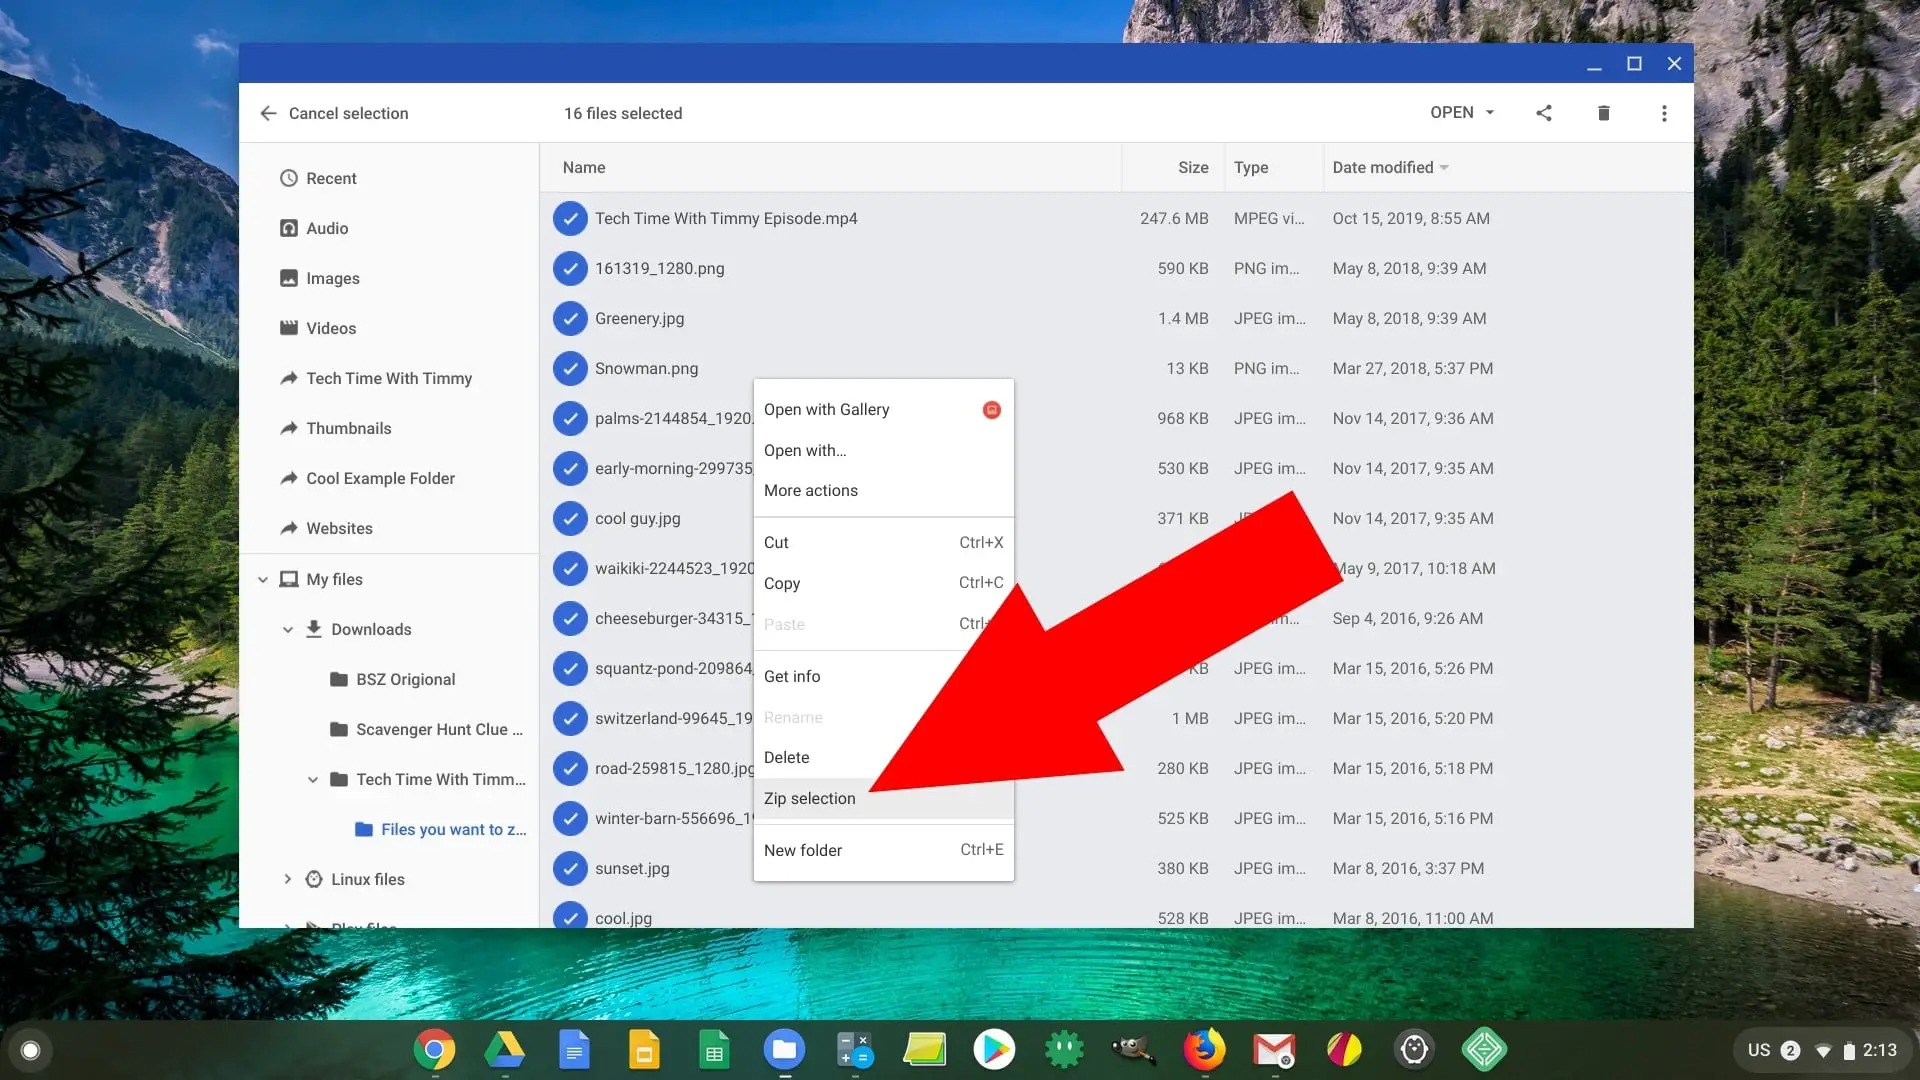
Next, select the specific files you wish to include in the zip file. You can do this by clicking on the first file, holding the Shift key, and then clicking on the last file. This will select all the files in between. Alternatively, you can hold the Ctrl key and click on individual files to select them.
After selecting the files, right-click on one of them and choose the “Compress” option from the context menu. A prompt will appear asking you to name the zip file. Give it a suitable name and click “Enter” or press the “Save” button.
The Files app will then create the zip file in the same location as the original files, with the “.zip” extension. You can easily identify it by the familiar zipper icon. To access the contents of the zip file, simply double-click on it, and the Files app will automatically extract the files for you.
Alternatively, you can also zip files by selecting them and clicking on the menu icon (three vertical dots) in the top-right corner of the Files app. From the drop-down menu, choose the “Compress” option, and follow the same steps as mentioned above.
That’s it! You’ve successfully zipped files on your Chromebook. Now you can easily share or store multiple files as a single compressed package.
It’s worth noting that the Files app on a Chromebook provides a basic, built-in zip functionality. However, if you require more advanced features or prefer a different interface, you can explore third-party apps available on the Chrome Web Store for zipping and unzipping files.
How to Unzip Files on a Chromebook
If you’ve received a zip file on your Chromebook or need to extract files from a compressed package, learning how to unzip files is essential. Thankfully, unzipping files on a Chromebook is a simple process that can be done using the built-in Files app. Here’s how you can unzip files on your Chromebook.
To begin, locate the zip file you want to unzip in the Files app. If the zip file is in your Downloads folder, you can find it under the “My Files” section in the app. If it’s saved in a different location, navigate to that folder using the sidebar on the left.
Once you’ve found the zip file, double-click on it. The Files app will automatically extract the contents and create a new folder with the same name as the zip file. You can access the extracted files by opening the newly created folder.
If you prefer a different method to unzip files, you can right-click on the zip file and select the “Extract” option from the context menu. Alternatively, you can select the zip file and click on the menu icon (three vertical dots) in the top-right corner of the Files app, then choose “Extract” from the drop-down menu.
By default, the extracted files will be saved in the same location as the original zip file. If you want to move the extracted files to a different location, simply click and drag the files or the folder to the desired location within the Files app.
That’s it! You’ve successfully unzipped files on your Chromebook. Now you can access and use the extracted files as needed.
It’s important to note that the built-in Files app on a Chromebook provides a basic unzip functionality. If you require advanced features or a more feature-rich interface, consider exploring third-party apps available on the Chrome Web Store for unzipping files.
Using the Files App for Zipping and Unzipping
One of the convenient features of a Chromebook is the built-in Files app, which allows you to easily manage and organize your files. When it comes to zipping and unzipping files, the Files app provides a user-friendly interface that simplifies the process. Here’s how you can leverage the Files app for zipping and unzipping files on your Chromebook.
To zip files using the Files app, simply open the app and navigate to the folder that contains the files you want to compress. Select the desired files by clicking on them while holding down the Shift or Ctrl key. Once you’ve selected the files, right-click on one of them and choose the “Compress” option from the context menu. Provide a name for the zip file and click “Enter” or press the “Save” button. The Files app will then create a zip file containing the selected files.
For unzipping files, locate the zip file in the Files app. Double-click on the zip file, and the Files app will automatically extract the contents and create a new folder with the same name as the zip file. You can access the extracted files by opening the folder.
Alternatively, you can use the “Extract” option found in the context menu when you right-click on a zip file. This will unzip the file and create a new folder with the extracted contents.
The Files app also allows you to easily move or copy files within your Chromebook’s storage. To move files, simply click and drag them to the desired folder or location. To copy files, hold down the Alt key while dragging the files to the destination folder. This feature can come in handy when organizing your files before or after zipping and unzipping them.
With the Files app on your Chromebook, zipping and unzipping files becomes a seamless process. It provides a user-friendly interface, making it easy for both beginners and experienced users to manage their files efficiently.
While the built-in Files app is ideal for basic file compression and extraction, if you require more advanced features or a different interface, you may consider exploring third-party apps available in the Chrome Web Store specifically designed for zipping and unzipping files.
Using Third-Party Apps for Zipping and Unzipping
While the built-in Files app on a Chromebook provides a convenient way to zip and unzip files, you may prefer more advanced features or a different interface. Fortunately, the Chrome Web Store offers a variety of third-party apps that specialize in file compression and extraction. Here’s how you can utilize these apps for zipping and unzipping files on your Chromebook.
Start by opening the Chrome Web Store on your Chromebook. You can access it by typing “chrome://apps” in the URL bar and pressing Enter. Once in the Chrome Web Store, you can search for “file compression” or “file extraction” apps to find suitable options.
Browse through the available apps and read reviews or ratings to determine which one meets your needs. Each app may offer unique features, such as support for different compression formats or enhanced functionality.
Once you’ve chosen an app, click on it to view more details. Read the app description, check if there are any in-app purchases, and review the user ratings and reviews to ensure it is reliable and suitable for your requirements.
Click on the “Add to Chrome” or “Install” button to install the app on your Chromebook. Follow the on-screen prompts to complete the installation process.
After the app is installed, you can launch it from the Chrome Launcher or the app shelf at the bottom of the screen. The third-party app will provide a standalone interface where you can easily access its zipping and unzipping functionalities.
Typically, these apps will offer similar options for zipping and unzipping files. You can choose the files you want to include in a zip file, name the file, and select the compression format. Similarly, to unzip files, you’ll need to select the zip file, specify the extraction location, and complete any additional prompts as needed.
It’s important to note that while third-party apps can provide additional features, they may also have limitations depending on the specific app. Ensure you understand the app’s capabilities and any potential restrictions before relying on it for your zipping and unzipping needs.
By utilizing third-party apps from the Chrome Web Store, you can further enhance your file compression and extraction experience on your Chromebook. These apps offer advanced features and customization options, allowing you to tailor the process to your specific requirements.
Alternative Methods for Zipping and Unzipping on a Chromebook
While the built-in Files app and third-party apps provide convenient options for zipping and unzipping files on a Chromebook, there are alternative methods you can explore as well. These methods can be helpful if you prefer a different workflow or need to perform specific tasks. Here are some alternative methods for zipping and unzipping on a Chromebook.
Online File Compression Tools: One alternative method is to use online file compression tools. There are various websites available that allow you to upload files and compress them into a zip format. These online tools often offer additional features like adjusting the compression level or supporting different file formats. Simply search for “online file compression” in your favorite search engine to find reputable websites offering this service.
Command Line: Another alternative method is to use the command line on your Chromebook. Chrome OS, being based on Linux, supports the use of the terminal, where you can use commands like “zip” and “unzip” to compress and extract files. To access the terminal, press Ctrl+Alt+T on your keyboard to open the Crosh shell, then type “shell” and hit Enter. From there, you can navigate to the desired folder and use the appropriate command-line tools for zipping and unzipping files.
Cloud Storage Services: If you regularly work with large files or need to share them with others, utilizing cloud storage services like Google Drive, Dropbox, or OneDrive can be an efficient alternative. These services often have built-in compression and extraction functionality. You can upload files to your cloud storage, compress them within the service, and easily share the zip file or extract files as needed.
Android Apps: If you have a Chromebook that supports Android apps, you can explore file compression and extraction apps available on the Google Play Store. These apps offer similar functionality to the third-party apps mentioned earlier but are specifically designed for Android devices. Install a trusted file compression app from the Play Store and use it to zip and unzip files directly on your Chromebook.
These alternative methods can provide flexibility and additional features for zipping and unzipping files on your Chromebook. Explore these options to find the method that best suits your workflow and requirements.
Tips and Tricks for Efficient Zipping and Unzipping on a Chromebook
Zipping and unzipping files on a Chromebook can save you time, storage space, and make file management more organized. To make the process even smoother, here are some tips and tricks for efficient zipping and unzipping on your Chromebook.
Keep Files Organized: Before zipping files, take a moment to organize them within folders. Having well-organized files makes it easier to select and zip them efficiently. Group related files together in separate folders to maintain a structured system.
Use Select All and Deselect: When selecting multiple files to zip, you don’t have to manually click on each file. Instead, use the Select All option by holding down the Ctrl key and pressing the letter A. To selectively deselect files, hold down the Ctrl key and click on individual files you want to exclude.
Choose Compression Format: Consider the compression format you want to use when creating zip files. While the default compression format in Chrome OS is ZIP, some third-party apps and online tools offer alternative formats like RAR or 7z. Different formats may offer better compression rates or additional features, so choose the format that suits your needs.
Protect Zip Files: If you need to secure your zip files with a password, some third-party apps and online tools allow you to do so. This is especially useful when sharing sensitive files or when you want to ensure only intended recipients can access the contents of the zip file.
Preview files before unzipping: If you’re unsure about the contents of a zip file, use the built-in preview feature in the Files app. Simply hover over the zip file, and a preview window will appear, displaying the file names and types contained within. This allows you to decide whether you want to unzip the entire file or selectively extract specific files.
Customize Extraction Location: When unzipping files, you can choose where the extracted files are saved. Instead of the default location, you can specify a different folder within the Files app or even an external storage device. This allows for better organization and ensures that the extracted files are placed exactly where you need them.
Regularly Clean Up Zipped Files: Over time, you may accumulate numerous zip files on your Chromebook. To prevent clutter and save storage space, periodically review and delete unnecessary zip files. Be sure to double-check the contents before deleting a zip file to avoid accidentally deleting important files.
By following these tips and tricks, you can streamline the process of zipping and unzipping files on your Chromebook. These practices will help you stay organized and efficiently manage your files, ultimately enhancing your overall productivity and file management experience.