
How to Zip Files and Folders on a Mac
One of the essential tasks when it comes to organizing and sharing files is compressing them into zip format. Thankfully, zipping files and folders on a Mac is a simple process. Follow these steps to zip your files:
- Select the file or folder that you want to zip by clicking on it.
- Right-click on the selected item and choose “Compress [item name]” from the contextual menu. Alternatively, you can also click on the “File” menu in the menu bar, hold down the “Option” key, and select “Compress [item name]”.
- A new zip file will be created in the same location as the original file or folder with the same name, but with a “.zip” extension.
That’s it! You have successfully zipped your files or folders. Keep in mind that the original file or folder will remain intact, and the zip file is a compressed version that takes up less space.
Using this method, you can zip multiple files or folders individually. However, if you have a large number of files or folders that you want to zip together, you can follow the next section to learn how to zip multiple items at once.
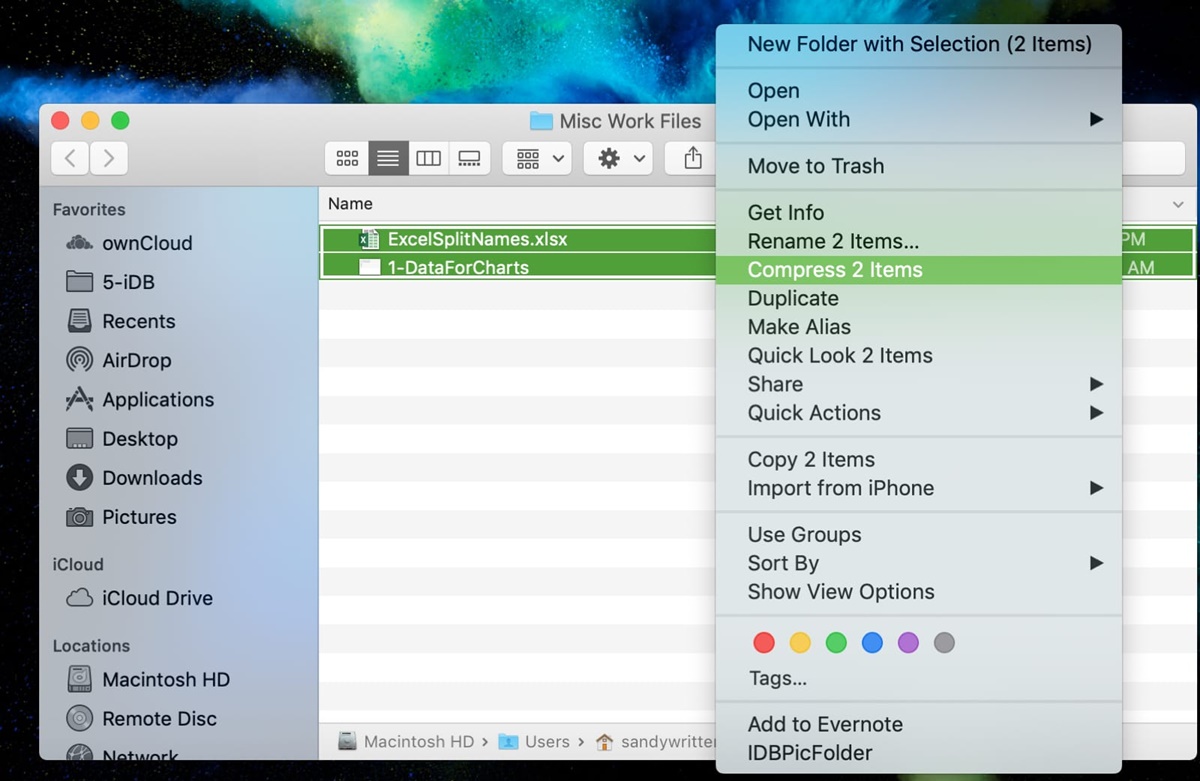
How to Zip Multiple Files or Folders at Once on a Mac
If you have a group of files or folders that you want to zip together, zipping them individually can be time-consuming. Fortunately, there’s a way to zip multiple items at once on a Mac. Follow these steps:
- Select all the files or folders that you want to zip by holding down the Command key while clicking on each item.
- Right-click on one of the selected items and choose “Compress [number of items] Items” from the contextual menu. Alternatively, you can also click on the “File” menu in the menu bar, hold down the “Option” key, and select “Compress [number of items] Items”.
- A new zip file will be created in the same location with the name “Archive.zip”.
By default, the zip file will be named “Archive.zip”. However, you can change its name by right-clicking on the zip file, selecting “Get Info”, and entering a new name in the “Name & Extension” field.
With this method, you can quickly create a zip file containing multiple files or folders. It’s a convenient way to organize and share a group of related items. Now that you know how to zip multiple items, let’s move on to learn how to create password-protected zip files on a Mac.
How to Create Password-Protected Zip Files on a Mac
If you want to add an extra layer of security to your zip files, you can create password-protected zip files on a Mac. This ensures that only those who know the password can access the contents of the zip file. Follow these steps to create a password-protected zip file:
- Select the file or folder that you want to zip by clicking on it.
- Right-click on the selected item and choose “Compress [item name]” from the contextual menu.
- A new zip file will be created in the same location as the original with the same name, but with a “.zip” extension.
- Double-click on the zip file to open it.
- In the Finder menu, click on “File” and select “Encrypt [zip file name]”.
- Enter a password of your choice. Make sure to choose a strong and secure password that you can remember.
- Confirm the password to create the password-protected zip file.
Once the password-protected zip file is created, you will be prompted to enter the password whenever you try to unzip or access the contents of the file. This provides an additional layer of protection for your sensitive and confidential information.
Keep in mind that if you forget the password, there is no way to recover it. Therefore, make sure to choose a password that you can remember or store it in a secure place.
Now you know how to create password-protected zip files on a Mac. In the next section, we will explore how to unzip files and folders.
How to Unzip Files and Folders on a Mac
Unzipping files and folders is a common task when you receive compressed files from others or download them from the internet. Fortunately, unzipping files on a Mac is straightforward. Follow these steps to unzip files or folders:
- Locate the zip file that you want to unzip.
- Double-click on the zip file to open it. The contents of the zip file will be displayed in a new window.
- To extract all the files and folders, either drag them to a desired location or click on the “Extract All” button in the toolbar of the zip window.
- A new folder will be created with the same name as the original zip file, and the extracted files and folders will be placed inside.
That’s it! You have successfully unzipped the file or folder on your Mac. The original zip file will remain intact, and you now have access to the individual files and folders inside.
If you only need to extract specific files from the zip folder, follow the next section to learn how to extract individual files.
Unzipping files and folders on a Mac is a simple and essential task for managing compressed files. In the next section, we will explore how to extract individual files from a zip folder.
How to Extract Individual Files from a Zip Folder on a Mac
Sometimes, you may only need to extract specific files from a zip folder instead of extracting all the contents. In such cases, you can follow these steps to extract individual files from a zip folder on a Mac:
- Locate the zip folder that contains the files you want to extract.
- Double-click on the zip folder to open it. The contents of the zip folder will be displayed in a new window.
- Click on the file you want to extract and drag it to a desired location on your Mac, such as the desktop or a specific folder.
- Release the mouse button to drop the file in the selected location. The individual file will be extracted from the zip folder and placed in the chosen location.
If you need to extract multiple files at once, you can hold down the Command key while clicking on each file, and then drag them to the desired location to extract them together.
By extracting individual files, you have the flexibility to only retrieve the specific files you need from a zip folder, saving time and storage space on your Mac.
In the next section, we will explore how to unzip multiple files or folders at once on a Mac.
How to Unzip Multiple Files or Folders at Once on a Mac
If you have multiple files or folders that are compressed in a zip format, you may want to extract them all at once to save time and effort. Fortunately, unzipping multiple files or folders at once on a Mac is a simple process. Follow these steps:
- Locate the zip file that contains the files or folders you want to unzip.
- Double-click on the zip file to open it. The contents of the zip file will be displayed in a new window.
- Select all the files or folders that you want to unzip by holding down the Command key and clicking on each item.
- Drag the selected items to a desired location on your Mac, such as the desktop or a specific folder.
- Release the mouse button to drop the items in the chosen location. The files or folders will be extracted from the zip file and placed in the selected location.
With this method, you can quickly unzip multiple files or folders at once, saving you the hassle of manually extracting each item individually. It’s a convenient way to manage and organize your files efficiently.
In the next section, we will explore how to unzip password-protected zip files on a Mac.
How to Unzip Password-Protected Zip Files on a Mac
If you have received a password-protected zip file or downloaded one from the internet, you will need to enter the correct password to access its contents. Here’s how you can unzip password-protected zip files on a Mac:
- Locate the password-protected zip file that you want to unzip.
- Double-click on the zip file to open it. You will be prompted to enter the password.
- Type in the correct password for the zip file and click on “OK”.
- The zip file will be extracted, and its contents will be placed in a new folder in the same location as the original zip file.
If you enter an incorrect password, you will receive an error message indicating that the password is incorrect. Make sure to enter the password carefully and ensure it matches the one provided to you.
Unzipping password-protected zip files provides an additional layer of security for your sensitive files. It helps ensure that only those who have the correct password can access the contents of the file.
In the next section, we will explore how to open zip files in a specific application on a Mac.
How to Open Zip Files in a Specific Application on a Mac
When you unzip a file on a Mac, the default Archive Utility program is used to extract the contents. However, if you prefer to open zip files in a specific application of your choice, you can easily make that change. Follow these steps to open zip files in a specific application on a Mac:
- Locate the zip file that you want to open.
- Right-click on the zip file and select “Get Info” from the contextual menu.
- In the “Open with” section, click on the drop-down menu to choose the application you want to use to open the zip file.
- If the desired application is not listed, click on “Other…” to browse and select it.
- Click on the “Change All” button to set the selected application as the default for opening zip files.
- Click on the “Continue” button in the confirmation dialog.
Once you have made this change, every time you double-click on a zip file, it will automatically open in the chosen application. This provides greater flexibility and convenience in handling zip files on your Mac.
In the next section, we will explore how to automatically unzip downloaded files on a Mac.
How to Automatically Unzip Downloaded Files on a Mac
If you frequently download zip files and want to save time by automatically unzipping them, you can set up your Mac to extract zip files automatically. Here’s how you can do it:
- Open the “Finder” on your Mac.
- In the menu bar, click on “Finder” and select “Preferences”.
- Go to the “General” tab in the Finder Preferences window.
- Check the box next to “Open ‘Safe’ files after downloading”.
- Close the Finder Preferences window.
With this setting enabled, any zip file that you download will automatically be extracted upon completion. The contents of the zip file will be placed in the same location as the downloaded file. This saves you the extra step of manually unzipping each file, streamlining your workflow.
It’s important to note that this setting applies to all zip files, regardless of their source. If you want to disable automatic extraction for specific files, you can right-click on the zip file, go to “Get Info”, and uncheck the box next to “Open with Archive Utility”.
By automatically unzipping downloaded files, you can quickly access the contents of zip files without any additional effort. In the next section, we will explore how to change the default zip and unzip program on a Mac.
How to Change the Default Zip and Unzip Program on a Mac
In macOS, the default program for zipping and unzipping files is Archive Utility. However, if you prefer to use a different zip and unzip program on your Mac, you can change the default application. Follow these steps to change the default zip and unzip program:
- Locate the zip file that you want to change the default program for.
- Right-click on the zip file and select “Get Info” from the contextual menu.
- In the “Open with” section, click on the drop-down menu to choose the application you want to use as the default for opening zip files.
- If the desired application is not listed, click on “Other…” to browse and select it.
- Click on the “Change All” button to set the selected application as the default for opening zip files.
- Click on the “Continue” button in the confirmation dialog.
By changing the default zip and unzip program, all zip files on your Mac will open with the selected application instead of the default Archive Utility. This allows you to have more control over your file management and use the program that best fits your needs.
It’s worth noting that this change will not affect the underlying macOS system functionality. The Archive Utility will continue to be used for system-level tasks, such as extracting certain system updates.
With the ability to change the default zip and unzip program, you can tailor your Mac’s file management process to suit your preferences. This concludes our guide on zipping and unzipping files on a Mac.