
The Excel DATE Function
The DATE function in Excel is a powerful tool that allows users to manipulate and work with dates easily. It is especially useful when performing calculations or creating formulas that involve dates.
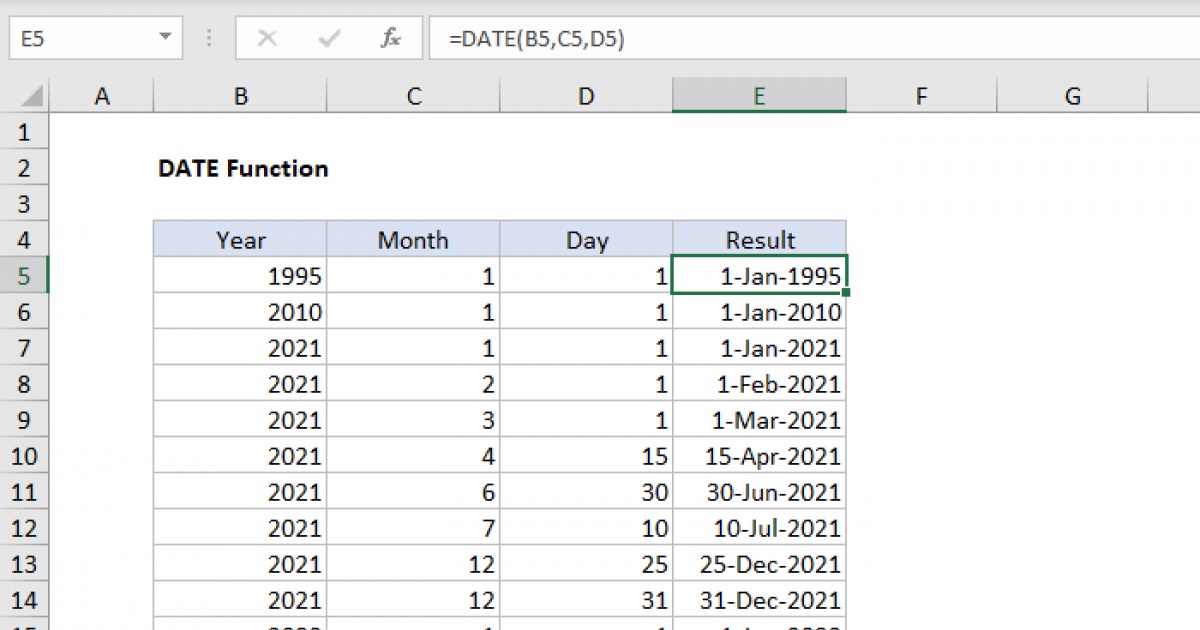
With the Excel DATE function, you can easily create a date by specifying the year, month, and day as separate arguments. This function returns a serial number that represents the date in Excel’s internal date format.
The syntax of the DATE function is as follows:
- =DATE(year, month, day)
The year argument refers to the desired year, using four digits (e.g., 2022).
The month argument represents the month, ranging from 1 (January) to 12 (December).
The day argument specifies the day of the month, ranging from 1 to 31.
For example, to create a date for March 15, 2022, you would use the following formula:
- =DATE(2022, 3, 15)
The result would be the serial number 44574, which represents the date in Excel.
You can also use cell references in the DATE function. This allows you to create dynamic formulas that update automatically when the referenced cells change. For example, if cell A1 contains the year, cell A2 contains the month, and cell A3 contains the day, you can use the formula:
- =DATE(A1, A2, A3)
This will create a date based on the values in cells A1, A2, and A3.
The DATE function can also be combined with other functions to perform more complex operations. For example, you can use the MONTH function to extract the month from a date created with the DATE function. The formula would be:
- =MONTH(DATE(2022, 3, 15))
This would return the value 3, indicating the month of March.
Formatting dates in Excel is also possible using various built-in date formats or custom formats. You can change the display format of a date by selecting the cell(s) containing the date, right-clicking, and choosing the “Format Cells” option. From there, you can select the desired date format.
However, it’s important to be cautious when using the DATE function to avoid common errors. Make sure to provide valid inputs for the year, month, and day arguments. Additionally, double-check that the formula is entered correctly to ensure accurate results.
What is the DATE function?
The DATE function in Excel is a valuable tool that allows users to create and manipulate dates easily. It is particularly useful when performing calculations or creating formulas that involve dates.
The purpose of the DATE function is to generate a date based on specified year, month, and day values. It returns a serial number, which represents the date in Excel’s internal date format.
By using the DATE function, you can input the necessary arguments to create a specific date. The syntax of the DATE function is as follows:
- =DATE(year, month, day)
The year argument represents the desired year and should be entered as a four-digit number (e.g., 2022).
The month argument indicates the desired month, with a range from 1 (January) to 12 (December).
The day argument specifies the desired day of the month, ranging from 1 to 31.
For instance, if you want to create a date for March 15, 2022, you can use the following formula:
- =DATE(2022, 3, 15)
The result will be a serial number, such as 44574, which represents the specified date in Excel.
One of the advantages of the DATE function is that it allows for the use of cell references. This means that you can create dynamic formulas that automatically update when the referenced cells change. To achieve this, you can use cell references for the year, month, and day values in the formula. For example:
- =DATE(A1, A2, A3)
In this case, if cell A1 contains the year, cell A2 contains the month, and cell A3 contains the day, the formula will generate a date based on the values entered in these cells.
The DATE function can also be combined with other functions to perform more complex operations. By using additional functions like MONTH, DAY, and YEAR, you can extract specific components of a date created with the DATE function. This allows you to analyze and manipulate dates more efficiently in your Excel spreadsheets.
Formatting dates in Excel is another essential aspect of working with the DATE function. Excel provides a range of built-in date formats as well as the option to create custom formats. By selecting the cell(s) containing the date, right-clicking, and choosing the “Format Cells” option, you can customize the display format to meet your preferences or the requirements of your data presentation.
However, it is crucial to be cautious when using the DATE function to avoid common errors. Always ensure that the provided arguments for year, month, and day are valid and accurately entered. Double-checking the formula for correctness is necessary to obtain accurate results.
Syntax of the DATE Function
The DATE function in Excel follows a specific syntax that allows users to create dates by specifying the year, month, and day values. By understanding the syntax, you can effectively use the DATE function to generate accurate dates in your Excel spreadsheets.
The syntax of the DATE function is as follows:
- =DATE(year, month, day)
The year argument refers to the desired year and should be provided as a four-digit number. For example, to specify the year 2022, you would enter 2022 as the year argument.
The month argument represents the desired month and should be entered as an integer value. The range for months in Excel is from 1 (January) to 12 (December). For instance, to specify the month of March, you would enter 3 as the month argument.
The day argument indicates the desired day of the month and should also be entered as an integer value. The range for days is from 1 to 31. For example, to specify the 15th day of the month, you would enter 15 as the day argument.
Putting it all together, if we wanted to create a date for March 15, 2022, the formula using the DATE function would be:
- =DATE(2022, 3, 15)
When you enter this formula, Excel will evaluate it and return the corresponding serial number that represents the specified date in Excel’s internal date format.
The syntax of the DATE function allows for flexibility and the use of cell references. This means you can input cell references instead of hardcoding the year, month, and day values in the formula. By using cell references, your formulas become dynamic and automatically update when the referenced cells change.
For example, if cell A1 contains the year, cell A2 contains the month, and cell A3 contains the day, you can use the following formula:
- =DATE(A1, A2, A3)
This formula will create a date based on the values entered in cells A1, A2, and A3.
Understanding the syntax of the DATE function allows you to utilize its full potential when working with dates in Excel. By correctly providing the year, month, and day arguments, you can generate accurate dates and perform various calculations or analyses with ease.
Examples of using the DATE function
The DATE function in Excel is a versatile tool that can be used in various scenarios to create and manipulate dates. Here are some examples that illustrate the practical use of the DATE function and its capabilities:
Example 1:
Let’s say you need to calculate the date that is 30 days from the current date. You can use the DATE function in combination with the TODAY function, which returns the current date. The formula would look like this:
- =TODAY() + 30
This formula adds 30 days to the current date, resulting in a future date. The DATE function is not explicitly used in this example, but it works in the background to calculate the new date based on the current date and the added days.
Example 2:
Suppose you have a spreadsheet where you want to calculate the age of a person based on their birthdate. You can use the DATE function, along with the YEAR, MONTH, and DAY functions, to make the calculation.
- =YEAR(TODAY()) – YEAR(DATE(1980, 5, 10))
In this formula, we use the YEAR function to extract the current year from the current date (TODAY). We also use the YEAR function along with the DATE function to extract the birth year. The difference between the current year and the birth year gives us the person’s age.
Example 3:
Let’s say you have a list of orders with the order dates in separate columns. You want to calculate the number of days that have passed since each order was placed. You can use the DATE function in combination with the TODAY function to achieve this.
- =TODAY() – DATE(2022, 1, 1)
In this formula, we subtract the date of the order from the current date (TODAY) to get the number of days that have passed since the order was placed. This allows you to track the age of each order and make data-driven decisions based on the elapsed time.
These examples demonstrate the versatility of the DATE function in Excel. By combining it with other functions and utilizing its ability to calculate dates based on specific year, month, and day values, you can perform a range of calculations and analyses involving dates with ease and precision.
Using cell references in the DATE function
One of the powerful features of the DATE function in Excel is its ability to use cell references as arguments. By using cell references, you can create dynamic formulas that update automatically when the referenced cells change. This allows for flexibility and efficiency when working with dates in your Excel spreadsheets.
Here’s how you can use cell references in the DATE function:
To start, you’ll need to have your year, month, and day values stored in separate cells. For example, let’s assume that cell A1 contains the year value, cell A2 contains the month value, and cell A3 contains the day value.
You can then use these cell references in the DATE function to generate a date:
- =DATE(A1, A2, A3)
Excel will evaluate this formula and use the values from cells A1, A2, and A3 as the arguments for the DATE function, resulting in a dynamically generated date.
The advantage of using cell references is that if you change the values in cells A1, A2, or A3, the DATE function will automatically recalculate and update the date accordingly. This saves you time and effort compared to manually changing the formula every time the date values change.
By using cell references, you can easily create formulas that incorporate other functions to perform more complex operations on dates. For example, you can combine the DATE function with the DAY function to extract the day from a dynamically generated date:
- =DAY(DATE(A1, A2, A3))
In this formula, the DATE function generates the date based on the values in cells A1, A2, and A3, and the DAY function extracts and returns the day of the month from that date.
Using cell references in the DATE function not only allows for flexibility in date calculations but also enables you to work with larger datasets more efficiently. By referring to specific cells that contain your date components, you can quickly update and manipulate multiple dates at once by simply changing the values in those cells.
Make sure to choose descriptive cell references that accurately represent the date components to enhance the readability and maintainability of your formulas. This practice will help you keep track of the relationships between your input values and the resulting dates in your Excel spreadsheets.
Using the DATE function with other functions
The Excel DATE function is a powerful tool on its own, but its capabilities can be further expanded when combined with other functions. By leveraging the DATE function in conjunction with other Excel functions, you can perform more complex calculations and analyses involving dates. This enhances the flexibility and efficiency of your spreadsheet tasks.
Here are a few examples of how you can use the DATE function with other functions:
Example 1: Using MONTH function to extract the month
Suppose you want to extract the month from a date generated using the DATE function. You can accomplish this by combining the DATE function with the MONTH function. The formula would look like this:
- =MONTH(DATE(2022, 3, 15))
The DATE function creates the date (March 15, 2022), and then the MONTH function extracts and returns the month value (which is 3) from that date.
Example 2: Using YEAR function to extract the year
Similar to the previous example, if you want to extract the year from a date created with the DATE function, you can utilize the YEAR function. The formula would be:
- =YEAR(DATE(2022, 3, 15))
This formula returns the year value (2022) from the specified date.
Example 3: Combining DATE function with arithmetic operators
In some cases, you may need to perform date arithmetic, such as adding or subtracting days, months, or years from a date. The DATE function can be combined with arithmetic operators (+, -) to achieve this. For instance, to calculate a future date by adding 30 days to a specific date, you can use:
- =DATE(2022, 3, 15) + 30
This formula adds 30 days to the specified date, resulting in a new date that is 30 days in the future.
These examples demonstrate the versatility of using the DATE function in combination with other Excel functions. By integrating the DATE function with functions such as MONTH, YEAR, or arithmetic operators, you can perform more advanced operations on dates and create dynamic formulas that adapt to changes in your data. This allows for complex date calculations, extractions of specific date components, and manipulation of dates to meet your specific requirements in Excel.
Formatting dates in Excel
Excel provides various options for formatting dates, allowing you to customize the display format of your date values based on your preferences or the requirements of your data presentation. Formatting dates in Excel helps to improve readability and understanding of the information conveyed by date values in your spreadsheets.
To format a date in Excel, you can follow these steps:
Step 1: Select the cell(s) containing the date value(s) that you want to format.
Step 2: Right-click on the selected cell(s) and choose the “Format Cells” option from the menu.
Step 3: In the Format Cells dialog box that appears, navigate to the “Number” tab.
Step 4: In the Category section, select “Date” or any other category that suits your desired date format.
Step 5: Choose the specific date format from the available options, or customize the format using the options provided.
Step 6: Click “OK” to apply the selected date format to the cell(s).
By following these steps, you can easily format the display of your dates in Excel. There are several built-in date formats available, including options such as “Short Date,” “Long Date,” “Time,” and more. These formats are based on common date conventions used in different regions or industries.
If the built-in formats do not meet your specific requirements, Excel also allows for custom date formatting. You can create your own custom date formats using different combinations of format codes, such as “yyyy” for the four-digit year, “mm” for the two-digit month, and “dd” for the two-digit day.
For example, you can use the custom format “dd-mmm-yyyy” to display dates in the format of “15-Mar-2022”. This allows for greater flexibility in presenting dates in a way that best suits your needs.
Keep in mind that formatting dates in Excel does not change the underlying value of the date. The date value remains the same, but the formatting affects how the date is displayed visually.
Proper formatting of dates in Excel enhances the clarity and understanding of the information conveyed by date values. It also helps to maintain consistent formatting across your spreadsheet, making it easier for users to interpret the dates correctly and work with the data effectively.
Common errors when using the DATE function
While the DATE function in Excel is a powerful tool for working with dates, there are some common errors that users might encounter. It is essential to be aware of these errors and how to avoid them to ensure accurate results in your spreadsheet calculations.
Here are some common errors to watch out for when using the DATE function:
1. Invalid arguments: One of the most common errors is providing invalid arguments for the DATE function. This can include incorrect values for the year, month, or day, such as using non-numeric characters, using values outside the valid range, or using incorrect formats. Double-check the values you provide to ensure they are valid for their respective arguments.
2. Incorrect order of arguments: Another error is using the arguments in the wrong order. The correct order for the DATE function is year, month, and day. Make sure you enter the arguments in the correct order to generate the desired date.
3. Incorrect cell references: When using cell references as arguments in the DATE function, it is crucial to ensure that the referenced cells contain the correct values and are properly formatted as dates. Incorrect cell references or incorrectly formatted dates can lead to inaccurate results in your formulas.
4. Formula syntax errors: Make sure to enter the formula correctly when using the DATE function. Typos, missing parentheses, or incorrect use of operators can cause syntax errors and prevent the formula from functioning as intended. Use the formula bar and Excel’s formula auditing tools to check for any syntax errors in your formulas.
5. Formatting issues: Sometimes, date values might appear incorrectly formatted in your spreadsheet due to issues with cell formatting. Ensure that the cells containing the date values are formatted as dates to display the desired date format. You can adjust the cell formatting using the Format Cells dialog box or by selecting the appropriate built-in or custom date format.
By being aware of these common errors and employing best practices when using the DATE function, you can minimize the risk of encountering issues and ensure accurate date calculations in your Excel spreadsheets. Double-checking your inputs, verifying your cell references, and maintaining consistent formatting will help you avoid potential errors and obtain reliable results from the DATE function.