
Overview
The AND, OR, and IF functions are powerful tools available in Microsoft Excel that allow users to perform complex calculations and logical operations within their spreadsheets. These functions help to streamline data analysis and decision-making processes, making them essential for anyone working with large amounts of information or performing complex calculations.
The AND function in Excel allows you to evaluate multiple conditions and return a result based on whether all conditions are true. This function is particularly useful when you need to perform logical tests and determine if all conditions are met.
On the other hand, the OR function allows you to evaluate multiple conditions and return a result based on whether at least one of the conditions is true. This function is handy when you want to perform logical tests and determine if any of the conditions are met.
Lastly, the IF function in Excel allows you to perform conditional calculations and return different values based on specified criteria. This function is invaluable when you need to automate decision-making processes and perform calculations based on certain conditions.
With these three functions in your Excel arsenal, you can take your data analysis and calculations to the next level. Whether you need to check multiple conditions, combine functions, or perform conditional calculations, the AND, OR, and IF functions will enable you to accomplish these tasks efficiently and accurately.
In the following sections, we will delve into the syntax and usage of each function, provide examples to demonstrate their functionalities, and address common errors that users may encounter.
AND Function
The AND function in Excel allows you to evaluate multiple conditions and return a result based on whether all conditions are true. It is a logical function that can be incredibly useful when you need to perform complex calculations or make decisions based on the satisfaction of multiple criteria.
The syntax of the AND function is simple:
=AND(logical1, logical2, ...)
Here, logical1, logical2, ... are the conditions that you want to evaluate. You can have as many conditions as needed, separated by commas.
The AND function returns TRUE if all of the conditions are true, and FALSE if at least one of the conditions is false.
Let’s look at a couple of examples to better understand how the AND function works:
Example 1: Checking multiple conditions
Suppose you have a worksheet with student records, and you want to determine whether a student is eligible for a scholarship based on their grades. You can use the AND function to check if the student’s average grade is above 80 and their attendance is at least 90%. The formula would be:
=AND(AverageGrade > 80, Attendance >= 90)
If both conditions are met, the formula will return TRUE, indicating that the student is eligible for the scholarship. Otherwise, it will return FALSE.
Example 2: Using AND with other functions
The AND function can also be combined with other functions to perform more complex calculations. For instance, you might want to check if a product is both in stock and meets a certain sales threshold. The formula would look like this:
=AND(InStock = "Yes", Sales >= 100)
If both conditions are true, the formula will return TRUE; otherwise, it will return FALSE.
It’s important to note that the AND function evaluates all conditions and returns a boolean result. This result can be used in other formulas or as part of logical tests to perform further calculations or decision-making processes.
In the following section, we will explore the syntax and usage of the OR function, another powerful logical function in Excel.
Syntax and Usage
The AND function in Excel follows a specific syntax that you need to understand in order to use it effectively in your spreadsheets. Let’s take a closer look at the syntax and explore some common use cases.
The syntax for the AND function is as follows:
=AND(logical1, logical2, ...)
logical1, logical2, ... represent the conditions or logical expressions you want to evaluate. You can have any number of conditions, separated by commas. Excel will check each condition and return TRUE only if all conditions are met. If any condition is not true, the function will return FALSE.
When using the AND function, it’s important to keep a few things in mind:
- The conditions can be logical values like
TRUEorFALSE, cell references to cells containing logical values, or actual logical expressions. - The AND function can be nested within other functions or combined with other logical operators.
- When using cell references, ensure that you provide the correct cell references or range to check. Incorrect references can lead to incorrect results.
Let’s take an example to illustrate the usage of the AND function:
Example 1: Checking multiple conditions
Assume you have a spreadsheet with sales data, and you want to identify all orders that meet specific criteria. Let’s say you want to find orders where the sales amount is greater than $500 and the customer name is “John”. You can use the AND function in the following way:
=AND(Sales > 500, CustomerName = "John")
If both conditions are true, the function will return TRUE, indicating that the order meets the specified criteria. Otherwise, it will return FALSE.
Example 2: Using AND with other functions
You can also combine the AND function with other functions to perform more complex calculations or decision-making processes. For example, suppose you want to determine whether a student’s average grade is above 90 and if they have completed all required coursework. The formula would look like this:
=AND(AverageGrade > 90, CourseworkComplete = "Yes")
If both conditions are met, the function will return TRUE; otherwise, it will return FALSE.
Understanding the syntax and usage of the AND function allows you to perform logical tests and make informed decisions based on multiple conditions in your Excel spreadsheets.
Next, we will explore examples of using the AND function in various scenarios to solve real-world problems.
Example 1: Checking multiple conditions
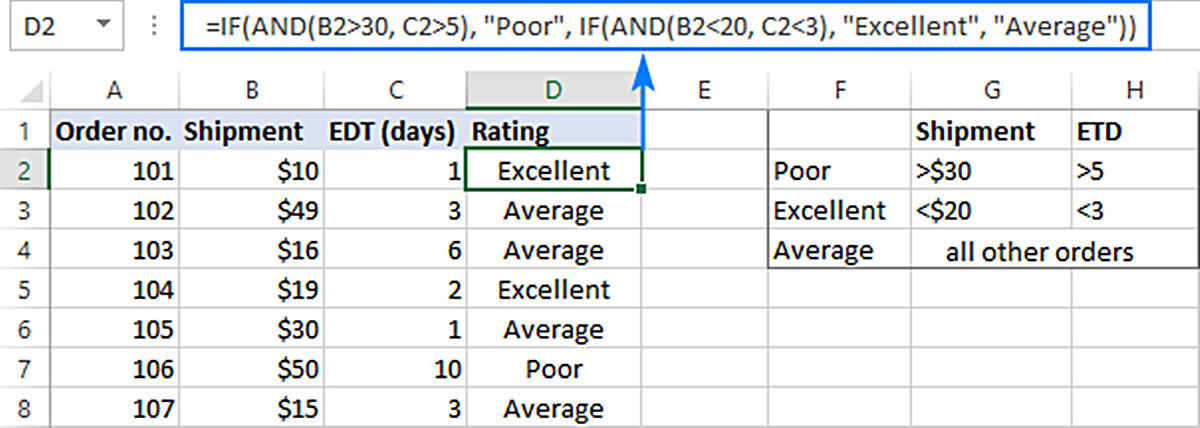
To better understand the practical application of the AND function, let’s consider a scenario where you have a dataset of employees and you want to identify those who meet specific criteria for a promotion. In this example, you will check if an employee’s performance rating is “Excellent” and their years of experience exceed 5.
The formula using the AND function would look like this:
=AND(Performance = "Excellent", YearsOfExperience > 5)
This formula evaluates two conditions:
- The performance rating should be “Excellent”
- The number of years of experience should be greater than 5
If both conditions are true for a particular employee, the formula will return TRUE, indicating that the employee meets the criteria for a promotion. Otherwise, it will return FALSE.
By using the AND function, you can quickly filter and identify employees who fulfill multiple criteria without having to manually check each individual. This allows for efficient decision-making in the promotion process.
Here’s another example where the AND function can be used:
Let’s say you have a list of products in an inventory spreadsheet and you want to identify the products that are both in stock and have a price less than $50. The formula would be:
=AND(InStock = "Yes", Price < 50)
If both conditions are met for a particular product, the formula will return TRUE, indicating that the product meets the specified criteria. Otherwise, it will return FALSE.
The AND function not only allows you to check if multiple conditions are true but also enables you to combine these conditions with other functions or use them as logical tests within larger formulas.
By using the AND function effectively, you can streamline your data analysis, automate decision-making processes, and make more informed choices based on multiple criteria in Microsoft Excel.
In the next section, we will explore how the AND function can be combined with other functions to solve more complex problems.
Example 2: Using AND with other functions
The AND function in Excel can be combined with other functions to perform more complex calculations and make informed decisions based on multiple conditions. Let's explore an example where the AND function is used in conjunction with other functions.
Assume you have a sales dataset containing information about products, quantities sold, and discounts applied. You want to identify products that have been sold in quantities greater than 100 and have received a discount of 10% or more.
The formula using the AND function and other functions would look like this:
=AND(Quantity > 100, Discount >= 0.1)
In this formula, we have two conditions:
- The quantity sold should be greater than 100
- The discount applied should be 10% or more (represented as a decimal value of 0.1 or higher)
If both conditions are met for a particular product, the formula will return TRUE, indicating that the product meets the specified criteria. Otherwise, it will return FALSE.
Using the AND function with other functions allows you to perform complex calculations and make decisions based on the combined satisfaction of multiple conditions. In this example, you can quickly identify products that have been popularly sold and have received significant discounts, aiding in analysis of customer behavior and pricing strategies.
Let's consider another example where the AND function is combined with other functions:
You have a customer support ticketing system and want to automatically assign tickets to the appropriate team based on the severity level and customer size. You can use the AND function in a formula like this:
=AND(Severity = "High", CustomerSize = "Large")
In this case, the formula checks if the severity level is "High" and the customer size is "Large". If both conditions are met, the formula will return TRUE to indicate that the ticket should be assigned to the dedicated team for high-priority large customers. Otherwise, it will return FALSE.
By combining the AND function with other functions, you can create dynamic formulas that consider multiple factors and enable automated decision-making based on various conditions.
The flexibility of the AND function allows you to handle a wide range of scenarios and streamline your data analysis and decision-making processes in Excel.
In the next section, we will address some common errors and offer troubleshooting tips you may encounter when using the AND function.
Common Errors and Troubleshooting
While using the AND function in Excel, you may come across some common errors or face challenges. Understanding these errors and knowing how to troubleshoot them can help you ensure accurate results and efficient spreadsheet usage. Let's explore some of the most common errors and provide troubleshooting tips:
1. Incorrect syntax: One of the most common errors is entering the wrong syntax for the AND function. Ensure that you use the correct syntax, with each logical condition separated by commas within the parentheses.
2. Incorrect cell references: When using cell references as conditions in the AND function, check that you have referenced the correct cells. Incorrect cell references can lead to inaccurate results.
3. Not using logical operators: Remember that the AND function requires logical operators, such as greater than (>), less than (<), or equal to (=), to compare conditions. Using arithmetic operators instead of logical operators can result in unexpected outcomes.
4. Nesting errors: If you are nesting the AND function within other functions or formulas, double-check the nesting structure. Ensure that opening and closing parentheses are used correctly to avoid errors.
5. Case sensitivity: Excel is case-sensitive, so be mindful of the case when specifying conditions. For example, "Excellent" and "excellent" are considered different values in the AND function.
6. Data type mismatches: Ensure that the data types of the conditions being compared are compatible. For example, comparing text and numeric values without appropriate conversions may result in unexpected outcomes.
7. Missing or additional conditions: Review your formula to make sure that you have included all the necessary conditions and haven't added any unnecessary ones. Missing or additional conditions can lead to incorrect results.
8. Check for hidden cells or filtered data: If your formula is not producing the expected results, verify if there are hidden cells or filtered data that might affect the evaluation of conditions. Unhide or unfilter the necessary cells to ensure accurate calculations.
When encountering errors, it can be helpful to review the formula, double-check the criteria, and step through the logical conditions to identify any discrepancies or issues. Verifying the input data and confirming the expected outcome can also assist in troubleshooting problems.
By staying mindful of these common errors and applying troubleshooting strategies, you can overcome challenges and ensure the accurate functioning of the AND function in Excel.
In the next section, we will explore the OR function, another powerful logical function in Excel.
OR Function
In addition to the AND function, Excel also provides the OR function, which allows you to evaluate multiple conditions and return a result based on whether at least one of the conditions is true. The OR function is invaluable when you need to perform logical tests and make decisions based on any one of several criteria.
The syntax of the OR function is similar to that of the AND function:
=OR(logical1, logical2, ...)
Here, logical1, logical2, ... represents the conditions or logical expressions you want to evaluate. You can have as many conditions as needed, separated by commas.
The OR function returns TRUE if at least one of the conditions is true, and FALSE only if all conditions are false.
Let's explore a couple of examples to better understand how the OR function works:
Example 1: Testing multiple conditions
Suppose you have a sales dataset, and you want to identify all orders that meet specific criteria. Let's say you want to find orders where either the sales amount is above $1000 or the customer is a VIP. You can use the OR function in the following way:
=OR(Sales > 1000, CustomerType = "VIP")
If either of the conditions is true for a particular order, the formula will return TRUE, indicating that the order meets the specified criteria. Otherwise, it will return FALSE.
Example 2: Using OR with other functions
The OR function can also be combined with other functions to perform more complex calculations. For example, suppose you want to determine whether a product is either in stock or has a price less than $50. The formula would look like this:
=OR(InStock = "Yes", Price < 50)
If either of the conditions is true, the formula will return TRUE; otherwise, it will return FALSE.
Just like the AND function, the OR function can handle multiple conditions and be combined with other functions to create dynamic formulas that cater to your specific requirements.
In the following section, we will explore the syntax and usage of the IF function, another powerful function in Excel useful for performing conditional calculations.
Syntax and Usage
The OR function in Excel follows a specific syntax that you need to understand to utilize it effectively in your spreadsheets. Let's explore the syntax and common use cases to harness the power of the OR function.
The syntax of the OR function is as follows:
=OR(logical1, logical2, ...)
logical1, logical2, ... represent the conditions or logical expressions that you want to evaluate. You can have any number of conditions, separated by commas. Excel evaluates each condition and returns TRUE if at least one condition is true, and FALSE if all conditions are false.
When working with the OR function, keep the following considerations in mind:
- The conditions can be logical values (
TRUEorFALSE), cell references to cells containing logical values, or actual logical expressions. - The OR function can be nested within other functions or combined with other logical operators.
- Ensure that the correct cell references or ranges are used for evaluating conditions. Incorrect references can lead to inaccurate results.
To use the OR function effectively, let's look at a couple of examples:
Example 1: Testing multiple conditions
Assume you have a dataset of employees, and you want to identify all the employees who have either a "Manager" job title or a salary greater than $100,000. You can use the OR function in the following way:
=OR(JobTitle = "Manager", Salary > 100000)
If either condition is true for a particular employee, the formula will return TRUE, indicating that the employee meets the criteria. Otherwise, it will return FALSE.
Example 2: Using OR with other functions
The OR function can be combined with other functions to perform more complex calculations. For instance, consider a sales calculation where you want to determine if a customer has made a purchase in the last 30 days or if their total purchases exceed $1,000. The formula would look like this:
=OR(LastPurchase <= 30, TotalPurchases > 1000)
If either condition is true, the formula will return TRUE; otherwise, it will return FALSE.
The flexible syntax of the OR function allows you to handle diverse scenarios and make decisions based on the satisfaction of one or more conditions. By combining the OR function with other functions, you can create dynamic formulas that cater to specific requirements.
Next, we will explore examples of using the IF function in various scenarios to achieve conditional calculations in Excel.
Example 1: Testing multiple conditions
To better understand the practical application of the OR function in Excel, let's consider a scenario where you have a dataset of customers and you want to identify those who meet certain criteria to receive a special discount. In this example, you will check if a customer's loyalty status is "Gold" or their total purchases exceed $1000.
The formula using the OR function would look like this:
=OR(LoyaltyStatus = "Gold", TotalPurchases > 1000)
This formula evaluates two conditions:
- The customer's loyalty status should be "Gold"
- The total purchases should exceed $1000
If either of the conditions is true for a particular customer, the formula will return TRUE, indicating that the customer meets the specified criteria. Otherwise, it will return FALSE.
By using the OR function, you can easily filter and identify customers who fulfill one or both criteria without manually checking each individual. This allows for efficient decision-making when applying targeted discounts and rewards.
Here's another example where the OR function can be used:
Let's say you have a project management sheet, and you want to identify tasks that are either marked as "Urgent" or have a due date within the next two days. The formula would be:
=OR(TaskPriority = "Urgent", DATEDIF(Today(), DueDate, "d") <= 2)
If either of the conditions is true for a particular task, the formula will return TRUE, indicating that the task falls within the specified criteria. Otherwise, it will return FALSE.
The OR function not only allows you to check if at least one condition is true but also enables you to combine these conditions with other functions or use them as logical tests within larger formulas.
By using the OR function effectively, you can streamline your data analysis, automate decision-making processes, and make more informed choices based on multiple criteria in Microsoft Excel.
In the next section, we will explore how the OR function can be combined with other functions to solve more complex problems.
Example 2: Using OR with other functions
The OR function in Excel can be combined with other functions to perform more complex calculations and make informed decisions based on multiple conditions. Let's explore an example where the OR function is used in conjunction with other functions.
Suppose you have a sales dataset containing information about products, quantities sold, and discounts applied. You want to identify products that have been sold in quantities greater than 100 or have received a discount of 20% or more.
The formula using the OR function and other functions would look like this:
=OR(Quantity > 100, Discount >= 0.2)
In this formula, we have two conditions:
- The quantity sold should be greater than 100
- The discount applied should be 20% or more (represented as a decimal value of 0.2 or higher)
If either of the conditions is true for a particular product, the formula will return TRUE, indicating that the product meets the specified criteria. Otherwise, it will return FALSE.
Using the OR function with other functions allows you to perform complex calculations and make decisions based on multiple criteria. In this example, you can quickly identify products that have been sold in large quantities or have received substantial discounts, aiding in analysis of sales performance and promotional strategies.
Here's another example where the OR function is combined with other functions:
Let's say you have a customer satisfaction survey and you want to categorize survey responses as either "Positive" or "Neutral" based on the rating being above 4 or the comment mentioning specific positive keywords. The formula would look like this:
=OR(Rating > 4, IFERROR(SEARCH("great", Comment), 0) + IFERROR(SEARCH("excellent", Comment), 0) > 0)
In this case, the formula checks if the rating is above 4 or if the comment contains either "great" or "excellent". If either condition is true, the formula will return TRUE to indicate a positive response. Otherwise, it will return FALSE for a neutral response.
By combining the OR function with other functions, you can create dynamic formulas that consider multiple factors and enable automated decision-making based on various conditions.
The flexibility of the OR function allows you to handle a wide range of scenarios and streamline your data analysis and decision-making processes in Excel.
In the next section, we will address some common errors and offer troubleshooting tips you may encounter when using the OR function.
Common Errors and Troubleshooting
While using the OR function in Excel, you may encounter some common errors or face challenges. Understanding these errors and knowing how to troubleshoot them can help ensure accurate results and efficient spreadsheet usage. Let's explore some of the most common errors and provide troubleshooting tips:
1. Syntax errors: One of the most common errors is entering the wrong syntax for the OR function. Ensure that you use the correct syntax, with each condition separated by commas within the parentheses.
2. Missing or extra parentheses: When combining multiple conditions or nesting functions, it's crucial to use the correct number of parentheses. Missing or extra parentheses can lead to formula errors.
3. Not using logical operators: Remember that the OR function requires logical operators, such as greater than (>), less than (<), or equal to (=), to compare conditions. Using arithmetic operators instead of logical operators can result in unexpected outcomes.
4. Data type mismatches: Ensure that the data types of the conditions being compared are compatible. For example, comparing numbers and text without appropriate conversions may result in errors.
5. Case sensitivity: Excel is case-sensitive, so keep in mind the case when specifying conditions. "Gold" and "gold" are considered different values in the OR function.
6. Incorrect cell references: Validate that you have referenced the correct cells when using cell references in the OR function. Incorrect references can lead to inaccurate results.
7. Order of conditions: Be mindful of the order of conditions when using the OR function. This is important if you want to prioritize certain conditions over others.
8. Missing or additional conditions: Review your formula to ensure that all the necessary conditions are included and that there are no extra or missing conditions. Incorrect conditions can result in incorrect outcomes.
When encountering errors, it can be helpful to review the formula, double-check the criteria, and step through the logical conditions to identify any discrepancies or issues. Verifying the input data and confirming the expected outcome can also assist in troubleshooting problems.
By staying mindful of these common errors and applying troubleshooting strategies, you can overcome challenges and ensure the accurate functioning of the OR function in Excel.
In the next section, we will explore the IF function, another powerful function in Excel that allows for conditional calculations and decision-making.
IF Function
The IF function is a versatile and powerful tool in Excel that allows you to perform conditional calculations and make decisions based on specified criteria. With the IF function, you can automate processes, assign values, and control the flow of your spreadsheet calculations.
The syntax of the IF function is as follows:
=IF(logical_test, value_if_true, value_if_false)
In this syntax, logical_test is the condition or expression that you want to evaluate, value_if_true is the value or action to be taken if the condition is true, and value_if_false is the value or action to be taken if the condition is false.
The IF function evaluates the logical_test and returns the value_if_true if the condition is met, and the value_if_false if the condition is not met.
Let's explore a couple of examples to better understand how the IF function works:
Example 1: Basic IF statement
Suppose you have a worksheet with student grades, and you want to assign a pass or fail status based on whether the grade is above or below 70. You can use the IF function in the following way:
=IF(Grade > 70, "Pass", "Fail")
If the grade is above 70, the formula will return "Pass". Otherwise, it will return "Fail".
Example 2: Combining IF with AND or OR
The IF function can also be combined with the AND or OR function to perform more complex calculations. For example, let's say you want to assign a bonus to employees based on their performance rating and years of experience. The formula would look like this:
=IF(AND(Rating = "Excellent", Experience > 5), "High Bonus", IF(OR(Rating = "Good", Experience > 3), "Medium Bonus", "No Bonus"))
In this example, the formula evaluates both the performance rating and years of experience. It assigns "High Bonus" to employees with an excellent rating and more than 5 years of experience, assigns a "Medium Bonus" to employees with a good rating or more than 3 years of experience, and assigns "No Bonus" to all other employees.
The IF function in Excel allows you to customize calculations and automate decision-making processes based on specific conditions. By considering different scenarios and combinations, you can create dynamic formulas that cater to your specific requirements.
In the next section, we will explore examples of using the IF function in various scenarios to achieve conditional calculations in Excel.
Syntax and Usage
The IF function in Excel follows a specific syntax that you need to understand in order to utilize it effectively in your spreadsheets. By mastering the syntax and understanding how to use it, you can perform conditional calculations and automate decision-making processes. Let's explore the syntax and common use cases for the IF function.
The syntax of the IF function is as follows:
=IF(logical_test, value_if_true, value_if_false)
In this syntax, the logical_test represents the condition or expression that you want to evaluate. It can be a comparison, a logical statement, or any expression that returns a value of TRUE or FALSE. The value_if_true is the value or action to be taken if the condition is TRUE, and the value_if_false is the value or action to be taken if the condition is FALSE.
When working with the IF function, keep the following considerations in mind:
- The
logical_testcan be a logical expression directly, or it can be the result of another formula or function. - The
value_if_trueandvalue_if_falsecan be any value, such as a number, text, formula, or cell reference. - The
value_if_trueandvalue_if_falsecan also be left blank to have no value or perform no action in specific cases. - You can nest IF functions within each other to create more complex logic and handle multiple conditions.
To use the IF function effectively, let's look at a couple of examples:
Example 1: Basic IF statement
Assume you have a worksheet with sales data, and you want to classify each product as "High" or "Low" based on its sales amount. You can use the IF function in the following way:
=IF(Sales > 1000, "High", "Low")
If the sales amount is greater than 1000, the formula will return "High". Otherwise, it will return "Low".
Example 2: Combining IF with AND or OR
The IF function can be combined with the AND or OR function to perform more complex calculations. For example, let's say you want to classify students as "Pass" or "Fail" based on their grade and attendance. The formula would look like this:
=IF(AND(Grade >= 70, Attendance >= 90), "Pass", "Fail")
In this example, the formula evaluates both the grade and attendance. It assigns "Pass" to students with a grade of 70 or above and attendance of 90% or higher, and assigns "Fail" to all other students.
The IF function provides a powerful way to perform conditional calculations and automate decision-making processes in Excel. It allows you to customize formulas and make data-driven decisions based on specific conditions.
In the next section, we will explore examples of using the IF function in various scenarios to achieve conditional calculations in Excel.
Example 1: Basic IF statement
To demonstrate the practical application of the IF function in Excel, let's consider a scenario where you have a dataset of students' test scores, and you want to determine if each student passed or failed based on a passing threshold of 70%. In this example, we will use the IF function to classify students as "Pass" or "Fail".
The formula using the IF function would look like this:
=IF(TestScore >= 70, "Pass", "Fail")
In this formula, the TestScore is the cell reference to the student's test score.
If the test score is greater than or equal to 70, the function will return "Pass", indicating that the student has passed. Otherwise, it will return "Fail" to indicate that the student has failed.
This basic IF statement allows you to quickly evaluate student performance and categorize them based on their test scores.
Here's another example where the IF function can be used:
Assume you have a worksheet with employee sales data, and you want to determine if each employee reached a specific sales target. Let's say the target amount is $10,000. You can use the IF function in the following way:
=IF(SalesAmount >= 10000, "Reached Target", "Not Reached")
In this formula, the SalesAmount is the cell reference to the employee's sales value.
If the sales amount is greater than or equal to $10,000, the function will return "Reached Target". Otherwise, it will return "Not Reached". This allows you to quickly identify which employees have met or exceeded the sales target.
The IF function provides a simple yet powerful way to perform conditional calculations and make decisions based on specific criteria. By customizing the formulas and criteria, you can automate processes and gain insights into your data more efficiently.
In the next section, we will explore more complex examples of using the IF function in combination with other functions to achieve conditional calculations in Excel.
Example 2: Combining IF with AND or OR
The IF function in Excel becomes even more powerful when combined with the logical functions AND and OR. By incorporating these functions into the IF statement, you can evaluate multiple conditions simultaneously and make decisions based on complex criteria. Let's explore an example of combining the IF function with AND and OR.
Suppose you have a dataset of product sales, and you want to classify products as "High Demand", "Medium Demand", or "Low Demand" based on both their sales quantity and sales revenue. Let's assume that if the sales quantity is above 100 units and the sales revenue is above $10,000, the product is classified as "High Demand". If either the sales quantity is above 50 units or the sales revenue is above $5,000, the product is classified as "Medium Demand". Otherwise, it is classified as "Low Demand".
The combined formula using the IF function, AND, and OR would look like this:
=IF(AND(SalesQuantity > 100, SalesRevenue > 10000), "High Demand", IF(OR(SalesQuantity > 50, SalesRevenue > 5000), "Medium Demand", "Low Demand"))
In this formula, the SalesQuantity is the cell reference to the sales quantity, and the SalesRevenue is the cell reference to the sales revenue.
The formula first evaluates the condition for high demand by using the AND function to check if both the sales quantity and sales revenue meet the specified criteria (greater than 100 units and greater than $10,000, respectively). If this condition is satisfied, the function returns "High Demand".
If the high-demand condition is not met, the formula proceeds to the next condition using the OR function. It checks if either the sales quantity is greater than 50 units or the sales revenue is greater than $5,000. If this condition is satisfied, the function returns "Medium Demand".
If none of the conditions are met, the function returns "Low Demand".
By combining the IF function with logical functions like AND and OR, you can create complex formulas that make decisions based on multiple criteria. This allows for more nuanced classification and analysis of your data.
In the next section, we will address some common errors and provide troubleshooting tips you may encounter when working with the IF function.
Example 3: Nesting IF statements
One of the powerful capabilities of the IF function in Excel is the ability to nest multiple IF statements within each other. This nesting allows you to create more complex conditional calculations and perform different actions based on multiple criteria. Let's explore an example of nesting IF statements to showcase its functionality.
Suppose you have a dataset of students' test scores, and you want to assign letter grades to each student based on their test scores. The grading scale is as follows:
- Above 90: A
- Between 80 and 89: B
- Between 70 and 79: C
- Between 60 and 69: D
- Below 60: F
The nested IF statement would look like this:
=IF(TestScore >= 90, "A", IF(TestScore >= 80, "B", IF(TestScore >= 70, "C", IF(TestScore >= 60, "D", "F"))))
In this example, the formula checks the test score against multiple conditions one by one. If the test score is greater than or equal to 90, the formula returns "A". Otherwise, it moves to the next condition and checks if the test score is between 80 and 89. If this condition is met, the formula returns "B". The process continues with subsequent conditions until the final condition is met, where the formula returns "F" for test scores below 60.
Nesting IF statements allows you to effectively create conditional grading systems, pricing tiers, or any other scenario where decision-making needs to be determined based on multiple criteria.
It's important to ensure proper syntax and correct ordering of the conditions within the nested IF statements. This will ensure the accurate evaluation of each condition and return the appropriate result based on the test score.
By utilizing the nesting capability of the IF function, you can create sophisticated calculations that handle various scenarios and automate decision-making processes based on multiple criteria.
In the next section, we will address some common errors and provide troubleshooting tips you may encounter when working with the IF function.
Common Errors and Troubleshooting
While working with the IF function in Excel, you may come across common errors or face challenges. Understanding these errors and knowing how to troubleshoot them can help ensure accurate results and efficient spreadsheet usage. Let's explore some of the most common errors and provide troubleshooting tips:
1. Syntax errors: One of the most common errors is incorrectly entering the syntax for the IF function. Ensure that you use the correct syntax, with the logical test followed by the values for true and false outcomes.
2. Incorrect or missing arguments: Check that you have entered the logical test, value_if_true, and value_if_false in the correct order and that you have provided all three arguments. Missing or incorrect arguments can lead to incorrect results.
3. Not using appropriate comparison operators: Ensure that you use the correct comparison operators, such as greater than (>), less than (<), or equal to (=), when constructing the logical test. Using the wrong operator can result in unexpected outcomes.
4. Nesting errors: When nesting IF statements, ensure that the nested functions are properly nested with the correct number of opening and closing parentheses. Mismatched or misplaced parentheses can cause formula errors.
5. Unmet conditions: Verify that the logical test in each IF statement accurately evaluates the condition you intended. If a condition is not met, the formula will proceed to the next logical test or return the value_if_false outcome.
6. Case sensitivity: Excel is case-sensitive, so check that your logical test's text values match the expected case. For example, "Pass" and "pass" will be evaluated as different values.
7. Incorrect cell references: Double-check that you have used the correct cell references within the logical test. Incorrect references can lead to incorrect evaluations and results.
8. Circular references: Avoid creating circular references where the result of the IF function refers back to the cell containing the formula itself. Circular references can cause calculation errors and infinite loops.
When encountering errors, it can be helpful to review the formula, check for any logical mistakes, and ensure that the inputs and expected outcomes align with your requirements. Additionally, using Excel's formula auditing tools, such as the Evaluate Formula feature, can help track down errors in complex IF statements.
By recognizing and addressing these common errors, you can troubleshoot issues with the IF function more effectively and ensure accurate conditional calculations in your Excel spreadsheets.
In the next section, we will explore some advanced tips and tricks for working with the IF function.